Page 209 of 274

5-25 SERVICE AND APPEARANCE CARE
78J00-03E
Windshield Wiper Blade
ReplacementWindshield wiper blades should be
inspected for wear or cracking. Refer to
“Scheduled Maintenance” in “Mainte-
nance Schedule” in the “Maintenance
Schedule” section for more information.
Replacement blades come in different
types and are removed in different ways.
For proper type and length, refer to “Nor-
mal Maintenance Replacement Parts” in
“Maintenance Schedule” in the “Mainte-
nance Schedule” section.
Here’s how to replace the windshield wiper
blades:
1) Make sure the front wipers are turned
off.
2) Pull the windshield wiper arm away
from the windshield.
811525
3) Pull up the release clip, located at the
connecting point of the blade and the
arm. Then, pull the blade assembly
down toward the glass to remove it
from the wiper arm.
4) Push the new wiper blade securely on
the wiper arm until you hear the release
clip “click” into place.
5) Push the release clip, from Step 3,
down to secure the wiper blade into
place.Rear Window Wiper Blade Replacement
To replace the rear window wiper blade,
do the following:
1) Make sure that the rear wiper is off.
2) Pull the wiper away from the rear win-
dow.
3) Pull up the release clip, located at the
connecting point of the blade and the
arm. Then, pull the blade assembly
down toward the glass to remove it
from the wiper arm.
4) Push the new wiper blade securely on
the wiper arm until you hear the release
clip “click” into place.
5) Push the release clip, from Step 3,
down to secure the wiper blade into
place.
Page 210 of 274

5-26 SERVICE AND APPEARANCE CARE
78J00-03E
TiresYour new vehicle comes with high-quality
tires made by a leading tire manufacturer.
If you ever have questions about your tire
warranty and where to obtain service, see
your Suzuki Warranty booklet for details.
For additional information refer to the tire
manufacturer’s booklet included with your
vehicle.
Tire Sidewall LabelingUseful information about a tire is molded
into its sidewall. The examples below show
a typical passenger vehicle tire and a com-
pact spare tire sidewall.
Passenger (P-Metric) Tire Example
1376078
A. Tire Size:
The tire size is a combination of let-ters and numbers used to define a
particular tire’s width, height, aspect
ratio, construction type, and service
description. See the “Tire Size” illus-
tration later in this section for more
detail.
B. TPC Spec (Tire Performance Criteria
Specification):
Original equipment tires designed to
SUZUKI’s specific tire performance
criteria have a TPC specification code
molded onto the sidewall. SUZUKI’s
TPC specifications meet or exceed all
federal safety guidelines.
C. DOT (Department of Transportation):
The Department of Transportation
(DOT) code indicates that the tire is in
compliance with the U.S. Department
of Transportation Motor Vehicle
Safety Standards.
D. Tire Identification Number (TIN):
The letters and numbers following
DOT (Department of Transportation)
code is the Tire Identification Number
(TIN). The TIN shows the manufac-
turer and plant code, tire size, and
date the tire was manufactured. The
TIN is molded onto both sides of the
tire, although only one side may have
the date of manufacture.
E. Tire Ply Material:
The type of cord and number of plies
in the sidewall and under the tread.
F. Uniform Tire Quality Grading
(UTQG):
Tire manufacturers are required to
WARNING
Poorly maintained and improperly
used tires are dangerous.
Overloading your tires can cause
overheating as a result of too much
friction. You could have an air-out
and a serious accident. Refer to
“Loading Your Vehicle” in “Your
Driving, the Road, and Your Vehi-
cle” in the “Driving Your Vehicle”
section.
Underinflated tires pose the same
danger as overloaded tires. The
resulting accident could cause
serious injury. Check all tires fre-
quently to maintain the recom-
mended pressure. Tire pressure
should be checked when your tires
are cold.
Overinflated tires are more likely to
be cut, punctured, or broken by a
sudden impact – such as when you
hit a pothole. Keep tires at the rec-
ommended pressure.
(Continued)
WARNING
(Continued)
Worn, old tires can cause acci-
dents. If your tread is badly worn,
or if your tires have been damaged,
replace them.
Refer to “Inflation – Tire Pressure” in
this section for inflation pressure
adjustment for high speed driving.
Page 211 of 274

5-27 SERVICE AND APPEARANCE CARE
78J00-03E
grade tires based on three perfor-
mance factors: treadwear, traction,
and temperature resistance. For more
information refer to “Uniform Tire
Quality Grading” in this section.
G. Maximum Cold Inflation Load Limit:
Maximum load that can be carried
and the maximum pressure needed to
support that load.
Compact Spare Tire Example
1376093
A. Temporary Use Only:
The compact spare tire or temporary
use tire has a tread life of approxi-
mately 3000 miles (5000 km) and
should not be driven at speeds over
65 mph (105 km/h). The compact
spare tire is for emergency use when
a regular road tire has lost air and
gone flat. If your vehicle has a com-
pact spare tire, refer to “CompactSpare Tire” and “If a Tire Goes Flat”
in this section.
B. Tire Ply Material:
The type of cord and number of plies
in the sidewall and under the tread.
C. Tire Identification Number (TIN):
The letters and numbers following the
DOT (Department of Transportation)
code is the Tire Identification Number
(TIN). The TIN shows the manufac-
turer and plant code, tire size, and
date the tire was manufactured. The
TIN is molded onto both sides of the
tire, although only one side may have
the date of manufacture.
D. Maximum Cold Inflation Load Limit:
Maximum load that can be carried
and the maximum pressure needed to
support that load.
E. Tire Inflation:
The temporary use tire or compact
spare tire should be inflated to 60 psi
(420 kPa). For more information on
tire pressure and inflation refer to
“Inflation – Tire Pressure” in this sec-
tion.
F. Tire Size:
A combination of letters and numbers
define a tire’s width, height, aspect
ratio, construction type, and service
description. The letter T as the first
character in the tire size means the
tire is for temporary use only.
G. TPC Spec (Tire Performance Criteria
Specification):
Original equipment tires designed toSUZUKI’s specific tire performance
criteria have a TPC specification code
molded onto the sidewall. SUZUKI’s
TPC specifications meet or exceed all
federal safety guidelines.
Tire SizeThe following illustration shows an exam-
ple of a typical passenger vehicle tire size.
1376101
A. Passenger (P-Metric) Tire:
The United States version of a metric
tire sizing system. The letter P as the
first character in the tire size means a
passenger vehicle tire engineered to
standards set by the U.S. Tire and
Rim Association.
B. Tire Width:
The three-digit number indicates the
tire section width in millimeters from
sidewall to sidewall.
Page 212 of 274

5-28 SERVICE AND APPEARANCE CARE
78J00-03E
C. Aspect Ratio:
A two-digit number that indicates the
tire height-to-width measurements.
For example, if the tire size aspect
ratio is 60, as shown in item C of the
illustration, it would mean that the
tire’s sidewall is 60 percent as high as
it is wide.
D. Construction Code:
A letter code is used to indicate the
type of ply construction in the tire. The
letter R means radial ply construction;
the letter D means diagonal or bias
ply construction; and the letter B
means belted-bias ply construction.
E. Rim Diameter:
Diameter of the wheel in inches.
F. Service Description:
These characters represent the load
range and speed rating of the tire.
The load index represents the load
carry capacity a tire is certified to
carry. The load index can range from
1 to 279. The speed rating is the max-
imum speed a tire is certified to carry
a load. Speed ratings range from A to
Z.
Tire Terminology and DefinitionsAir Pressure:
The amount of air inside the tire pressing
outward on each square inch of the tire. Air
pressure is expressed in pounds per
square inch (psi) or kilopascal (kPa).
Accessory Weight:
This means the combined weight of
optional accessories. Some examples of
optional accessories are, automatic trans-
mission/transaxle, power steering, power
brakes, power windows, power seats, and
air conditioning.
Aspect Ratio:
The relationship of a tire’s height to its
width.
Belt:
A rubber coated layer of cords that is
located between the plies and the tread.
Cords may be made from steel or other
reinforcing materials.
Bead:
The tire bead contains steel wires wrapped
by steel cords that hold the tire onto the
rim.
Bias Ply Tire:
A pneumatic tire in which the plies are laid
at alternate angles less than 90 degrees to
the centerline of the tread.
Cold Tire Pressure:
The amount of air pressure in a tire, mea-
sured in pounds per square inch (psi) orkilopascals (kPa) before a tire has built up
heat from driving. Refer to “Inflation – Tire
Pressure” in this section.
Curb Weight:
This means the weight of a motor vehicle
with standard and optional equipment
including the maximum capacity of fuel, oil,
and coolant, but without passengers and
cargo.
DOT Markings:
A code molded into the sidewall of a tire
signifying that the tire is in compliance with
the U.S. Department of Transportation
(DOT) motor vehicle safety standards. The
DOT code includes the Tire Identification
Number (TIN), an alphanumeric designator
which can also identify the tire manufac-
turer, production plant, brand, and date of
production.
GVWR:
Gross Vehicle Weight Rating. Refer to
“Loading Your Vehicle” in “Your Driving,
the Road, and Your Vehicle” in the “Driving
Your Vehicle” section.
GAWR FRT:
Gross Axle Weight Rating for the front
axle. Refer to “Loading Your Vehicle” in
“Your Driving, the Road, and Your Vehicle”
in the “Driving Your Vehicle” section.
GAWR RR:
Gross Axle Weight Rating for the rear axle.
Refer to “Loading Your Vehicle” in “Your
Page 213 of 274

5-29 SERVICE AND APPEARANCE CARE
78J00-03E
Driving, the Road, and Your Vehicle” in the
“Driving Your Vehicle” section.
Intended Outboard Sidewall:
The side of an asymmetrical tire, that must
always face outward when mounted on a
vehicle.
Kilopascal (kPa):
The metric unit for air pressure.
Light Truck (LT-Metric) Tire:
A tire used on light duty trucks and some
multipurpose passenger vehicles.
Load Index:
An assigned number ranging from 1 to 279
that corresponds to the load carrying
capacity of a tire.
Maximum Inflation Pressure:
The maximum air pressure to which a cold
tire may be inflated. The maximum air
pressure is molded onto the sidewall.
Maximum Load Rating:
The load rating for a tire at the maximum
permissible inflation pressure for that tire.
Maximum Loaded Vehicle Weight:
The sum of curb weight, accessory weight,
vehicle capacity weight, and production
options weight.
Normal Occupant Weight:
The number of occupants a vehicle is
designed to seat multiplied by 150 lbs (68
kg). Refer to “Loading Your Vehicle” in
“Your Driving, the Road, and Your Vehicle”
in the “Driving Your Vehicle” section.Occupant Distribution:
Designated seating positions.
Outward Facing Sidewall:
The side of an asymmetrical tire that has a
particular side that faces outward when
mounted on a vehicle. The side of the tire
that contains a whitewall, bears white let-
tering, or bears manufacturer, brand, and/
or model name molding that is higher or
deeper than the same moldings on the
other sidewall of the tire.
Passenger (P-Metric) Tire:
A tire used on passenger cars and some
light duty trucks and multipurpose vehicles.
Recommended Inflation Pressure:
Vehicle manufacturer’s recommended tire
inflation pressure as shown on the tire
placard. Refer to “Inflation – Tire Pressure”
in this section and “Loading Your Vehicle”
in “Your Driving, the Road, and Your Vehi-
cle” in the “Driving Your Vehicle” section.
Radial Ply Tire:
A pneumatic tire in which the ply cords that
extend to the beads are laid at 90 degrees
to the centerline of the tread.
Rim:
A metal support for a tire and upon which
the tire beads are seated.
Sidewall:
The portion of a tire between the tread and
the bead.Speed Rating:
An alphanumeric code assigned to a tire
indicating the maximum speed at which a
tire can operate.
Traction:
The friction between the tire and the road
surface. The amount of grip provided.
Tread:
The portion of a tire that comes into con-
tact with the road.
Treadwear Indicators:
Narrow bands, sometimes called wear
bars, that show across the tread of a tire
when only 1/16 inch (1.6 mm) of tread
remains. Refer to “When It Is Time for New
Tires” in this section.
UTQGS (Uniform Tire Quality Grading
Standards):
A tire information system that provides
consumers with ratings for a tire’s traction,
temperature, and treadwear. Ratings are
determined by tire manufacturers using
government testing procedures. The rat-
ings are molded into the sidewall of the
tire. Refer to “Uniform Tire Quality Grad-
ing” in this section.
Vehicle Capacity Weight:
The number of designated seating posi-
tions multiplied by 150 lbs (68 kg) plus the
rated cargo load. Refer to “Loading Your
Vehicle” in “Your Driving, the Road, and
Your Vehicle” in the “Driving Your Vehicle”
section.
Page 214 of 274

5-30 SERVICE AND APPEARANCE CARE
78J00-03E
Vehicle Maximum Load on the Tire:
Load on an individual tire due to curb
weight, accessory weight, occupant
weight, and cargo weight.
Vehicle Placard:
A label permanently attached to a vehicle
showing the vehicle’s capacity weight and
the original equipment tire size and recom-
mended inflation pressure. Refer to “Tire
and Loading Information Label” under
“Loading Your Vehicle” in “Your Driving,
the Road, and Your Vehicle” in the “Driving
Your Vehicle” section.Inflation – Tire PressureTires need the correct amount of air pres-
sure to operate effectively.
A Tire and Loading Information label is
attached to the vehicle’s center pillar (B-
pillar). This label shows your vehicle’s orig-
inal equipment tires and the correct infla-
tion pressures for your tires when they are
cold. The recommended cold tire inflation
pressure, shown on the label, is the mini-
mum amount of air pressure needed to
support your vehicle’s maximum load car-
rying capacity.
For additional information regarding how
much weight your vehicle can carry, and
an example of the Tire and Loading Infor-
mation label, refer to “Loading Your Vehi-cle” in “Your Driving, the Road, and Your
Vehicle” in the “Driving Your Vehicle” sec-
tion. How you load your vehicle affects
vehicle handling and ride comfort. Never
load your vehicle with more weight than it
was designed to carry.
When to Check
Check your tires once a month or more. Do
not forget to check the compact spare tire,
it should be at 60 psi (420 kPa). For addi-
tional information regarding the compact
spare tire, refer to “Compact Spare Tire” in
this section.
How to Check
Use a good quality pocket-type gage to
check tire pressure. You cannot tell if your
tires are properly inflated simply by looking
at them. Radial tires may look properly
inflated even when they are under-inflated.
Check the tire’s inflation pressure when
the tires are cold. Cold means your vehicle
has been sitting for at least three hours or
driven no more than 1 mile (1.6 km).
Remove the valve cap from the tire valve
stem. Press the tire gage firmly onto the
valve to get a pressure measurement. If
the cold tire inflation pressure matches the
recommended pressure on the Tire and
Loading Information label, no further
adjustment is necessary. If the inflation
pressure is low, add air until you reach the
recommended amount.
CAUTION
Do not let anyone tell you that under-
inflation or over-inflation is all right. It
is not. If your tires do not have
enough air (under-inflation), you can
get the following:
Too much flexing
Too much heat
Tire overloading
Premature or irregular wear
Poor handling
Reduced fuel economy
If your tires have too much air (over-
inflation), you can get the following:
Unusual wear
Poor handling
Rough ride
Needless damage from road haz-
ards
Page 215 of 274

5-31 SERVICE AND APPEARANCE CARE
78J00-03E
If you overfill the tire, release air by push-
ing on the metal stem in the center of the
tire valve. Re-check the tire pressure with
the tire gage.
Be sure to put the valve caps back on the
valve stems. They help prevent leaks by
keeping out dirt and moisture.Tire Pressure Monitor SystemYour vehicle has a Tire Pressure Monitor
System (TPMS). This system uses radio
and sensor technology to check tire pres-
sure levels. TPMS sensors are mounted
onto each tire and wheel assembly, except
for the spare tire. The TPMS sensors mon-
itor the air pressure in your vehicle's tires
and transmit tire pressure readings to a
receiver located in the vehicle.
Low Tire Pressure Warning Light
1198521
Your vehicle has also been equipped with
a TPMS malfunction indicator to indicate
when the system is not operating properly.
The TPMS malfunction indicator is com-
bined with the low tire pressure telltale.
When the system detects a malfunction,
the telltale will flash for approximately one
minute and then remain continuously illu-
minated. This sequence will continue upon
subsequent vehicle start-ups as long as
the malfunction exists.
When the malfunction indicator is illumi-
nated, the system may not be able to
detect or signal low tire pressure as
intended. TPMS malfunctions may occur
for a variety of reasons, including the
installation of replacement or alternate
tires or wheels on the vehicle that prevent
the TPMS from functioning properly.
Always check the TPMS malfunction tell-
tale after replacing one or more tires or
wheels on your vehicle to ensure that the
replacement or alternate tires and wheels
WARNING
Each tire, including the spare (if pro-
vided), should be checked monthly
when cold and inflated to the inflation
pressure recommended by the vehi-
cle manufacturer on the vehicle plac-
ard or tire inflation pressure label. (If
your vehicle has tires of a different
size than the size indicated on the
vehicle placard or tire inflation pres-
sure label, you should determine the
proper tire inflation pressure for
those tires.)
As an added safety feature, your
vehicle has been equipped with a tire
pressure monitoring system (TPMS)
that illuminates a low tire pressure
telltale when one or more of your
tires is significantly under-inflated.
Accordingly, when the low tire pres-
sure telltale illuminates, you should
stop and check your tires as soon as
possible, and inflate them to the
proper pressure. Driving on a signifi-
cantly under-inflated tire causes the
tire to overheat and can lead to tire
failure. Under-inflation also reduces
fuel efficiency and tire tread life, and
may affect the vehicle’s handling and
stopping ability.
(Continued)
WARNING
(Continued)
Please note that the TPMS is not a
substitute for proper tire mainte-
nance, and it is the driver’s responsi-
bility to maintain correct tire
pressure, even if under-inflation has
not reached the level to trigger illumi-
nation of the TPMS low tire pressure
telltale.
Page 216 of 274

5-32 SERVICE AND APPEARANCE CARE
78J00-03E
allow the TPMS to continue to function
properly.
When a low tire pressure condition is
detected, the TPMS will illuminate the low
tire pressure warning symbol on the instru-
ment panel cluster, and at the same time a
message to check the pressure in a spe-
cific tire will appear on the Driver Informa-
tion Center (DIC) display. The low tire
pressure warning symbol on the instru-
ment panel cluster and the check tire pres-
sure message will appear at each ignition
cycle until the tires are inflated to the cor-
rect inflation pressure. Using the DIC, tire
pressure levels can be viewed by the
driver. For additional information and
details about the DIC operation and dis-
plays refer to “DIC Operation and Dis-
plays” and “DIC Warnings and Messages”
in “Driver Information Center (DIC)” in the
“Instrument Panel” section.
The low tire pressure warning light may
come on in cool weather when the vehicle
is first started, and then turn off as you
start to drive. This may be an early indica-
tor that the air pressure in the tire(s) are
getting low and need to be inflated to the
proper pressure.
A Tire and Loading Information Label,
attached to your vehicle, shows the size of
your vehicle’s original equipment tires and
the correct inflation pressure for your vehi-
cle's tires when they are cold. Refer to
“Loading Your Vehicle” in “Your Driving,the Road, and Your Vehicle” in the “Driving
Your Vehicle” section, for an example of
the Tire and Loading Information Label
and its location on your vehicle. Also refer
to “Inflation - Tire Pressure” in this section.
Your vehicle’s TPMS system can warn you
about a low tire pressure condition but it
does not replace normal tire maintenance.
Refer to “Tire Inspection and Rotation” and
“Tires” in this section.
The TPMS will not function properly if one
or more of the TPMS sensors are missing
or inoperable. If the system detects a miss-
ing or inoperable sensor, an error mes-
sage SERVICE TIRE MONITOR SYSTEM
will be shown on the DIC display. If you
have replaced a tire/wheel assembly with-
out transferring the TPMS sensors, the
error message will be displayed. Once you
re-install the TPMS sensors, the error
message should go off. See your SUZUKI
dealer for service if all TPMS sensors are
installed and the error message comes on
and stays on.
TPMS Sensor Matching Process
Each TPMS sensor has a unique identifi-
cation code. Any time you replace one ormore of the TPMS sensors or rotate the
vehicle’s tires, the identification codes will
need to be matched to the new tire/wheel
position. The sensors are matched, to the
tire/wheel positions, in the following order:
driver side front tire, passenger side front
tire, passenger side rear tire, and driver
side rear tire using a TPMS diagnostic tool.
See your SUZUKI dealer for service.
The TPMS sensors may also be matched
to each tire/wheel position by increasing or
decreasing the tire’s air pressure. When
increasing the tire’s pressure, do not
exceed the maximum inflation pressure
indicated on the tire’s sidewall.
You will have two minutes to match each
tire and wheel position. If it takes longer
than two minutes to match any tire and
wheel position, the matching process
stops and you will need to start over.
The TPMS matching process is outlined
below:
1) Set the parking brake.
2) Turn the ignition switch to RUN with the
engine off.
3) Using the DIC, press the vehicle infor-
mation button until the TIRE LOCA-
TIONS PRESS TO LEARN message
displays.
4) Press the set/reset button to allow the
system to learn the tire positions. The
horn will sound twice to indicate the
receiver is ready, and the TIRE
LEARNING ACTIVE message displays.
CAUTION
Do not use a tire sealant if your vehi-
cle has Tire Pressure Monitors. The
liquid sealant can damage the tire
pressure monitor sensors.
 1
1 2
2 3
3 4
4 5
5 6
6 7
7 8
8 9
9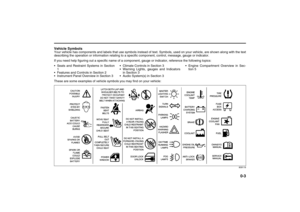 10
10 11
11 12
12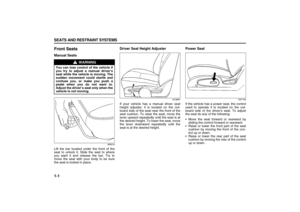 13
13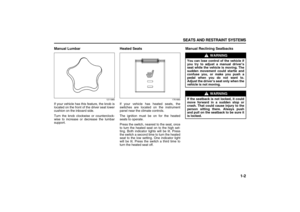 14
14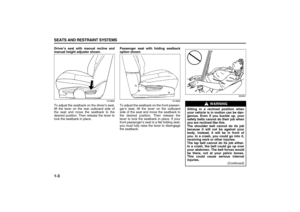 15
15 16
16 17
17 18
18 19
19 20
20 21
21 22
22 23
23 24
24 25
25 26
26 27
27 28
28 29
29 30
30 31
31 32
32 33
33 34
34 35
35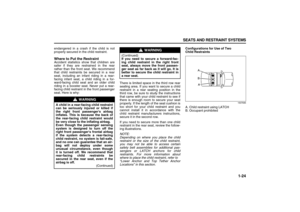 36
36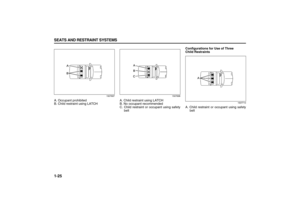 37
37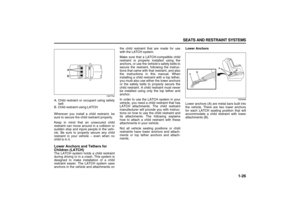 38
38 39
39 40
40 41
41 42
42 43
43 44
44 45
45 46
46 47
47 48
48 49
49 50
50 51
51 52
52 53
53 54
54 55
55 56
56 57
57 58
58 59
59 60
60 61
61 62
62 63
63 64
64 65
65 66
66 67
67 68
68 69
69 70
70 71
71 72
72 73
73 74
74 75
75 76
76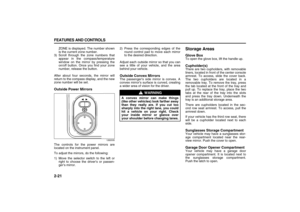 77
77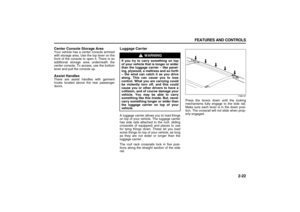 78
78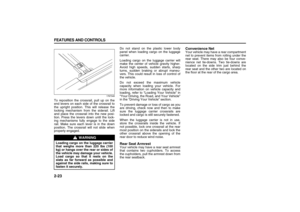 79
79 80
80 81
81 82
82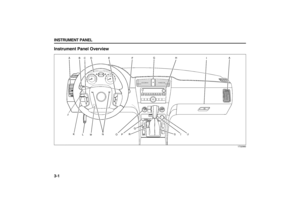 83
83 84
84 85
85 86
86 87
87 88
88 89
89 90
90 91
91 92
92 93
93 94
94 95
95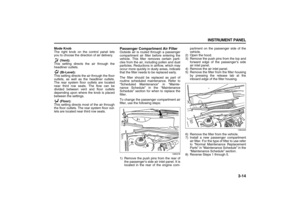 96
96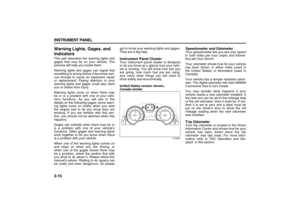 97
97 98
98 99
99 100
100 101
101 102
102 103
103 104
104 105
105 106
106 107
107 108
108 109
109 110
110 111
111 112
112 113
113 114
114 115
115 116
116 117
117 118
118 119
119 120
120 121
121 122
122 123
123 124
124 125
125 126
126 127
127 128
128 129
129 130
130 131
131 132
132 133
133 134
134 135
135 136
136 137
137 138
138 139
139 140
140 141
141 142
142 143
143 144
144 145
145 146
146 147
147 148
148 149
149 150
150 151
151 152
152 153
153 154
154 155
155 156
156 157
157 158
158 159
159 160
160 161
161 162
162 163
163 164
164 165
165 166
166 167
167 168
168 169
169 170
170 171
171 172
172 173
173 174
174 175
175 176
176 177
177 178
178 179
179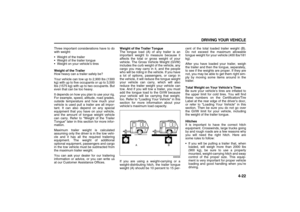 180
180 181
181 182
182 183
183 184
184 185
185 186
186 187
187 188
188 189
189 190
190 191
191 192
192 193
193 194
194 195
195 196
196 197
197 198
198 199
199 200
200 201
201 202
202 203
203 204
204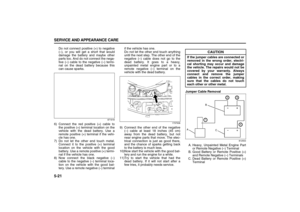 205
205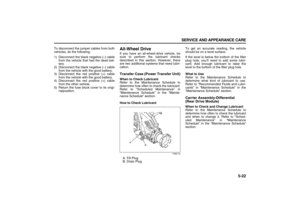 206
206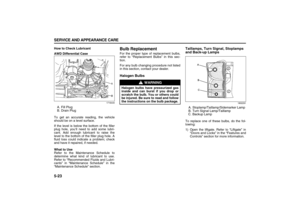 207
207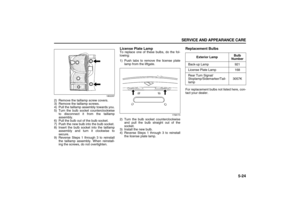 208
208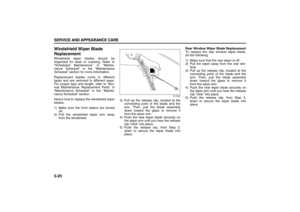 209
209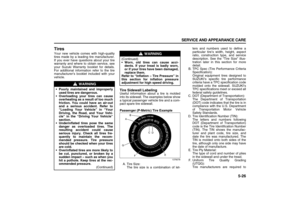 210
210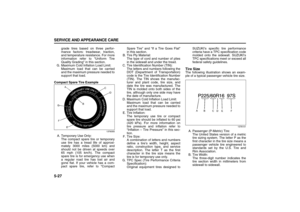 211
211 212
212 213
213 214
214 215
215 216
216 217
217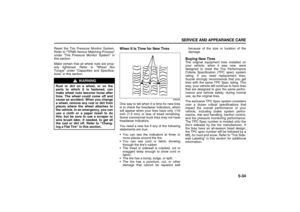 218
218 219
219 220
220 221
221 222
222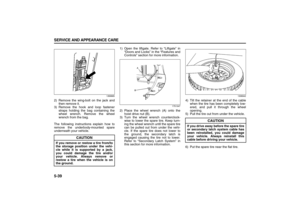 223
223 224
224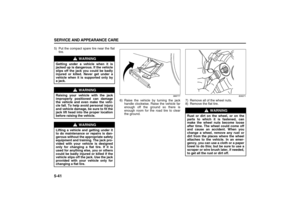 225
225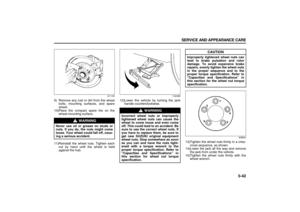 226
226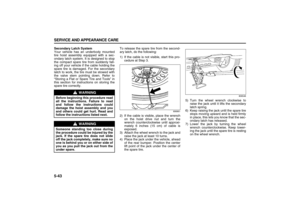 227
227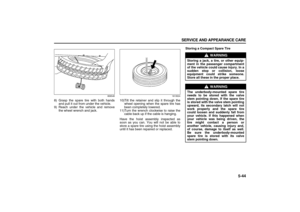 228
228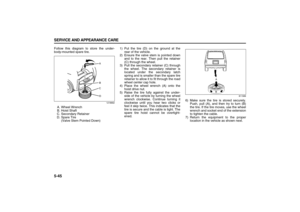 229
229 230
230 231
231 232
232 233
233 234
234 235
235 236
236 237
237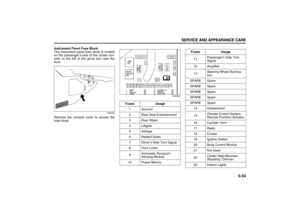 238
238 239
239 240
240 241
241 242
242 243
243 244
244 245
245 246
246 247
247 248
248 249
249 250
250 251
251 252
252 253
253 254
254 255
255 256
256 257
257 258
258 259
259 260
260 261
261 262
262 263
263 264
264 265
265 266
266 267
267 268
268 269
269 270
270 271
271 272
272 273
273