Page 89 of 116

NAVIGATION SYSTEM
AV-89
C
D
E
F
G
H
I
J
L
MA
B
AV
Revision: 2006 November2007 350Z
Tint Is Strange for The RGB ImageNKS000DL
Symptom: Tint of RGB image is strange.
1. CHECK HARNESS
1. Turn ignition switch OFF.
2. Disconnect NAVI control unit and display unit connectors.
3. Check the malfunctioning circuit according to the symptoms.
�Light blue (Cyan) tinged screen
Check continuity between NAVI control unit harness connector
(A) B105 terminal 44 and display unit harness connector (B)
M35 terminal 1.
Check continuity between NAVI control unit harness connector
(A) B105 terminal 44 and ground.
�Purple (Magenta) tinged screen
Check continuity between NAVI control unit harness connector
(A) B105 terminal 45 and display unit harness connector (B)
M35 terminal 2.
Check continuity between NAVI control unit harness connector
(A) B105 terminal 45 and ground.
�Yellow tinged screen
Check continuity between NAVI control unit harness connector
(A) B105 terminal 46 and display unit harness connector (B)
M35 terminal 3.
Check continuity between NAVI control unit harness connector
(A) B105 terminal 46 and ground.
OK or NG
OK >> GO TO 2.
NG >> Repair harness or connector.44 – 1 : Continuity should exist.
44 – Ground : Continuity should not exist.
SKIB6994E
45 – 2 : Continuity should exist.
45 – Ground : Continuity should not exist.
SKIB6995E
46 – 3 : Continuity should exist.
46 – Ground : Continuity should not exist.
SKIB6996E
Page 90 of 116

AV-90
NAVIGATION SYSTEM
Revision: 2006 November2007 350Z
2. CHECK RGB SIGNAL
1. Connect NAVI control unit and display unit connectors.
2. Turn ignition switch ON.
3. Start Confirmation/Adjustment mode. Refer to AV- 7 7 , "
Confirmation/Adjustment Mode" .
4. Display color bar by selecting “Color Spectrum bar” on Display Diagnosis screen. Refer to AV- 7 8 , "
DIS-
PLAY DIAGNOSIS" .
5. Check the malfunctioning circuit according to the symptoms.
�Light blue (Cyan) tinged screen
Check voltage waveform between NAVI control unit harness
connector B105 terminal 44 and ground using oscilloscope.
�Purple (Magenta) tinged screen
Check voltage waveform between NAVI control unit harness
connector B105 terminal 45 and ground using or oscilloscope.
�Yellow tinged screen
Check voltage waveform between NAVI control unit harness
connector B105 terminal 46 and ground using oscilloscope.
OK or NG
OK >> Replace display unit.
NG >> Replace NAVI control unit.44 – Ground:
SKIB6997E
SKIB7360E
45 – Ground:
SKIB6998E
SKIB7361E
46 – Ground:
SKIB6999E
SKIB7362E
Page 91 of 116

NAVIGATION SYSTEM
AV-91
C
D
E
F
G
H
I
J
L
MA
B
AV
Revision: 2006 November2007 350Z
RGB Image Is RollingNKS000DM
Symptom: RGB image such as a map screen is rolling.
1. CHECK HARNESS
1. Turn ignition switch OFF.
2. Disconnect NAVI control unit and display unit connectors.
3. Check continuity between NAVI control unit harness connector
(A) B105 terminal 48 and display unit harness connector (B)
M35 terminal 7.
4. Check continuity between NAVI control unit harness connector
(A) B105 terminal 48 and ground.
OK or NG
OK >> GO TO 2.
NG >> Repair harness or connector.
2. CHECK RGB SYNCHRONIZING SIGNAL
1. Connect NAVI control unit and display unit connectors.
2. Turn ignition switch ON.
3. Check voltage waveform between NAVI control unit harness
connector B105 terminal 48 and ground using oscilloscope.
OK or NG
OK >> Replace display unit.
NG >> Replace NAVI control unit.48 – 7 : Continuity should exist.
48 – Ground : Continuity should not exist.
SKIB7000E
48 – Ground:
SKIB7001E
SKIB3603E
Page 92 of 116

AV-92
NAVIGATION SYSTEM
Revision: 2006 November2007 350Z
Voice Guidance Is Not HeardNKS000DN
Symptom: Voice guidance does not sound at route guidance.
1. CHECK CONDITION
Turn audio system ON, and check if any sound can be heard from front door speaker.
OK or NG
OK >> GO TO 2.
NG >> Refer to AV- 3 9 , "
Trouble Diagnosis" and repair malfunctioning part.
2. CHECK CONDITION
Turn audio system ON, and check if front door speaker is muted when pressing “VOICE” button during sound-
ing from front door speaker.
Is front door speaker muted?
YES >> GO TO 3.
NO >> GO TO 5.
3. CHECK HARNESS
With BOSE system
1. Turn ignition switch OFF.
2. Disconnect NAVI control unit and audio unit connectors.
3. Check continuity between NAVI control unit harness connector
(A) B104 terminals 12, 14 and audio unit harness connector (B)
M39 terminals 32, 30.
4. Check continuity between NAVI control unit harness connector
(A) B104 terminals 12, 14 and ground.
With base system
1. Turn ignition switch OFF.
2. Disconnect NAVI control unit and audio unit connectors.
3. Check continuity between NAVI control unit harness connector
(A) B104 terminals 12, 14 and audio unit harness connector (B)
M46 terminals 20, 19.
4. Check continuity between NAVI control unit harness connector
(A) B104 terminals 12, 14 and ground.
OK or NG
OK >> GO TO 4.
NG >> Repair harness or connector.12 – 32 : Continuity should exist.
14 – 30 : Continuity should exist.
12, 14 – Ground : Continuity should not exist.
SKIB7401E
12 – 20 : Continuity should exist.
14 – 19 : Continuity should exist.
12, 14 – Ground : Continuity should not exist.
SKIB7402E
Page 93 of 116

NAVIGATION SYSTEM
AV-93
C
D
E
F
G
H
I
J
L
MA
B
AV
Revision: 2006 November2007 350Z
4. CHECK VOICE GUIDANCE SIGNAL
1. Connect NAVI control unit and audio unit connectors.
2. Turn ignition switch ON.
3. When pressing “VOICE” button, check voltage waveform
between NAVI control unit harness connector B104 terminals 12
and 14 using or oscilloscope.
OK or NG
OK >> Replace audio unit.
NG >> Replace NAVI control unit.
5. CHECK HARNESS
With BOSE system
1. Turn ignition switch OFF.
2. Disconnect NAVI control unit and audio unit connectors.
3. Check continuity between NAVI control unit harness connector
(A) B104 terminals 13, 24 and audio unit harness connector (B)
M39 terminals 31, 24.
4. Check continuity between NAVI control unit harness connector
(A) B104 terminal 24 and ground.
With base system
1. Turn ignition switch OFF.
2. Disconnect NAVI control unit and audio unit connectors.
3. Check continuity between NAVI control unit harness connector
(A) B104 terminals 13, 24 and audio unit harness connector (B)
M46 terminals 18, 17.
4. Check continuity between NAVI control unit harness connector
(A) B104 terminal 24 and ground.
OK or NG
OK >> GO TO 6.
NG >> Repair harness or connector.12 – 14:
SKIB7003ESKIB3597E
13 – 31 : Continuity should exist.
24 – 24 : Continuity should exist.
24 – Ground : Continuity should not exist.
SKIB7403E
13 – 18 : Continuity should exist.
24 – 17 : Continuity should exist.
24 – Ground : Continuity should not exist.
SKIB7404E
Page 94 of 116

AV-94
NAVIGATION SYSTEM
Revision: 2006 November2007 350Z
6. CHECK VOICE GUIDANCE ON SIGNAL
1. Connect NAVI control unit and audio unit connectors.
2. Turn ignition switch ON.
3. When pressing “VOICE” button, check voltage waveform
between NAVI control unit harness connector B104 terminals 24
and 13 using oscilloscope.
OK or NG
OK >> Replace audio unit.
NG >> Replace NAVI control unit.
Vehicle Mark Is Not Displayed ProperlyNKS000DO
Symptom: Vehicle mark is not displayed at the vehicle driving position properly.
1. NAVIGATION SYSTEM ADJUSTMENT
1. Select “Navigation” in Confirmation/Adjustment mode, and adjust items, “Steering Angle Adjustment” and
“Speed Calibration”. Refer to AV- 7 9 , "
NAVIGATION" .
2. Check symptom with driving.
Is any malfunction observed?
YES >> GO TO 2.
NO >> INSPECTION END
2. SELF-DIAGNOSIS
Start self-diagnosis, and check any malfunction related to GPS. Refer to AV- 7 4 , "
Self Diagnosis Mode" .
Is any malfunction related to GPS observed?
YES >> Repair malfunctioning part by diagnosis results.
NO >> GO TO 3.
3. CHECK VEHICLE SIGNAL
Select “Vehicle Signals” in Confirmation/Adjustment mode, and check the vehicle speed signal and reverse
signal inputting to NAVI control unit. Refer to AV- 7 8 , "
VEHICLE SIGNALS" .
OK or NG
OK >> Limit of position detection capacity.
NG >>
�Check NAVI control unit vehicle speed signal circuit, and repair malfunctioning part.
�Check NAVI control unit reverse signal circuit, and repair malfunctioning part. 24 – 13:
SKIB7405ESKIB0232E
Page 95 of 116

NAVIGATION SYSTEM
AV-95
C
D
E
F
G
H
I
J
L
MA
B
AV
Revision: 2006 November2007 350Z
Example of Symptoms Possible No MalfunctionNKS002JQ
For Navigation System operation information, refer to Navigation System Owner's Manual.
BASIC OPERATIONS
NOTE:
Locations stored in the Address Book and other memory functions may be lost if the vehicle's battery is disconnected or is discharged. If
this occurs, service the vehicle's battery as necessary and re-enter the information in the Address Book.
VEHICLE MARKS
Symptom Possible cause Possible solution
No image is displayed.The brightness is at the lowest setting. Adjust the brightness of the display.
The display is turned off.Press and hold the button to turn on the
display.
No voice guidance is available. or
The volume is too high or too low.The volume is not set correctly, or it is turned
off.Adjust the volume of voice guidance.
No map is displayed on the
screen.The DVD-ROM is not inserted, or it is inserted
upside down.Insert the DVD-ROM correctly.
A screen other than map screen is displayed. Press the “MAP” button.
The pickup lens of the DVD unit is dirty.The pickup lens can become dirty depending
on how you use the vehicle. Contact a NIS-
SAN dealer or qualified workshop for pickup
lens cleaning.
The screen is too dim. The move-
ment is slow.The temperature in the interior of the vehicle is
low.Wait until the interior of the vehicle has
warmed up.
Some pixels in the display are
darker or brighter than others.This condition is an inherent characteristic of
liquid crystal displays.This is not a malfunction.
Some menu items cannot be
selected.Some menu items become unavailable while
the vehicle is driven.Park the vehicle in a safe location, then oper-
ate the navigation system.
Symptom Possible cause Possible solution
Names of roads and locations dif-
fer between plan view and BIRD-
VIEW
™ .This is because the quantity of the displayed
information is reduced so that the screen does
not become difficult to read. There is also a
chance that names of the roads or locations
may be displayed several times, and the names
appearing on the screen may be different
because of a processing procedure.This is not a malfunction.
The vehicle mark is not displayed
in the correct position.The vehicle was transported after the ignition
switch was turned off, for example, by a ferry or
car transporter.Drive the vehicle for a while on a road where
GPS signals can be received.
The position and direction of the vehicle mark
may be incorrect depending on the driving envi-
ronments and the levels of positioning accuracy
of the navigation system.This is not a malfunction. Drive the vehicle for
a while to automatically correct the position
and direction of the vehicle mark.
When the vehicle is travelling on a
new road, the vehicle mark is
located on another road nearby.The system automatically places the vehicle
mark on the nearest available road, because
the new road is not stored in the map data.Updated road information will be included in
the next version of the DVD-ROM.
The screen does not switch to the
night screen even after turning on
the headlights.The daytime screen was set the last time the
headlights were turned on.Set the screen to the night screen mode using
button when you turn on the headlights.
The map does not scroll even
when the vehicle is moving.The current location map screen is not dis-
played.Press the “MAP” button.
The vehicle mark is not displayed.The current location map screen is not dis-
played.Press the “MAP” button.
Page 96 of 116

AV-96
NAVIGATION SYSTEM
Revision: 2006 November2007 350Z
DVD-ROM
ROUTE CALCULATION AND VISUAL GUIDANCE
The GPS indicator on the screen
remains gray.GPS signals cannot be received depending on
the vehicle location, such as in a parking
garage, on a road that has numerous tall build-
ings, etc.Drive on an open, straight road for a while.
A sufficient amount of GPS satellites is not
available.Please wait for the satellites to move to loca-
tions available for your navigation system.
The location of the vehicle mark is
misaligned from the actual posi-
tion.When using tire chains or replacing the tires,
speed calculations based on the speed sensor
may be incorrect.Drive the vehicle for a while [at approximately
30 km/h (19 MPH) for about 30 minutes] to
automatically correct the vehicle's mark posi-
tion. If this does not correct the vehicle mark
position, contact a NISSAN dealer or qualified
workshop.
The map data has a mistake or is incomplete
(the vehicle mark position is always misaligned
in the same area).Updated road information will be included in
the next version of the DVD-ROM. Symptom Possible cause Possible solution
Symptom Possible cause Possible solution
The message “Error” appears. The DVD-ROM is dirty or partially damaged.Check the DVD-ROM and wipe it clean with a
soft cloth.
In you see any damage, replace the DVD-
ROM.
Symptom Possible cause Possible solution
In the auto re-route calculation,
waypoints are not included.Waypoints that you have already passed are
not included in the auto re-route calculation.If you want to go to that waypoint again, you
need to edit the route.
Route information is not dis-
played.Route calculation has not yet been performed.Set the destination and perform route calcula-
tion.
You are not driving on the suggested route. Drive on the suggested route.
Route guidance is set to off. Turn on the route guidance.
The auto re-route calculation (or
detour calculation) suggests the
same route as the one previously
suggested.Route calculations took priority conditions into
consideration, but the same route was calcu-
lated.This is not a malfunction.
A waypoint cannot be added.Five waypoints are already set on the route,
including the ones that you have already
passed.A maximum of 5 waypoints can be set on the
route. If you want to go to 6 or more waypoints,
perform route calculations several times, as
necessary.
The suggested route is not dis-
played.Roads near the destination cannot be calcu-
lated.Reset the destination to a main or ordinary
road, and recalculate the route.
The starting point and destination are too close. Set a more distant destination.
The starting point and destination are too far
away.Divide your trip by selecting one or two inter-
mediate destinations, and perform a global
route calculation based on multiple route cal-
culations.
There are time restricted roads (day of week,
time) near the current vehicle location or desti-
nation.Set [Use Time Restricted Roads] to off.
The part of the route that you have
already passed is deleted.A route is managed by sections between way-
points. If you passed the first waypoint, the sec-
tion between the starting point and the waypoint
is deleted. (It may not be deleted depending on
the area.)This is not a malfunction.
 1
1 2
2 3
3 4
4 5
5 6
6 7
7 8
8 9
9 10
10 11
11 12
12 13
13 14
14 15
15 16
16 17
17 18
18 19
19 20
20 21
21 22
22 23
23 24
24 25
25 26
26 27
27 28
28 29
29 30
30 31
31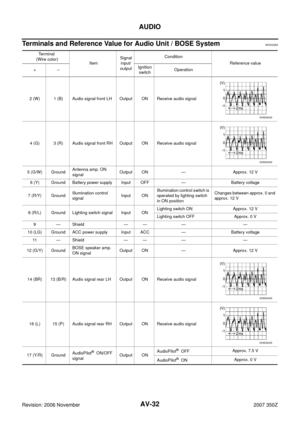 32
32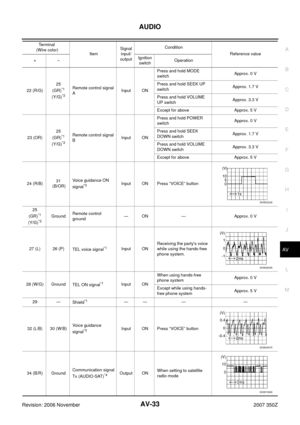 33
33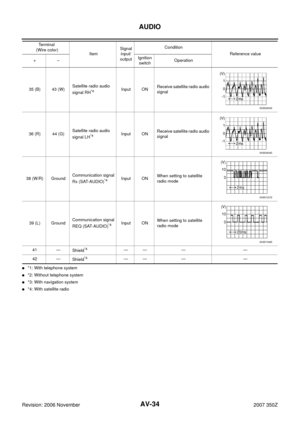 34
34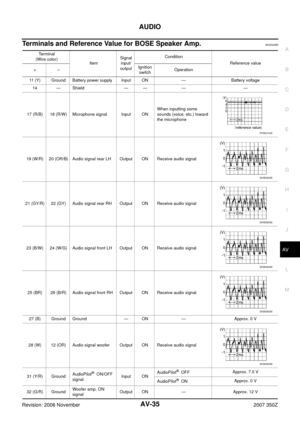 35
35 36
36 37
37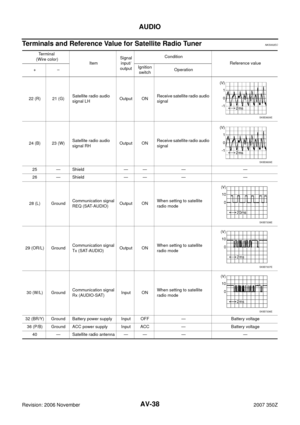 38
38 39
39 40
40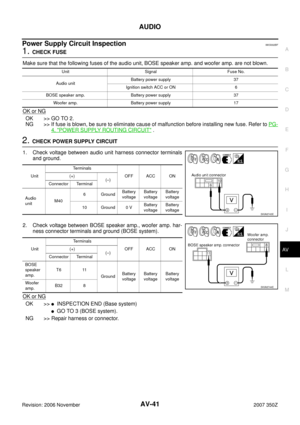 41
41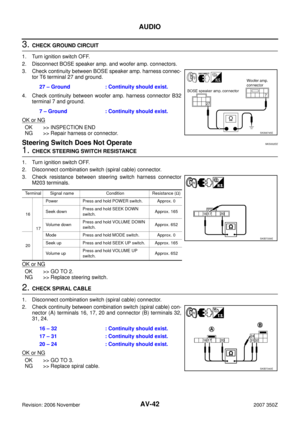 42
42 43
43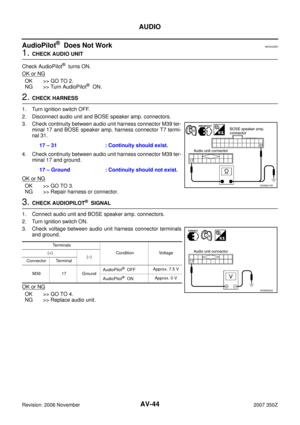 44
44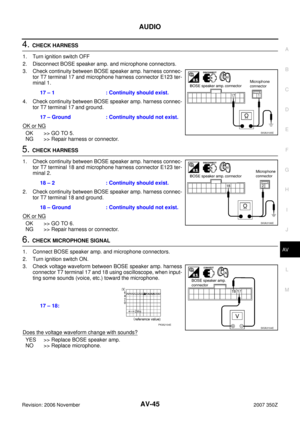 45
45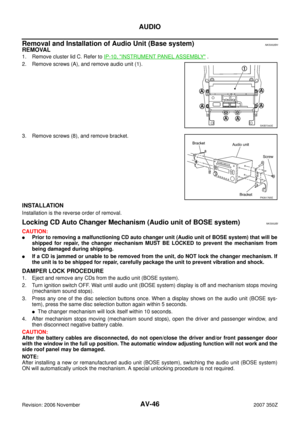 46
46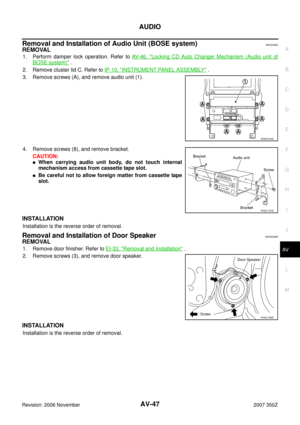 47
47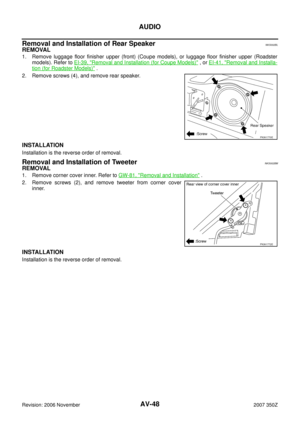 48
48 49
49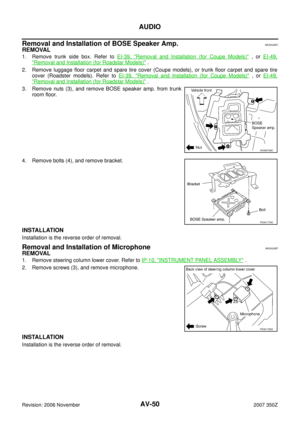 50
50 51
51 52
52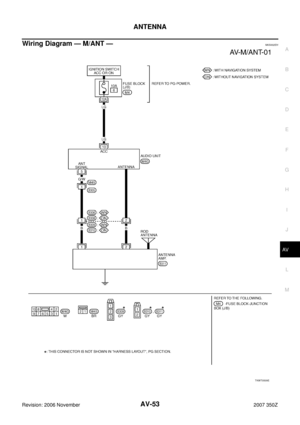 53
53 54
54 55
55 56
56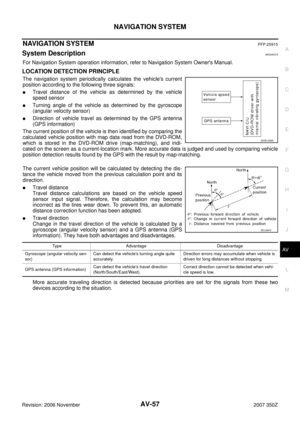 57
57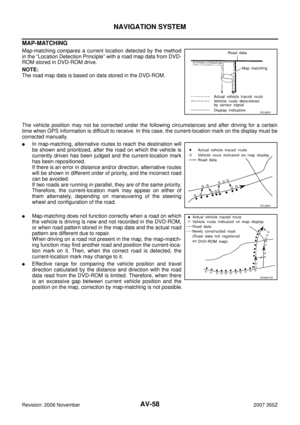 58
58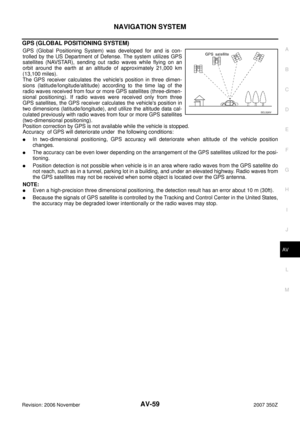 59
59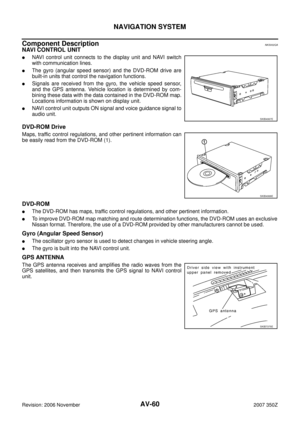 60
60 61
61 62
62 63
63 64
64 65
65 66
66 67
67 68
68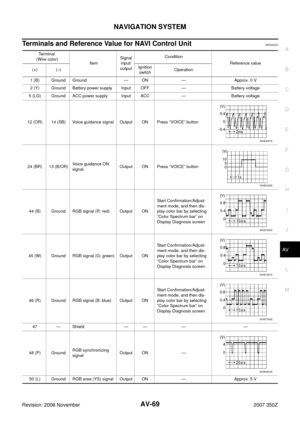 69
69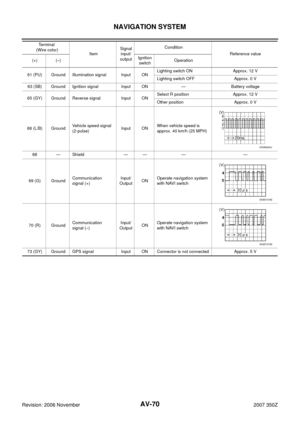 70
70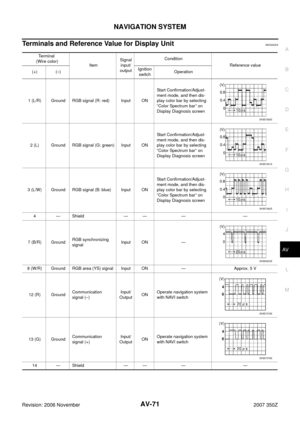 71
71 72
72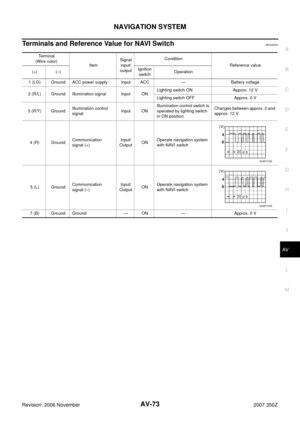 73
73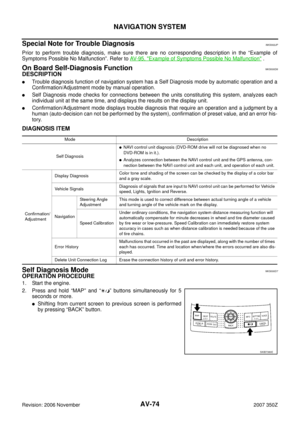 74
74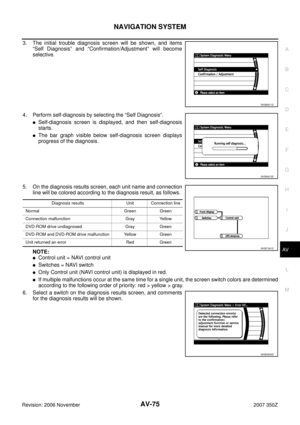 75
75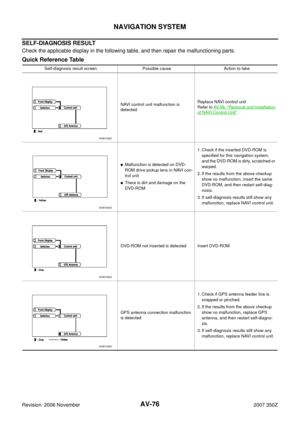 76
76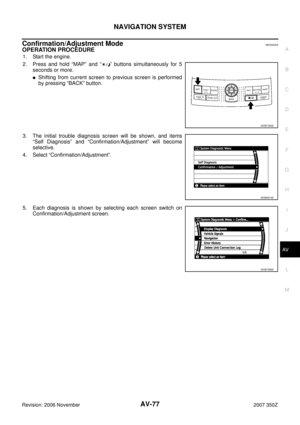 77
77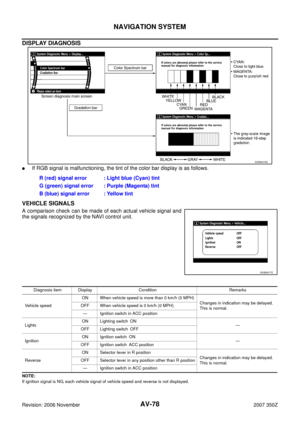 78
78 79
79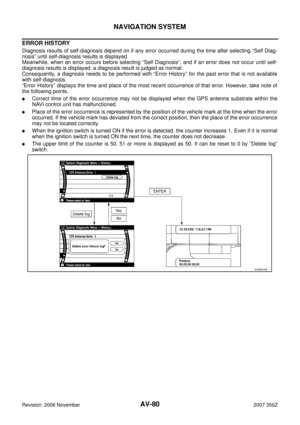 80
80 81
81 82
82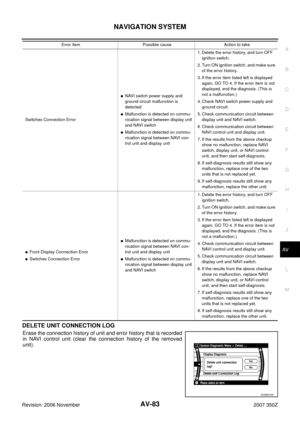 83
83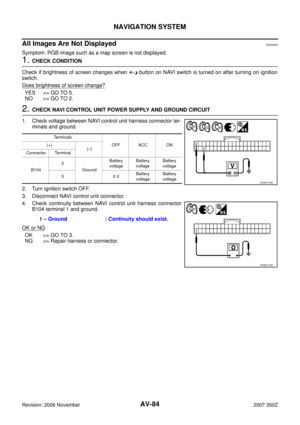 84
84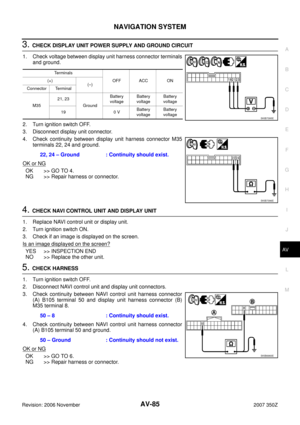 85
85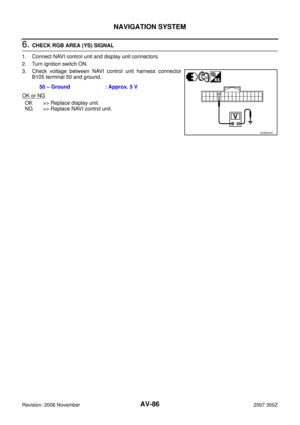 86
86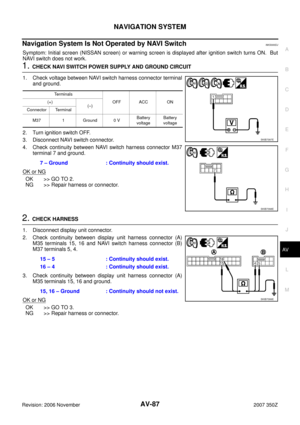 87
87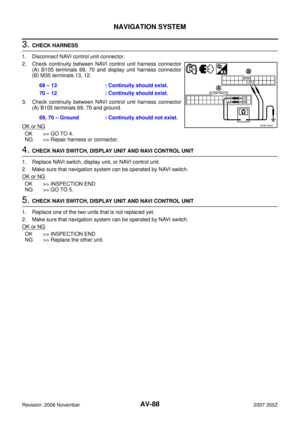 88
88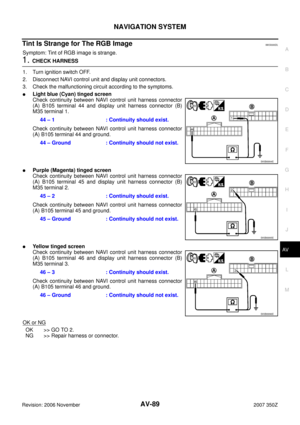 89
89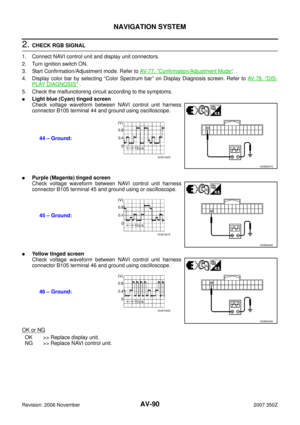 90
90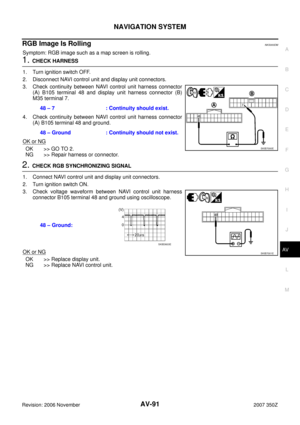 91
91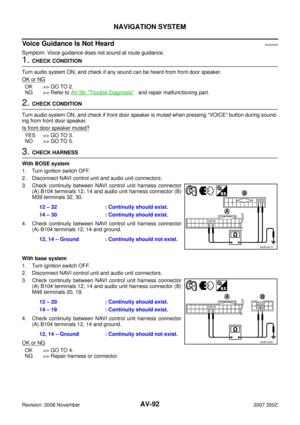 92
92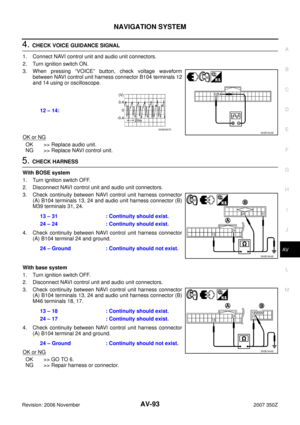 93
93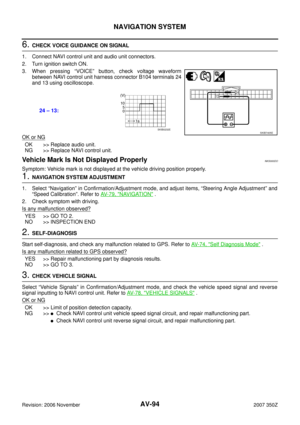 94
94 95
95 96
96 97
97 98
98 99
99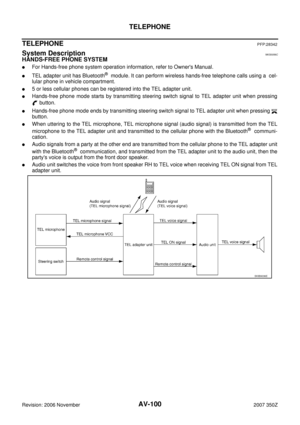 100
100 101
101 102
102 103
103 104
104 105
105 106
106 107
107 108
108 109
109 110
110 111
111 112
112 113
113 114
114 115
115