Page 46 of 116

AV-46
AUDIO
Revision: 2006 November2007 350Z
Removal and Installation of Audio Unit (Base system)NKS002BH
REMOVAL
1. Remove cluster lid C. Refer to IP-10, "INSTRUMENT PANEL ASSEMBLY" .
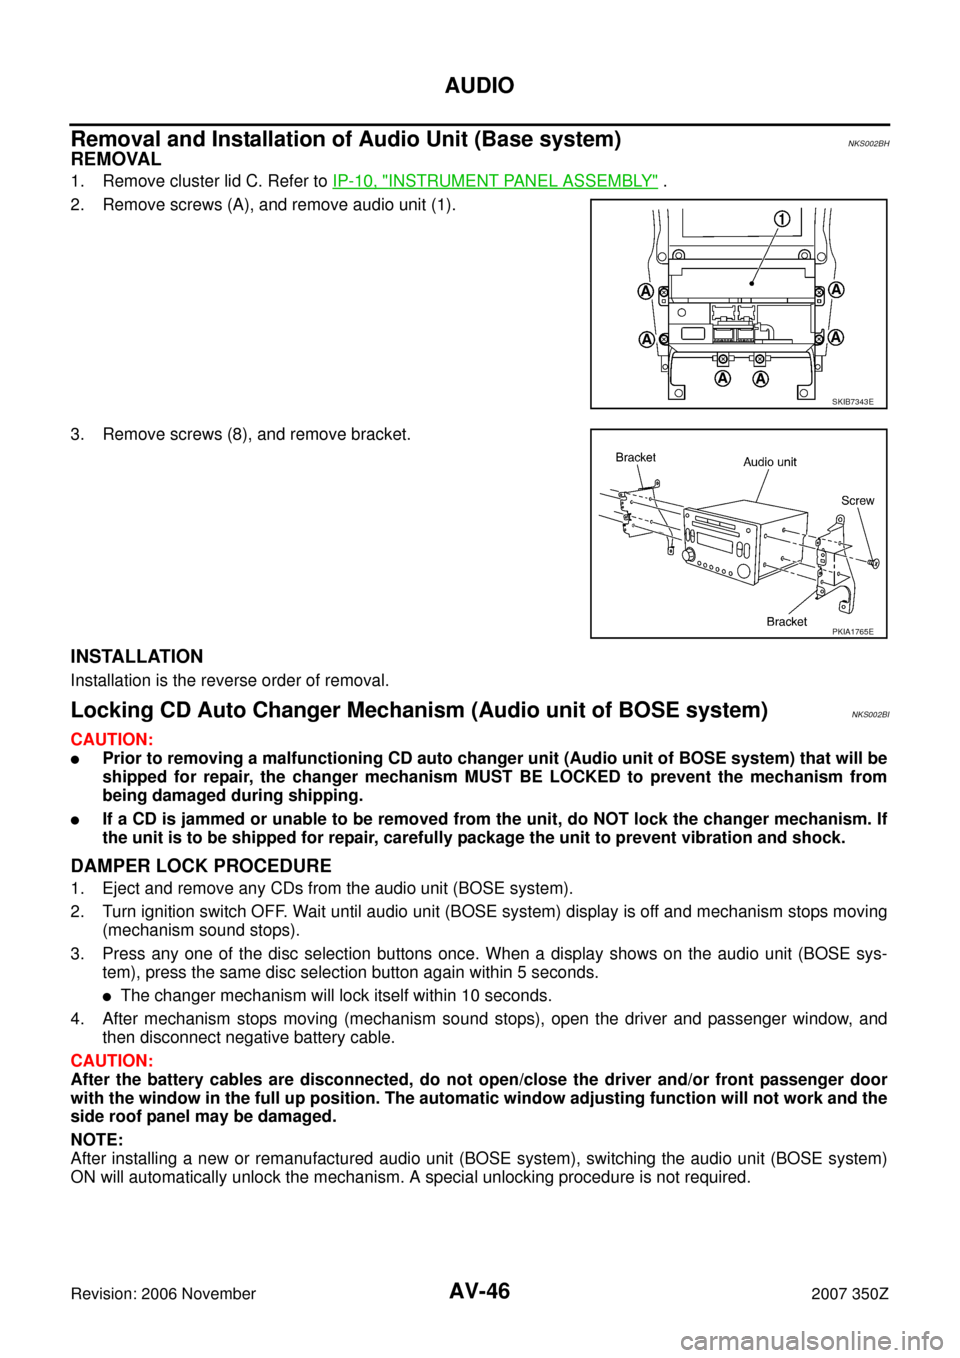
2. Remove screws (A), and remove audio unit (1).
3. Remove screws (8), and remove bracket.
INSTALLATION
Installation is the reverse order of removal.
Locking CD Auto Changer Mechanism (Audio unit of BOSE system)NKS002BI
CAUTION:
�Prior to removing a malfunctioning CD auto changer unit (Audio unit of BOSE system) that will be
shipped for repair, the changer mechanism MUST BE LOCKED to prevent the mechanism from
being damaged during shipping.
�If a CD is jammed or unable to be removed from the unit, do NOT lock the changer mechanism. If
the unit is to be shipped for repair, carefully package the unit to prevent vibration and shock.
DAMPER LOCK PROCEDURE
1. Eject and remove any CDs from the audio unit (BOSE system).
2. Turn ignition switch OFF. Wait until audio unit (BOSE system) display is off and mechanism stops moving
(mechanism sound stops).
3. Press any one of the disc selection buttons once. When a display shows on the audio unit (BOSE sys-
tem), press the same disc selection button again within 5 seconds.
�The changer mechanism will lock itself within 10 seconds.
4. After mechanism stops moving (mechanism sound stops), open the driver and passenger window, and
then disconnect negative battery cable.
CAUTION:
After the battery cables are disconnected, do not open/close the driver and/or front passenger door
with the window in the full up position. The automatic window adjusting function will not work and the
side roof panel may be damaged.
NOTE:
After installing a new or remanufactured audio unit (BOSE system), switching the audio unit (BOSE system)
ON will automatically unlock the mechanism. A special unlocking procedure is not required.
SKIB7343E
PKIA1765E
Page 47 of 116
AUDIO
AV-47
C
D
E
F
G
H
I
J
L
MA
B
AV
Revision: 2006 November2007 350Z
Removal and Installation of Audio Unit (BOSE system)NKS002BJ
REMOVAL
1. Perform damper lock operation. Refer to AV- 4 6 , "Locking CD Auto Changer Mechanism (Audio unit of
BOSE system)" .
2. Remove cluster lid C. Refer to IP-10, "
INSTRUMENT PANEL ASSEMBLY" .
3. Remove screws (A), and remove audio unit (1).
4. Remove screws (8), and remove bracket.
CAUTION:
�When carrying audio unit body, do not touch internal
mechanism access from cassette tape slot.
�Be careful not to allow foreign matter from cassette tape
slot.
INSTALLATION
Installation is the reverse order of removal.
Removal and Installation of Door Speaker NKS002BK
REMOVAL
1. Remove door finisher. Refer to EI-33, "Removal and Installation" .
2. Remove screws (3), and remove door speaker.
INSTALLATION
Installation is the reverse order of removal.
SKIB7343E
PKIA1767E
PKIA1768E
Page 99 of 116
NAVIGATION SYSTEM
AV-99
C
D
E
F
G
H
I
J
L
MA
B
AV
Revision: 2006 November2007 350Z
Removal and Installation of NAVI SwitchNKS000DV
REMOVAL
1. Insert cloth-covered driver into gaps between mask (1) and
NAVI switch (2), and remove mask (1).
2. Remove screws (A), and remove NAVI switch (1).
INSTALLATION
Installation is the reverse order of removal.
Removal and Installation of Display UnitNKS000DW
REMOVAL
1. Remove cluster lid C. Refer to IP-10, "INSTRUMENT PANEL ASSEMBLY" .
2. Remove screws (2), and remove display unit.
3. Remove screws (4), and remove bracket.
INSTALLATION
Installation is the reverse order of removal.
SKIB7406E
SKIB6921J
PKIA1783E
PKIA1784E