Page 531 of 1449
ENGINE LUBLICATION -Engine Oli Cooler12-7
ENGINE OIL COOLER
REMOVAL AND INSTALLATION
Caution
If the vehicle is equipped with the Brembo disc brake, during maintenance, take care not to contact
the parts or tools to the caliper because the paint of caliper will be scratched.
Pre-removal and Post-installation Operation
DEngine Oil Draining and Supplying (Refer to P.12-4.)
DUnder Cover Removal and Installation (Refer to GROUP 51 - Front Bumper.)
DSide Cover Removal and Installation
3
4
5 67
12±2 N·m
42±2 N·m
1 2
1 3
42±2 N·m 12±2 N·m
12±2 N·m
8
Removal steps
1. Engine oil cooler tube gasket
2. Engine oil cooler, braket and hose
assembly
3. Engine oil cooler braket
4. Engine oil cooler tube gasket5. Engine oil cooler feed hose
6. Engine oil cooler tube gasket
7. Engine oil cooler return hose
8. Engine oil cooler
Page 675 of 1449

MPI -Throttle Body13A-143
THROTTLE BODY
REMOVAL AND INSTALLATION
Pre-removal and Post-installation Operation
DUnder Cover Removal and Installation
(Refer to GROUP 51 - Front Bumper.)
DEngine Coolant Draining and Supplying
(Refer to GROUP 14 - On-vehicle Service.)
DStrut Tower Bar Removal and Installation
(Refer to GROUP 42.)DAir Hose E, Air By-pass Hose, Air Pipe C Removal
and Installation (Refer to GROUP 15 - Intercooler.)
DAccelerator Cable Adjustment (Refer to GROUP 17
- On-vehicle Service.)
2
19�¶3 N·m5.0�¶1.0 N·m
1
34
5 6
7
5
Removal steps
1. Accelerator cable connection
2. Throttle position sensor connector
3. Idle speed control servo connector
4. Vacuum hose connection5. Water hose connection
6. Throttle body
"AA7. Throttle body gasket
INSTALLATION SERVICE POINT
"AATHROTTLE BODY GASKET INSTALLATION
Place the gasket so that the projecting part is positioned
as shown in the illustration, and then install it between the
intake manifold and the throttle body.
Up
Towards front of vehicle
Page 683 of 1449

FUEL SUPPLY - On-vehicle Service/Fuel tank13B-3
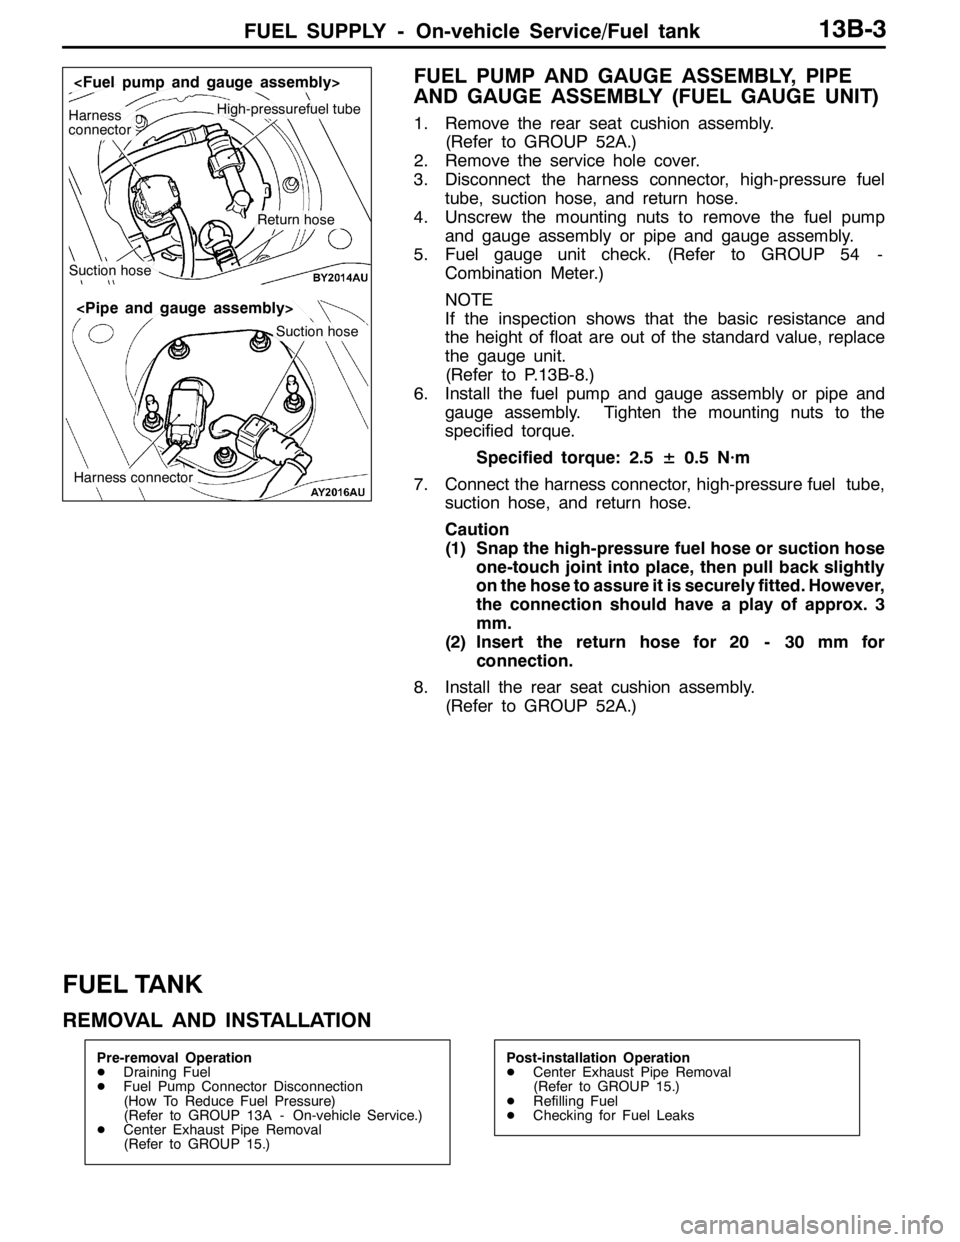
FUEL PUMP AND GAUGE ASSEMBLY, PIPE
AND GAUGE ASSEMBLY (FUEL GAUGE UNIT)
1. Remove the rear seat cushion assembly.
(Refer to GROUP 52A.)
2. Remove the service hole cover.
3. Disconnect the harness connector, high-pressure fuel
tube, suction hose, and return hose.
4. Unscrew the mounting nuts to remove the fuel pump
and gauge assembly or pipe and gauge assembly.
5. Fuel gauge unit check. (Refer to GROUP 54 -
Combination Meter.)
NOTE
If the inspection shows that the basic resistance and
the height of float are out of the standard value, replace
the gauge unit.
(Refer to P.13B-8.)
6. Install the fuel pump and gauge assembly or pipe and
gauge assembly. Tighten the mounting nuts to the
specified torque.
Specified torque: 2.5± 0.5 N·m
7. Connect the harness connector, high-pressure fuel tube,
suction hose, and return hose.
Caution
(1) Snap the high-pressure fuel hose or suction hose
one-touch joint into place, then pull back slightly
on the hose to assure it is securely fitted. However,
the connection should have a play of approx. 3
mm.
(2) Insert the return hose for 20 - 30 mm for
connection.
8. Install the rear seat cushion assembly.
(Refer to GROUP 52A.)
FUEL TANK
REMOVAL AND INSTALLATION
Pre-removal Operation
DDraining Fuel
DFuel Pump Connector Disconnection
(How To Reduce Fuel Pressure)
(Refer to GROUP 13A - On-vehicle Service.)
DCenter Exhaust Pipe Removal
(Refer to GROUP 15.)Post-installation Operation
DCenter Exhaust Pipe Removal
(Refer to GROUP 15.)
DRefilling Fuel
DChecking for Fuel Leaks
High-pressurefuel tubeHarness
connector
Suction hose
Return hose
Suction hose
Harness connector
Page 690 of 1449

ENGINE COOLING -GeneralInformation/
Service Specifications/Lubricant/Sealant14-2
GENERAL INFORMATION
The cooling system is designed to keep every part
of the engine at appropriate temperature in
whatever condition the engine may be operated.
The cooling method is of the water-cooled, pressure
forced circulation type in which the water pump
pressurizes coolant and circulates it throughout the
engine. If the coolant temperature exceeds the
prescribed temperature, the thermostat opens to
circulate the coolant through the radiator as well
so that the heat absorbed by the coolant may be
radiated into the air.The water pump is of the centrifugal type and is
driven by the drive belt from the crankshaft.
The radiator is the corrugated fin, down flow type.
The cooling fan is controlled by the radiator fan
controller and engine-ECU depend on driving
conditions.
ItemSpecification
Radiator performance kJ/h216,700
SERVICE SPECIFICATIONS
ItemsStandard valueLimit
Radiator cap opening pressure kPa93 - 12383
Range of coolant antifreeze concentration of radiator %30 - 60-
ThermostatValve opening temperature of thermostat_C80±1.5-
Full-opening temperature of thermostat_C93-
Valve lift (at 93_C) mm9.5 or more-
LUBRICANT
ItemSpecified coolantQuantity L
Engine coolantMITSUBISHI GENUINE COOLANT or equivalent6.0Enginecoolant
(including reserve tank)
MITSUBISHIGENUINECOOLANTorequivalent6.0
SEALANT
ItemSpecified sealantRemark
Cylinder block drain plug3M Nut Locking Part No. 4171 or equivalentDrying sealant
Page 694 of 1449

ENGINE COOLING -On-vehicle Service14-6
ON-VEHICLE SERVICE
ENGINE COOLANT LEAK CHECKING
1. Confirm that the coolant level is up to the filler neck.
Install a radiator cap tester and apply 160 kPa pressure,
and then check for leakage from the radiator hose or
connections.
Caution
(1) Be sure to completely clean away any moisture
from the places checked.
(2) When the tester is taken out, be careful not to
spill any coolant from it.
(3) Be careful, when installing and removing the tester
and when testing, not to deform the filler neck
of the radiator.
2. If there is leakage, repair or replace the appropriate part.
RADIATOR CAP OPENING PRESSURE CHECK
1. Use a cap adapter to attach the cap to the tester.
2. Increase the pressure until the indicator of the gauge
stops moving.
Limit: 83 kPa
Standard value: 93 - 123 kPa
3. Replace the radiator cap if the reading does not remain
at or above the limit.
NOTE
Be sure that the cap is clean before testing, since rust
or other foreign material on the cap seal will cause an
improper indication.
ENGINE COOLANT REPLACEMENT
1. Remove the under cover.
(Refer to GROUP 51 - Front Bumper.)
2. Drain the engine coolant by removing the drain plug and
then the radiator cap.
Cap adapter
Adapter
Cap adapter
Page 695 of 1449

ENGINE COOLING -On-vehicle ServiceENGINE COOLING -On-vehicle Service14-7
3. Remove the cylinder block drain plug from the cylinder
block to drain the engine coolant.
4. Remove the reserve tank to drain the engine coolant.
5. When the engine coolant has drained, pour in water from
the radiator cap to clean the engine coolant line.
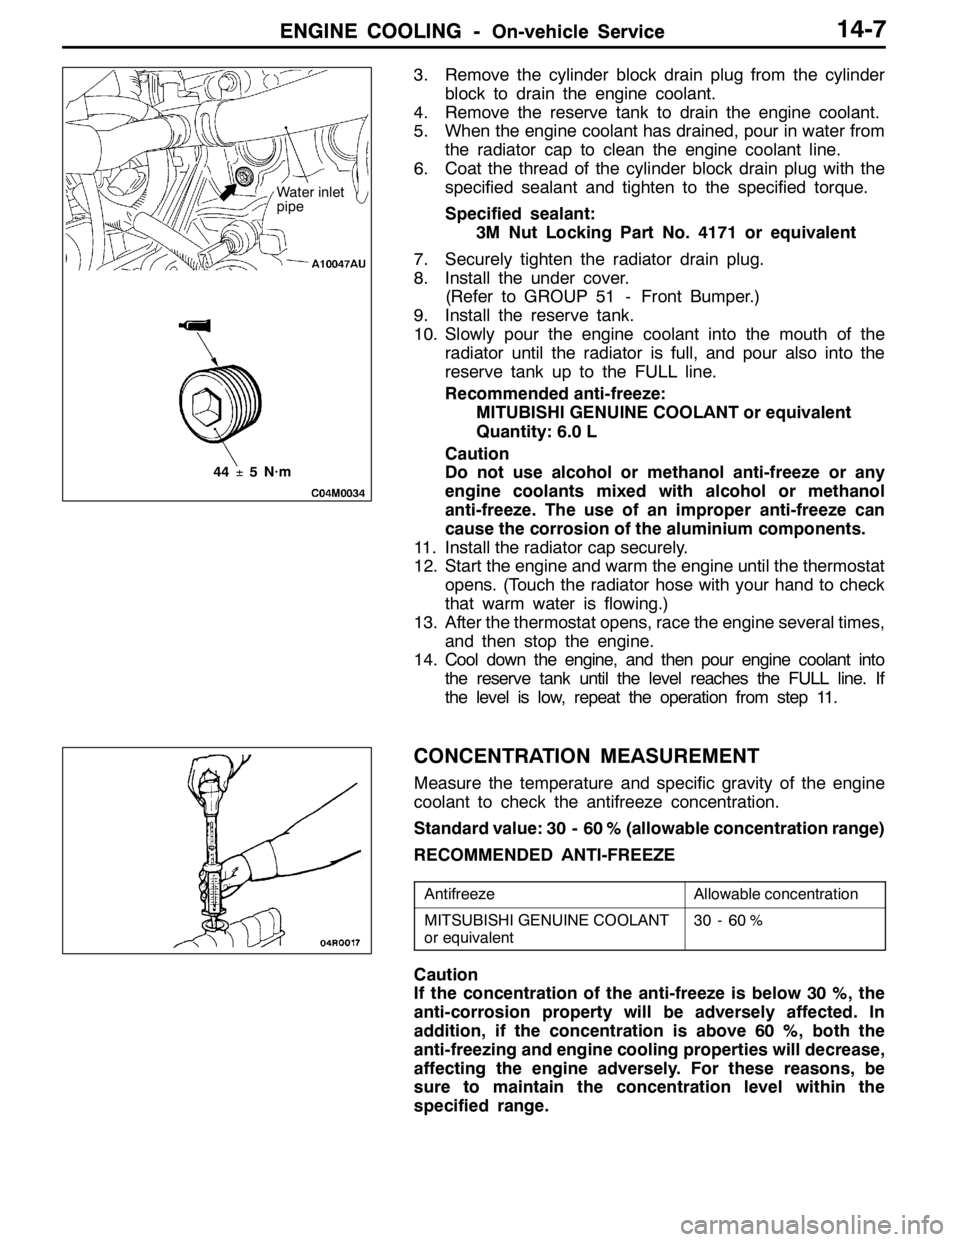
6. Coat the thread of the cylinder block drain plug with the
specified sealant and tighten to the specified torque.
Specified sealant:
3M Nut Locking Part No. 4171 or equivalent
7. Securely tighten the radiator drain plug.
8. Install the under cover.
(Refer to GROUP 51 - Front Bumper.)
9. Install the reserve tank.
10. Slowly pour the engine coolant into the mouth of the
radiator until the radiator is full, and pour also into the
reserve tank up to the FULL line.
Recommended anti-freeze:
MITUBISHI GENUINE COOLANT or equivalent
Quantity: 6.0 L
Caution
Do not use alcohol or methanol anti-freeze or any
engine coolants mixed with alcohol or methanol
anti-freeze. The use of an improper anti-freeze can
cause the corrosion of the aluminium components.
11. Install the radiator cap securely.
12. Start the engine and warm the engine until the thermostat
opens. (Touch the radiator hose with your hand to check
that warm water is flowing.)
13. After the thermostat opens, race the engine several times,
and then stop the engine.
14. Cool down the engine, and then pour engine coolant into
the reserve tank until the level reaches the FULL line. If
the level is low, repeat the operation from step 11.
CONCENTRATION MEASUREMENT
Measure the temperature and specific gravity of the engine
coolant to check the antifreeze concentration.
Standard value: 30 - 60 % (allowable concentration range)
RECOMMENDED ANTI-FREEZE
AntifreezeAllowable concentration
MITSUBISHI GENUINE COOLANT
or equivalent30 - 60 %
Caution
If the concentration of the anti-freeze is below 30 %, the
anti-corrosion property will be adversely affected. In
addition, if the concentration is above 60 %, both the
anti-freezing and engine cooling properties will decrease,
affecting the engine adversely. For these reasons, be
sure to maintain the concentration level within the
specified range.
44±5N·m
Water inlet
pipe
Page 699 of 1449
ENGINE COOLING -ThermostatENGINE COOLING -Thermostat14-11
THERMOSTAT
REMOVAL AND INSTALLATION
Pre-removal and Post-installation Operation
DEngine Coolant Draining and Supplying (Refer to P.14-6.)
DAir Duct Assembly Removal and Installation (Refer to GROUP 15 - Air Cleaner.)
DVacuum Pipe, Secondary Air Pipe Assembly Removal and Installation
(Refer to GROUP 15 - Secondary Air Supply System.)
1
2
3
10±1 N·m
Removal steps
AA""BA1. Radiator upper hose connection
2. Water outlet fitting
"AA3. Thermostat
REMOVAL SERVICE POINT
AA"RADIATOR UPPER HOSE DISCONNECTION
After making mating marks on the radiator hose and the hose
clamp,disconnect the radiator hose.
Page 701 of 1449
ENGINE COOLING -Water Pump14-13
WATER PUMP
Caution
If the vehicle is equipped with the Brembo disc brake, during maintenance, take care not to contact
the parts or tools to the caliper because the paint of caliper will be scratched.
REMOVAL AND INSTALLATION
Pre-remobal and Post-installation Operation
DEngine Coolant Draining and Supplying (Refer to P.14-6.)
DTiming Belt Removal and installation (Refer to GROUP 11A.)
1
Bolt specifications
28×22
2
23±3 N·m
14±1 N·m
Nominal diameter×Nominal length mm
8×70
8×14
8×22 8×25
3 4
22±4 N·m
Removal steps
1. Alternator brace
2. Water pump
3. Water pump Gasket
"AA4. O-ring
INSTALLATION SERVICE POINT
"AAO-RING INSTALLATION
Fit an O-ring into the O-ring groove located at the end of
the water inlet pipe and apply water to the O-ring or the
inside of the mounting surface of the water pump for insertion.
CAUTION
Do not let the O-ring get contaminated with grease, such
as engine oil.Water pump
O-ring
Water inlet pipe