Page 2565 of 3061
RFD-8
< SERVICE INFORMATION >
DIFFERENTIAL GEAR OIL
DIFFERENTIAL GEAR OIL
Changing Differential Gear OilINFOID:0000000003532601
DRAINING
1. Stop the engine.
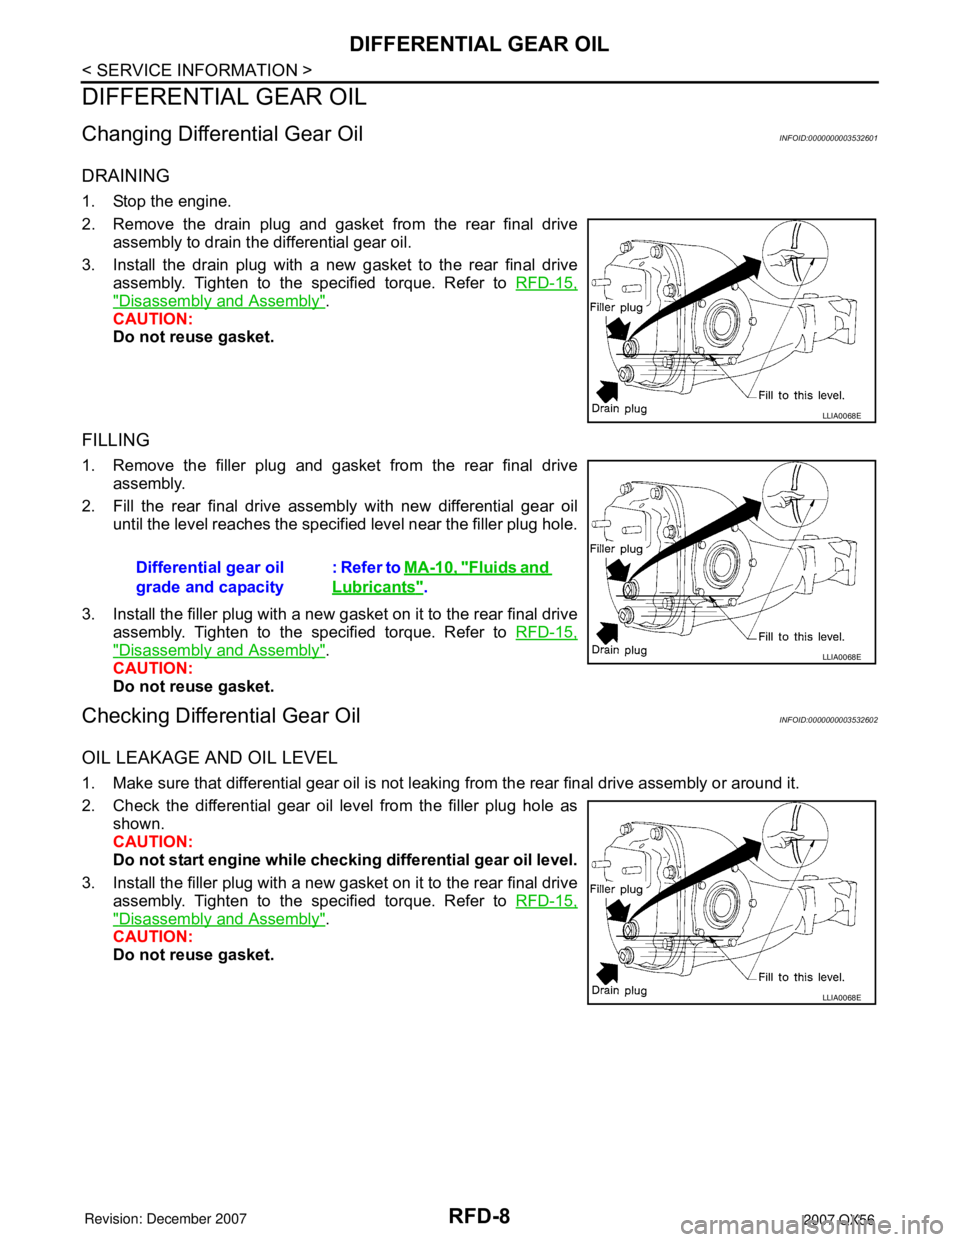
2. Remove the drain plug and gasket from the rear final drive
assembly to drain the differential gear oil.
3. Install the drain plug with a new gasket to the rear final drive
assembly. Tighten to the specified torque. Refer to RFD-15,
"Disassembly and Assembly".
CAUTION:
Do not reuse gasket.
FILLING
1. Remove the filler plug and gasket from the rear final drive
assembly.
2. Fill the rear final drive assembly with new differential gear oil
until the level reaches the specified level near the filler plug hole.
3. Install the filler plug with a new gasket on it to the rear final drive
assembly. Tighten to the specified torque. Refer to RFD-15,
"Disassembly and Assembly".
CAUTION:
Do not reuse gasket.
Checking Differential Gear OilINFOID:0000000003532602
OIL LEAKAGE AND OIL LEVEL
1. Make sure that differential gear oil is not leaking from the rear final drive assembly or around it.
2. Check the differential gear oil level from the filler plug hole as
shown.
CAUTION:
Do not start engine while checking differential gear oil level.
3. Install the filler plug with a new gasket on it to the rear final drive
assembly. Tighten to the specified torque. Refer to RFD-15,
"Disassembly and Assembly".
CAUTION:
Do not reuse gasket.
LLIA0068E
Differential gear oil
grade and capacity: Refer to MA-10, "Fluids and
Lubricants".
LLIA0068E
LLIA0068E
Page 2566 of 3061
FRONT OIL SEAL
RFD-9
< SERVICE INFORMATION >
C
E
F
G
H
I
J
K
L
MA
B
RFD
N
O
P
FRONT OIL SEAL
Removal and InstallationINFOID:0000000003532603
REMOVAL
1. Remove the drive shafts from the rear final drive assembly. Refer to RAX-7, "Removal and Installation".
2. Remove the side flanges and side oil seals. Refer to RFD-11, "
Removal and Installation".
3. Remove the rear propeller shaft. Refer to PR-8, "
Removal and Installation".
4. Measure the total preload torque. Refer to RFD-15, "
Disassembly and Assembly".
NOTE:
Record the total preload torque measurement.
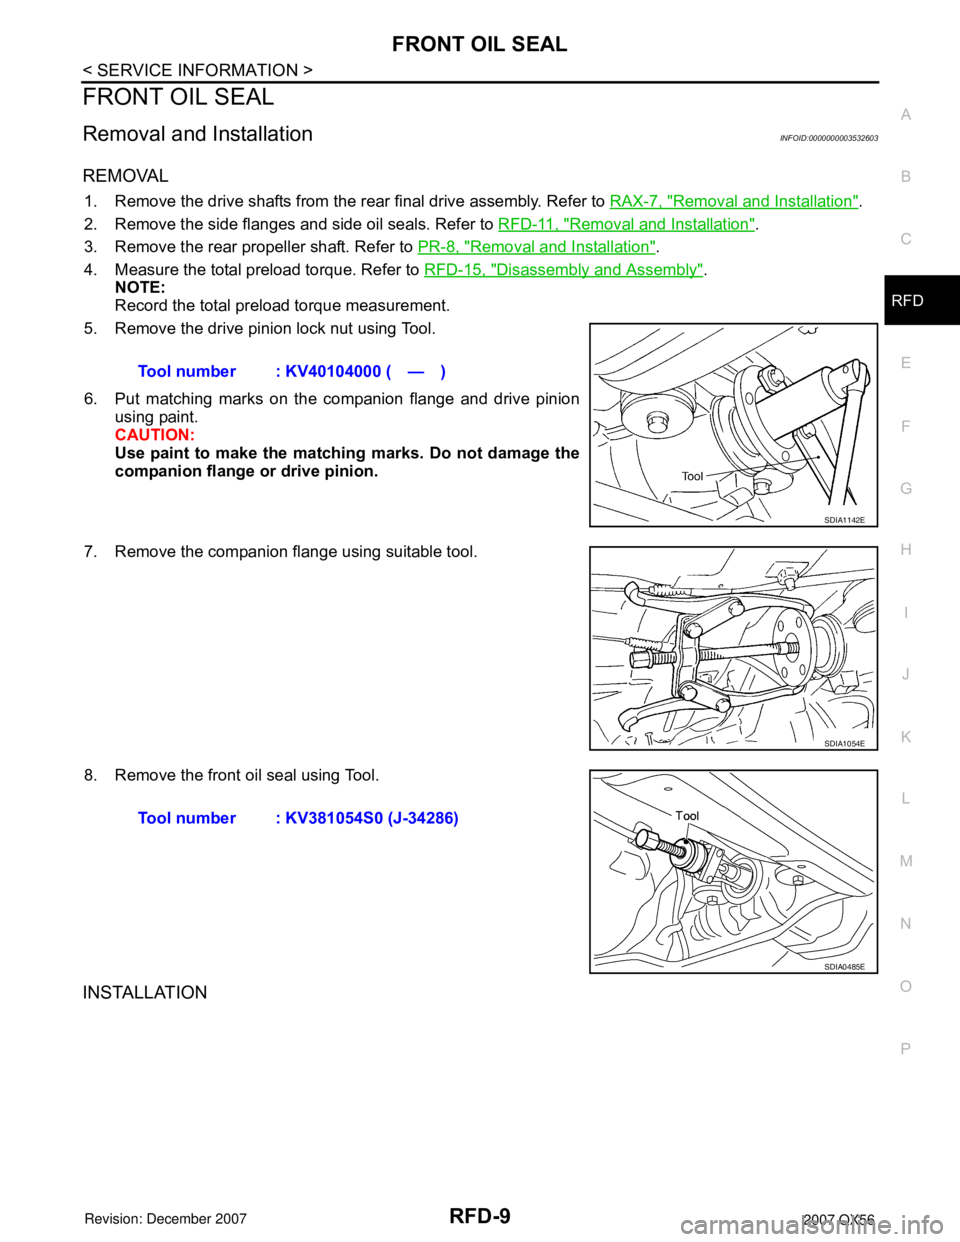
5. Remove the drive pinion lock nut using Tool.
6. Put matching marks on the companion flange and drive pinion
using paint.
CAUTION:
Use paint to make the matching marks. Do not damage the
companion flange or drive pinion.
7. Remove the companion flange using suitable tool.
8. Remove the front oil seal using Tool.
INSTALLATION
Tool number : KV40104000 ( — )
SDIA1142E
SDIA1054E
Tool number : KV381054S0 (J-34286)
SDIA0485E
Page 2567 of 3061
RFD-10
< SERVICE INFORMATION >
FRONT OIL SEAL
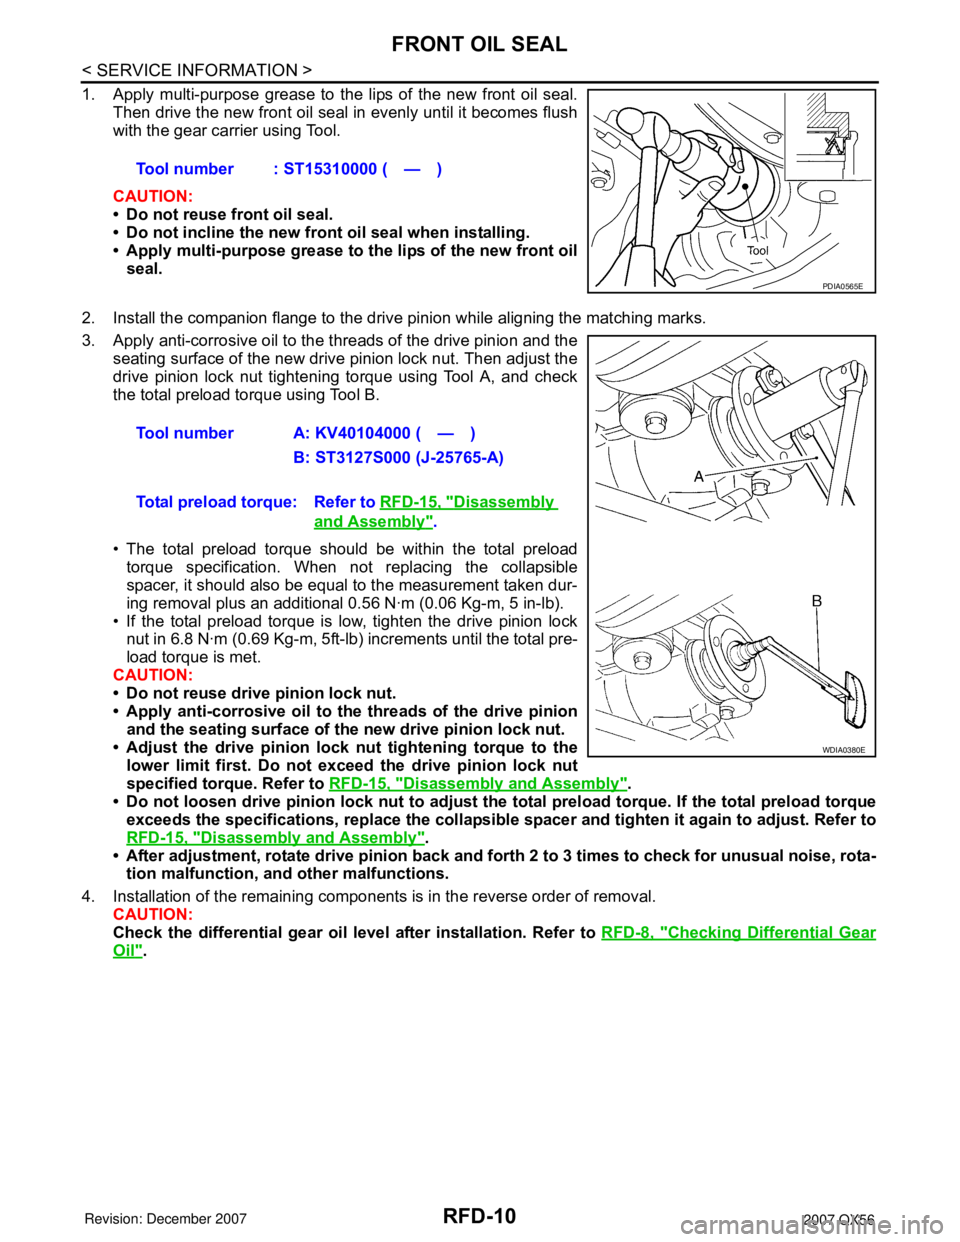
1. Apply multi-purpose grease to the lips of the new front oil seal.
Then drive the new front oil seal in evenly until it becomes flush
with the gear carrier using Tool.
CAUTION:
• Do not reuse front oil seal.
• Do not incline the new front oil seal when installing.
• Apply multi-purpose grease to the lips of the new front oil
seal.
2. Install the companion flange to the drive pinion while aligning the matching marks.
3. Apply anti-corrosive oil to the threads of the drive pinion and the
seating surface of the new drive pinion lock nut. Then adjust the
drive pinion lock nut tightening torque using Tool A, and check
the total preload torque using Tool B.
• The total preload torque should be within the total preload
torque specification. When not replacing the collapsible
spacer, it should also be equal to the measurement taken dur-
ing removal plus an additional 0.56 N·m (0.06 Kg-m, 5 in-lb).
• If the total preload torque is low, tighten the drive pinion lock
nut in 6.8 N·m (0.69 Kg-m, 5ft-lb) increments until the total pre-
load torque is met.
CAUTION:
• Do not reuse drive pinion lock nut.
• Apply anti-corrosive oil to the threads of the drive pinion
and the seating surface of the new drive pinion lock nut.
• Adjust the drive pinion lock nut tightening torque to the
lower limit first. Do not exceed the drive pinion lock nut
specified torque. Refer to RFD-15, "
Disassembly and Assembly".
• Do not loosen drive pinion lock nut to adjust the total preload torque. If the total preload torque
exceeds the specifications, replace the collapsible spacer and tighten it again to adjust. Refer to
RFD-15, "
Disassembly and Assembly".
• After adjustment, rotate drive pinion back and forth 2 to 3 times to check for unusual noise, rota-
tion malfunction, and other malfunctions.
4. Installation of the remaining components is in the reverse order of removal.
CAUTION:
Check the differential gear oil level after installation. Refer to RFD-8, "
Checking Differential Gear
Oil". Tool number : ST15310000 ( — )
PDIA0565E
Tool number A: KV40104000 ( — )
B: ST3127S000 (J-25765-A)
Total preload torque: Refer to RFD-15, "
Disassembly
and Assembly".
WDIA0380E
Page 2568 of 3061
SIDE OIL SEAL
RFD-11
< SERVICE INFORMATION >
C
E
F
G
H
I
J
K
L
MA
B
RFD
N
O
P
SIDE OIL SEAL
Removal and InstallationINFOID:0000000003532604
REMOVAL
1. Remove the drive shaft from the rear final drive assembly. Refer to RAX-7, "Removal and Installation".
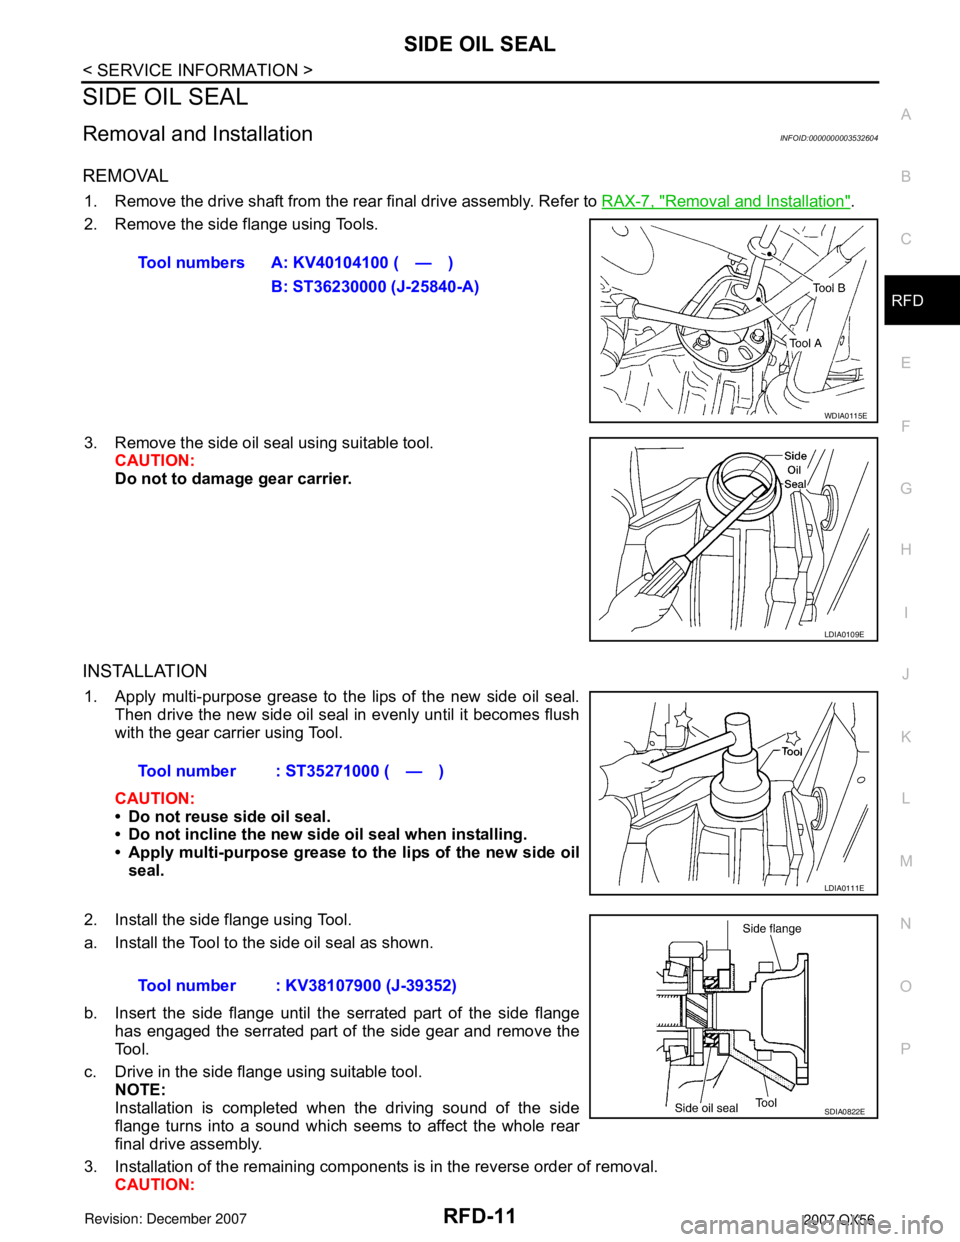
2. Remove the side flange using Tools.
3. Remove the side oil seal using suitable tool.
CAUTION:
Do not to damage gear carrier.
INSTALLATION
1. Apply multi-purpose grease to the lips of the new side oil seal.
Then drive the new side oil seal in evenly until it becomes flush
with the gear carrier using Tool.
CAUTION:
• Do not reuse side oil seal.
• Do not incline the new side oil seal when installing.
• Apply multi-purpose grease to the lips of the new side oil
seal.
2. Install the side flange using Tool.
a. Install the Tool to the side oil seal as shown.
b. Insert the side flange until the serrated part of the side flange
has engaged the serrated part of the side gear and remove the
Tool.
c. Drive in the side flange using suitable tool.
NOTE:
Installation is completed when the driving sound of the side
flange turns into a sound which seems to affect the whole rear
final drive assembly.
3. Installation of the remaining components is in the reverse order of removal.
CAUTION:Tool numbers A: KV40104100 ( — )
B: ST36230000 (J-25840-A)
WDIA0115E
LDIA0109E
Tool number : ST35271000 ( — )
LDIA0111E
Tool number : KV38107900 (J-39352)
SDIA0822E
Page 2569 of 3061
RFD-12
< SERVICE INFORMATION >
SIDE OIL SEAL
Check the differential gear oil level after installation. Refer to RFD-8, "Checking Differential Gear
Oil".
Page 2570 of 3061
CARRIER COVER
RFD-13
< SERVICE INFORMATION >
C
E
F
G
H
I
J
K
L
MA
B
RFD
N
O
P
CARRIER COVER
Removal and InstallationINFOID:0000000003532605
REMOVAL
1. Remove the rear final drive assembly. Refer to RFD-14, "Removal and Installation".
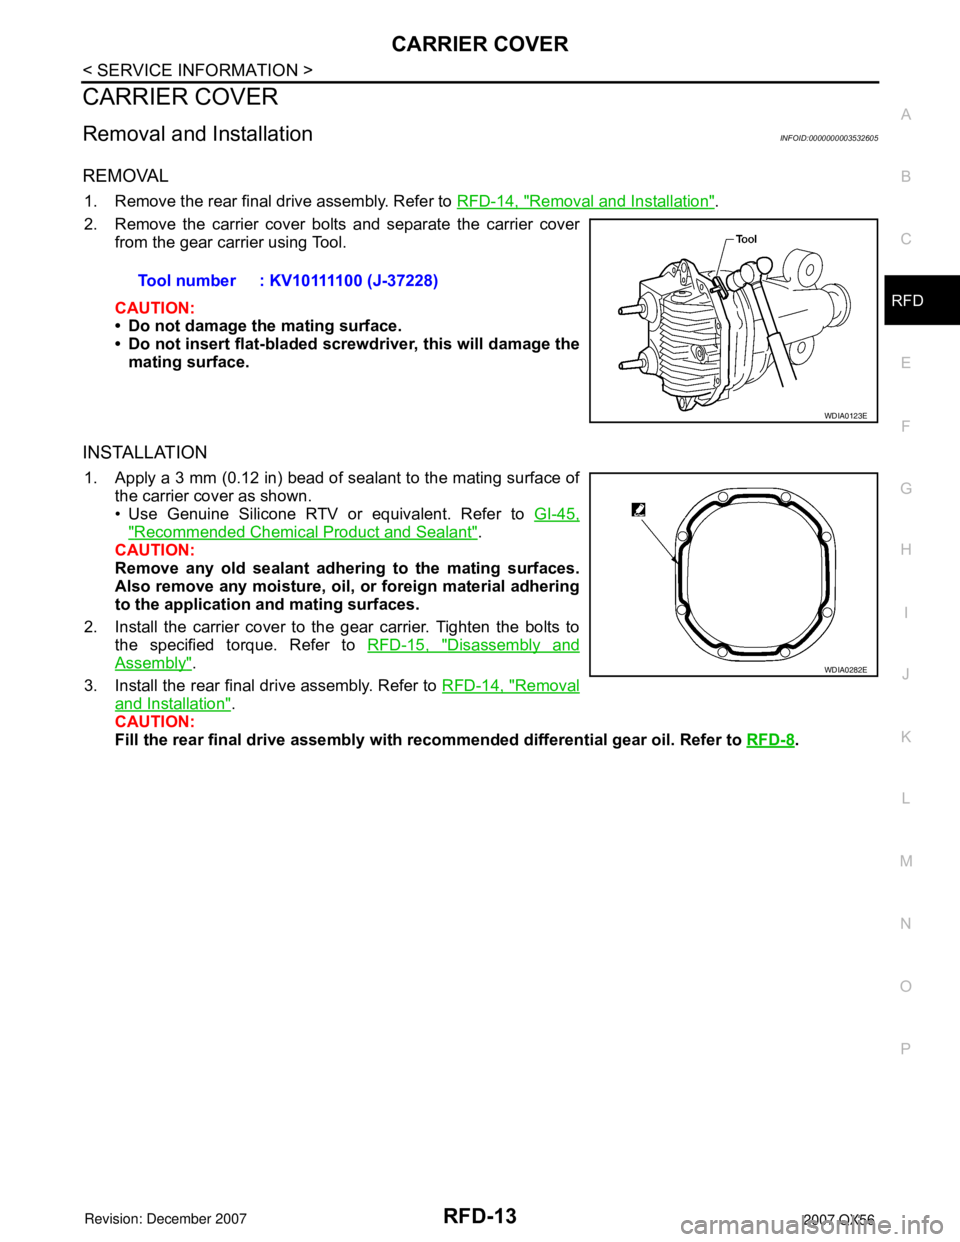
2. Remove the carrier cover bolts and separate the carrier cover
from the gear carrier using Tool.
CAUTION:
• Do not damage the mating surface.
• Do not insert flat-bladed screwdriver, this will damage the
mating surface.
INSTALLATION
1. Apply a 3 mm (0.12 in) bead of sealant to the mating surface of
the carrier cover as shown.
• Use Genuine Silicone RTV or equivalent. Refer to GI-45,
"Recommended Chemical Product and Sealant".
CAUTION:
Remove any old sealant adhering to the mating surfaces.
Also remove any moisture, oil, or foreign material adhering
to the application and mating surfaces.
2. Install the carrier cover to the gear carrier. Tighten the bolts to
the specified torque. Refer to RFD-15, "
Disassembly and
Assembly".
3. Install the rear final drive assembly. Refer to RFD-14, "
Removal
and Installation".
CAUTION:
Fill the rear final drive assembly with recommended differential gear oil. Refer to RFD-8
. Tool number : KV10111100 (J-37228)
WDIA0123E
WDIA0282E
Page 2571 of 3061
RFD-14
< SERVICE INFORMATION >
REAR FINAL DRIVE ASSEMBLY
REAR FINAL DRIVE ASSEMBLY
Removal and InstallationINFOID:0000000003532606
REMOVAL
1. Remove the spare tire.
2. Drain the differential gear oil. Refer to FFD-7
.
3. Remove the rear stabilizer bar. Refer to RSU-21, "
Component".
4. Remove the rear propeller shaft. Refer to PR-8, "
Removal and Installation".
5. Remove the rear drive shafts from the rear final drive assembly
and support them using suitable wire. Refer to RAX-7, "
Removal
and Installation".
6. Disconnect the breather hose from the rear final drive assembly.
1. Breather hose 2. Rear final drive assembly 3. Rear propeller shaft
4. Washer 5. Lower stopper 6. Rear drive shaft
7. Rear final drive assembly 8. Upper stopper⇐Vehicle front
WDIA0375E
LDIA0164E
Page 2572 of 3061
REAR FINAL DRIVE ASSEMBLY
RFD-15
< SERVICE INFORMATION >
C
E
F
G
H
I
J
K
L
MA
B
RFD
N
O
P
7. Place a suitable jack under the rear final drive assembly.
CAUTION:
Do not place the jack on the carrier cover.
8. Remove the nuts and bolts and remove the rear final drive
assembly.
CAUTION:
Secure rear final drive assembly to the jack while removing
it.
INSTALLATION
Installation is in the reverse order of removal.
CAUTION:
• When installing the breather hose make sure the painted marking on the metal end of breather hose
is to the front of the vehicle and there are no pinched or restricted areas on the breather hose
caused by folding or bending when installing it.
• When installing the breather hose insert the plastic end of the breather hose into the hole in the sus-
pension member.
• Fill the rear final drive assembly with differential gear oil after installation. Refer to RFD-8
.
Disassembly and AssemblyINFOID:0000000003532607
COMPONENTS
WDIA0117E