2007 INFINITI QX56 oil
[x] Cancel search: oilPage 2573 of 3061
RFD-16
< SERVICE INFORMATION >
REAR FINAL DRIVE ASSEMBLY
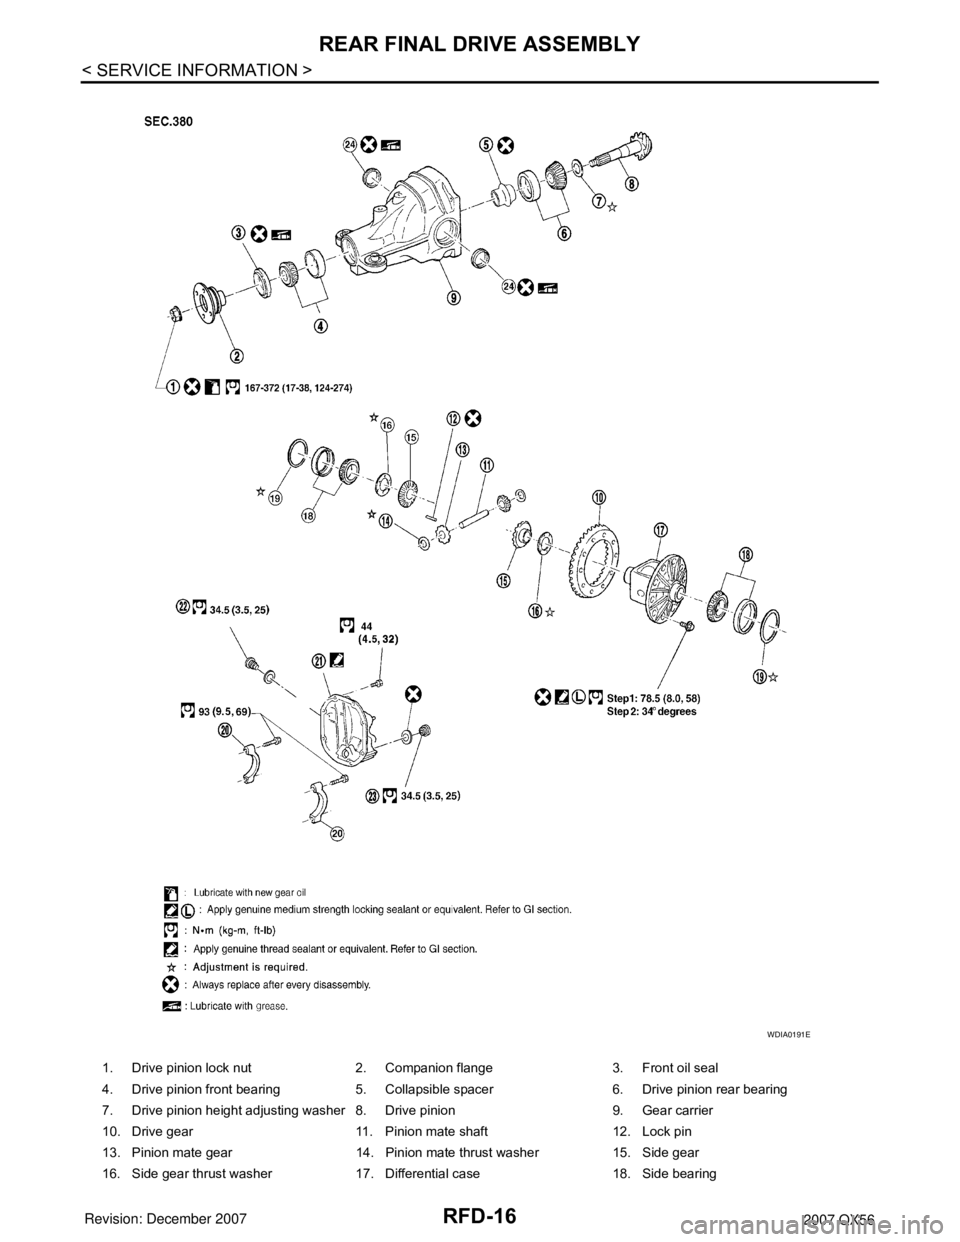
1. Drive pinion lock nut 2. Companion flange 3. Front oil seal
4. Drive pinion front bearing 5. Collapsible spacer 6. Drive pinion rear bearing
7. Drive pinion height adjusting washer 8. Drive pinion 9. Gear carrier
10. Drive gear 11. Pinion mate shaft 12. Lock pin
13. Pinion mate gear 14. Pinion mate thrust washer 15. Side gear
16. Side gear thrust washer 17. Differential case 18. Side bearing
WDIA0191E
Page 2574 of 3061

REAR FINAL DRIVE ASSEMBLY
RFD-17
< SERVICE INFORMATION >
C
E
F
G
H
I
J
K
L
MA
B
RFD
N
O
P
ASSEMBLY INSPECTION AND ADJUSTMENT
• Drain the differential gear oil before inspection and adjustment. Refer to RFD-8.
• Remove and install the carrier cover as necessary for inspection and adjustment. Refer to RFD-13
.
Total Preload Torque
1. Remove the side flanges if necessary.
CAUTION:
The side flanges shaft must removed in order to measure total preload torque.
2. Rotate the drive pinion back and forth 2 to 3 times to check for unusual noise and rotation malfunction.
3. Rotate the drive pinion at least 20 times to check for smooth operation of the bearings.
4. Measure the total preload torque using Tool.
NOTE:
Total preload torque = Drive pinion bearing preload torque +
Side bearing preload torque
• If the measured value is out of the specification, check and adjust each part. Adjust the drive pinion
bearing preload torque first, then adjust the side bearing preload torque.
CAUTION:
Select a side bearing adjusting washer for right and left individually.
Drive Gear Runout
1. Fit a dial indicator to the drive gear back face.
2. Rotate the drive gear to measure runout.
• If the runout is outside of the limit, check the condition of the drive
gear assembly. Foreign material may be caught between the drive
gear and differential case, or the differential case or drive gear may
be deformed.
CAUTION:
Replace drive gear and drive pinion as a set.
Tooth Contact
19. Side bearing adjusting washer 20. Bearing cap 21. Carrier cover
22. Filler plug 23. Drain plug 24. Side oil seal
Tool number : ST3127S000 (J-25765-A)
Total preload torque:
2.05 - 4.11 N·m (0.21 - 0.42 kg-m, 19 - 36 in-lb)
SPD884
If the total preload torque is greater than specification
On drive pinion bearings: Replace the collapsible spacer.
On side bearings: Use thinner side bearing adjusting washers by the same
amount on each side. Refer to RFD-32, "
Inspection and Adjust-
ment".
If the total preload torque is less than specification
On drive pinion bearings: Tighten the drive pinion lock nut.
On side bearings: Use thicker side bearing adjusting washers by the same
amount on each side. Refer to RFD-32, "
Inspection and Adjust-
ment".
Runout limit : 0.05 mm (0.0020 in) or less
SPD886
Page 2576 of 3061
REAR FINAL DRIVE ASSEMBLY
RFD-19
< SERVICE INFORMATION >
C
E
F
G
H
I
J
K
L
MA
B
RFD
N
O
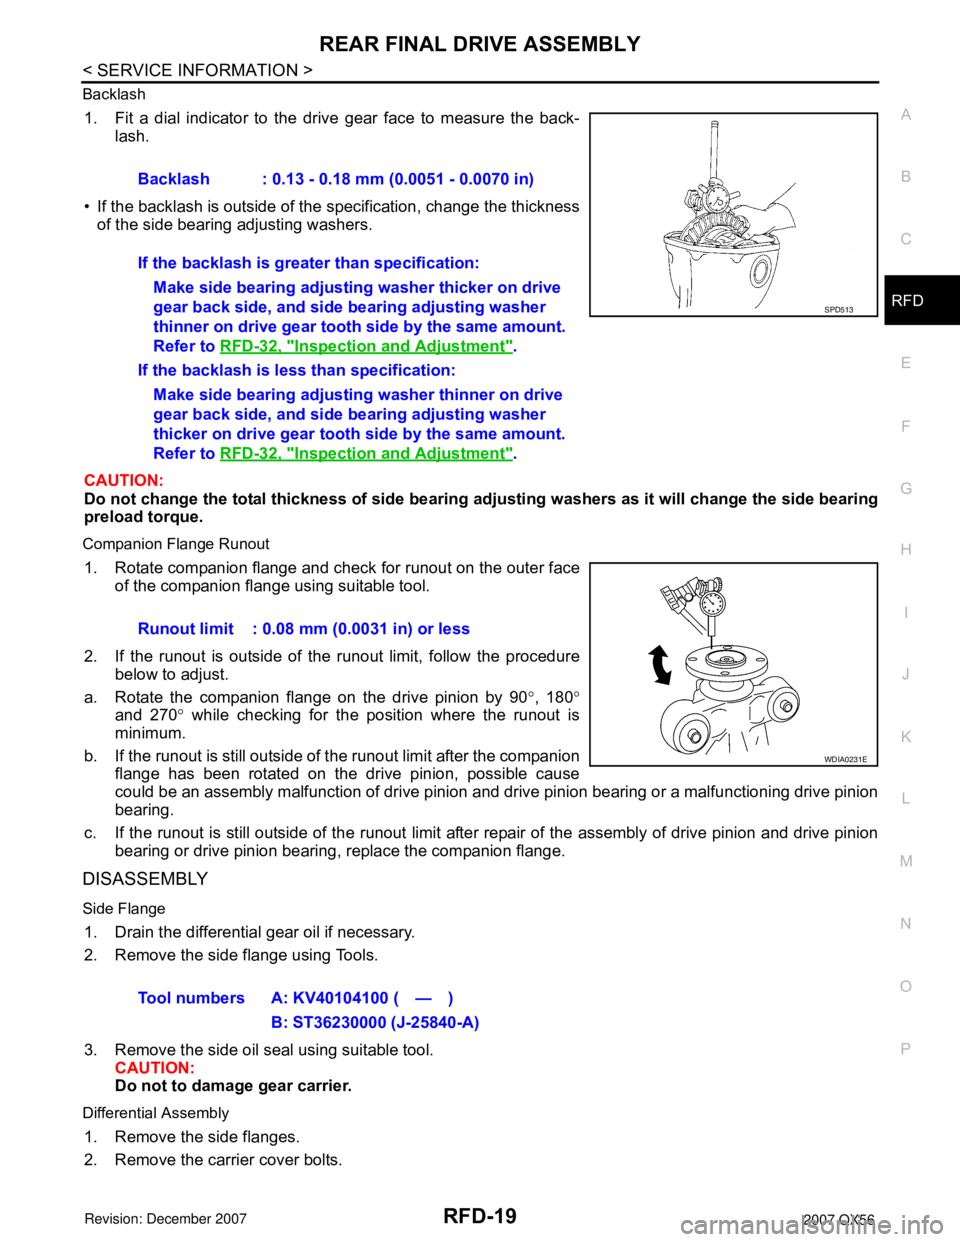
P Backlash
1. Fit a dial indicator to the drive gear face to measure the back-
lash.
• If the backlash is outside of the specification, change the thickness
of the side bearing adjusting washers.
CAUTION:
Do not change the total thickness of side bearing adjusting washers as it will change the side bearing
preload torque.
Companion Flange Runout
1. Rotate companion flange and check for runout on the outer face
of the companion flange using suitable tool.
2. If the runout is outside of the runout limit, follow the procedure
below to adjust.
a. Rotate the companion flange on the drive pinion by 90°, 180°
and 270° while checking for the position where the runout is
minimum.
b. If the runout is still outside of the runout limit after the companion
flange has been rotated on the drive pinion, possible cause
could be an assembly malfunction of drive pinion and drive pinion bearing or a malfunctioning drive pinion
bearing.
c. If the runout is still outside of the runout limit after repair of the assembly of drive pinion and drive pinion
bearing or drive pinion bearing, replace the companion flange.
DISASSEMBLY
Side Flange
1. Drain the differential gear oil if necessary.
2. Remove the side flange using Tools.
3. Remove the side oil seal using suitable tool.
CAUTION:
Do not to damage gear carrier.
Differential Assembly
1. Remove the side flanges.
2. Remove the carrier cover bolts.Backlash : 0.13 - 0.18 mm (0.0051 - 0.0070 in)
If the backlash is greater than specification:
Make side bearing adjusting washer thicker on drive
gear back side, and side bearing adjusting washer
thinner on drive gear tooth side by the same amount.
Refer to RFD-32, "
Inspection and Adjustment".
If the backlash is less than specification:
Make side bearing adjusting washer thinner on drive
gear back side, and side bearing adjusting washer
thicker on drive gear tooth side by the same amount.
Refer to RFD-32, "
Inspection and Adjustment".
SPD513
Runout limit : 0.08 mm (0.0031 in) or less
WDIA0231E
Tool numbers A: KV40104100 ( — )
B: ST36230000 (J-25840-A)
Page 2580 of 3061
REAR FINAL DRIVE ASSEMBLY
RFD-23
< SERVICE INFORMATION >
C
E
F
G
H
I
J
K
L
MA
B
RFD
N
O
P
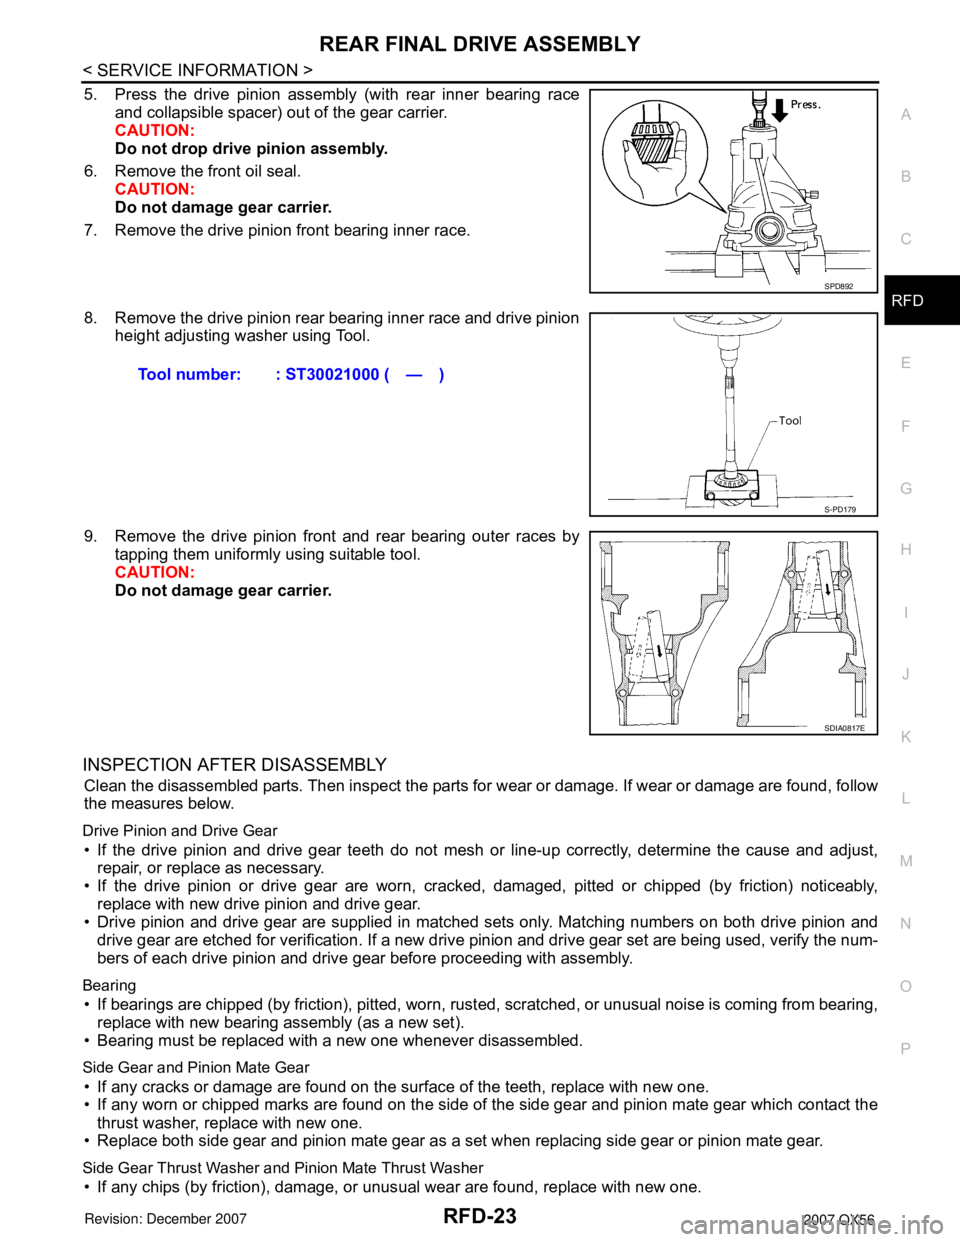
5. Press the drive pinion assembly (with rear inner bearing race
and collapsible spacer) out of the gear carrier.
CAUTION:
Do not drop drive pinion assembly.
6. Remove the front oil seal.
CAUTION:
Do not damage gear carrier.
7. Remove the drive pinion front bearing inner race.
8. Remove the drive pinion rear bearing inner race and drive pinion
height adjusting washer using Tool.
9. Remove the drive pinion front and rear bearing outer races by
tapping them uniformly using suitable tool.
CAUTION:
Do not damage gear carrier.
INSPECTION AFTER DISASSEMBLY
Clean the disassembled parts. Then inspect the parts for wear or damage. If wear or damage are found, follow
the measures below.
Drive Pinion and Drive Gear
• If the drive pinion and drive gear teeth do not mesh or line-up correctly, determine the cause and adjust,
repair, or replace as necessary.
• If the drive pinion or drive gear are worn, cracked, damaged, pitted or chipped (by friction) noticeably,
replace with new drive pinion and drive gear.
• Drive pinion and drive gear are supplied in matched sets only. Matching numbers on both drive pinion and
drive gear are etched for verification. If a new drive pinion and drive gear set are being used, verify the num-
bers of each drive pinion and drive gear before proceeding with assembly.
Bearing
• If bearings are chipped (by friction), pitted, worn, rusted, scratched, or unusual noise is coming from bearing,
replace with new bearing assembly (as a new set).
• Bearing must be replaced with a new one whenever disassembled.
Side Gear and Pinion Mate Gear
• If any cracks or damage are found on the surface of the teeth, replace with new one.
• If any worn or chipped marks are found on the side of the side gear and pinion mate gear which contact the
thrust washer, replace with new one.
• Replace both side gear and pinion mate gear as a set when replacing side gear or pinion mate gear.
Side Gear Thrust Washer and Pinion Mate Thrust Washer
• If any chips (by friction), damage, or unusual wear are found, replace with new one.
SPD892
Tool number: : ST30021000 ( — )
S-PD179
SDIA0817E
Page 2581 of 3061
RFD-24
< SERVICE INFORMATION >
REAR FINAL DRIVE ASSEMBLY
Gear Carrier
• If any wear or cracks are found on the contact sides of gear carrier, replace with new one.
Companion Flange
• If any chips (about 0.1mm, 0.004 in) or other damage on the companion flange surface which contacts the
front oil seal lips are found, replace with new one.
ADJUSTING AND SELECTING WASHERS
Side Gear Back Clearance
• Assemble the differential parts if they are disassembled.
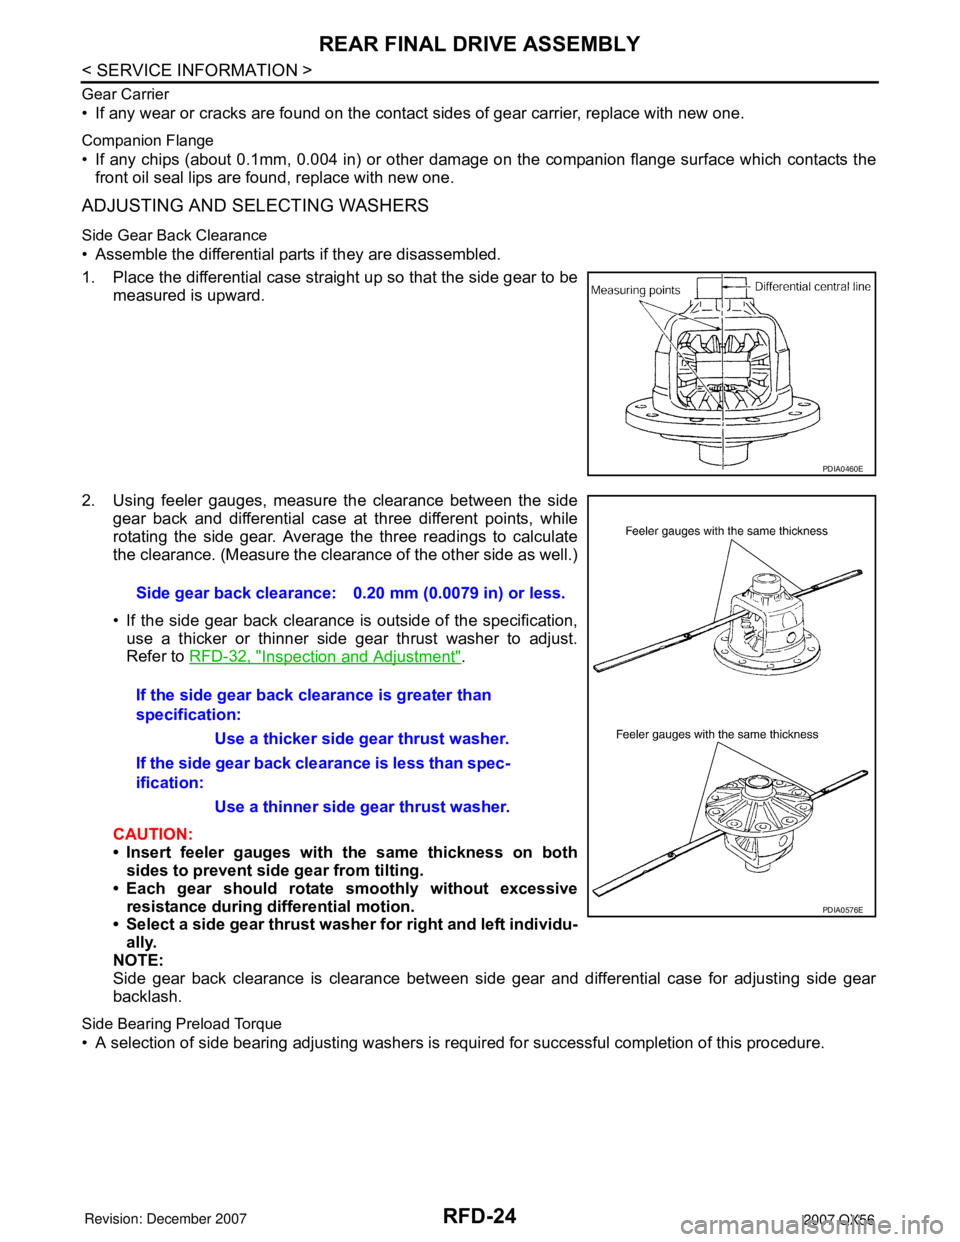
1. Place the differential case straight up so that the side gear to be
measured is upward.
2. Using feeler gauges, measure the clearance between the side
gear back and differential case at three different points, while
rotating the side gear. Average the three readings to calculate
the clearance. (Measure the clearance of the other side as well.)
• If the side gear back clearance is outside of the specification,
use a thicker or thinner side gear thrust washer to adjust.
Refer to RFD-32, "
Inspection and Adjustment".
CAUTION:
• Insert feeler gauges with the same thickness on both
sides to prevent side gear from tilting.
• Each gear should rotate smoothly without excessive
resistance during differential motion.
• Select a side gear thrust washer for right and left individu-
ally.
NOTE:
Side gear back clearance is clearance between side gear and differential case for adjusting side gear
backlash.
Side Bearing Preload Torque
• A selection of side bearing adjusting washers is required for successful completion of this procedure.
PDIA0460E
Side gear back clearance: 0.20 mm (0.0079 in) or less.
If the side gear back clearance is greater than
specification:
Use a thicker side gear thrust washer.
If the side gear back clearance is less than spec-
ification:
Use a thinner side gear thrust washer.
PDIA0576E
Page 2582 of 3061
REAR FINAL DRIVE ASSEMBLY
RFD-25
< SERVICE INFORMATION >
C
E
F
G
H
I
J
K
L
MA
B
RFD
N
O
P
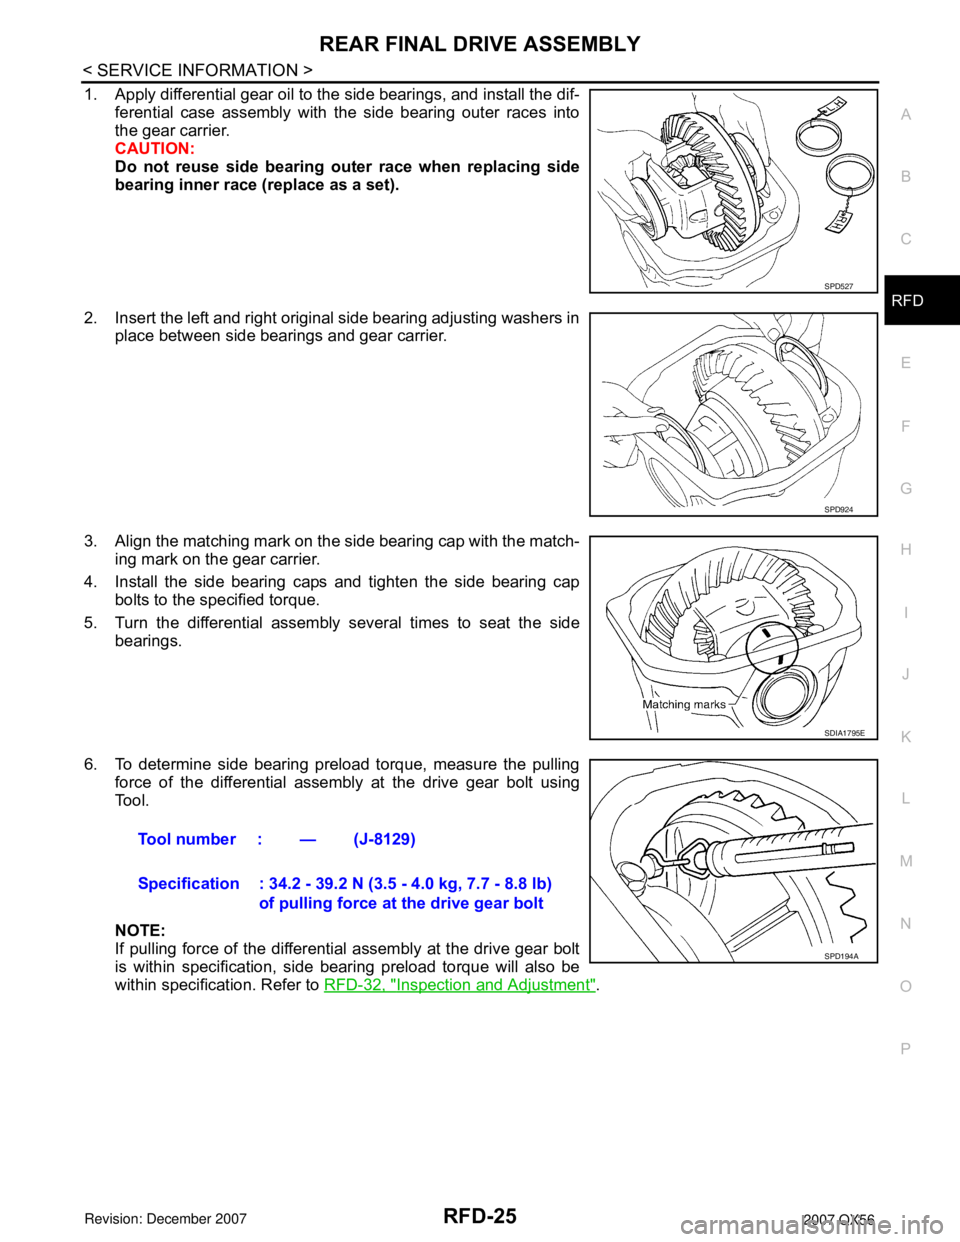
1. Apply differential gear oil to the side bearings, and install the dif-
ferential case assembly with the side bearing outer races into
the gear carrier.
CAUTION:
Do not reuse side bearing outer race when replacing side
bearing inner race (replace as a set).
2. Insert the left and right original side bearing adjusting washers in
place between side bearings and gear carrier.
3. Align the matching mark on the side bearing cap with the match-
ing mark on the gear carrier.
4. Install the side bearing caps and tighten the side bearing cap
bolts to the specified torque.
5. Turn the differential assembly several times to seat the side
bearings.
6. To determine side bearing preload torque, measure the pulling
force of the differential assembly at the drive gear bolt using
Tool.
NOTE:
If pulling force of the differential assembly at the drive gear bolt
is within specification, side bearing preload torque will also be
within specification. Refer to RFD-32, "
Inspection and Adjustment".
SPD527
SPD924
SDIA1795E
Tool number : — (J-8129)
Specification : 34.2 - 39.2 N (3.5 - 4.0 kg, 7.7 - 8.8 lb)
of pulling force at the drive gear bolt
SPD194A
Page 2584 of 3061
REAR FINAL DRIVE ASSEMBLY
RFD-27
< SERVICE INFORMATION >
C
E
F
G
H
I
J
K
L
MA
B
RFD
N
O
P
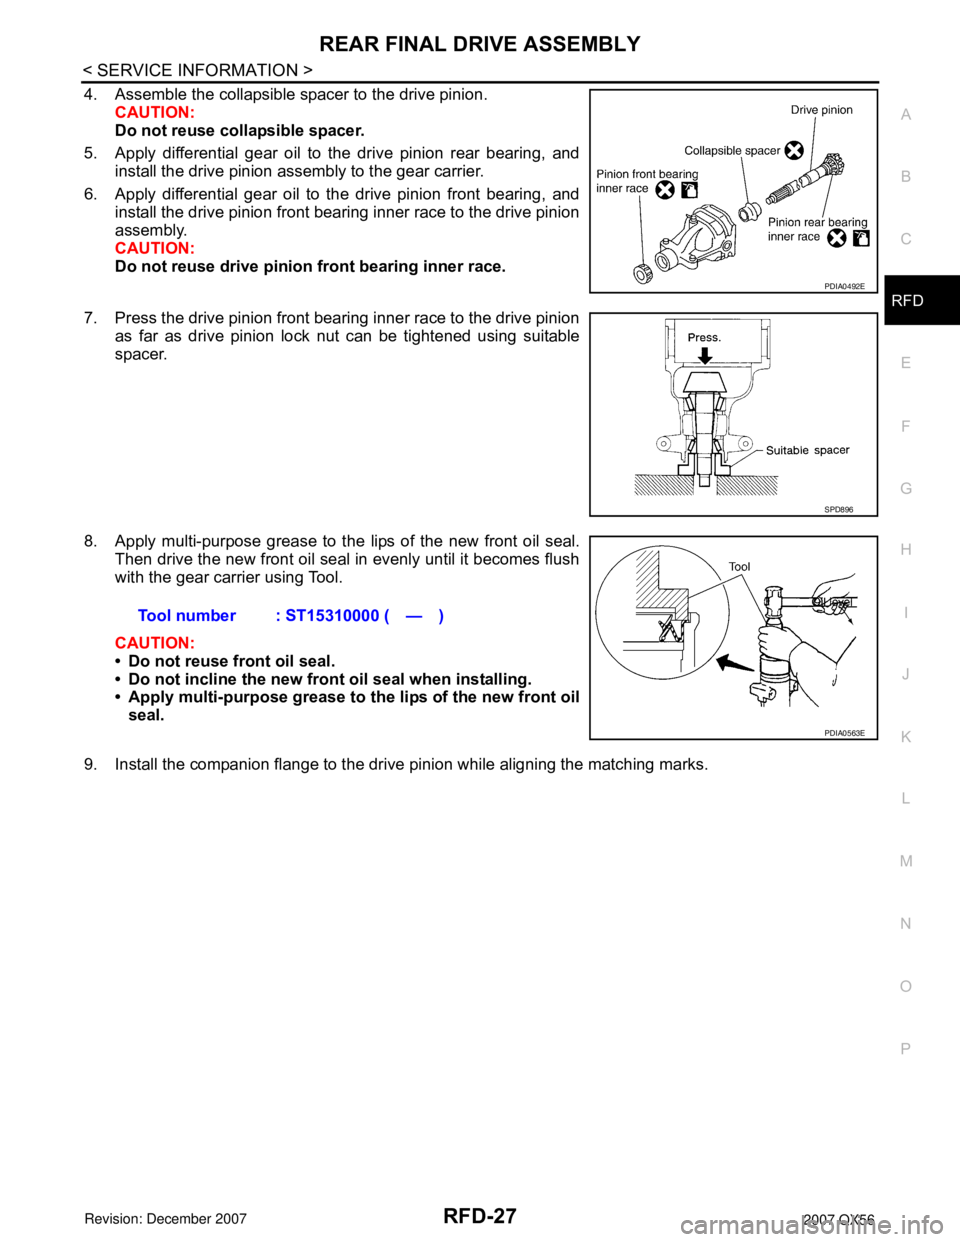
4. Assemble the collapsible spacer to the drive pinion.
CAUTION:
Do not reuse collapsible spacer.
5. Apply differential gear oil to the drive pinion rear bearing, and
install the drive pinion assembly to the gear carrier.
6. Apply differential gear oil to the drive pinion front bearing, and
install the drive pinion front bearing inner race to the drive pinion
assembly.
CAUTION:
Do not reuse drive pinion front bearing inner race.
7. Press the drive pinion front bearing inner race to the drive pinion
as far as drive pinion lock nut can be tightened using suitable
spacer.
8. Apply multi-purpose grease to the lips of the new front oil seal.
Then drive the new front oil seal in evenly until it becomes flush
with the gear carrier using Tool.
CAUTION:
• Do not reuse front oil seal.
• Do not incline the new front oil seal when installing.
• Apply multi-purpose grease to the lips of the new front oil
seal.
9. Install the companion flange to the drive pinion while aligning the matching marks.
PDIA0492E
SPD896
Tool number : ST15310000 ( — )
PDIA0563E
Page 2585 of 3061
RFD-28
< SERVICE INFORMATION >
REAR FINAL DRIVE ASSEMBLY
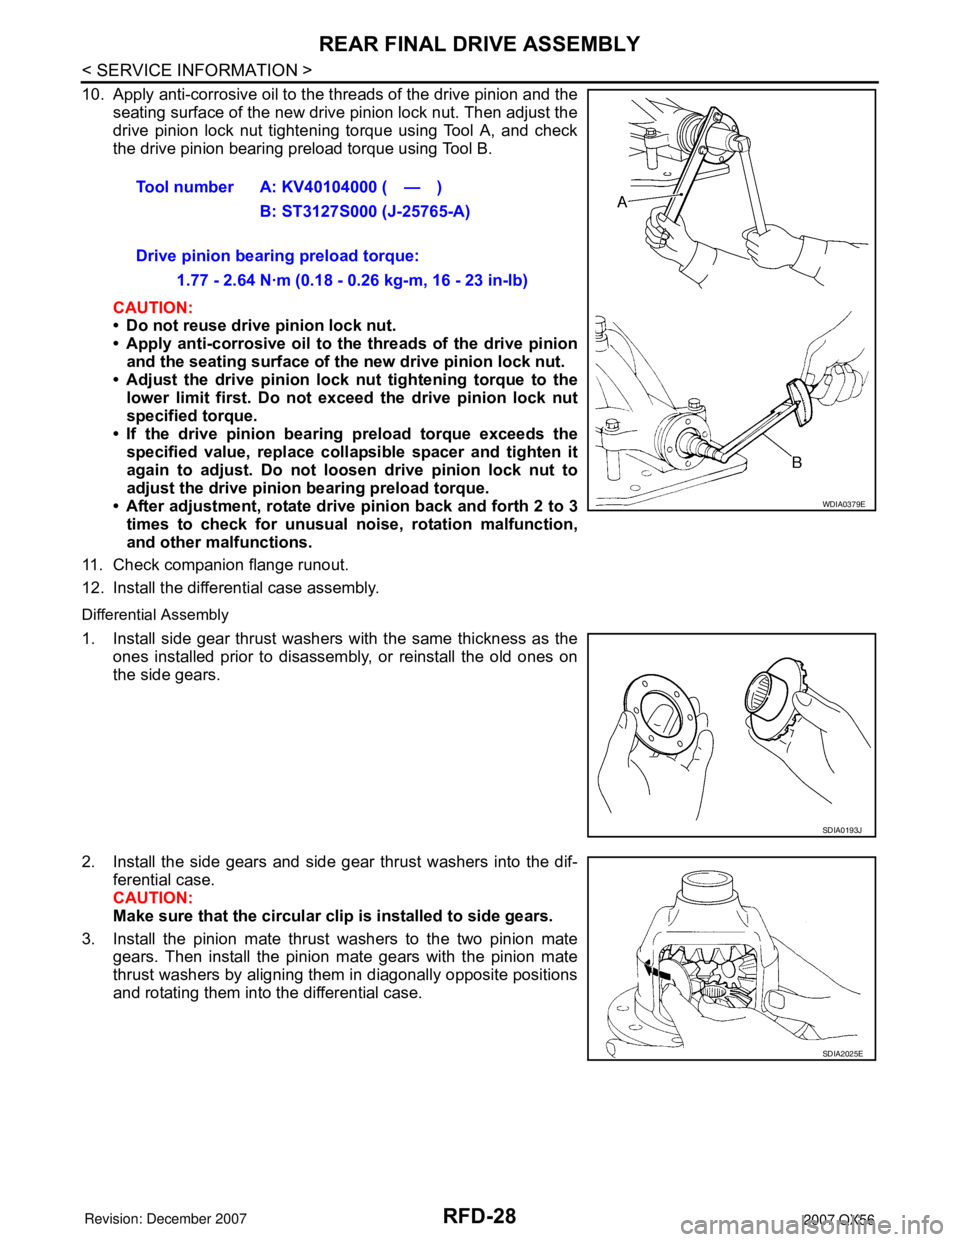
10. Apply anti-corrosive oil to the threads of the drive pinion and the
seating surface of the new drive pinion lock nut. Then adjust the
drive pinion lock nut tightening torque using Tool A, and check
the drive pinion bearing preload torque using Tool B.
CAUTION:
• Do not reuse drive pinion lock nut.
• Apply anti-corrosive oil to the threads of the drive pinion
and the seating surface of the new drive pinion lock nut.
• Adjust the drive pinion lock nut tightening torque to the
lower limit first. Do not exceed the drive pinion lock nut
specified torque.
• If the drive pinion bearing preload torque exceeds the
specified value, replace collapsible spacer and tighten it
again to adjust. Do not loosen drive pinion lock nut to
adjust the drive pinion bearing preload torque.
• After adjustment, rotate drive pinion back and forth 2 to 3
times to check for unusual noise, rotation malfunction,
and other malfunctions.
11. Check companion flange runout.
12. Install the differential case assembly.
Differential Assembly
1. Install side gear thrust washers with the same thickness as the
ones installed prior to disassembly, or reinstall the old ones on
the side gears.
2. Install the side gears and side gear thrust washers into the dif-
ferential case.
CAUTION:
Make sure that the circular clip is installed to side gears.
3. Install the pinion mate thrust washers to the two pinion mate
gears. Then install the pinion mate gears with the pinion mate
thrust washers by aligning them in diagonally opposite positions
and rotating them into the differential case.Tool number A: KV40104000 ( — )
B: ST3127S000 (J-25765-A)
Drive pinion bearing preload torque:
1.77 - 2.64 N·m (0.18 - 0.26 kg-m, 16 - 23 in-lb)
WDIA0379E
SDIA0193J
SDIA2025E