2007 INFINITI QX56 ignition
[x] Cancel search: ignitionPage 2272 of 3061
TURN SIGNAL AND HAZARD WARNING LAMPS
LT-65
< SERVICE INFORMATION >
C
D
E
F
G
H
I
J
L
MA
B
LT
N
O
P
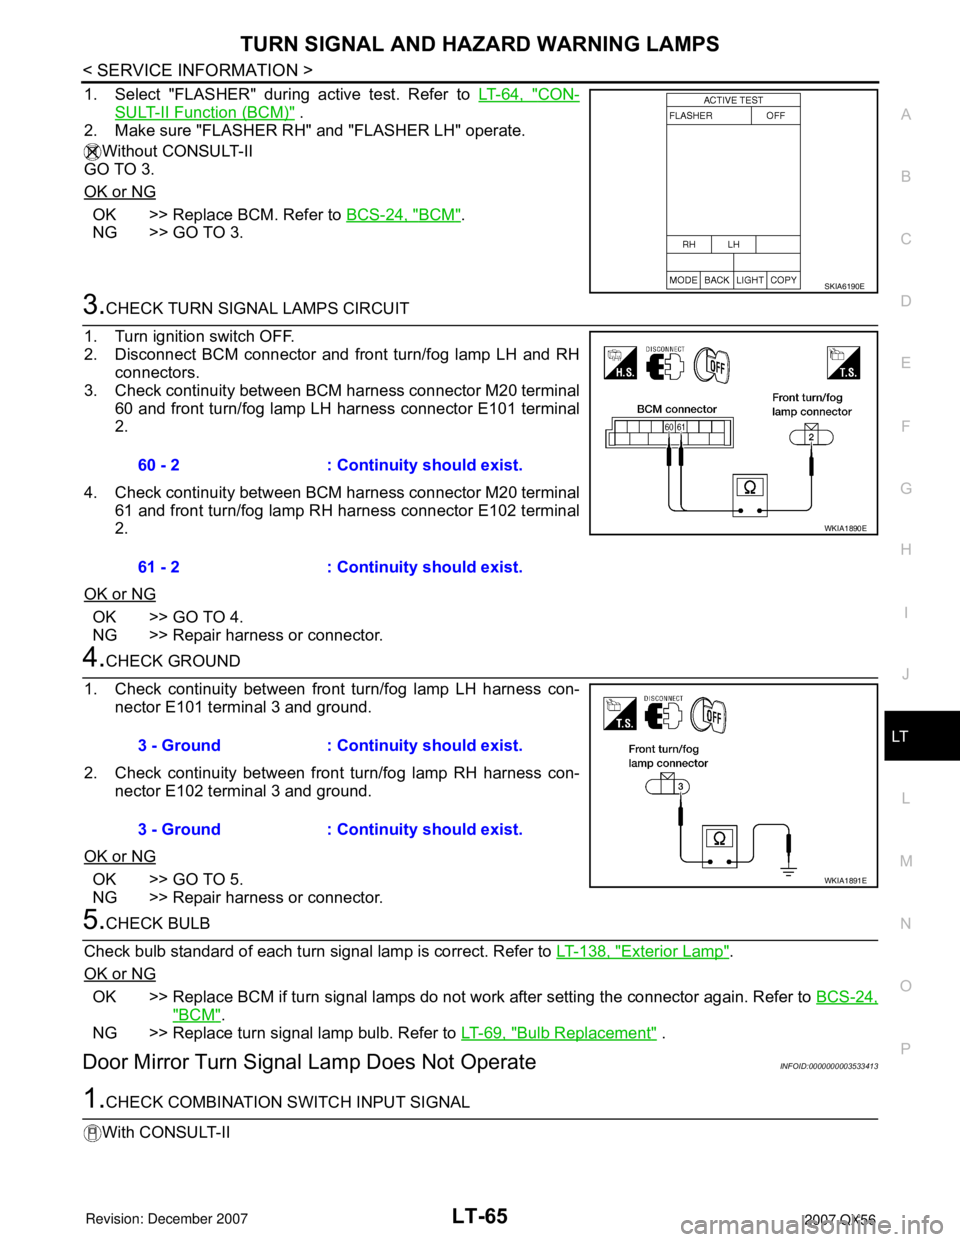
1. Select "FLASHER" during active test. Refer to LT-64, "CON-
SULT-II Function (BCM)" .
2. Make sure "FLASHER RH" and "FLASHER LH" operate.
Without CONSULT-II
GO TO 3.
OK or NG
OK >> Replace BCM. Refer to BCS-24, "BCM".
NG >> GO TO 3.
3.CHECK TURN SIGNAL LAMPS CIRCUIT
1. Turn ignition switch OFF.
2. Disconnect BCM connector and front turn/fog lamp LH and RH
connectors.
3. Check continuity between BCM harness connector M20 terminal
60 and front turn/fog lamp LH harness connector E101 terminal
2.
4. Check continuity between BCM harness connector M20 terminal
61 and front turn/fog lamp RH harness connector E102 terminal
2.
OK or NG
OK >> GO TO 4.
NG >> Repair harness or connector.
4.CHECK GROUND
1. Check continuity between front turn/fog lamp LH harness con-
nector E101 terminal 3 and ground.
2. Check continuity between front turn/fog lamp RH harness con-
nector E102 terminal 3 and ground.
OK or NG
OK >> GO TO 5.
NG >> Repair harness or connector.
5.CHECK BULB
Check bulb standard of each turn signal lamp is correct. Refer to LT-138, "
Exterior Lamp".
OK or NG
OK >> Replace BCM if turn signal lamps do not work after setting the connector again. Refer to BCS-24,
"BCM".
NG >> Replace turn signal lamp bulb. Refer to LT-69, "
Bulb Replacement" .
Door Mirror Turn Signal Lamp Does Not OperateINFOID:0000000003533413
1.CHECK COMBINATION SWITCH INPUT SIGNAL
With CONSULT-II
SKIA6190E
60 - 2 : Continuity should exist.
61 - 2 : Continuity should exist.
WKIA1890E
3 - Ground : Continuity should exist.
3 - Ground : Continuity should exist.
WKIA1891E
Page 2273 of 3061
LT-66
< SERVICE INFORMATION >
TURN SIGNAL AND HAZARD WARNING LAMPS
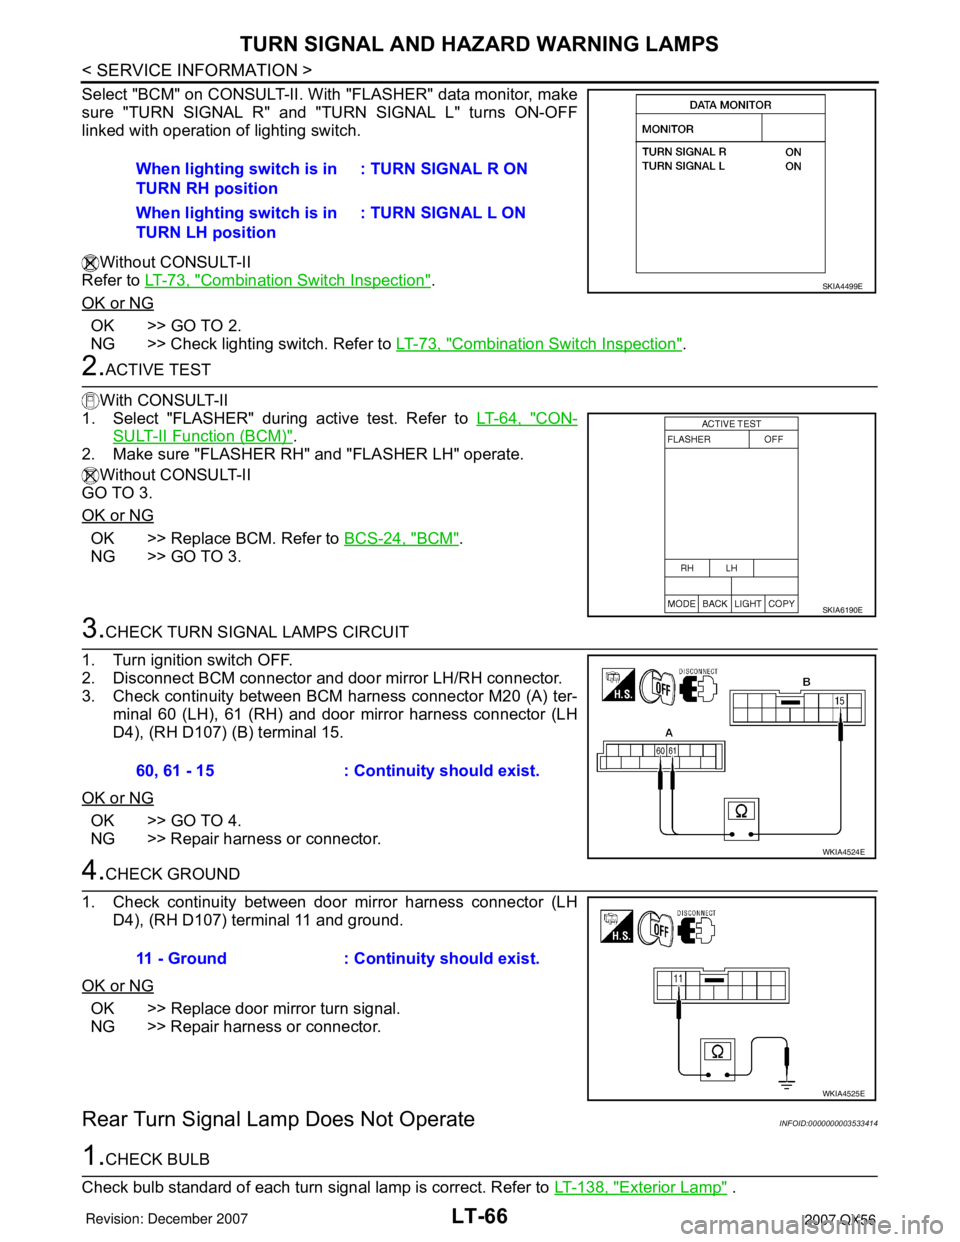
Select "BCM" on CONSULT-II. With "FLASHER" data monitor, make
sure "TURN SIGNAL R" and "TURN SIGNAL L" turns ON-OFF
linked with operation of lighting switch.
Without CONSULT-II
Refer to LT-73, "
Combination Switch Inspection".
OK or NG
OK >> GO TO 2.
NG >> Check lighting switch. Refer to LT-73, "
Combination Switch Inspection".
2.ACTIVE TEST
With CONSULT-II
1. Select "FLASHER" during active test. Refer to LT-64, "
CON-
SULT-II Function (BCM)".
2. Make sure "FLASHER RH" and "FLASHER LH" operate.
Without CONSULT-II
GO TO 3.
OK or NG
OK >> Replace BCM. Refer to BCS-24, "BCM".
NG >> GO TO 3.
3.CHECK TURN SIGNAL LAMPS CIRCUIT
1. Turn ignition switch OFF.
2. Disconnect BCM connector and door mirror LH/RH connector.
3. Check continuity between BCM harness connector M20 (A) ter-
minal 60 (LH), 61 (RH) and door mirror harness connector (LH
D4), (RH D107) (B) terminal 15.
OK or NG
OK >> GO TO 4.
NG >> Repair harness or connector.
4.CHECK GROUND
1. Check continuity between door mirror harness connector (LH
D4), (RH D107) terminal 11 and ground.
OK or NG
OK >> Replace door mirror turn signal.
NG >> Repair harness or connector.
Rear Turn Signal Lamp Does Not OperateINFOID:0000000003533414
1.CHECK BULB
Check bulb standard of each turn signal lamp is correct. Refer to LT-138, "
Exterior Lamp" . When lighting switch is in
TURN RH position: TURN SIGNAL R ON
When lighting switch is in
TURN LH position: TURN SIGNAL L ON
SKIA4499E
SKIA6190E
60, 61 - 15 : Continuity should exist.
WKIA4524E
11 - Ground : Continuity should exist.
WKIA4525E
Page 2275 of 3061
LT-68
< SERVICE INFORMATION >
TURN SIGNAL AND HAZARD WARNING LAMPS
Without CONSULT-II
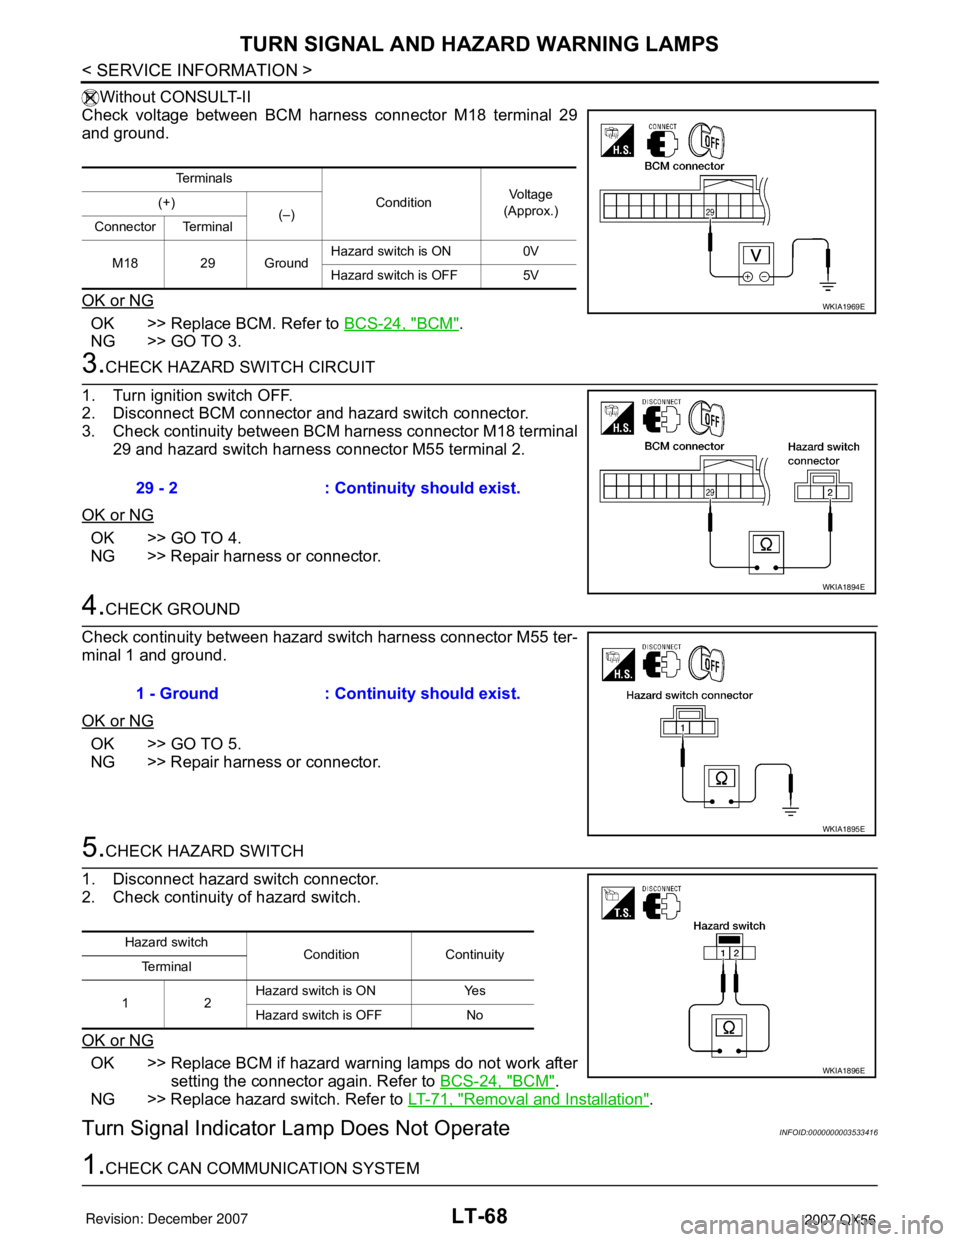
Check voltage between BCM harness connector M18 terminal 29
and ground.
OK or NG
OK >> Replace BCM. Refer to BCS-24, "BCM".
NG >> GO TO 3.
3.CHECK HAZARD SWITCH CIRCUIT
1. Turn ignition switch OFF.
2. Disconnect BCM connector and hazard switch connector.
3. Check continuity between BCM harness connector M18 terminal
29 and hazard switch harness connector M55 terminal 2.
OK or NG
OK >> GO TO 4.
NG >> Repair harness or connector.
4.CHECK GROUND
Check continuity between hazard switch harness connector M55 ter-
minal 1 and ground.
OK or NG
OK >> GO TO 5.
NG >> Repair harness or connector.
5.CHECK HAZARD SWITCH
1. Disconnect hazard switch connector.
2. Check continuity of hazard switch.
OK or NG
OK >> Replace BCM if hazard warning lamps do not work after
setting the connector again. Refer to BCS-24, "
BCM".
NG >> Replace hazard switch. Refer to LT-71, "
Removal and Installation".
Turn Signal Indicator Lamp Does Not OperateINFOID:0000000003533416
1.CHECK CAN COMMUNICATION SYSTEM
Te r m i n a l s
ConditionVoltag e
(Approx.) (+)
(–)
Connector Terminal
M18 29 GroundHazard switch is ON 0V
Hazard switch is OFF 5V
WKIA1969E
29 - 2 : Continuity should exist.
WKIA1894E
1 - Ground : Continuity should exist.
WKIA1895E
Hazard switch
Condition Continuity
Te r m i n a l
12Hazard switch is ON Yes
Hazard switch is OFF No
WKIA1896E
Page 2281 of 3061
LT-74
< SERVICE INFORMATION >
COMBINATION SWITCH
If CONSULT-II is used with no connection of CONSULT-II CONVERTER, malfunctions might be
detected in self-diagnosis depending on control unit which carries out CAN communication.
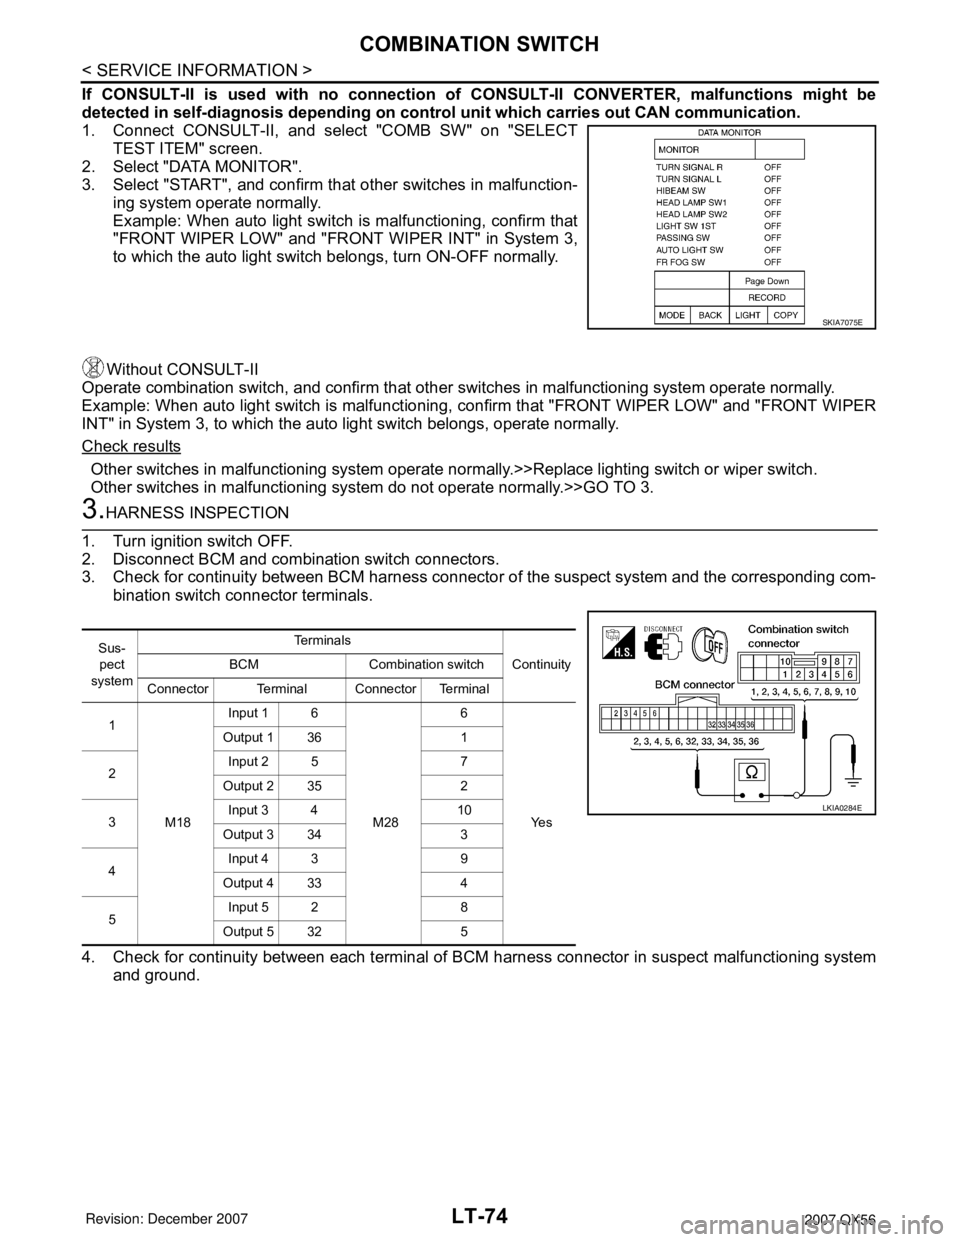
1. Connect CONSULT-II, and select "COMB SW" on "SELECT
TEST ITEM" screen.
2. Select "DATA MONITOR".
3. Select "START", and confirm that other switches in malfunction-
ing system operate normally.
Example: When auto light switch is malfunctioning, confirm that
"FRONT WIPER LOW" and "FRONT WIPER INT" in System 3,
to which the auto light switch belongs, turn ON-OFF normally.
Without CONSULT-II
Operate combination switch, and confirm that other switches in malfunctioning system operate normally.
Example: When auto light switch is malfunctioning, confirm that "FRONT WIPER LOW" and "FRONT WIPER
INT" in System 3, to which the auto light switch belongs, operate normally.
Check results
Other switches in malfunctioning system operate normally.>>Replace lighting switch or wiper switch.
Other switches in malfunctioning system do not operate normally.>>GO TO 3.
3.HARNESS INSPECTION
1. Turn ignition switch OFF.
2. Disconnect BCM and combination switch connectors.
3. Check for continuity between BCM harness connector of the suspect system and the corresponding com-
bination switch connector terminals.
4. Check for continuity between each terminal of BCM harness connector in suspect malfunctioning system
and ground.
SKIA7075E
Sus-
pect
systemTe r m i n a l s
Continuity BCM Combination switch
Connector Terminal Connector Terminal
1
M18Input 1 6
M286
Ye s Output 1 36 1
2Input 2 5 7
Output 2 35 2
3Input 3 4 10
Output 3 34 3
4Input 4 3 9
Output 4 33 4
5Input 5 2 8
Output 5 32 5
LKIA0284E
Page 2282 of 3061
COMBINATION SWITCH
LT-75
< SERVICE INFORMATION >
C
D
E
F
G
H
I
J
L
MA
B
LT
N
O
P
OK or NG
OK >> GO TO 4.
NG >> Check harness between BCM and combination switch for open or short circuit.
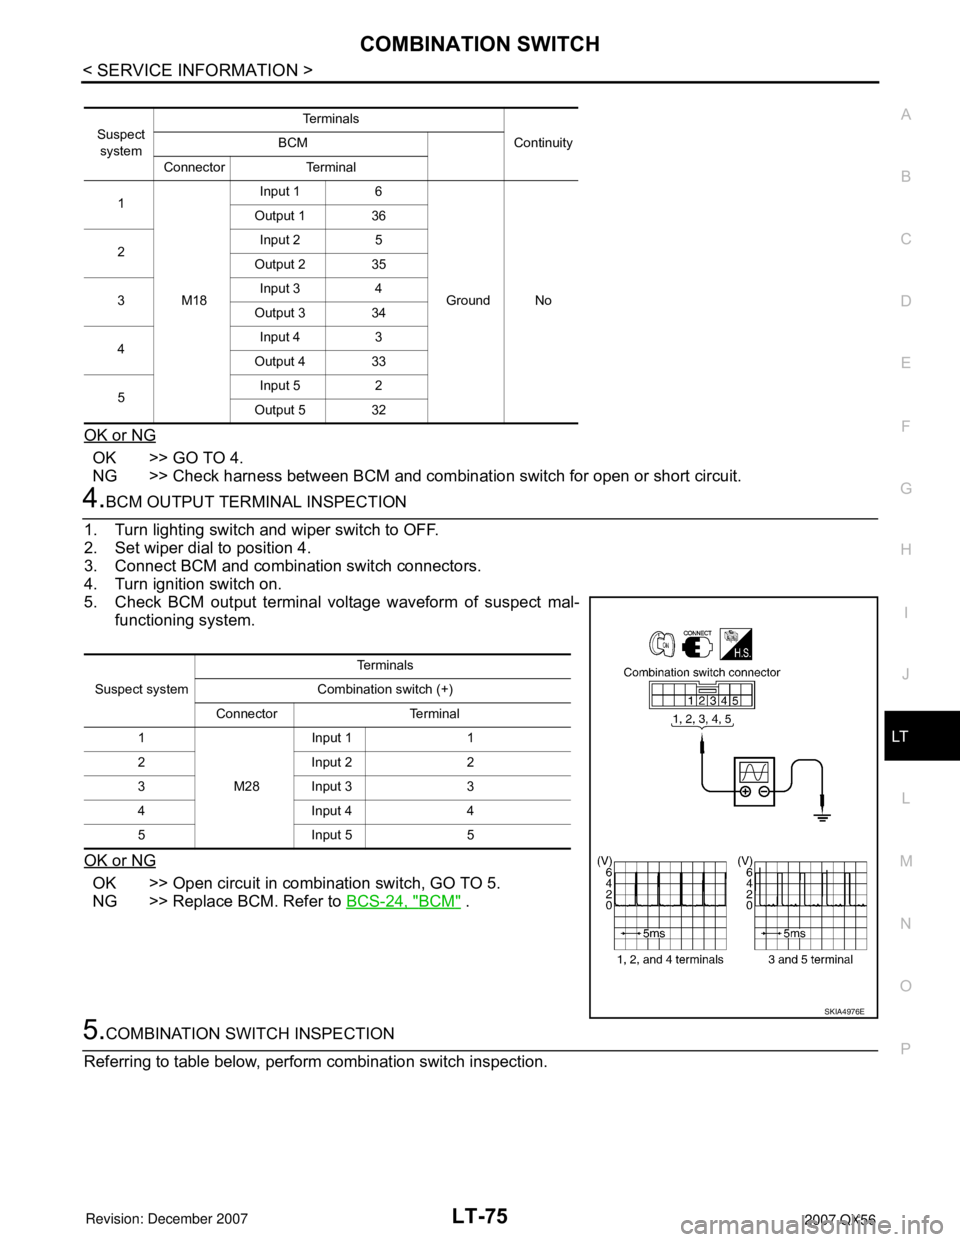
4.BCM OUTPUT TERMINAL INSPECTION
1. Turn lighting switch and wiper switch to OFF.
2. Set wiper dial to position 4.
3. Connect BCM and combination switch connectors.
4. Turn ignition switch on.
5. Check BCM output terminal voltage waveform of suspect mal-
functioning system.
OK or NG
OK >> Open circuit in combination switch, GO TO 5.
NG >> Replace BCM. Refer to BCS-24, "
BCM" .
5.COMBINATION SWITCH INSPECTION
Referring to table below, perform combination switch inspection.
Suspect
systemTe r m i n a l s
Continuity BCM
Connector Terminal
1
M18Input 1 6
Ground No Output 1 36
2Input 2 5
Output 2 35
3Input 3 4
Output 3 34
4Input 4 3
Output 4 33
5Input 5 2
Output 5 32
Suspect systemTe r m i n a l s
Combination switch (+)
Connector Terminal
1
M28Input 1 1
2 Input 2 2
3 Input 3 3
4 Input 4 4
5 Input 5 5
SKIA4976E
Page 2289 of 3061
LT-82
< SERVICE INFORMATION >
PARKING, LICENSE PLATE AND TAIL LAMPS
PARKING, LICENSE PLATE AND TAIL LAMPS
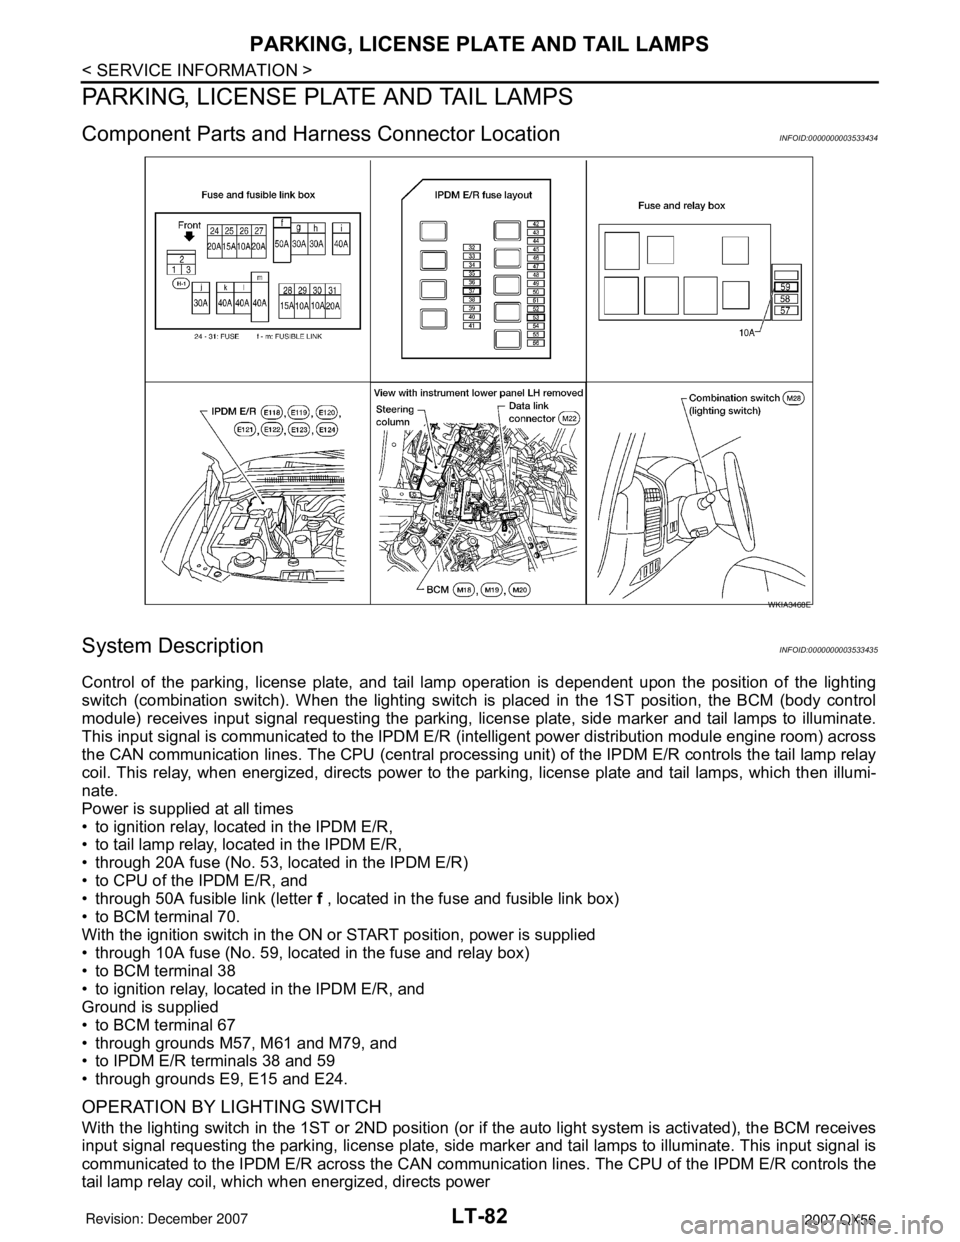
Component Parts and Harness Connector LocationINFOID:0000000003533434
System DescriptionINFOID:0000000003533435
Control of the parking, license plate, and tail lamp operation is dependent upon the position of the lighting
switch (combination switch). When the lighting switch is placed in the 1ST position, the BCM (body control
module) receives input signal requesting the parking, license plate, side marker and tail lamps to illuminate.
This input signal is communicated to the IPDM E/R (intelligent power distribution module engine room) across
the CAN communication lines. The CPU (central processing unit) of the IPDM E/R controls the tail lamp relay
coil. This relay, when energized, directs power to the parking, license plate and tail lamps, which then illumi-
nate.
Power is supplied at all times
• to ignition relay, located in the IPDM E/R,
• to tail lamp relay, located in the IPDM E/R,
• through 20A fuse (No. 53, located in the IPDM E/R)
• to CPU of the IPDM E/R, and
• through 50A fusible link (letter f , located in the fuse and fusible link box)
• to BCM terminal 70.
With the ignition switch in the ON or START position, power is supplied
• through 10A fuse (No. 59, located in the fuse and relay box)
• to BCM terminal 38
• to ignition relay, located in the IPDM E/R, and
Ground is supplied
• to BCM terminal 67
• through grounds M57, M61 and M79, and
• to IPDM E/R terminals 38 and 59
• through grounds E9, E15 and E24.
OPERATION BY LIGHTING SWITCH
With the lighting switch in the 1ST or 2ND position (or if the auto light system is activated), the BCM receives
input signal requesting the parking, license plate, side marker and tail lamps to illuminate. This input signal is
communicated to the IPDM E/R across the CAN communication lines. The CPU of the IPDM E/R controls the
tail lamp relay coil, which when energized, directs power
WKIA3468E
Page 2290 of 3061
PARKING, LICENSE PLATE AND TAIL LAMPS
LT-83
< SERVICE INFORMATION >
C
D
E
F
G
H
I
J
L
MA
B
LT
N
O
P
• through 10 A fuse (No. 37, located in the IPDM E/R)
• through IPDM E/R terminal 57
• to front combination lamp LH and RH terminal 3
• to license plate lamps terminal 1 and
• to rear combination lamp LH and RH terminal 3.
Ground is supplied
• to front combination lamp LH and RH terminal 4
• through grounds E9, E15 and E24,
• to rear combination lamp LH terminal 1
• through grounds B7 and B19,
• to rear combination lamp RH terminal 1 and
• to license plate lamps terminal 2
• through grounds B117 and B132.
With power and ground supplied, the parking, license plate and tail lamps illuminate.
COMBINATION SWITCH READING FUNCTION
Refer to BCS-3, "System Description" .
EXTERIOR LAMP BATTERY SAVER CONTROL
When the combination switch (lighting switch) is in the 1ST (or 2ND) position, and the ignition switch is turned
from ON or ACC to OFF, the battery saver control feature is activated.
Under this condition, the parking, license and tail lamps remain illuminated for 5 minutes, then the parking,
license plate and tail lamps are turned off.
Exterior lamp battery saver control mode can be changed by the function setting of CONSULT-II.
CAN Communication System DescriptionINFOID:0000000003533436
Refer to LAN-4, "CAN Communication System".
Page 2296 of 3061
PARKING, LICENSE PLATE AND TAIL LAMPS
LT-89
< SERVICE INFORMATION >
C
D
E
F
G
H
I
J
L
MA
B
LT
N
O
P
OK >> GO TO 3.
NG >> GO TO 4.
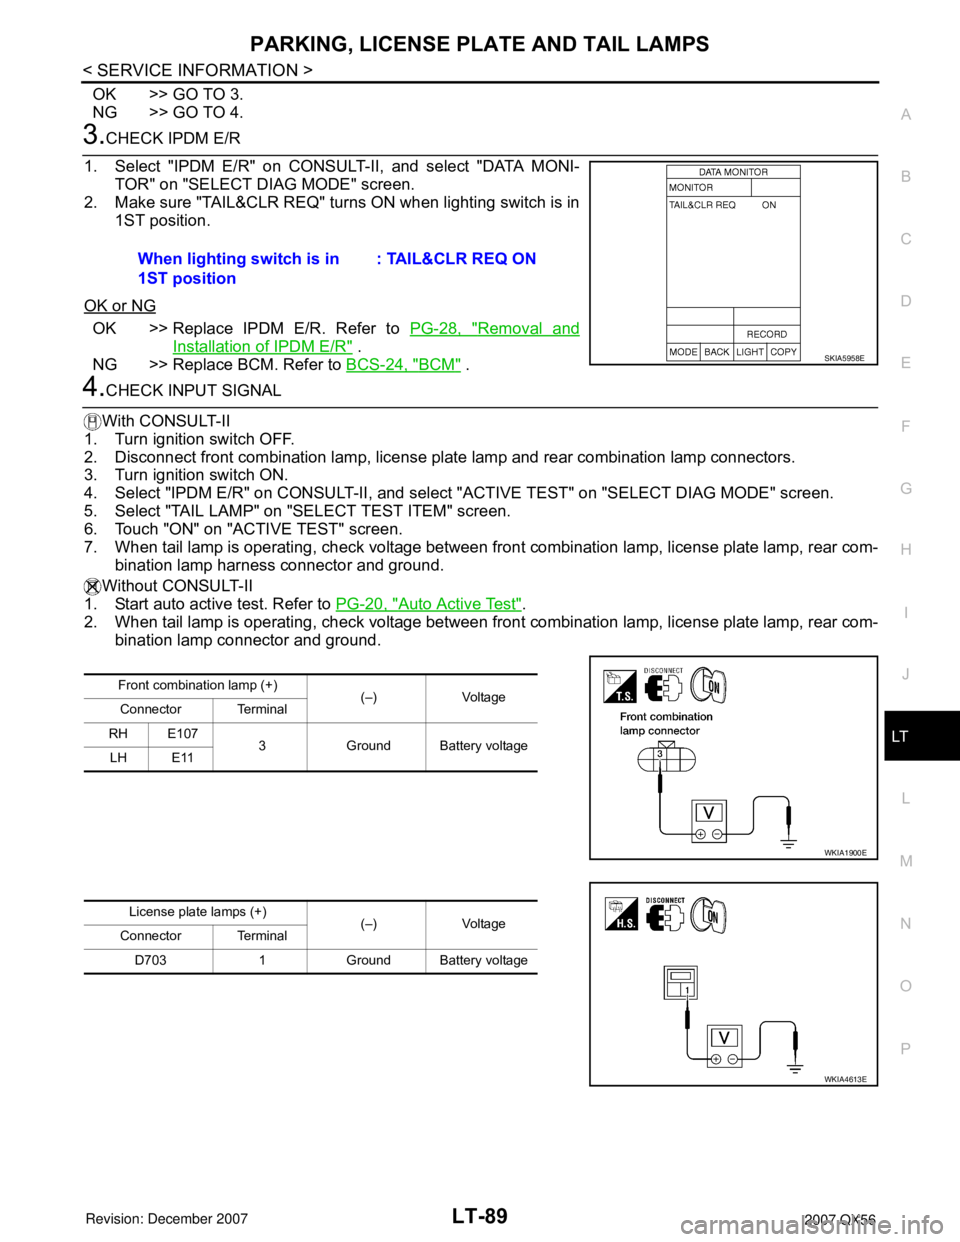
3.CHECK IPDM E/R
1. Select "IPDM E/R" on CONSULT-II, and select "DATA MONI-
TOR" on "SELECT DIAG MODE" screen.
2. Make sure "TAIL&CLR REQ" turns ON when lighting switch is in
1ST position.
OK or NG
OK >> Replace IPDM E/R. Refer to PG-28, "Removal and
Installation of IPDM E/R" .
NG >> Replace BCM. Refer to BCS-24, "
BCM" .
4.CHECK INPUT SIGNAL
With CONSULT-II
1. Turn ignition switch OFF.
2. Disconnect front combination lamp, license plate lamp and rear combination lamp connectors.
3. Turn ignition switch ON.
4. Select "IPDM E/R" on CONSULT-II, and select "ACTIVE TEST" on "SELECT DIAG MODE" screen.
5. Select "TAIL LAMP" on "SELECT TEST ITEM" screen.
6. Touch "ON" on "ACTIVE TEST" screen.
7. When tail lamp is operating, check voltage between front combination lamp, license plate lamp, rear com-
bination lamp harness connector and ground.
Without CONSULT-II
1. Start auto active test. Refer to PG-20, "
Auto Active Test".
2. When tail lamp is operating, check voltage between front combination lamp, license plate lamp, rear com-
bination lamp connector and ground.When lighting switch is in
1ST position: TAIL&CLR REQ ON
SKIA5958E
Front combination lamp (+)
(–) Voltage
Connector Terminal
RH E107
3 Ground Battery voltage
LH E11
WKIA1900E
License plate lamps (+)
(–) Voltage
Connector Terminal
D703 1 Ground Battery voltage
WKIA4613E