2006 LAND ROVER FRELANDER 2 brake
[x] Cancel search: brakePage 2741 of 3229
21
Quick start
R
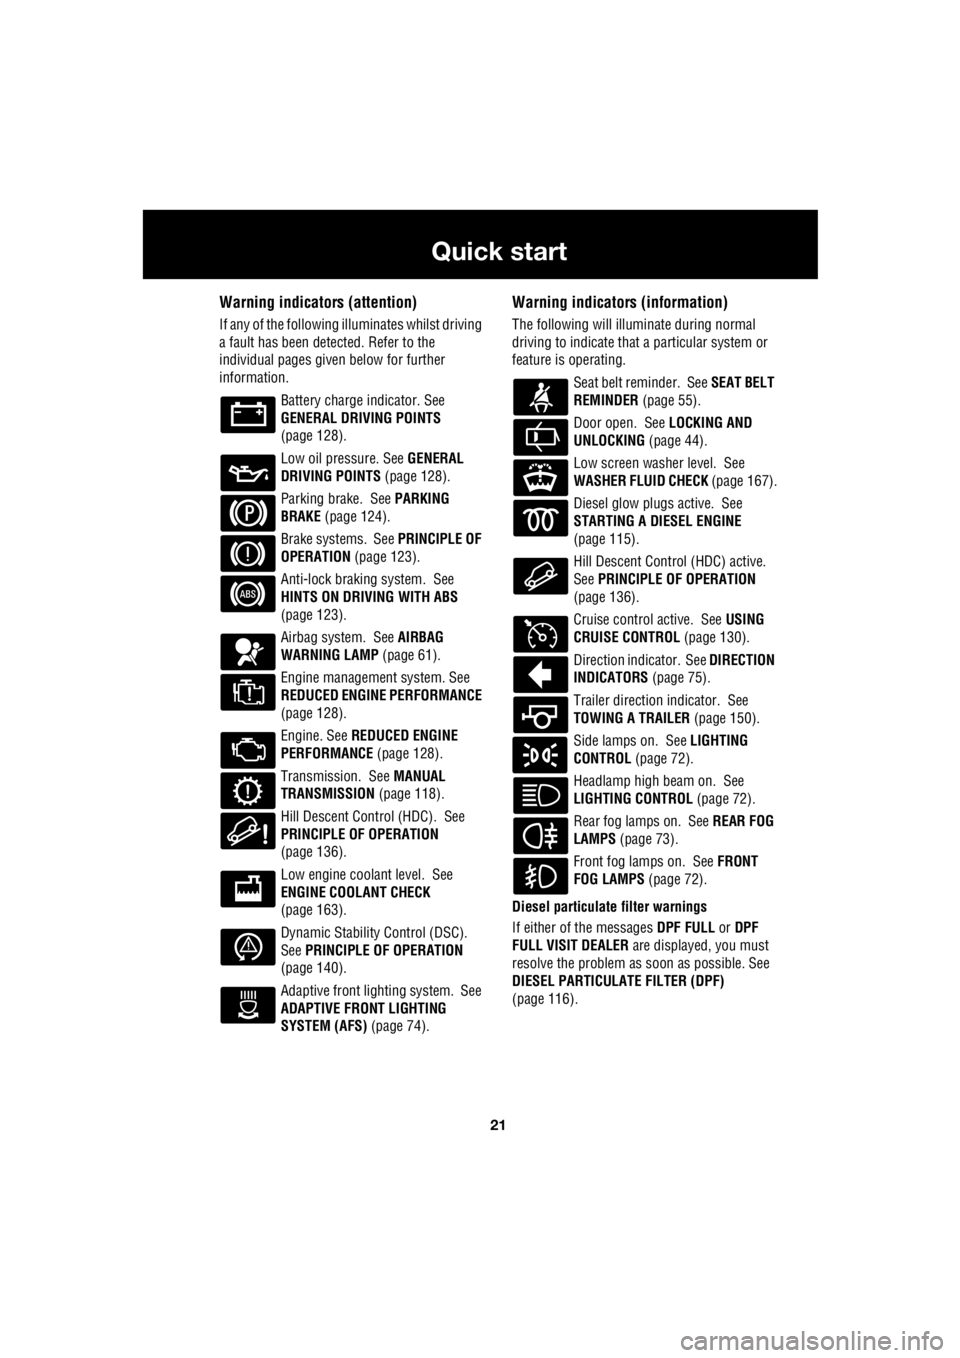
Warning indicators (attention)
If any of the following illuminates whilst driving
a fault has been detected. Refer to the
individual pages give n below for further
information.
Battery charge indicator. See
GENERAL DRIVING POINTS
(page 128).
Low oil pressure. See GENERAL
DRIVING POINTS (page 128).
Parking brake. See PARKING
BRAKE (page 124).
Brake systems. See PRINCIPLE OF
OPERATION (page 123).
Anti-lock braking system. See
HINTS ON DRIVING WITH ABS
(page 123).
Airbag system. See AIRBAG
WARNING LAMP (page 61).
Engine management system. See
REDUCED ENGINE PERFORMANCE
(page 128).
Engine. See REDUCED ENGINE
PERFORMANCE (page 128).
Transmission. See MANUAL
TRANSMISSION (page 118).
Hill Descent Control (HDC). See
PRINCIPLE OF OPERATION
(page 136).
Low engine coolant level. See
ENGINE COOLANT CHECK
(page 163).
Dynamic Stability Control (DSC).
See PRINCIPLE OF OPERATION
(page 140).
Adaptive front lighting system. See
ADAPTIVE FRONT LIGHTING
SYSTEM (AFS) (page 74).
Warning indicators (information)
The following will illuminate during normal
driving to indicate that a particular system or
feature is operating.
Seat belt reminder. See SEAT BELT
REMINDER (page 55).
Door open. See LOCKING AND
UNLOCKING (page 44).
Low screen washer level. See
WASHER FLUID CHECK (page 167).
Diesel glow plugs active. See
STARTING A DIESEL ENGINE
(page 115).
Hill Descent Control (HDC) active.
See PRINCIPLE OF OPERATION
(page 136).
Cruise control active. See USING
CRUISE CONTROL (page 130).
Direction indicator. See DIRECTION
INDICATORS (page 75).
Trailer direction indicator. See
TOWING A TRAILER (page 150).
Side lamps on. See LIGHTING
CONTROL (page 72).
Headlamp high beam on. See
LIGHTING CONTROL (page 72).
Rear fog lamps on. See REAR FOG
LAMPS (page 73).
Front fog lamps on. See FRONT
FOG LAMPS (page 72).
Diesel particulate filter warnings
If either of the messages DPF FULL or DPF
FULL VISIT DEALER are displayed, you must
resolve the problem as soon as possible. See
DIESEL PARTICULATE FILTER (DPF)
(page 116).
Page 2743 of 3229
23
Quick start
R
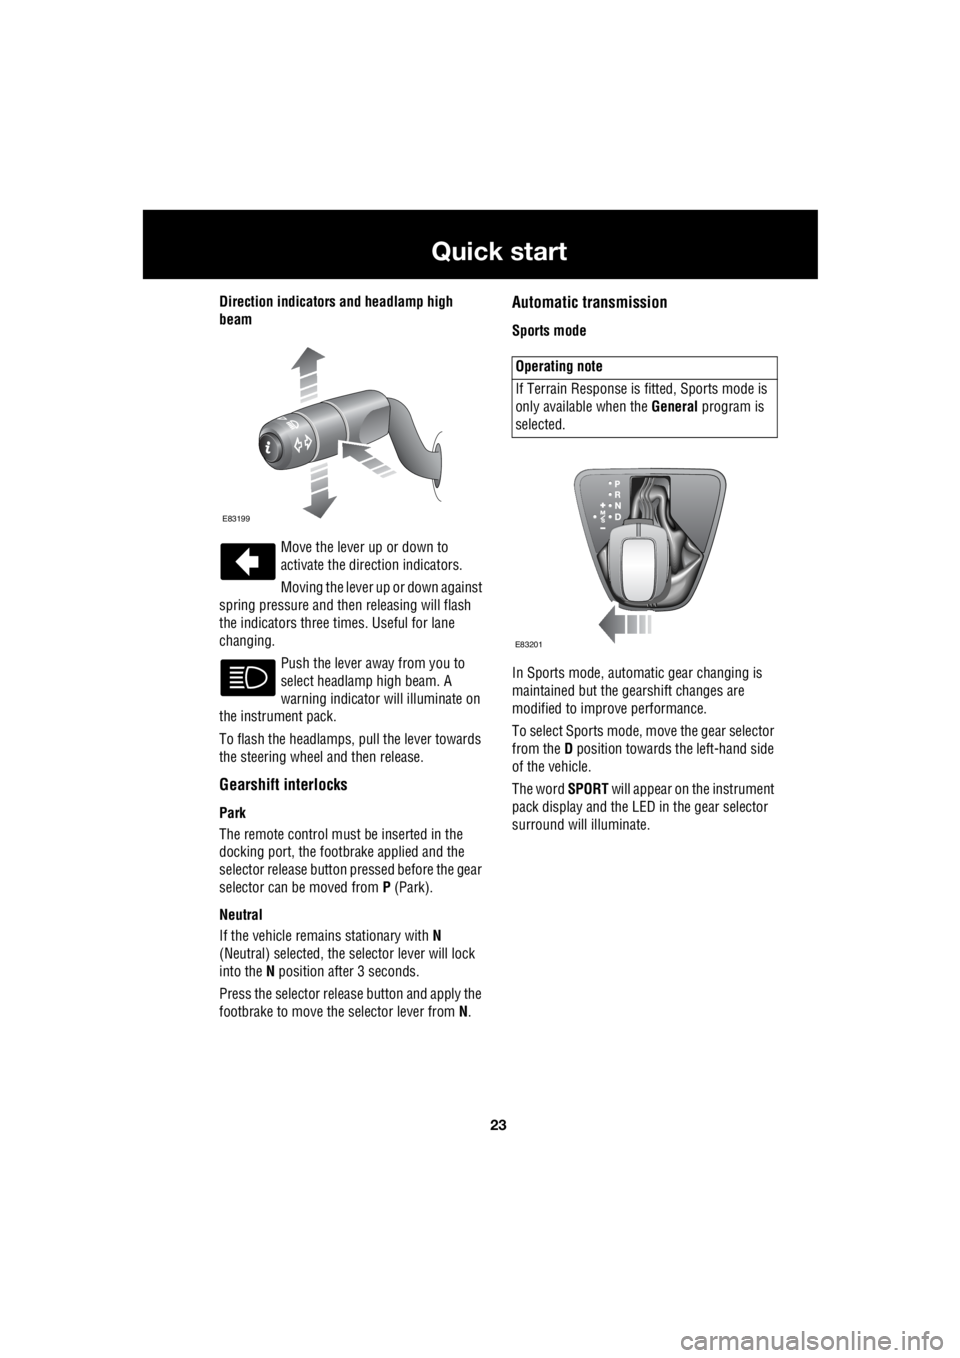
Direction indicators and headlamp high
beam
Move the lever up or down to
activate the direction indicators.
Moving the lever up or down against
spring pressure and then releasing will flash
the indicators three times. Useful for lane
changing.
Push the lever away from you to
select headlamp high beam. A
warning indicator will illuminate on
the instrument pack.
To flash the headlamps, pull the lever towards
the steering wheel and then release.
Gearshift interlocks
Park
The remote control must be inserted in the
docking port, the footbrake applied and the
selector release button pr essed before the gear
selector can be moved from P (Park).
Neutral
If the vehicle remains stationary with N
(Neutral) selected, the selector lever will lock
into the N position after 3 seconds.
Press the selector rele ase button and apply the
footbrake to move the selector lever from N.
Automatic transmission
Sports mode
In Sports mode, automatic gear changing is
maintained but the gearshift changes are
modified to improve performance.
To select Sports mode, move the gear selector
from the D position towards the left-hand side
of the vehicle.
The word SPORT will appear on the instrument
pack display and the LED in the gear selector
surround will illuminate.
E83199
Operating note
If Terrain Response is fi tted, Sports mode is
only available when the General program is
selected.
E83201
Page 2744 of 3229
24
Quick start
L
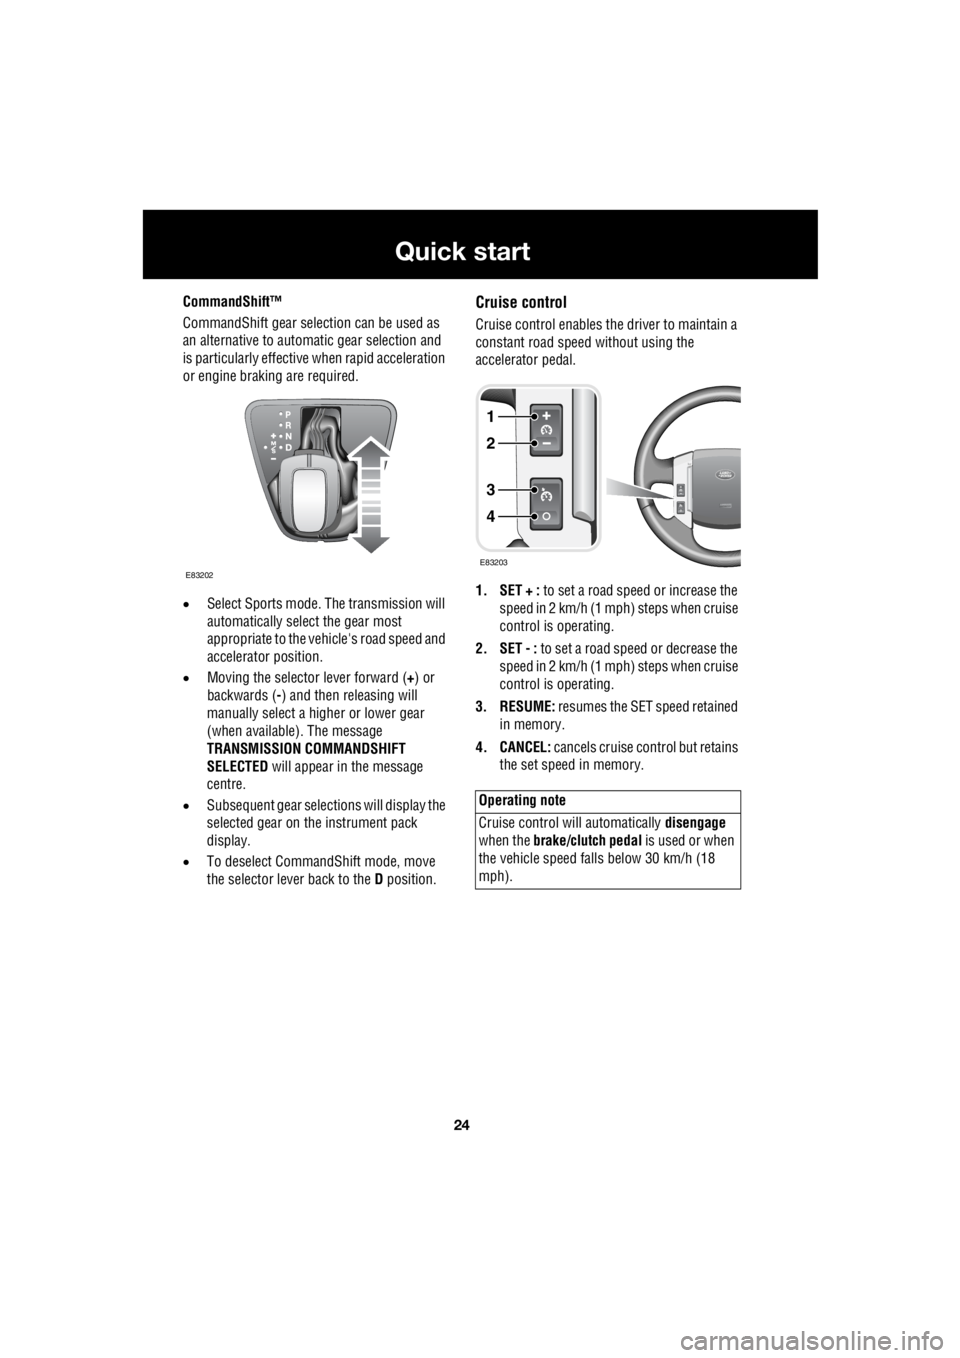
CommandShift™
CommandShift gear sele ction can be used as
an alternative to automatic gear selection and
is particularly effective when rapid acceleration
or engine braking are required.
• Select Sports mode. The transmission will
automatically select the gear most
appropriate to the vehi cle's road speed and
accelerator position.
• Moving the selector lever forward ( +) or
backwards ( -) and then releasing will
manually select a hi gher or lower gear
(when available). The message
TRANSMISSION COMMANDSHIFT
SELECTED will appear in the message
centre.
• Subsequent gear selections will display the
selected gear on the instrument pack
display.
• To deselect Comma ndShift mode, move
the selector lever back to the D position.Cruise control
Cruise control enables the driver to maintain a
constant road speed without using the
accelerator pedal.
1. SET + : to set a road speed or increase the
speed in 2 km/h (1 mph) steps when cruise
control is operating.
2. SET - : to set a road speed or decrease the
speed in 2 km/h (1 mph) steps when cruise
control is operating.
3. RESUME: resumes the SET speed retained
in memory.
4. CANCEL: cancels cruise control but retains
the set speed in memory.
E83202
Operating note
Cruise control will automatically disengage
when the brake/clutch pedal is used or when
the vehicle speed falls below 30 km/h (18
mph).
1
2
3
4
E83203
Page 2756 of 3229
Introduction
36
L
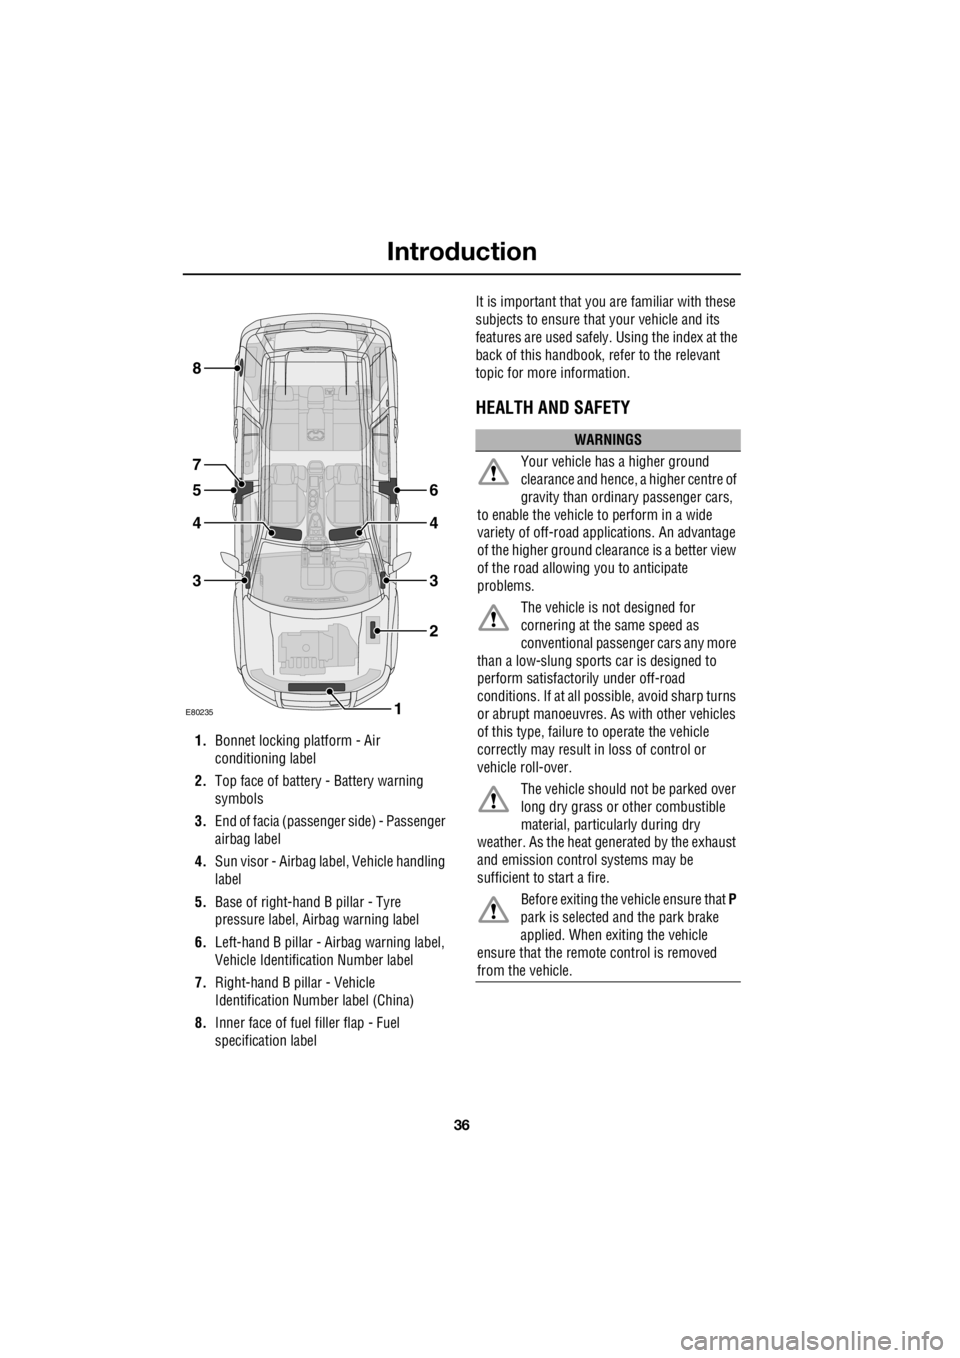
1. Bonnet locking platform - Air
conditioning label
2. Top face of battery - Battery warning
symbols
3. End of facia (passenger side) - Passenger
airbag label
4. Sun visor - Airbag label, Vehicle handling
label
5. Base of right-hand B pillar - Tyre
pressure label, Ai rbag warning label
6. Left-hand B pillar - Airbag warning label,
Vehicle Identification Number label
7. Right-hand B pillar - Vehicle
Identification Number label (China)
8. Inner face of fuel filler flap - Fuel
specification label It is important that you are familiar with these
subjects to ensure that your vehicle and its
features are used safely. Using the index at the
back of this handbook, re fer to the relevant
topic for more information.
HEALTH AND SAFETY
E80235
6
4
3
2
1
5
4
3
8
7
WARNINGS
Your vehicle has a higher ground
clearance and hence, a higher centre of
gravity than ordina ry passenger cars,
to enable the vehicle to perform in a wide
variety of off-road app lications. An advantage
of the higher ground clea rance is a better view
of the road allowing you to anticipate
problems.
The vehicle is not designed for
cornering at the same speed as
conventional passenge r cars any more
than a low-slung sports car is designed to
perform satisfactori ly under off-road
conditions. If at all possible, avoid sharp turns
or abrupt manoeuvres. As with other vehicles
of this type, failure to operate the vehicle
correctly may result in loss of control or
vehicle roll-over.
The vehicle should no t be parked over
long dry grass or other combustible
material, particul arly during dry
weather. As the heat ge nerated by the exhaust
and emission control systems may be
sufficient to start a fire.
Before exiting the vehicle ensure that P
park is selected and the park brake
applied. When exiting the vehicle
ensure that the remote control is removed
from the vehicle.
Page 2757 of 3229
37
Introduction
R
DATA RECORDING
Service data recording
Service data recorders in your vehicle are
capable of collecting and storing diagnostic
information about your vehicle. This potentially
includes information about the performance or
status of various syst ems and modules in the
vehicle such as engine, throttle, steering or
brakes.
In order to properly di agnose and service your
vehicle, Land Rover a nd service and repair
facilities may access vehicle diagnostic
information through a direct connection to
your vehicle.
Event data recording
Event data recorders are capable of collecting
and storing data during a crash or near-crash
event. The recorded information may assist in
the investigation of such an event. The
modules may record information about both
the vehicle and the oc cupants, potentially
including information such as:
• How various systems in your vehicle were
operating.
• Whether or not the driver and passenger
seat belts were buckled.
• How far, if at all, the driver was depressing
the accelerator and/or the brake pedal.
• How fast the vehicle was travelling.
• Where the driver was positioning the
steering wheel.
To access this information special equipment
must be connected directly to the recording
modules. Land Rover do not access event data
recorder information without obtaining
consent, unless pursuan t to court order or
where required by law enforcement, other
government authorities or third parties acting
with lawful authority. Other parties may seek to access the
information independe ntly of Land Rover.
DISABILITY MODIFICATIONS
Occupants with disabili ties which may require
modification of the vehi cle must contact a Land
Rover Dealer/Authorised Repairer before any
modifications are made.
PARTS AND ACCESSORIES
WARNINGS
The fitting of non-approved parts and
accessories, or the carrying out of
non-approved alterations or
conversions, may be dangerous and could
affect the safety of th e vehicle and occupants
and also invalidate the terms and conditions of
the vehicle warranty.
Land Rover will not accept any liability
for death, personal injury or damage to
property which may occur as a direct
result of fitment of non-approved accessories
or the carrying out of non-approved
conversions to La nd Rover vehicles.
Land Rover strongly advise against
making any modifications to the
suspension or steering system. This
could seriously affe ct the handling and
stability of the vehicle leading to loss of control
or roll-over.
Page 2803 of 3229
83
Lighting
R
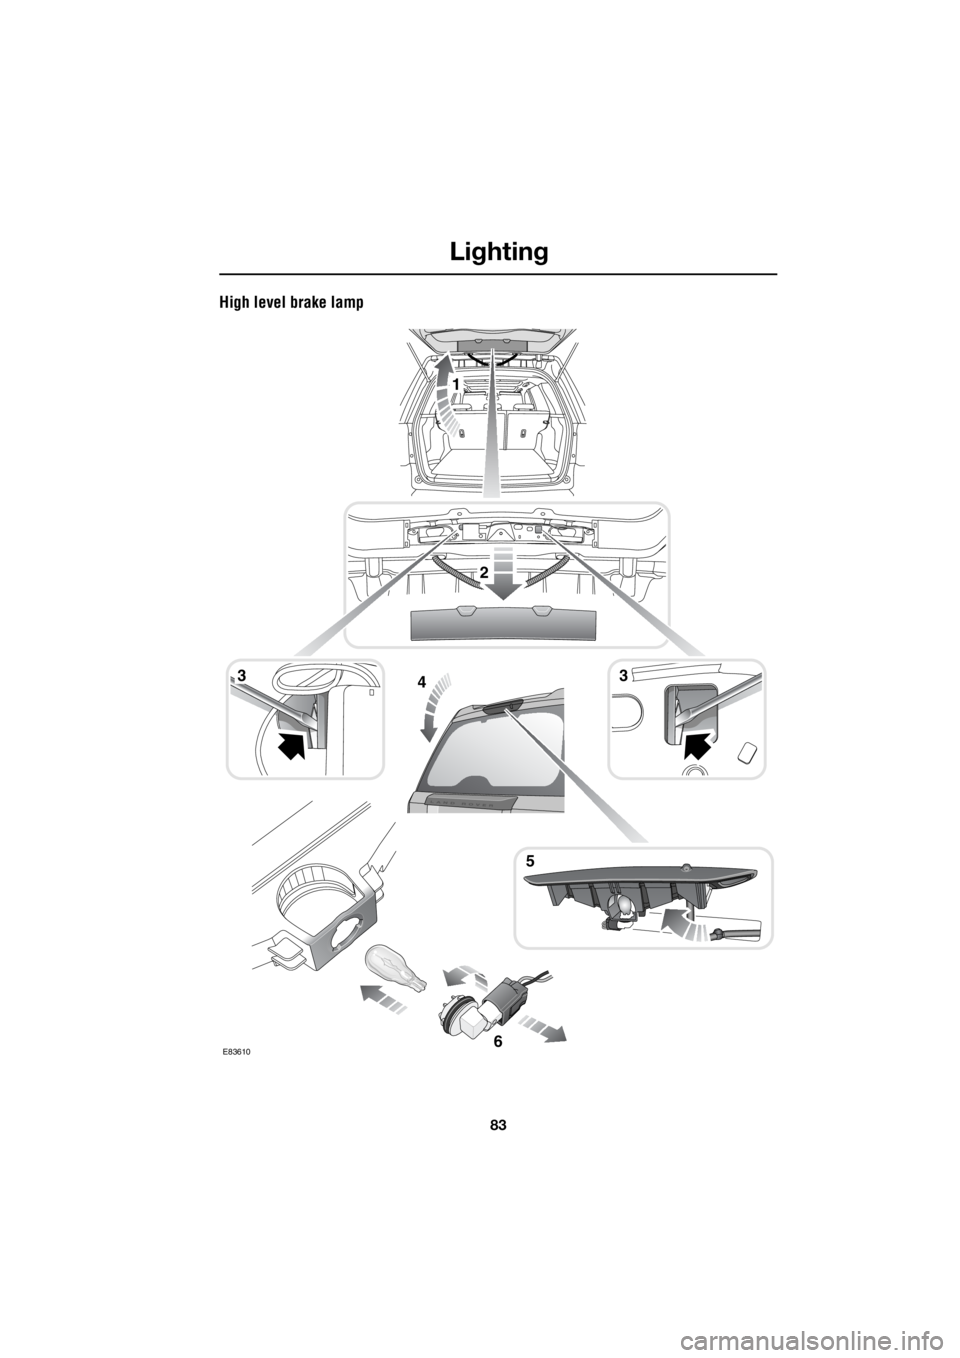
High level brake lamp
6
1
E83610
2
34
5
3
Page 2834 of 3229
Starting the engine
114
L
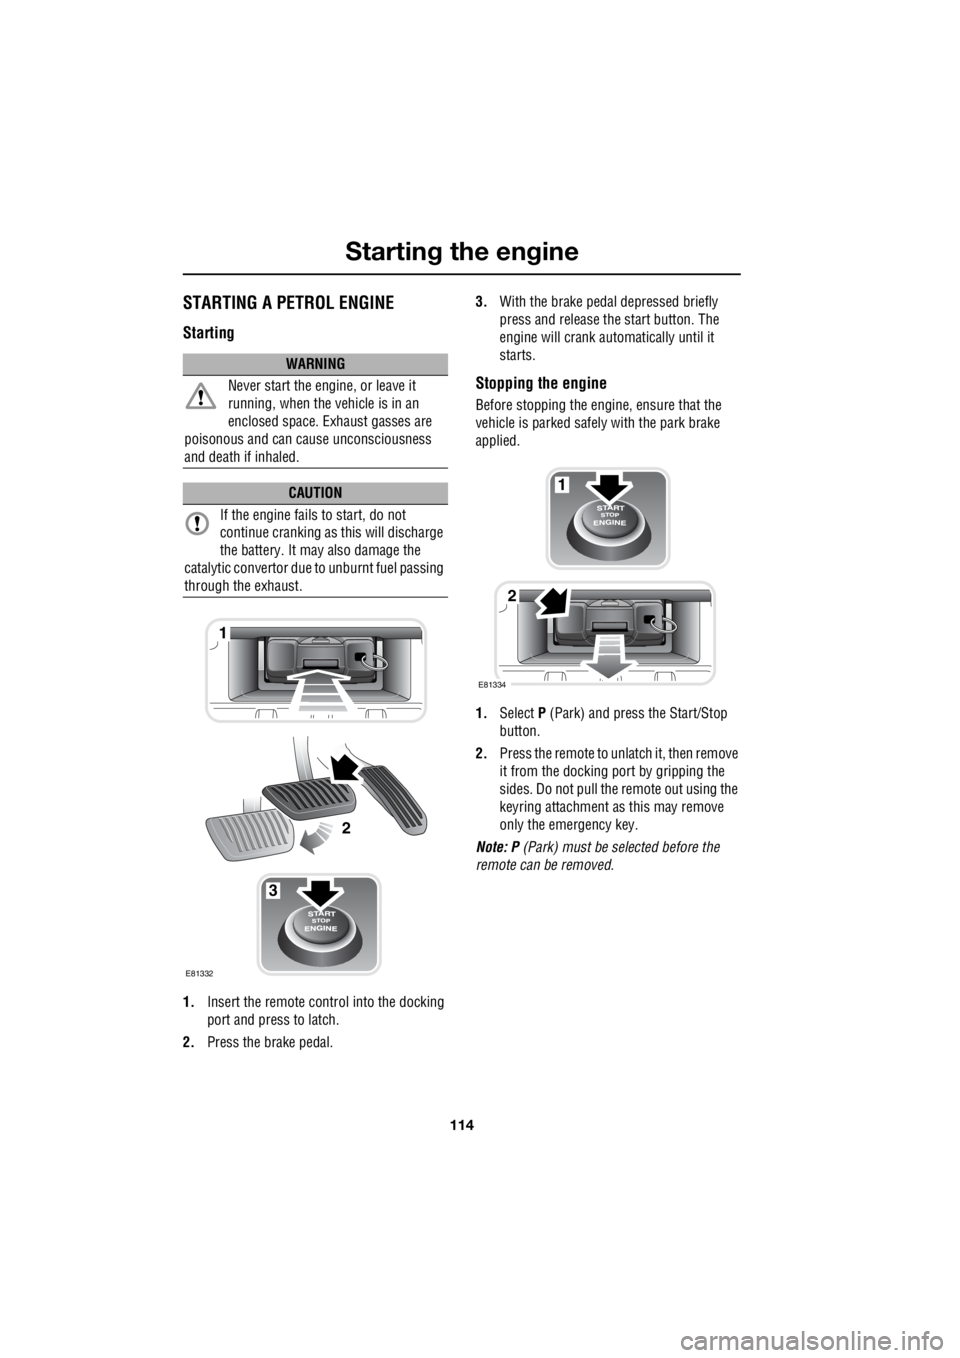
STARTING A PETROL ENGINE
Starting
1. Insert the remote control into the docking
port and press to latch.
2. Press the brake pedal. 3.
With the brake peda l depressed briefly
press and release the start button. The
engine will crank auto matically until it
starts.
Stopping the engine
Before stopping the engine, ensure that the
vehicle is parked safely with the park brake
applied.
1. Select P (Park) and press the Start/Stop
button.
2. Press the remote to unlatch it, then remove
it from the docking port by gripping the
sides. Do not pull the remote out using the
keyring attachment as this may remove
only the emergency key.
Note: P (Park) must be selected before the
remote can be removed.
WARNING
Never start the engine, or leave it
running, when the vehicle is in an
enclosed space. Exhaust gasses are
poisonous and can cau se unconsciousness
and death if inhaled.
CAUTION
If the engine fails to start, do not
continue cranking as this will discharge
the battery. It may also damage the
catalytic conver tor due to unburnt fuel passing
through the exhaust.
3
1
2
E81332
1
2
E81334
Page 2835 of 3229
115
Starting the engine
R
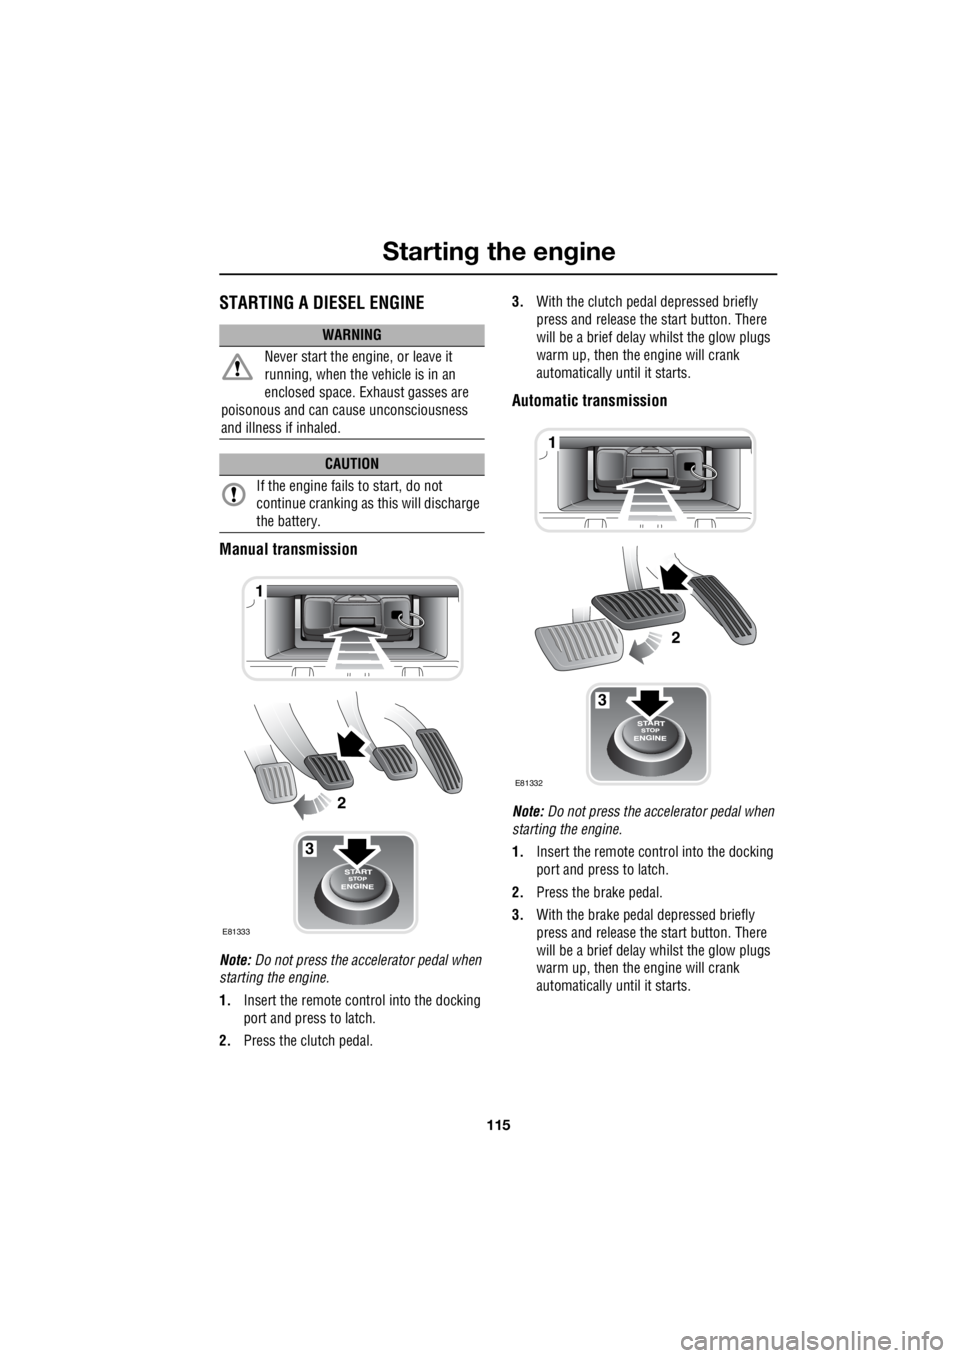
STARTING A DIESEL ENGINE
Manual transmission
Note: Do not press the accelerator pedal when
starting the engine.
1. Insert the remote control into the docking
port and press to latch.
2. Press the clutch pedal. 3.
With the clutch peda l depressed briefly
press and release the start button. There
will be a brief delay whilst the glow plugs
warm up, then the engine will crank
automatically until it starts.
Automatic transmission
Note: Do not press the accelerator pedal when
starting the engine.
1. Insert the remote control into the docking
port and press to latch.
2. Press the brake pedal.
3. With the brake pedal depressed briefly
press and release the start button. There
will be a brief delay whilst the glow plugs
warm up, then the engine will crank
automatically until it starts.
WARNING
Never start the engine, or leave it
running, when the vehicle is in an
enclosed space. Exhaust gasses are
poisonous and can cause unconsciousness
and illness if inhaled.
CAUTION
If the engine fails to start, do not
continue cranking as this will discharge
the battery.
3
1
2
E81333
3
1
2
E81332