Page 2360 of 3229
Publi s hed: 11-May-2011
Wipers and Washers - Windshield Washer Pump
Removal and Inst all ati on
Removal
1. W ARNING: Do not work on or under a vehi cle s upported onl yby a jack. Al ways support t he vehi cl e on s afet y s tands .
Rais e and s upport t he vehi cl e.
1.
Remove t he RH fender s plas h s hield.
Refer t o: Fender Spl ash Shi eld (501-02 Front End Body Panel s ,Removal and Ins tall ati on).
2.
Drai n t he was her reservoi r fl ui d.3.
4. NOTE: Do not dis ass embl e further if t he componenti s removed for acces s onl y.
Remove t he winds hield was her pump.
4.
Installation
To i nst all , revers e t he removal procedure.1.
Page 2361 of 3229
Publi s hed: 11-May-2011
Wipers and Washers - Windshield Washer Reservoir
Removal and Inst all ati on
Removal
• NOTE: Removal s t eps in t his procedure may cont ain i nst all ati on det ail s.
1. W ARNING: Do not work on or under a vehi cle s upported onl y
by a jack. Al ways support t he vehi cl e on s afet y s tands .
Rais e and s upport t he vehi cl e.
1.
Remove t he RH fender s plas h s hield.
Refer t o: Fender Spl ash Shi eld (501-02 Front End Body Panel s ,
Removal and Ins tall ati on).
2.
Drai n t he was her reservoi r fl ui d.
3. Remove t he winds hield was her res ervoir.
T orque: 6 Nm 4.
5.
NOTE: Do not dis ass embl e further if t he component
i s removed for acces s onl y.
Remove t he winds hield was her pump.
5.
Page 2363 of 3229
Publi s hed: 11-May-2011
Wipers and Washers - Headlamp Washer Pump
Removal and Inst all ati on
Removal
1. W ARNING: Do not work on or under a vehi cle s upported onl y
by a jack. Al ways support t he vehi cl e on s afet y s tands .
Rais e and s upport t he vehi cl e.
1.
Remove t he RH fender s plas h s hield.
Refer t o: Fender Spl ash Shi eld (501-02 Front End Body Panel s ,
Removal and Ins tall ati on).
2.
Drai n t he was her reservoi r fl ui d.
3. 4.
NOTE: Do not dis ass embl e further if t he component
i s removed for acces s onl y.
Remove t he headl amp was her pump.
4.
Installation To i nst all , revers e t he removal procedure.
1.
Page 2364 of 3229
Publi s hed: 11-May-2011
Wipers and Washers - Rear Window Wiper Pivot Arm
Removal and Inst all ati on
Special T ool(s) 303-D121
Pull er, General Purpose
Removal
• NOTE: Removal s t eps in t his procedure may cont ain i nst all ati on det ail s. 1. CAUTION: Make s ure that thes e component s
are ins tal led t o t he noted removal pos it ion.
Releas e t he cover. Loosen, but do not remove t he nut.
Us ing t he s peci al t ool, rel ease the rear window
wi per pi vot arm.
Speci al Tool (s ): 303-D121 1.
Remove t he rear window wiper pivot arm nut .
T orque: 7 Nm 2.
Page 2723 of 3229

Contents
3
R
Quick start
QUICK START ................................................... 7
Filling station information
FILLING STATION INFORMATION................... 33
Introduction
SYMBOLS GLOSSARY .................................... 35
LABEL LOCATIONS ......................................... 35
HEALTH AND SAFETY ..................................... 36
DATA RECORDING.......................................... 37
DISABILITY MODIFICATIONS ......................... 37
PARTS AND ACCESSORIES ............................ 37
Keys and remote controls
USING THE KEY .............................................. 40
GENERAL INFORMATION ON RADIO
FREQUENCIES ................................................ 40
USING THE REMOTE CONTROL ..................... 41
Locks
LOCKING AND UNLOCKING ............................ 44
Alarm
ARMING THE ALARM ..................................... 45
DISARMING THE ALARM ............................... 46
Seats
SITTING IN THE CORRECT POSITION ............ 47
MANUAL SEATS ............................................. 48
ELECTRIC SEATS ............................................ 49
HEAD RESTRAINTS ........................................ 51
REAR SEATS................................................... 51
HEATED SEATS............................................... 53
Seat belts
PRINCIPLE OF OPERATION ............................ 54
SEAT BELT REMINDER ................................... 55
FASTENING THE SEAT BELTS ........................ 56
SEAT BELT HEIGHT ADJUSTMENT................. 56
USING SEAT BELTS DURI NG PREGNANCY .... 57
Supplementary restraints system
PRINCIPLE OF OPERATION ............................ 58
AIRBAG WARNING LAMP ............................... 61
DISABLING THE PASSENGER AIRBAG ........... 62
AIRBAG SERVICE INFORMATION ................... 63
Child safety
CHILD SEATS ................................................. 64
BOOSTER CUSHIONS ..................................... 66
ISOFIX ANCHOR POINTS................................ 67
CHILD SAFETY LOCKS ................................... 69
Steering wheel
ADJUSTING THE STEERING WHEEL .............. 70
AUDIO CONTROL ........................................... 70
Lighting
LIGHTING CONTROL ...................................... 72
FRONT FOG LAMPS........................................ 72
REAR FOG LAMPS.......................................... 73
ADJUSTING THE HEADLAMPS....................... 73
HEADLAMP LEVELLING ................................. 73
HAZARD WARNING FLASHERS...................... 74
ADAPTIVE FRONT LIGHTING SYSTEM (AFS) . 74
DIRECTION INDICATORS ............................... 75
INTERIOR LAMPS .......................................... 76
APPROACH LAMPS ........................................ 76
CHANGING A BULB ........................................ 77
BULB SPECIFICATION CHART ........................ 86
Wipers and washers
WINDSCREEN WIPERS .................................. 87
RAIN SENSOR ................................................ 87
WINDSCREEN WASHERS............................... 88
HEADLAMP WASHERS................................... 88
REAR WINDOW WIPER AND WASHERS ........ 89
ADJUSTING THE WINDSCREEN WASHER JETS .
89
CHECKING THE WIPER BLADES .................... 90
CHANGING THE WIPER BLADES.................... 90
Windows and mirrors
ELECTRIC WINDOWS ..................................... 93
EXTERIOR MIRRORS ..................................... 94
ELECTRIC EXTERIOR MIRRORS .................... 95
INTERIOR MIRROR ........................................ 96
Instruments
INSTRUMENT PANEL OVERVIEW .................. 97
Information displays
TRIP COMPUTER ........................................... 99
INFORMATION MESSAGES ............................ 99
Page 2742 of 3229

22
Quick start
L
Wipers and washers
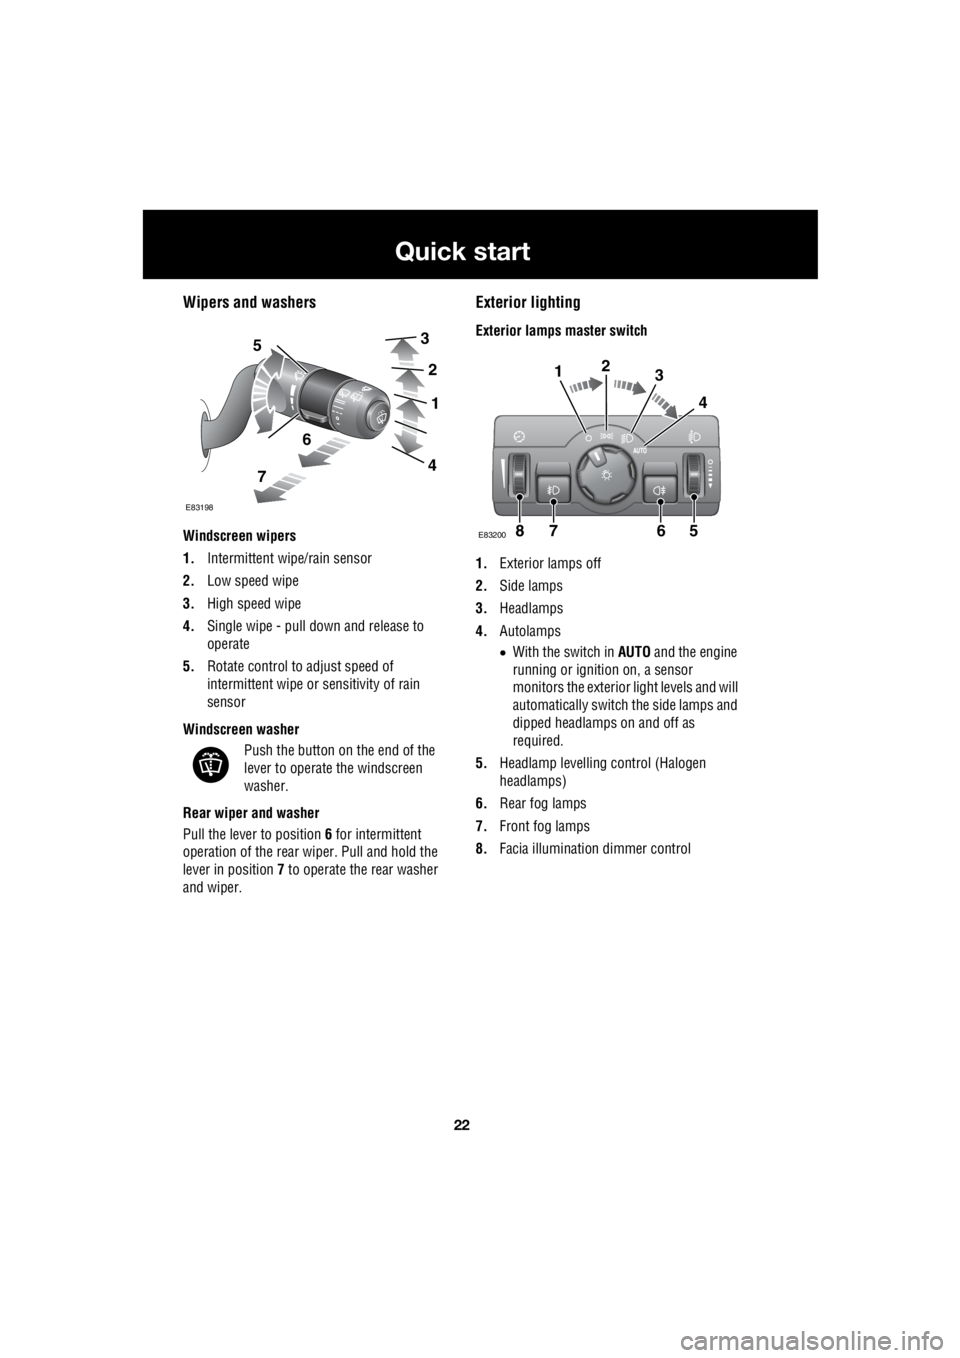
Windscreen wipers
1. Intermittent wipe/rain sensor
2. Low speed wipe
3. High speed wipe
4. Single wipe - pull down and release to
operate
5. Rotate control to adjust speed of
intermittent wipe or sensitivity of rain
sensor
Windscreen washer Push the button on the end of the
lever to operate the windscreen
washer.
Rear wiper and washer
Pull the lever to position 6 for intermittent
operation of the rear wiper. Pull and hold the
lever in position 7 to operate the rear washer
and wiper.
Exterior lighting
Exterior lamps master switch
1. Exterior lamps off
2. Side lamps
3. Headlamps
4. Autolamps
• With the switch in AUTO and the engine
running or ignition on, a sensor
monitors the exterior light levels and will
automatically switch the side lamps and
dipped headlamps on and off as
required.
5. Headlamp levelli ng control (Halogen
headlamps)
6. Rear fog lamps
7. Front fog lamps
8. Facia illumination dimmer control 5
6
7
3
2
1
4
E83198
7865
123
4
E83200
Page 2807 of 3229

87
Wipers and washers
R
Wipers and washersWINDSCREEN WIPERS
Note: If the wiper blades do become stuck, or
jammed, an electronic cut-out may temporarily
halt the operation of the wipers. If this
happens, switch off the wipers and the ignition.
Clear any obstructions, and free the wiper
blades before attempting to switch on the
ignition.
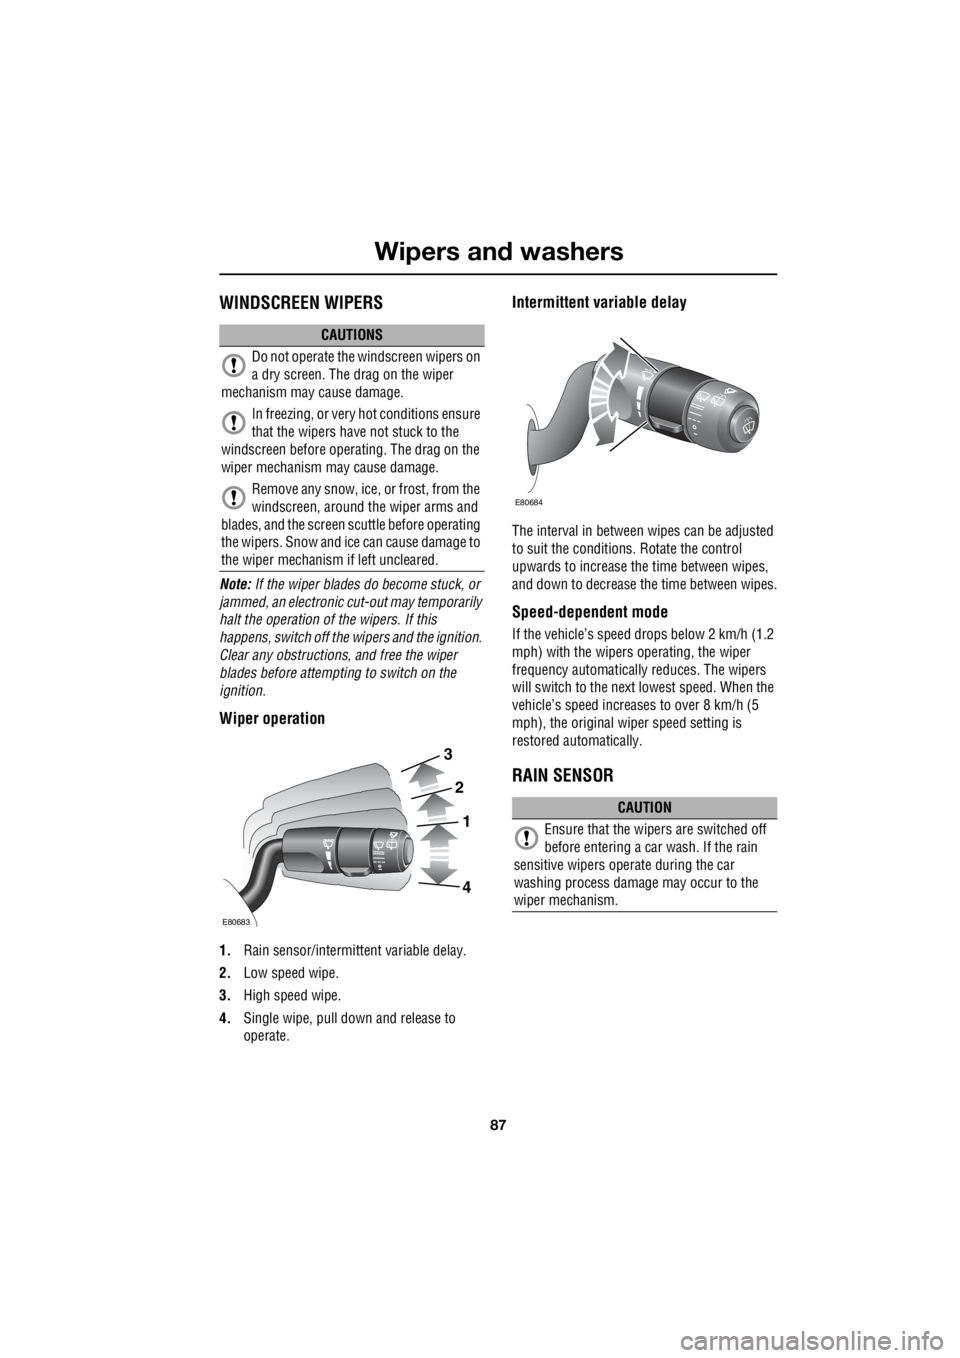
Wiper operation
1. Rain sensor/intermitt ent variable delay.
2. Low speed wipe.
3. High speed wipe.
4. Single wipe, pull down and release to
operate.
Intermittent variable delay
The interval in between wipes can be adjusted
to suit the conditions. Rotate the control
upwards to increase th e time between wipes,
and down to decrease the time between wipes.
Speed-dependent mode
If the vehicle’s speed drops below 2 km/h (1.2
mph) with the wipers operating, the wiper
frequency automatically reduces. The wipers
will switch to the next lowest speed. When the
vehicle’s speed increases to over 8 km/h (5
mph), the original wiper speed setting is
restored automatically.
RAIN SENSOR
CAUTIONS
Do not operate the windscreen wipers on
a dry screen. The drag on the wiper
mechanism may cause damage.
In freezing, or very hot conditions ensure
that the wipers have not stuck to the
windscreen before operating. The drag on the
wiper mechanism ma y cause damage.
Remove any snow, ice, or frost, from the
windscreen, around the wiper arms and
blades, and the screen scuttle before operating
the wipers. Snow and ic e can cause damage to
the wiper mechanism if left uncleared.
3
2
1
4
E80683
CAUTION
Ensure that the wipers are switched off
before entering a car wash. If the rain
sensitive wipers ope rate during the car
washing process damage may occur to the
wiper mechanism.
E80684
Page 2808 of 3229

Wipers and washers
88
L
The rain sensor is able to detect the presence
and amount of rain/dirt/snow on the
windscreen.
Operation
To use the rain sensitive wipers, move the
wiper stalk to position 1 rain
sensor/intermittent variable delay.
Adjusting the sensitivity
Rotate the control upwards to increase the
sensitivity, and down to reduce the sensitivity.
If the sensor detects co nstant rain the wipers
will operate continuously.
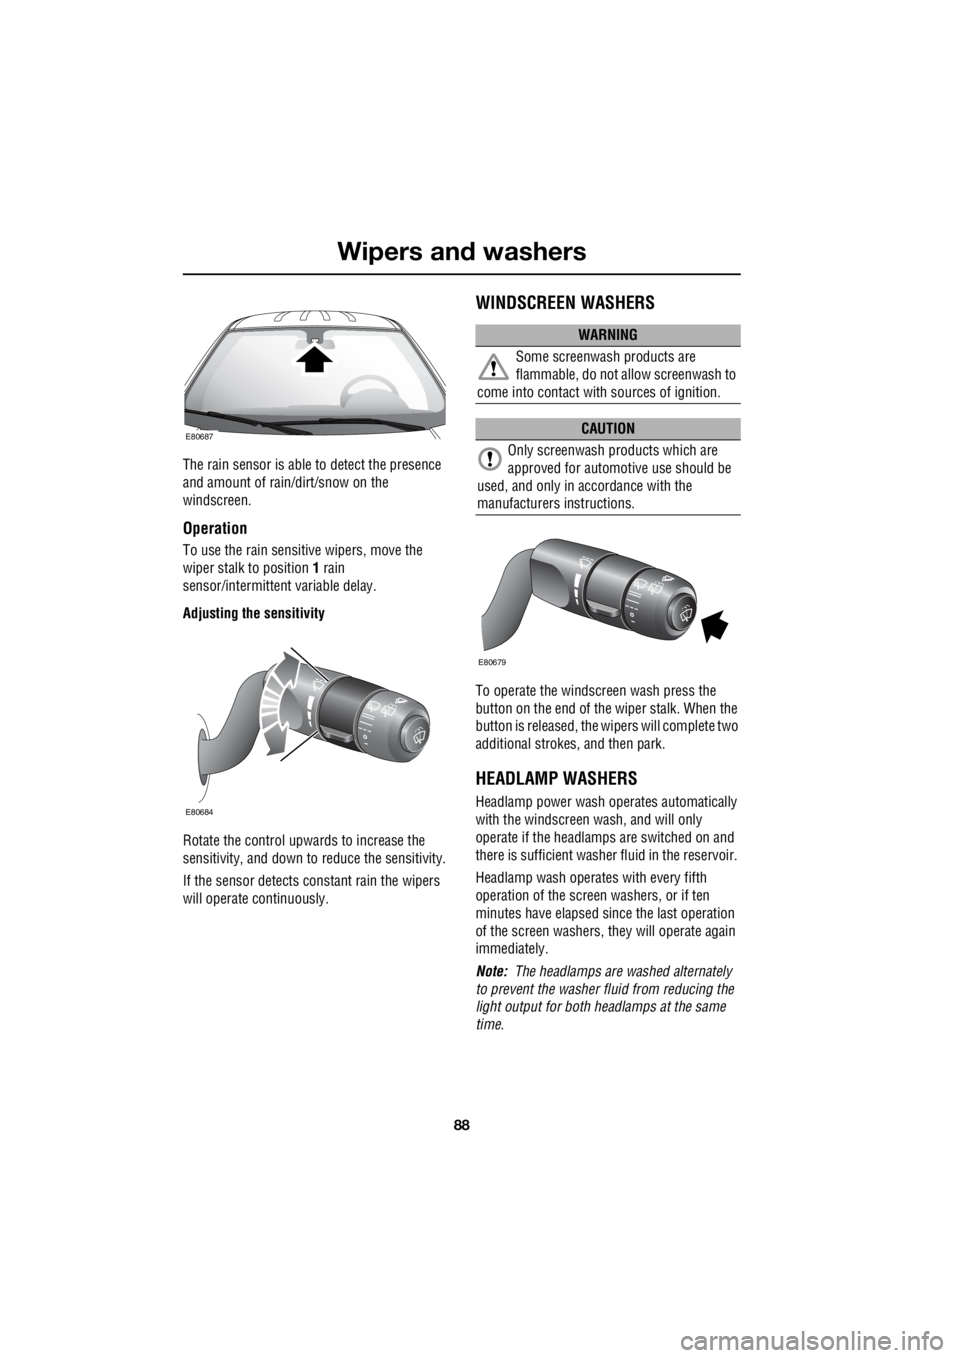
WINDSCREEN WASHERS
To operate the windscreen wash press the
button on the end of the wiper stalk. When the
button is released, the wi pers will complete two
additional strokes, and then park.
HEADLAMP WASHERS
Headlamp power wash operates automatically
with the windscreen wash, and will only
operate if the headlamps are switched on and
there is sufficient washer fluid in the reservoir.
Headlamp wash operates with every fifth
operation of the screen washers, or if ten
minutes have elapsed si nce the last operation
of the screen washers, they will operate again
immediately.
Note: The headlamps are washed alternately
to prevent the washer fluid from reducing the
light output for both headlamps at the same
time.
E80687
E80684
WARNING
Some screenwash products are
flammable, do not allow screenwash to
come into contact with sources of ignition.
CAUTION
Only screenwash products which are
approved for automotive use should be
used, and only in accordance with the
manufacturers instructions.
E80679