2006 LAND ROVER FRELANDER 2 jacking
[x] Cancel search: jackingPage 38 of 3229
Flammabl e - OBSERVE NO SMOKING POLICY .
Irrit at ion of t he mout h and t hroat may res ult from s wallowi ng. The main hazard from s wallowi ng ari ses if li qui d as pirat ionint o t he lungs occurs.
Liquid contact dri es the ski n and can caus e i rrit at ion or dermati ti s. Splas hes in the eye may be s light ly i rrit ati ng.
In normal circums t ances t he low vol ati lit y does not give ris e t o harmful vapors . Expos ure to mis t s and vapors fromkeros ene at el evat ed t emperature s houl d be avoi ded (mis ts may ari s e in dewaxing). Avoi d s ki n and eye cont act and makes ure t here i s adequat e vent il ati on.
If sw allow ed, DO NOT induce vomiting - SEEK IMMEDIAT E MEDICAL AT T ENT ION.
Gas Cylinders
Gas es such as oxygen, acet ylene, argon and propane are normall y s tored in cyli nders at pres s ures of up t o 138 bar (13800kPa) (2000 lbf/i n²) and great care should be taken i n handl ing t hese cyli nders t o avoi d mechani cal damage t o t hem or t ot he val ve gear at tached. The contents of each cylinder s houl d be clearl y ident ifi ed by appropri ate markings .
Cylinders should be s tored in wel l vent il at ed encl osures, and protected from ice and s now or direct sunli ght . Fuel gas es,for example acetyl ene and propane should not be st ored i n clos e proximit y t o oxygen cylinders .
Care should be exerci sed to prevent l eaks from gas cyl inders and l ines and als o t o avoid s ources of ignit ion.
Only trai ned pers onnel s houl d undertake work involving gas cyli nders .
General Workshop Tools and Equipment
It is es s ent ial t hat al l tools and equipment are maint ained in good condit ion and t he correct s afet y equi pment is us edwhere required.
Never us e t ools or equipment for any purpos e other t han that for whi ch they were desi gned. Never overl oad equi pments uch as hoi st s , jacks, axle and chas si s s tands or li ft ing sl ings . Damage caus ed by overloading i s not always immediatel yapparent and may res ult i n a fatal fai lure the next t ime that t he equi pment is us ed.
Do not us e damaged or defect ive t ools or equipment, part icularly hi gh s peed equipment s uch as gri ndi ng wheel s . Adamaged grindi ng wheel can dis int egrate wit hout warning and cause serious i njury.
W ear s uit abl e eye prot ect ion when us ing grinding, chis elli ng or s and bl ast ing equi pment .
W ear a s uit able breat hing mas k when us i ng abrasi ve blas ti ng equi pment or us i ng sprayi ng equi pment.
Make s ure t here i s adequat e vent il ati on to cont rol dust s , mis t s and fumes .
High Pressure Air, Lubrication and Oil Test Equipment
Always keep high press ure equi pment i n good condi ti on, and regul arly maint ai ned, parti cularly at joint s and uni ons.
Never di rect a high press ure nozzle, for example dies el i njector, at t he s kin as the fluid may penet rat e t o t he underlyingt is sue and caus e s eri ous i njury.
Jacking
Always refer to the Jacki ng and Lifti ng s ect ion of t hi s manual prior t o rai s ing t he vehi cl e off the ground.
W hen vehicle is t o be rais ed by means of a jack, ensure t hat i t is st andi ng on l evel ground, that parking brake is appli edand wheels are chocked. ALW AY S us e t he recommended jacking poi nt s and ens ure t hat vehi cl e jack has s ufficient loadcapacit y for t he weight of t he vehi cl e.
W ARNING: Do not work on or under a vehi cle s upported onl y by a jack. Always s upport t he vehi cl e on s afet y s tands .
Ensure t hat hois t s have s uffi ci ent load capacit y for t he wei ght of t he vehi cl e.
Legal Aspects
There are many l aws and regulat ions rel at ing to healt h and s afet y i n the us e and di spos al of materials and equipment i n aworks hop.
For a s afe worki ng envi ronment and t o avoi d environment al poll uti on, workshops s hould be famil iar, i n detai l, wi th t hemany healt h and s afety laws and regul ati ons wit hi n t hei r count ry, publ is hed by both nat ional and local aut horit ies .
Lubricants and Greases
Avoi d all prolonged and repeat ed contact wit h mi neral oils . All l ubricants and greases may be irri tat ing t o t he eyes ands ki n.
Used Engine Oil
Prol onged and repeat ed cont act wi th engi ne oil wil l res ult i n t he removal of nat ural fat s from the s kin, leading to drynes s ,irri tat ion and dermati ti s. In addit ion, used engi ne oil cont ains potent iall y harmful cont aminants whi ch may caus e s kincancer. Adequat e means of s kin protecti on and washi ng facil it ies mus t be provi ded.
Do not employ us ed engine oi ls as l ubricants or for any appli cat ion where appreciable s kin cont act i s li kel y t o occur.
Page 163 of 3229
Publ is hed: 24-Jun-2011
Jacking and Lifting - Jacking
Des cript ion and Operat ion
General
W ARNING: The foll owing i nst ructi ons mus t be adhered to before rais i ng the vehicle off t he ground:
Posi ti on vehi cl e on a sol id, level surface.Apply t he parking brake.Select 'P' - PARK on automat ic t rans mis s ion sel ect or.Select 'N' - Neutral on manual t rans mis s ion.
W ARNING: If t he dri ve s haft(s ) are t o be di sconnect ed, i t wil l be neces s ary t o rai s e all four wheels off the ground inorder t hat t he s haft (s ) can be rot ated. DO NOT us e the cus tomer jack and ens ure that t he vehi cl e is adequatel y s upport edon axle s t ands . W i th the vehicle rai sed, it will be necess ary to releas e t he park brake and sel ect Neutral - 'N' in the mai nt ransmis s ion t o enabl e t he dri ve s haft(s ) to be rot ated.
• CAUTIO NS:
To avoid damage t o t he underbody components of t he vehi cle, the foll owing i ns t ructions mus t be adhered to:
Do not pos it ion jacks or axle s t ands under the foll owing component s :
Body s truct ure ot her t han any approved jacki ng or li ft ing point sRear subframeBumpersFuel l inesFuel t ankBrake l inesFront or rear s uspens ion armsSteering l inkageRear di fferenti al uni tTrans mis s ionEngi ne oil pan - See not e below
• NOTE: For certain repair operat ions, i t may be necess ary to support t he engine under t he oil pan. In thi s cas e, a bl ock ofhardwood or a rubber pad mus t be pos it ioned on t he jack li ft ing pad t o protect the oi l pan.
Hydraulic jack
• W ARNINGS:
Before commenci ng work on undersi de of vehi cl e, ens ure that axle s t ands are correctly pos it ioned and vehi cle i ss ecurel y s upported.
Al ways chock the rear wheel s when jacking t he front of the vehicle.
A hydrauli c jack wi th a mi ni mum li ft ing capacit y of 1500 kg, (3,300 l bs) must be us ed.
Raising and Supporting the Vehicle
To as si s t in rais ing the vehicle, us e t he cus t omer jacki ng poi nts on the s i ll or on t he trolley jack pos i ti on at the rear of t hefront subframe as indicated i n t he fol lowing ill ust rat ions .
Raising the front of the vehicle
W ARNING: Always chock t he rear wheels when jacki ng the front of t he vehi cl e.
Apply t he parking brake.
Select 'P' - Park on aut omat ic trans mi s si on s el ect or.
Select 'N' - Neutral on manual t rans mis s ion.
Page 164 of 3229
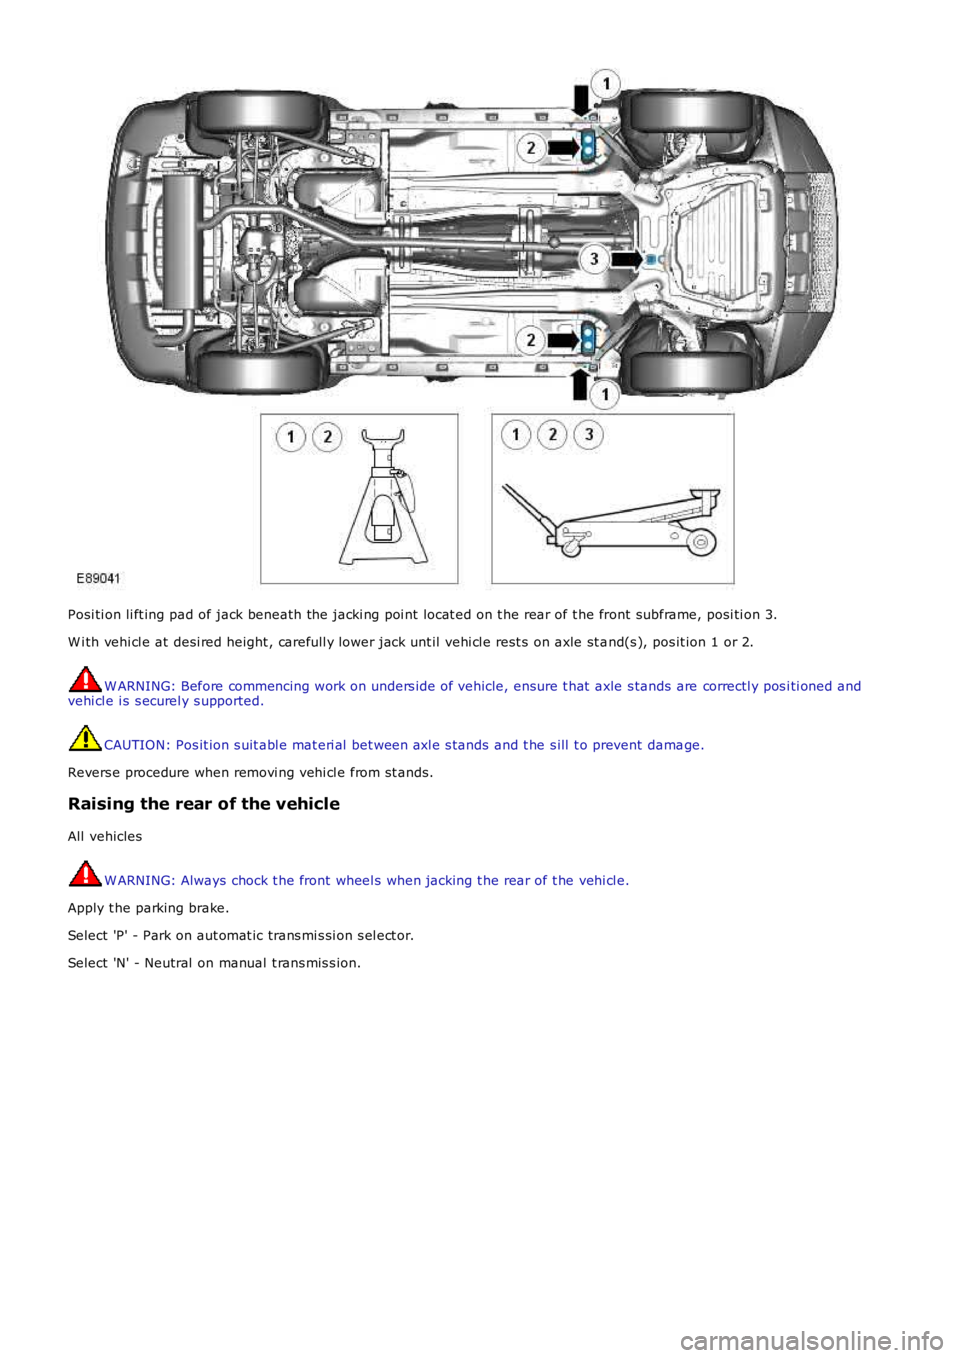
Posi ti on li ft ing pad of jack beneath the jacki ng poi nt locat ed on t he rear of t he front subframe, posi ti on 3.
W i th vehi cl e at desi red height , carefull y lower jack unt il vehi cl e rest s on axle st and(s ), pos it ion 1 or 2.
W ARNING: Before commencing work on unders ide of vehicle, ensure t hat axle s tands are correctl y pos i ti oned andvehi cl e i s s ecurel y s upported.
CAUTION: Pos it ion s uit abl e mat eri al bet ween axl e s tands and t he s ill t o prevent damage.
Revers e procedure when removi ng vehi cl e from st ands.
Raising the rear of the vehicle
All vehicles
W ARNING: Always chock t he front wheel s when jacking t he rear of t he vehi cl e.
Apply t he parking brake.
Select 'P' - Park on aut omat ic trans mi s si on s el ect or.
Select 'N' - Neutral on manual t rans mis s ion.
Page 165 of 3229
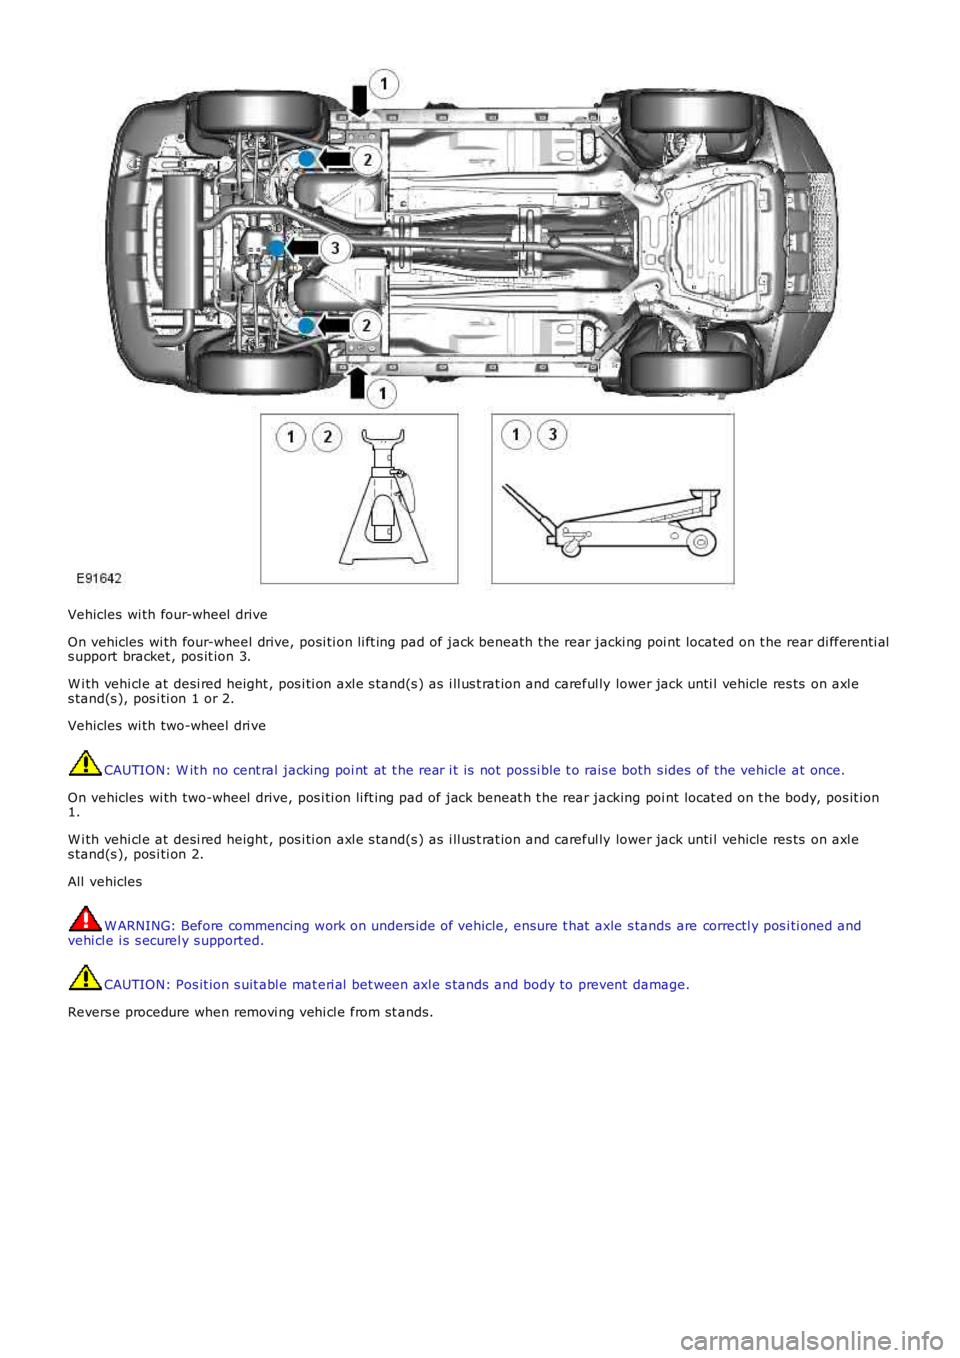
Vehicles wi th four-wheel drive
On vehicles wi th four-wheel drive, posi ti on li ft ing pad of jack beneath the rear jacki ng poi nt located on t he rear di fferenti als upport bracket , pos it ion 3.
W i th vehi cl e at desi red height , pos i ti on axl e s tand(s ) as i ll us t rat ion and careful ly lower jack unti l vehicle res ts on axl es tand(s ), pos i ti on 1 or 2.
Vehicles wi th two-wheel dri ve
CAUTION: W it h no cent ral jacking poi nt at t he rear i t is not pos si ble t o rais e both s ides of the vehicle at once.
On vehicles wi th two-wheel drive, pos i ti on li ft ing pad of jack beneat h t he rear jacking poi nt locat ed on t he body, pos it ion1.
W i th vehi cl e at desi red height , pos i ti on axl e s tand(s ) as i ll us t rat ion and careful ly lower jack unti l vehicle res ts on axl es tand(s ), pos i ti on 2.
All vehicles
W ARNING: Before commencing work on unders ide of vehicle, ensure t hat axle s tands are correctl y pos i ti oned andvehi cl e i s s ecurel y s upported.
CAUTION: Pos it ion s uit abl e mat eri al bet ween axl e s tands and body to prevent damage.
Revers e procedure when removi ng vehi cl e from st ands.
Page 166 of 3229

Publi s hed: 11-May-2011
Jacking and Lifting - Lifting
Des cript ion and Operat ion
Two-Post Lift
W ARNING: Make sure t hat t he vehicle i s s table before commencing work.
CAUTION: If the drive s haft (s ) are to be removed, rel eas e t he parking brake and s el ect NEUTRAL 'N' i n t het ransmis s ion i n order t hat t he s haft (s ) can be rot ated when the vehicle is rais ed to the des ired height.
1. Pos i ti on the vehicle wit h t he cent re of the l ift pill ars al igned approxi mat el y wi th t he front of the driver/pass enger s eatcus hions .
ItemPart NumberDescription
1-Two post l ift locati ons - Cus t omer jacki ng points2-Opti onal, Two-pos t front li ft l ocat ions - Body mounti ng us ed in vehicle product ion
2. Ext end t he li ft ing arms and pos it ion t he pad of each l ifti ng arm beneat h t he approved poi nt s .
3. Rais e t he vehi cl e unti l the wheels are just cl ear of t he ground and check t hat the pads of each lift ing arm are s ti llcorrect ly pos it ioned.
4. Rais e t he vehi cl e t o t he des i red height .
5. Ensure t he vehi cl e is correctl y s upport ed wi th the l ifti ng pads in full cont act with t he approved poi nt s .
Vehicle on wheels - Four-Post Ramp
• W ARNINGS:
If the drive s haft (s ) are t o be dis connected, it will be necess ary to rais e al l four wheel s off t he ramp in order thatt he shaft(s ) can be rot at ed. Refer to the 'W heel Free Lift - Four-Pos t Ramp' s ecti on below for li ft ing i ns t ructi ons thenrel eas e t he parki ng brake and s elect NEUTRAL i n t he transmis si on.
Do not pus h t he vehi cl e backwards and forwards along t he ramp in order to gai n acces s t o the drive s haft fixi ngs .
Posi ti on t he vehi cl e on t he ramp wit h t he front and rear wheel s equidis t ant from t he ends of t he ramp. Chock t he wheel s,s elect NEUTRAL i n t he transmis si on and where pract ical, apply the parki ng brake.
Wheel-Free Lift - Four-Post Ramp
Page 169 of 3229

Publi s hed: 11-May-2011
Jacking and Lifting - Vehicle Recovery
Des cript ion and Operat ion
Towing Points
CAUTION: The s ingle towi ng poi nts at t he front and rear of t he vehi cl e are des igned for vehicl e recovery purpos esonly and mus t NOT be used to t ow a trail er or caravan.
The front towi ng eye is acces s ibl e aft er releas ing t he 2 t oggle fast eners s ecuring the t owing eye acces s panel andremovi ng the panel.
CAUTION: Ens ure t hat during t owing, the towi ng att achment does not contact t he bumper.
The rear t owing eye i s acces si ble after rel eas i ng the 2 toggle fas teners securi ng the towing eye access panel and removingt he panel.
CAUTION: This t owing eye s hould onl y be us ed for t owing another vehi cl e or for recovery purpos es .
Towing the vehicle on four wheels
• W ARNINGS:
Ens ure t hat the remote cont rol remai ns docked whil s t the vehicle is being towed. Removi ng the remot e cont rol wi llengage t he s t eering l ock, which wi ll prevent the vehicle from s t eering correct ly.
If the engine cannot be run whi ls t t he vehi cl e i s bei ng t owed, t here wi ll be no power as si s tance for t he s teeri ng orbrakes. Thi s wil l res ult in greater effort bei ng required to st eer or sl ow t he vehi cl e, and greatl y increas ed s toppingdis t ances.
• CAUTIO NS:
The vehicle s hould onl y be t owed wit h four wheels on the ground. Towing wi th two wheel s on t he ground wi ll res ultin serious damage t o t he trans mi s si on.
The vehicle s hould onl y be t owed for a maxi mum of 80 km (50 mil es), at a maximum s peed of 80 km/h (50 mph).Towing for a great er di st ance, or at a higher s peed may res ult i n s eri ous damage t o t he t rans mis s ion.
• NOTE: The recommended recovery met hod is to rais e al l four wheel s.
Towing procedure
1. The vehi cl e s houl d be parked on firm level ground, wi th t he park brake on, and the gear s el ect or in P if an aut omati cgearbox is fit t ed.
2. Secure the towing at t achment from the recovery vehicle to the front t owing eye.
CAUTION: Leavi ng the ignit ion s wi tched on for extended peri ods wil l caus e the bat tery t o drai n.
3. Dock the remote cont rol, and s wi tch on t he igni ti on.
4. Appl y t he foot brake, and s el ect neutral.
5. W i th the foot brake s t ill appli ed, releas e the park brake.
Page 233 of 3229
The t op mount at t aches t o a s t rengthened turret on t he chas s is wit h 3 i ntegral s tuds and s elf-l ocking nut s .
Two brackets are welded t o t he damper body. One bracket provides for t he att achment of t he s tabil izer li nk. The s econdbracket provi des for t he att achment of t he brake hose and wheel s peed s ens or cabl e. This bracket als o pos it ively locat est he damper i nto t he wheel knuckle and i ts locat ion i s cri ti cal t o cont rol li ng the vehicle trim height.
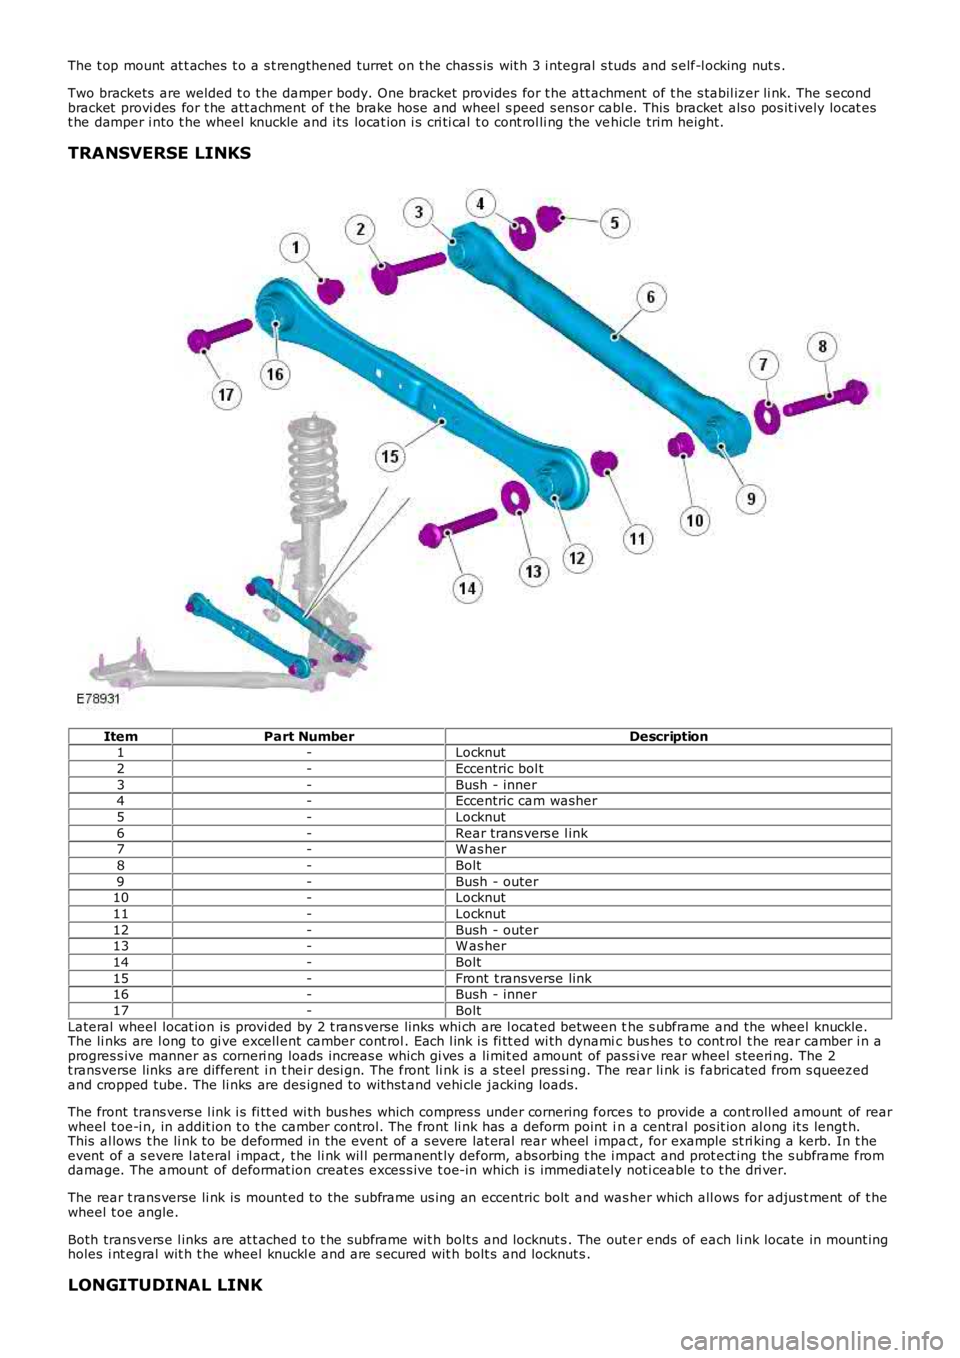
TRANSVERSE LINKS
ItemPart NumberDescription1-Locknut
2-Eccentric bol t
3-Bush - inner4-Eccentric cam washer
5-Locknut
6-Rear trans vers e l ink7-W as her
8-Bolt
9-Bush - outer10-Locknut
11-Locknut
12-Bush - outer13-W as her
14-Bolt
15-Front t ransverse link16-Bush - inner
17-Bolt
Lateral wheel locat ion is provi ded by 2 t rans verse li nks whi ch are l ocat ed between the s ubframe and the wheel knuckle.The li nks are l ong to gi ve excell ent camber cont rol . Each l ink i s fi tt ed wi th dynamic bus hes t o cont rol t he rear camber i n aprogres s ive manner as corneri ng loads increas e which gi ves a li mit ed amount of pas s ive rear wheel s teeri ng. The 2t ransverse links are different i n t hei r des i gn. The front li nk is a s teel pres si ng. The rear li nk is fabricated from s queezedand cropped tube. The li nks are des igned to wit hst and vehi cle jacking loads.
The front trans vers e l ink i s fi tt ed wi th bus hes which compres s under cornering forces to provide a cont roll ed amount of rearwheel t oe-i n, in addit ion t o t he camber control. The front li nk has a deform point in a central pos it ion al ong it s lengt h.This al lows t he li nk to be deformed in the event of a s evere lat eral rear wheel i mpact , for example st ri king a kerb. In t heevent of a s evere l ateral i mpact , t he li nk wil l permanent ly deform, abs orbing t he i mpact and prot ect ing the s ubframe fromdamage. The amount of deformat ion creat es exces s ive t oe-in which i s immedi ately not iceable t o t he dri ver.
The rear t rans verse li nk is mount ed to the subframe us ing an eccentric bolt and was her which all ows for adjus t ment of t hewheel t oe angle.
Both trans vers e l inks are at t ached t o t he s ubframe wit h bolt s and locknut s . The out er ends of each li nk locate in mount ingholes i nt egral wit h t he wheel knuckl e and are s ecured wit h bolt s and locknut s .
LONGITUDINAL LINK
Page 2904 of 3229
Wheels and tyres
184
L
Wheel changing safety
Before raising the vehicl e, or changing a wheel
ensure that you read, and comply with the
following warnings.
WARNINGS
Always find a safe pl ace to stop, off of
the highway and away from traffic.
Ensure that the vehicle is on firm level
ground.
Disconnect traile r/caravan from
vehicle.
Switch on the hazard warning lamps.
Ensure that all passengers, and
animals, are out of the vehicle, and in a
safe place away from the highway.
Place a warning triangle at a suitable
distance behind th e vehicle, facing
towards oncoming traffic.
Ensure that the front wheels are in the
straight ahead positi on, and engage the
steering lock.
Apply the parking br ake, and engage
Park in vehicles fitted with an automatic
transmission.
Apply the parking br ake, and engage
1st or reverse gear in vehicles fitted
with a manual transmission.
Ensure that the jack is on firm level
ground.
Never place anything between the jack
and the ground, or the jack and the
vehicle.
Always chock the whee ls using suitable
wheel chocks. Place the chocks on both
sides of the wheel diagonally opposite the
wheel to be changed.
If jacking the vehicle on a slight slope is
unavoidable, place the chocks on the
downhill side of the two opposite wheels.
Take care when lifting the spare wheel,
and removing the punctured wheel. The
wheels are heavy, and ca n cause injuries if not
handled correctly.
Remove the spare wheel prior to
jacking the vehicle. To avoid
destabilising the vehicle when raised.
Take care when loosening the wheel
nuts. The wheel brace may slip off if not
properly attached, and the wheel nuts may
give way suddenly. Either unexpected
movement may cause an injury.
WARNINGS