2006 INFINITI M35 air condition
[x] Cancel search: air conditionPage 4634 of 5621
FRONT FOG LAMP
LT-207
C
D
E
F
G
H
I
J
L
MA
B
LT
Revision: 2006 January2006 M35/M45
Front Fog Lamp Does Not Illuminate (One Side)NKS003RF
1. CHECK BULB
Check bulb of fog lamp which does not illuminate.
OK or NG
OK >> GO TO 2.
NG >> Replace front fog lamp bulb.
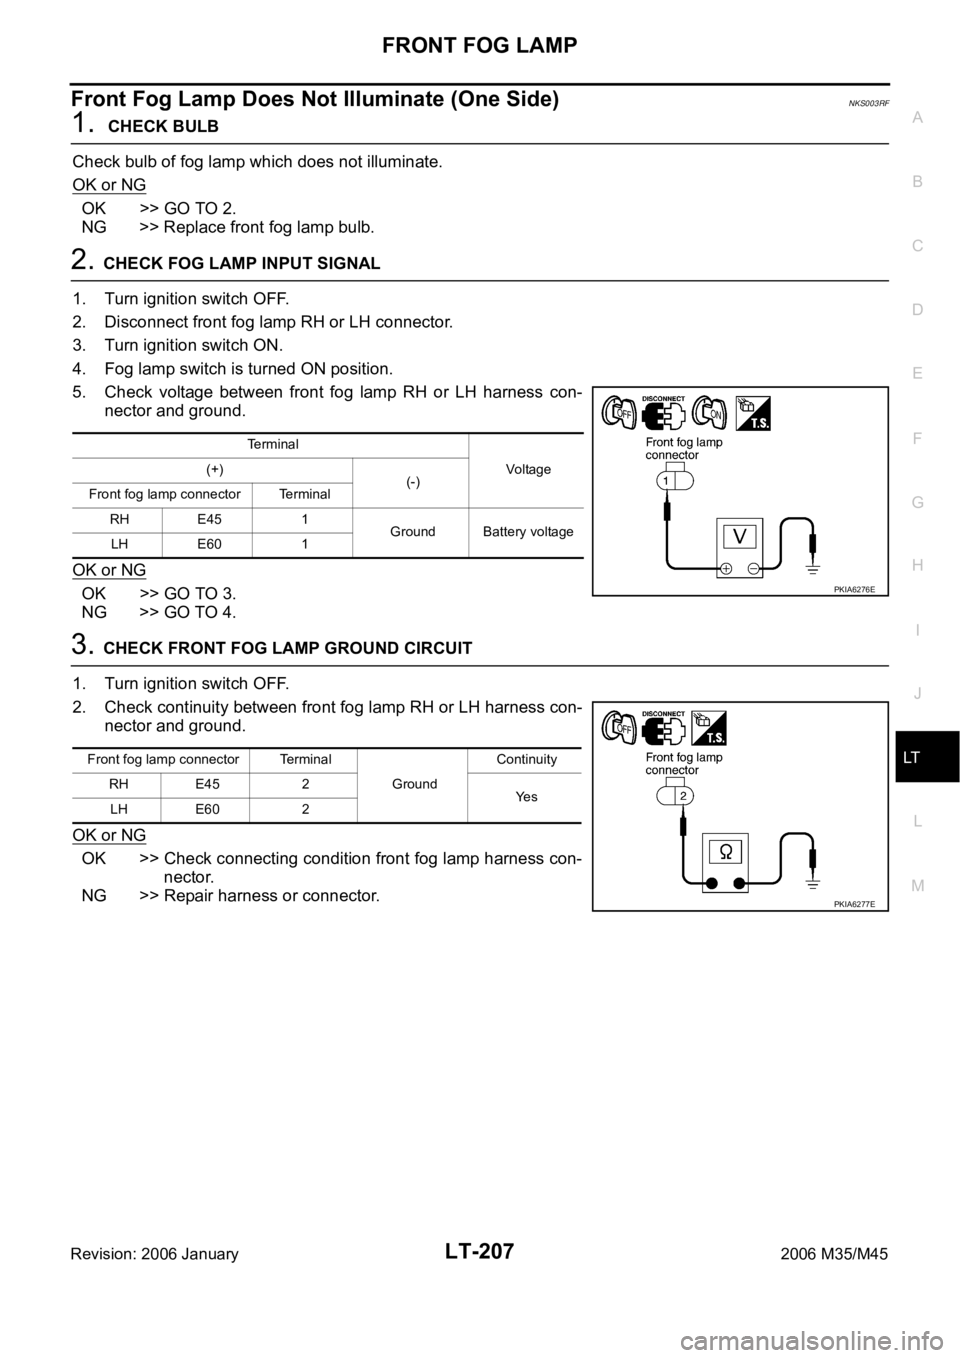
2. CHECK FOG LAMP INPUT SIGNAL
1. Turn ignition switch OFF.
2. Disconnect front fog lamp RH or LH connector.
3. Turn ignition switch ON.
4. Fog lamp switch is turned ON position.
5. Check voltage between front fog lamp RH or LH harness con-
nector and ground.
OK or NG
OK >> GO TO 3.
NG >> GO TO 4.
3. CHECK FRONT FOG LAMP GROUND CIRCUIT
1. Turn ignition switch OFF.
2. Check continuity between front fog lamp RH or LH harness con-
nector and ground.
OK or NG
OK >> Check connecting condition front fog lamp harness con-
nector.
NG >> Repair harness or connector.
Terminal
Voltag e (+)
(-)
Front fog lamp connector Terminal
RH E45 1
Ground Battery voltage
LH E60 1
PKIA6276E
Front fog lamp connector Terminal
Ground Continuity
RH E45 2
Ye s
LH E60 2
PKIA6277E
Page 4647 of 5621
LT-220
TURN SIGNAL AND HAZARD WARNING LAMPS
Revision: 2006 January2006 M35/M45
How to Perform Trouble DiagnosesNKS003RR
1. Confirm the symptom or customer complaint.
2. Understand operation description and function description. Refer to LT- 2 11 , "
System Description" .
3. Perform the Preliminary Check. Refer to LT-221, "
Preliminary Check" .
4. Check symptom and repair or replace the cause of malfunction.
5. Do turn signal and hazard warning lamps operate normally? If YES, GO TO 6. If NO, GO TO 4.
6. INSPECTION END
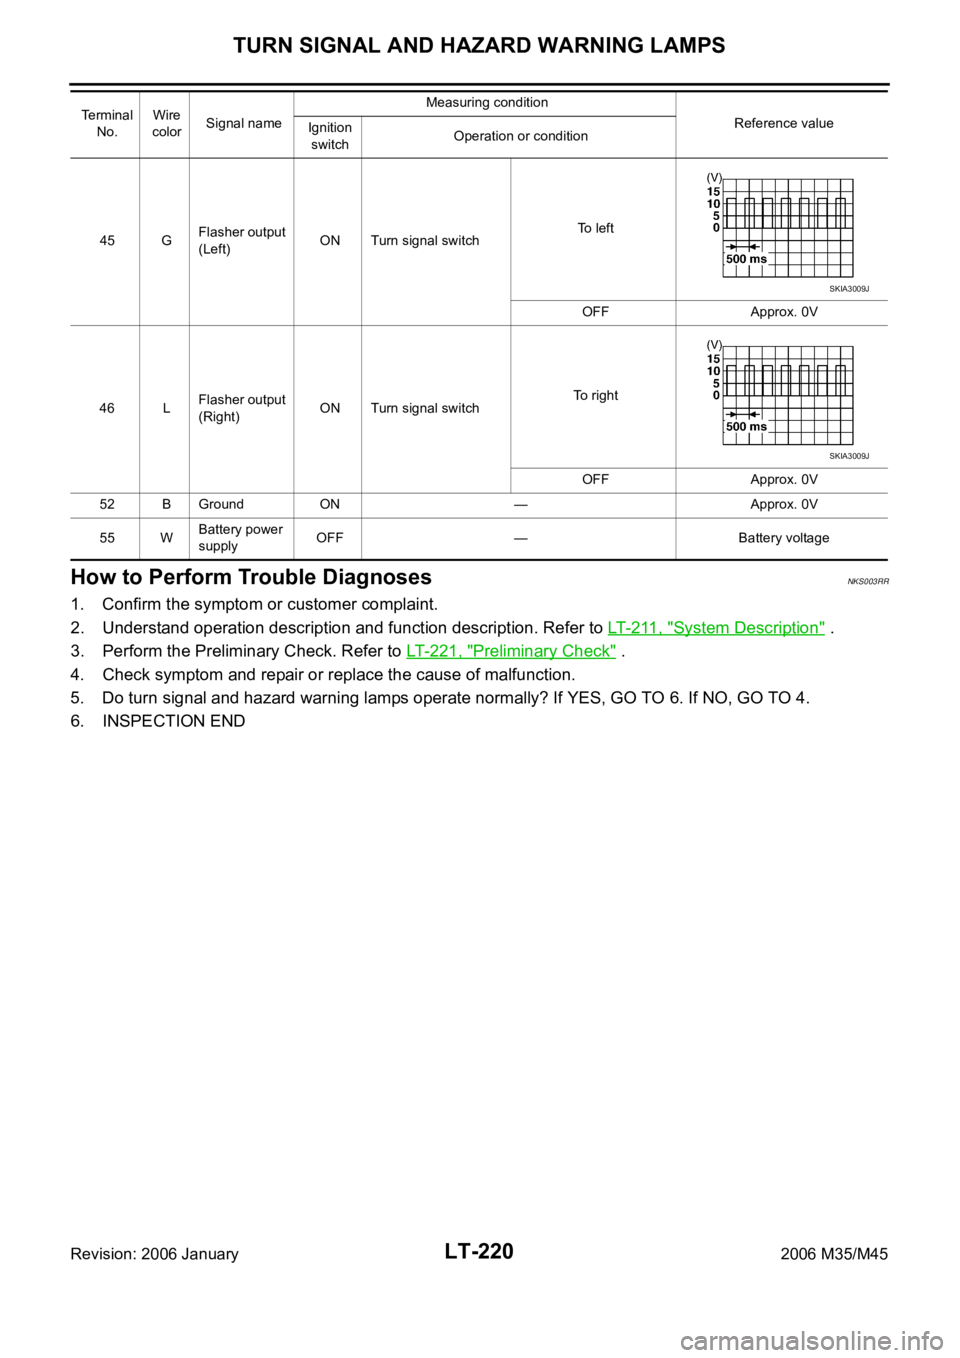
45 GFlasher output
(Left)ON Turn signal switchTo l e f t
OFF Approx. 0V
46 LFlasher output
(Right)ON Turn signal switchTo right
OFF Approx. 0V
52 B Ground ON — Approx. 0V
55 WBattery power
supplyOFF — Battery voltage Te r m i n a l
No.Wire
colorSignal nameMeasuring condition
Reference value
Ignition
switchOperation or condition
SKIA3009J
SKIA3009J
Page 4654 of 5621
TURN SIGNAL AND HAZARD WARNING LAMPS
LT-227
C
D
E
F
G
H
I
J
L
MA
B
LT
Revision: 2006 January2006 M35/M45
Hazard Warning Lamp Does Not Operate But Turn Signal Lamp OperateNKS003RV
1. CHECK CIRCUIT BETWEEN HAZARD SWITCH AND BCM
With CONSULT-II
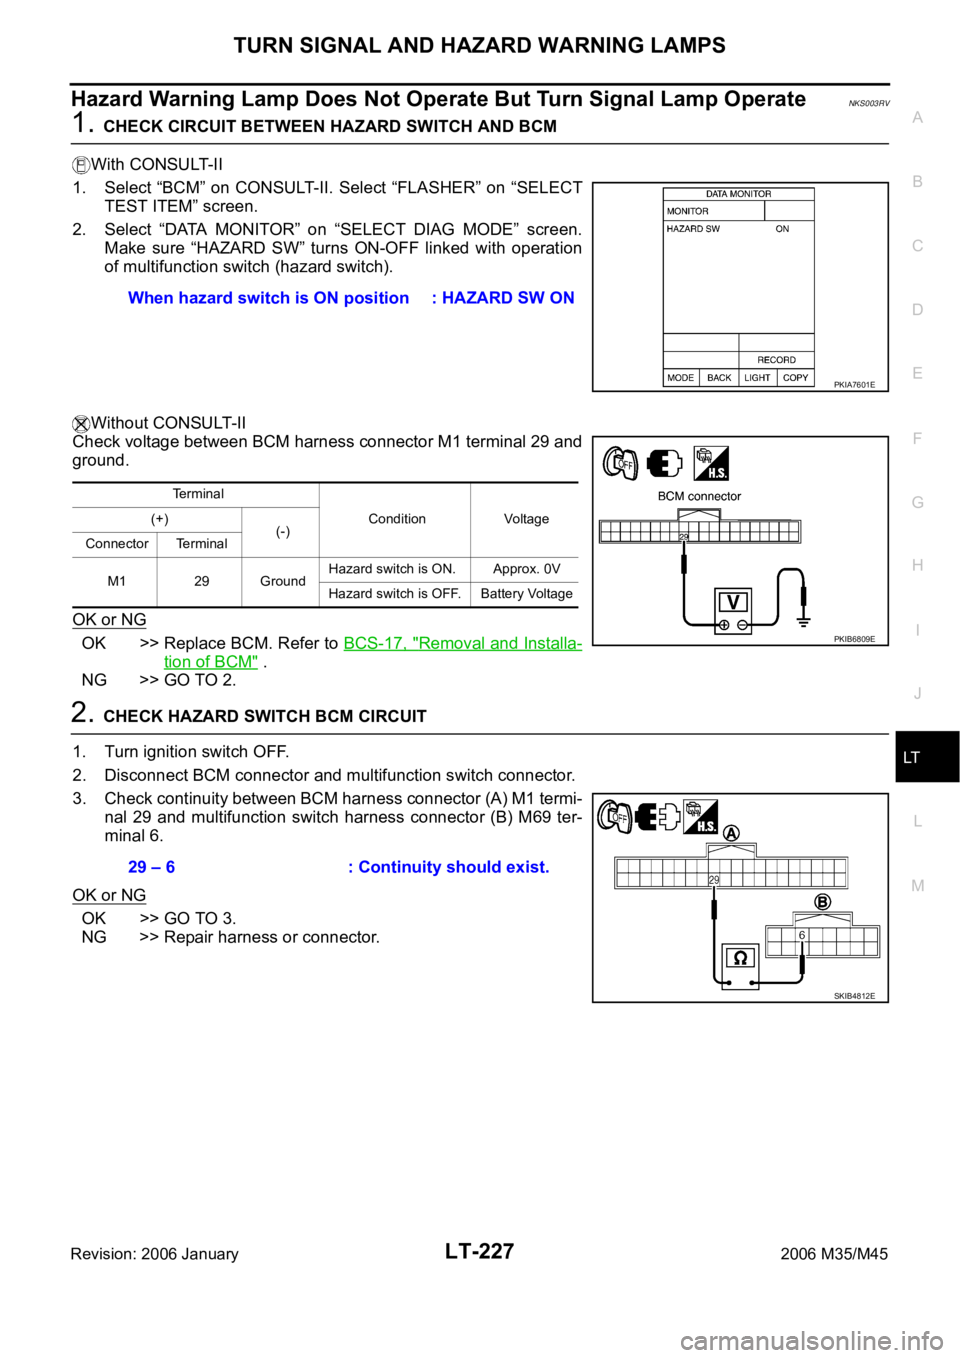
1. Select “BCM” on CONSULT-II. Select “FLASHER” on “SELECT
TEST ITEM” screen.
2. Select “DATA MONITOR” on “SELECT DIAG MODE” screen.
Make sure “HAZARD SW” turns ON-OFF linked with operation
of multifunction switch (hazard switch).
Without CONSULT-II
Check voltage between BCM harness connector M1 terminal 29 and
ground.
OK or NG
OK >> Replace BCM. Refer to BCS-17, "Removal and Installa-
tion of BCM" .
NG >> GO TO 2.
2. CHECK HAZARD SWITCH BCM CIRCUIT
1. Turn ignition switch OFF.
2. Disconnect BCM connector and multifunction switch connector.
3. Check continuity between BCM harness connector (A) M1 termi-
nal 29 and multifunction switch harness connector (B) M69 ter-
minal 6.
OK or NG
OK >> GO TO 3.
NG >> Repair harness or connector.When hazard switch is ON position : HAZARD SW ON
PKIA7601E
Terminal
Condition Voltage (+)
(-)
Connector Terminal
M1 29 GroundHazard switch is ON. Approx. 0V
Hazard switch is OFF. Battery Voltage
PKIB6809E
29 – 6 : Continuity should exist.
SKIB4812E
Page 4655 of 5621
LT-228
TURN SIGNAL AND HAZARD WARNING LAMPS
Revision: 2006 January2006 M35/M45
3. CHECK HAZARD SWITCH GROUND CIRCUIT
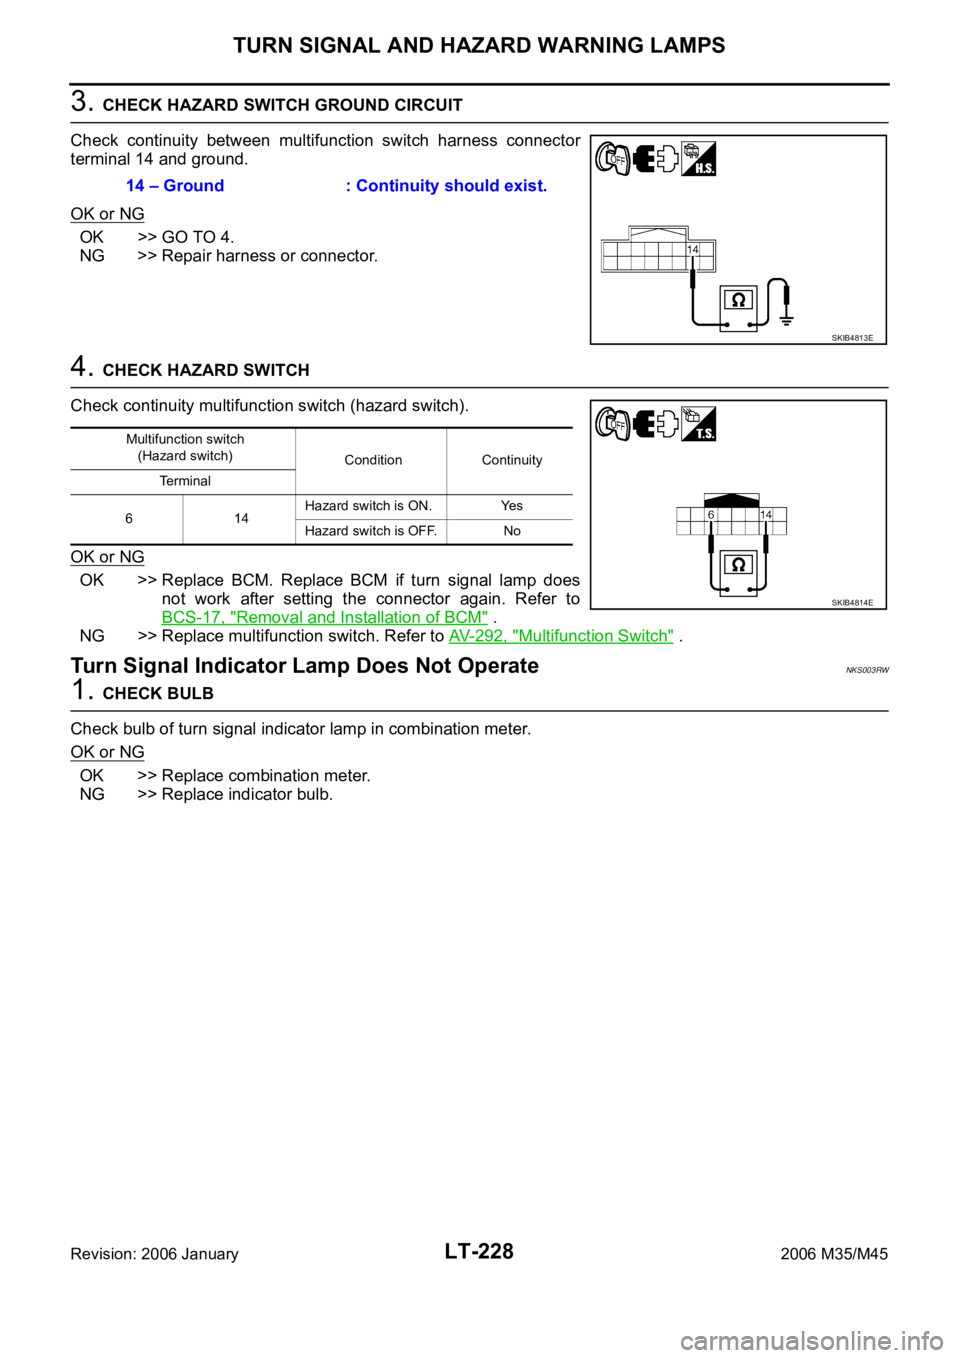
Check continuity between multifunction switch harness connector
terminal 14 and ground.
OK or NG
OK >> GO TO 4.
NG >> Repair harness or connector.
4. CHECK HAZARD SWITCH
Check continuity multifunction switch (hazard switch).
OK or NG
OK >> Replace BCM. Replace BCM if turn signal lamp does
not work after setting the connector again. Refer to
BCS-17, "
Removal and Installation of BCM" .
NG >> Replace multifunction switch. Refer to AV- 2 9 2 , "
Multifunction Switch" .
Turn Signal Indicator Lamp Does Not OperateNKS003RW
1. CHECK BULB
Check bulb of turn signal indicator lamp in combination meter.
OK or NG
OK >> Replace combination meter.
NG >> Replace indicator bulb.14 – Ground : Continuity should exist.
SKIB4813E
Multifunction switch
(Hazard switch)
Condition Continuity
Terminal
614Hazard switch is ON. Yes
Hazard switch is OFF. No
SKIB4814E
Page 4685 of 5621

LT-258
PARKING, LICENSE PLATE AND TAIL LAMPS
Revision: 2006 January2006 M35/M45
Terminals and Reference Values for IPDM E/RNKS003SO
How to Perform Trouble DiagnosesNKS003SP
1. Confirm the symptom or customer complaint.
2. Understand operation description and function description. Refer to LT- 2 4 9 , "
System Description" .
3. Carry out the Preliminary Check. Refer to LT- 2 5 8 , "
Preliminary Check" .
4. Check symptom and repair or replace the cause of malfunction.
5. Do the parking, license plate and tail lamps operate normally? If YES, GO TO 6. If NO, GO TO 4.
6. INSPECTION END
Preliminary CheckNKS003SQ
CHECK POWER SUPPLY AND GROUND CIRCUIT
1. CHECK FUSE
Check for blown fuses.
Refer to LT-252, "Wiring Diagram — TAIL/L —" .
OK or NG
OK >> GO TO 2.
NG >> If fuse or fusible link is blown, be sure to eliminate cause of malfunction before installing new fuse
or fusible link. Refer to PG-3, "
POWER SUPPLY ROUTING CIRCUIT" .
Terminal
No.Wire
colorSignal nameMeasuring condition
Reference value
Ignition
switchOperation or condition
21 R/LParking, license plate, and
tail lamp outputONLighting switch
1STOFF Approx. 0V
ON Battery voltage
38 B Ground ON — Approx. 0V
49 L CAN
H — — —
50 P CAN
L — — —
51 B Ground ON — Approx. 0V
Unit Power source Fuse and fusible link No.
BCMBatteryF
21
Ignition switch ON or START position 1
Ignition switch ACC or ON position 6
IPDM E/R Battery71
78
Page 4709 of 5621
LT-282
INTERIOR ROOM LAMP
Revision: 2006 January2006 M35/M45
How to Perform Trouble DiagnosesNKS003T5
1. Confirm the symptom or customer complaint.
2. Understand operation description and function description. Refer to LT- 2 6 7 , "
System Description" .
3. Perform the Preliminary Check. Refer to LT-283, "
Preliminary Check" .
4. Check symptom and repair or replace the cause of malfunction.
5. Does the interior room lamp operate normally? If YES, GO TO 6. If NO, GO TO 4.
6. INSPECTION END
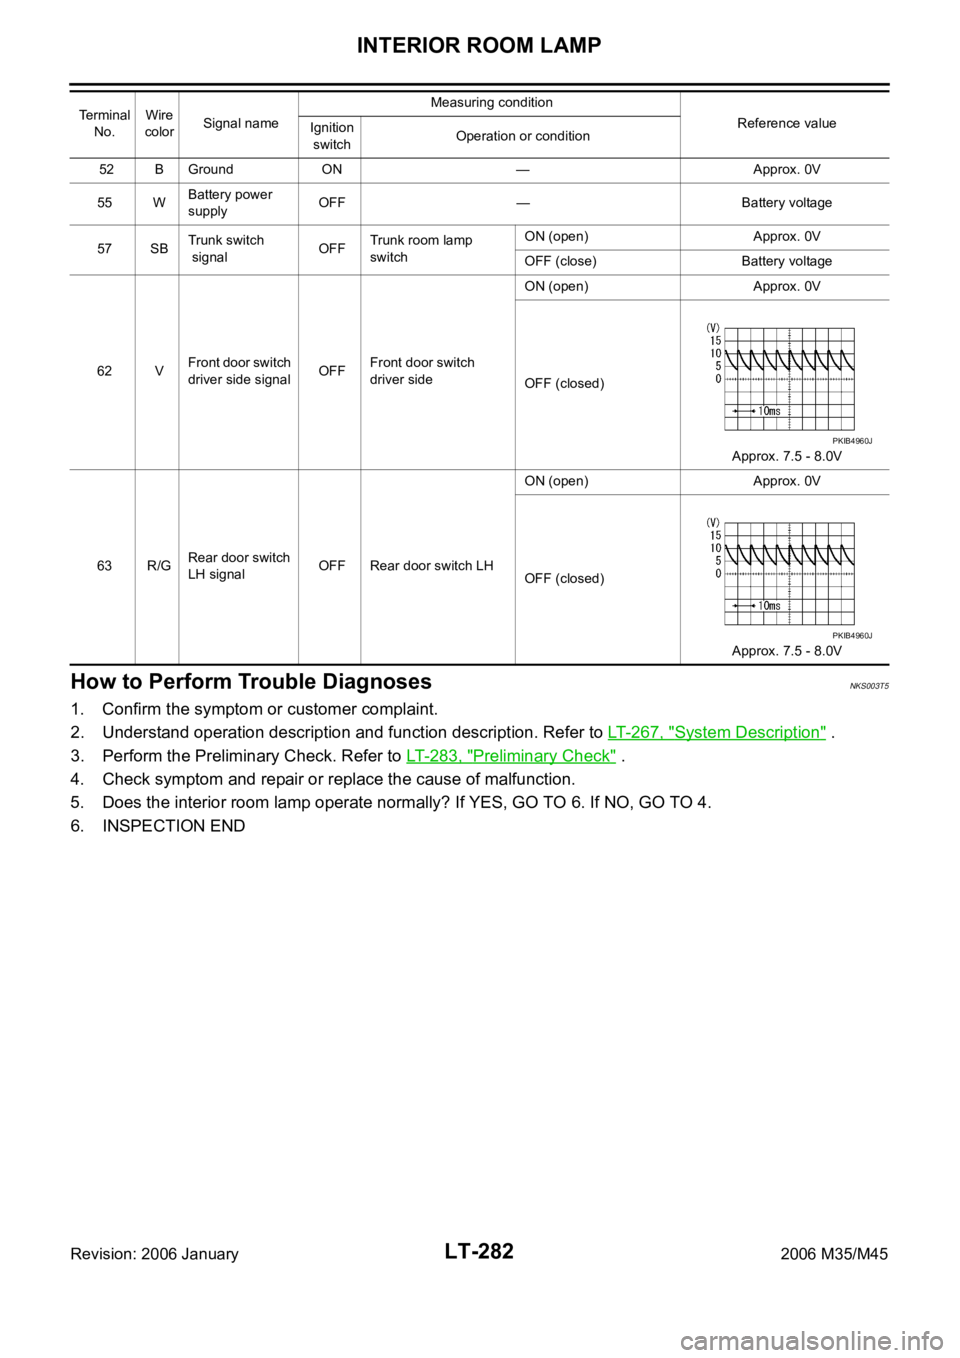
52 B Ground ON — Approx. 0V
55 WBattery power
supplyOFF — Battery voltage
57 SBTrunk switch
signalOFFTrunk room lamp
switchON (open) Approx. 0V
OFF (close) Battery voltage
62 VFront door switch
driver side signalOFFFront door switch
driver sideON (open) Approx. 0V
OFF (closed)
Approx. 7.5 - 8.0V
63 R/GRear door switch
LH signalOFF Rear door switch LHON (open) Approx. 0V
OFF (closed)
Approx. 7.5 - 8.0V Terminal
No.Wire
colorSignal nameMeasuring condition
Reference value
Ignition
switchOperation or condition
PKIB4960J
PKIB4960J
Page 4782 of 5621

GENERAL MAINTENANCE
MA-5
C
D
E
F
G
H
I
J
K
MA
B
MA
Revision: 2006 January2006 M35/M45
OUTSIDE THE VEHICLE
The maintenance items listed here should be performed from time to time, unless otherwise specified.
INSIDE THE VEHICLE
The maintenance items listed here should be checked on a regular basis, such as when performing periodic maintenance, cleaning the
vehicle, etc.ItemReference page
TiresCheck the pressure with a gauge, including the spare, at least once a month
and always prior to a long distance trips. Adjust to the specified pressure if
necessary. Check carefully for damage, cuts or excessive wear.—
Wheel nutsWhen checking the tires, make sure no nuts are missing, and check for any
loose nuts. Tighten if necessary.—
WindshieldClean the windshield on a regular basis. Check the windshield at least every
six months for cracks or other damage. Repair as necessary.—
Tire rotationTires should be rotated every 12,000 km (7,500 miles).MA-35
Wheel alignment and
balanceIf the vehicle pulls to either side while driving on a straight and level road, or if
you detect uneven or abnormal tire wear, there may be a need for wheel align-
ment. If the steering wheel or seat vibrates at normal highway speeds, wheel
balancing may be needed.MA-33,
FSU-6
(2WD),
FSU-23
(AWD)
Windshield wiper
bladesCheck for cracks or wear if they do not wipe properly. —
Doors and engine
hoodCheck that all doors and the engine hood operate smoothly as well as the
trunk lid. Also make sure that all latches lock securely. Lubricate if necessary.
Make sure that the secondary latch keeps the hood from opening when the pri-
mary latch is released.
When driving in areas using road salt or other corrosive materials, check lubri-
cation frequently.MA-38
LampsMake sure that the headlamps, stop lamps, tail lamps, turn signal lamps, and
other lamps are all operating properly and installed securely. Also check head-
lamp aim. Clean the headlamps on a regular basis. —
ItemReference page
Warning lamps and
chimesMake sure that all warning lamps and chimes are operating properly. —
Windshield wiper and
washerCheck that the wipers and washer operate properly and that the wipers do not
streak.—
Windshield defrosterCheck that the air comes out of the defroster outlets properly and in sufficient
quantity when operating the heater or air conditioner.—
Steering wheelCheck that it has the specified play. Be sure to check for changes in the steer-
ing condition, such as excessive play, hard steering or strange noises.
Free play: Less than 35 mm (1.38 in)—
SeatsCheck seat position controls such as seat adjusters, seatback recliner, etc. to
make sure they operate smoothly and that all latches lock securely in every
position. Check that the head restrains move up and down smoothly and that
the locks (if equipped) hold securely in all latched positions. Check that the
latches lock securely for folding-down rear seatbacks.—
Seat beltsCheck that all parts of the seat belt system (e.g. buckles, anchors, adjusters
and retractors) operate properly and smoothly, and are installed securely.
Check the belt webbing for cuts, fraying, wear or damage.MA-39
Accelerator pedalCheck the pedal for smooth operation and make sure the pedal does not catch
or require uneven effort. Keep the floor mats away from the pedal.—
BrakesCheck that the brake does not pull the vehicle to one side when applied. —
Brake pedal and
boosterCheck the pedal for smooth operation and make sure it has the proper dis-
tance under it when depressed fully. Check the brake booster function. Be
sure to keep the floor mats away from the pedal.BR-6
, BR-18
Page 4783 of 5621
MA-6
GENERAL MAINTENANCE
Revision: 2006 January2006 M35/M45
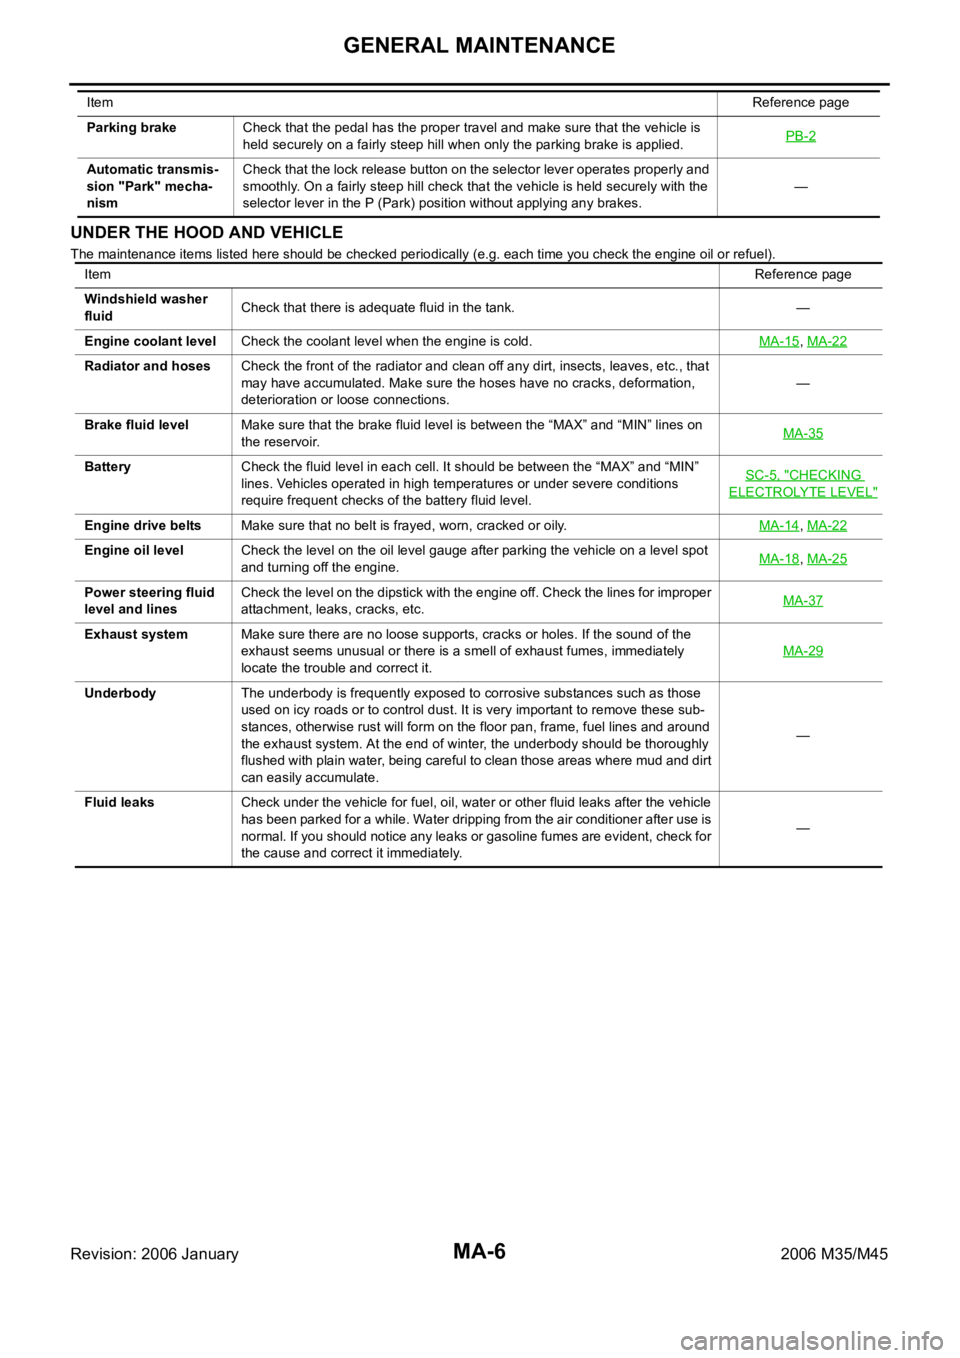
UNDER THE HOOD AND VEHICLE
The maintenance items listed here should be checked periodically (e.g. each time you check the engine oil or refuel). Parking brakeCheck that the pedal has the proper travel and make sure that the vehicle is
held securely on a fairly steep hill when only the parking brake is applied.PB-2
Automatic transmis-
sion "Park" mecha-
nismCheck that the lock release button on the selector lever operates properly and
smoothly. On a fairly steep hill check that the vehicle is held securely with the
selector lever in the P (Park) position without applying any brakes.— ItemReference page
ItemReference page
Windshield washer
fluidCheck that there is adequate fluid in the tank. —
Engine coolant levelCheck the coolant level when the engine is cold.MA-15
, MA-22
Radiator and hosesCheck the front of the radiator and clean off any dirt, insects, leaves, etc., that
may have accumulated. Make sure the hoses have no cracks, deformation,
deterioration or loose connections.—
Brake fluid levelMake sure that the brake fluid level is between the “MAX” and “MIN” lines on
the reservoir.MA-35
BatteryCheck the fluid level in each cell. It should be between the “MAX” and “MIN”
lines. Vehicles operated in high temperatures or under severe conditions
require frequent checks of the battery fluid level.SC-5, "
CHECKING
ELECTROLYTE LEVEL"
Engine drive beltsMake sure that no belt is frayed, worn, cracked or oily.MA-14, MA-22
Engine oil levelCheck the level on the oil level gauge after parking the vehicle on a level spot
and turning off the engine.MA-18, MA-25
Power steering fluid
level and linesCheck the level on the dipstick with the engine off. Check the lines for improper
attachment, leaks, cracks, etc.MA-37
Exhaust systemMake sure there are no loose supports, cracks or holes. If the sound of the
exhaust seems unusual or there is a smell of exhaust fumes, immediately
locate the trouble and correct it.MA-29
UnderbodyThe underbody is frequently exposed to corrosive substances such as those
used on icy roads or to control dust. It is very important to remove these sub-
stances, otherwise rust will form on the floor pan, frame, fuel lines and around
the exhaust system. At the end of winter, the underbody should be thoroughly
flushed with plain water, being careful to clean those areas where mud and dirt
can easily accumulate.—
Fluid leaksCheck under the vehicle for fuel, oil, water or other fluid leaks after the vehicle
has been parked for a while. Water dripping from the air conditioner after use is
normal. If you should notice any leaks or gasoline fumes are evident, check for
the cause and correct it immediately.—