Page 4447 of 5621
LT-20
HEADLAMP (FOR USA) - CONVENTIONAL TYPE -
Revision: 2006 January2006 M35/M45
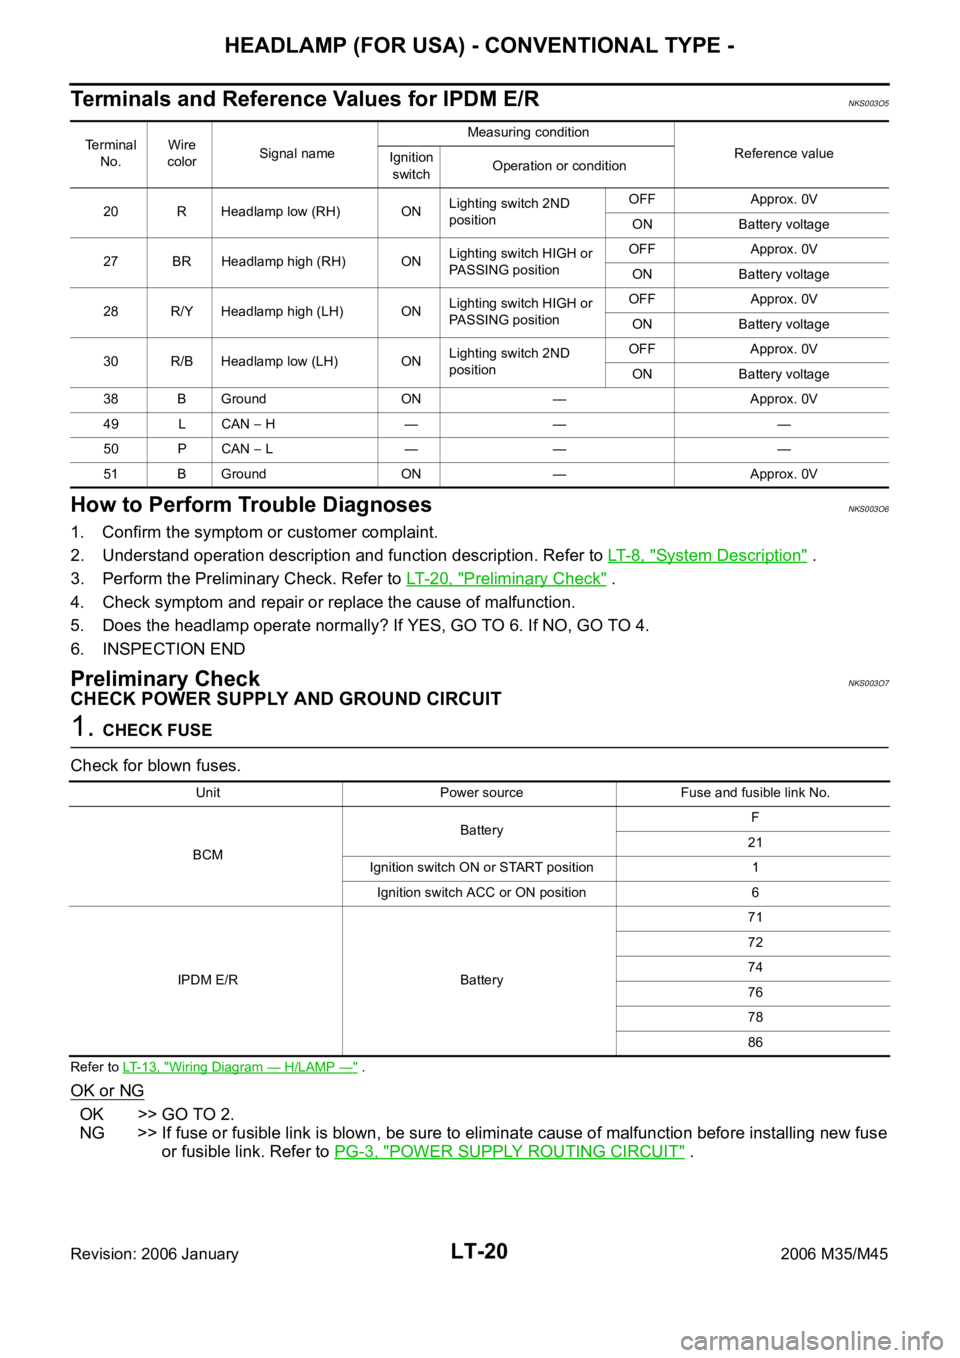
Terminals and Reference Values for IPDM E/RNKS003O5
How to Perform Trouble DiagnosesNKS003O6
1. Confirm the symptom or customer complaint.
2. Understand operation description and function description. Refer to LT- 8 , "
System Description" .
3. Perform the Preliminary Check. Refer to LT- 2 0 , "
Preliminary Check" .
4. Check symptom and repair or replace the cause of malfunction.
5. Does the headlamp operate normally? If YES, GO TO 6. If NO, GO TO 4.
6. INSPECTION END
Preliminary CheckNKS003O7
CHECK POWER SUPPLY AND GROUND CIRCUIT
1. CHECK FUSE
Check for blown fuses.
Refer to LT-13, "Wiring Diagram — H/LAMP —" .
OK or NG
OK >> GO TO 2.
NG >> If fuse or fusible link is blown, be sure to eliminate cause of malfunction before installing new fuse
or fusible link. Refer to PG-3, "
POWER SUPPLY ROUTING CIRCUIT" .
Terminal
No.Wire
colorSignal nameMeasuring condition
Reference value
Ignition
switchOperation or condition
20 R Headlamp low (RH) ONLighting switch 2ND
positionOFF Approx. 0V
ON Battery voltage
27 BR Headlamp high (RH) ONLighting switch HIGH or
PASSING positionOFF Approx. 0V
ON Battery voltage
28 R/Y Headlamp high (LH) ONLighting switch HIGH or
PASSING positionOFF Approx. 0V
ON Battery voltage
30 R/B Headlamp low (LH) ONLighting switch 2ND
positionOFF Approx. 0V
ON Battery voltage
38 B Ground ON — Approx. 0V
49 L CAN
H — — —
50 P CAN
L — — —
51 B Ground ON — Approx. 0V
Unit Power source Fuse and fusible link No.
BCMBatteryF
21
Ignition switch ON or START position 1
Ignition switch ACC or ON position 6
IPDM E/R Battery71
72
74
76
78
86
Page 4456 of 5621
HEADLAMP (FOR USA) - CONVENTIONAL TYPE -
LT-29
C
D
E
F
G
H
I
J
L
MA
B
LT
Revision: 2006 January2006 M35/M45
6. CHECK BULB
Check bulbs of lamp (both side).
OK or NG
OK >> Check connecting condition headlamp harness connector.
NG >> Replace headlamp bulb.
7. CHECK CIRCUIT BETWEEN IPDM E/R AND FRONT COMBINATION LAMP
1. Turn ignition switch OFF.
2. Disconnect IPDM E/R connector.
3. Check continuity between IPDM E/R harness connector (A) and
front combination lamp (RH and LH) harness connector (B).
4. Check harness continuity between IPDM E/R harness connector
(A) and ground.
OK or NG
OK >> Replace IPDM E/R. Refer to PG-31, "Removal and Installation of IPDM E/R" .
NG >> Repair harness or connector.
CircuitAB
Continuity
Connector Terminal Connector Terminal
RH
E727 E47 6
Ye s
LH 28 E54 6
A
GroundContinuity
Connector Terminal
RH
E727
No
LH 28
SKIB4753E
Page 4458 of 5621
HEADLAMP (FOR USA) - CONVENTIONAL TYPE -
LT-31
C
D
E
F
G
H
I
J
L
MA
B
LT
Revision: 2006 January2006 M35/M45
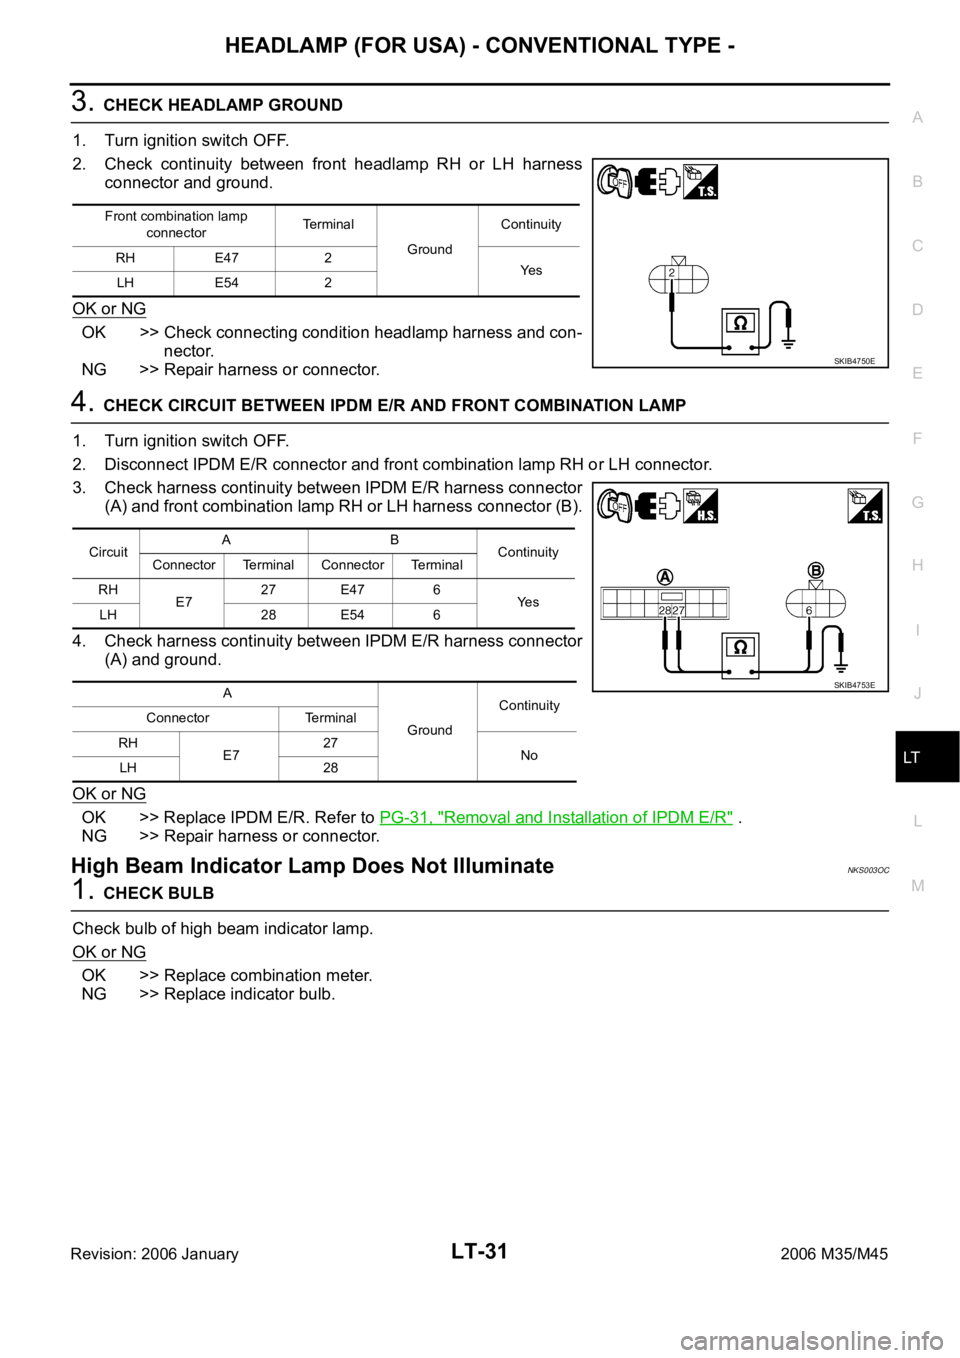
3. CHECK HEADLAMP GROUND
1. Turn ignition switch OFF.
2. Check continuity between front headlamp RH or LH harness
connector and ground.
OK or NG
OK >> Check connecting condition headlamp harness and con-
nector.
NG >> Repair harness or connector.
4. CHECK CIRCUIT BETWEEN IPDM E/R AND FRONT COMBINATION LAMP
1. Turn ignition switch OFF.
2. Disconnect IPDM E/R connector and front combination lamp RH or LH connector.
3. Check harness continuity between IPDM E/R harness connector
(A) and front combination lamp RH or LH harness connector (B).
4. Check harness continuity between IPDM E/R harness connector
(A) and ground.
OK or NG
OK >> Replace IPDM E/R. Refer to PG-31, "Removal and Installation of IPDM E/R" .
NG >> Repair harness or connector.
High Beam Indicator Lamp Does Not IlluminateNKS003OC
1. CHECK BULB
Check bulb of high beam indicator lamp.
OK or NG
OK >> Replace combination meter.
NG >> Replace indicator bulb.
Front combination lamp
connectorTe r m i n a l
GroundContinuity
RH E47 2
Ye s
LH E54 2
SKIB4750E
CircuitAB
Continuity
Connector Terminal Connector Terminal
RH
E727 E47 6
Ye s
LH 28 E54 6
A
GroundContinuity
Connector Terminal
RH
E727
No
LH 28
SKIB4753E
Page 4482 of 5621
HEADLAMP (FOR USA) - XENON TYPE -
LT-55
C
D
E
F
G
H
I
J
L
MA
B
LT
Revision: 2006 January2006 M35/M45
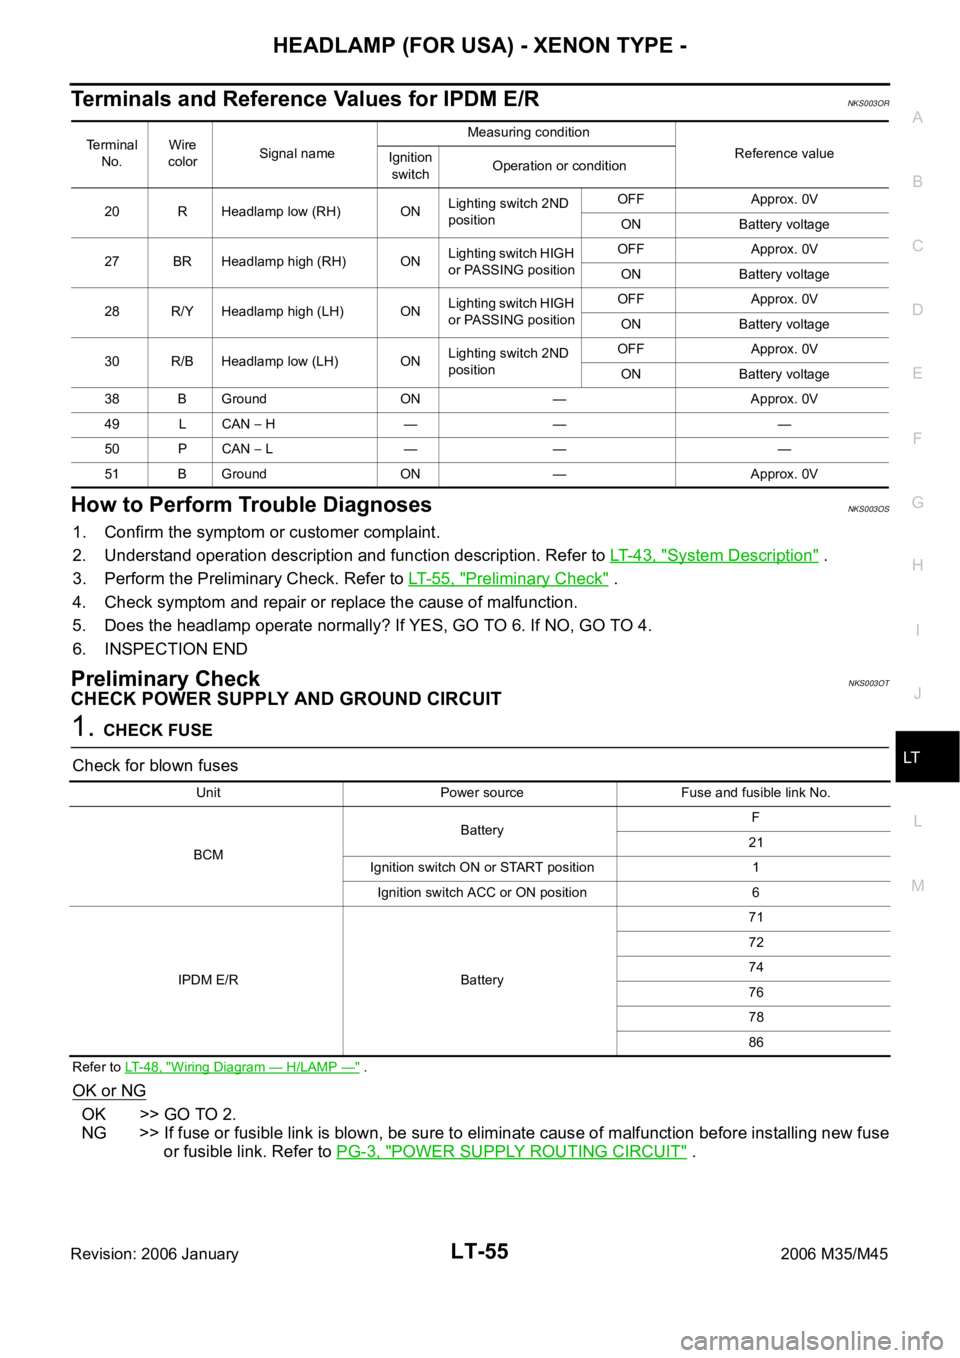
Terminals and Reference Values for IPDM E/RNKS003OR
How to Perform Trouble DiagnosesNKS003OS
1. Confirm the symptom or customer complaint.
2. Understand operation description and function description. Refer to LT- 4 3 , "
System Description" .
3. Perform the Preliminary Check. Refer to LT-55, "
Preliminary Check" .
4. Check symptom and repair or replace the cause of malfunction.
5. Does the headlamp operate normally? If YES, GO TO 6. If NO, GO TO 4.
6. INSPECTION END
Preliminary CheckNKS003OT
CHECK POWER SUPPLY AND GROUND CIRCUIT
1. CHECK FUSE
Check for blown fuses
Refer to LT-48, "Wiring Diagram — H/LAMP —" .
OK or NG
OK >> GO TO 2.
NG >> If fuse or fusible link is blown, be sure to eliminate cause of malfunction before installing new fuse
or fusible link. Refer to PG-3, "
POWER SUPPLY ROUTING CIRCUIT" .
Terminal
No.Wire
colorSignal nameMeasuring condition
Reference value
Ignition
switchOperation or condition
20 R Headlamp low (RH) ONLighting switch 2ND
positionOFF Approx. 0V
ON Battery voltage
27 BR Headlamp high (RH) ONLighting switch HIGH
or PASSING positionOFF Approx. 0V
ON Battery voltage
28 R/Y Headlamp high (LH) ONLighting switch HIGH
or PASSING positionOFF Approx. 0V
ON Battery voltage
30 R/B Headlamp low (LH) ONLighting switch 2ND
positionOFF Approx. 0V
ON Battery voltage
38 B Ground ON — Approx. 0V
49 L CAN
H — — —
50 P CAN
L — — —
51 B Ground ON — Approx. 0V
Unit Power source Fuse and fusible link No.
BCMBatteryF
21
Ignition switch ON or START position 1
Ignition switch ACC or ON position 6
IPDM E/R Battery71
72
74
76
78
86
Page 4491 of 5621
LT-64
HEADLAMP (FOR USA) - XENON TYPE -
Revision: 2006 January2006 M35/M45
6. CHECK BULB
Check bulbs of lamp (both side).
OK or NG
OK >> Check connecting condition headlamp harness connector.
NG >> Replace headlamp bulb.
7. CHECK CIRCUIT BETWEEN IPDM E/R AND FRONT COMBINATION LAMP
1. Turn ignition switch OFF.
2. Disconnect IPDM E/R connector.
3. Check continuity between IPDM E/R harness connector (A) and
front combination lamp (RH and LH) harness connector (B).
4. Check harness continuity between IPDM E/R harness connector
(A) and ground.
OK or NG
OK >> Replace IPDM E/R. Refer to PG-31, "Removal and Installation of IPDM E/R" .
NG >> Repair harness or connector.
CircuitAB
Continuity
Connector Terminal Connector Terminal
RH
E727 E47 6
Ye s
LH 28 E54 6
A
GroundContinuity
Connector Terminal
RH
E727
No
LH 28
SKIB4753E
Page 4493 of 5621
LT-66
HEADLAMP (FOR USA) - XENON TYPE -
Revision: 2006 January2006 M35/M45
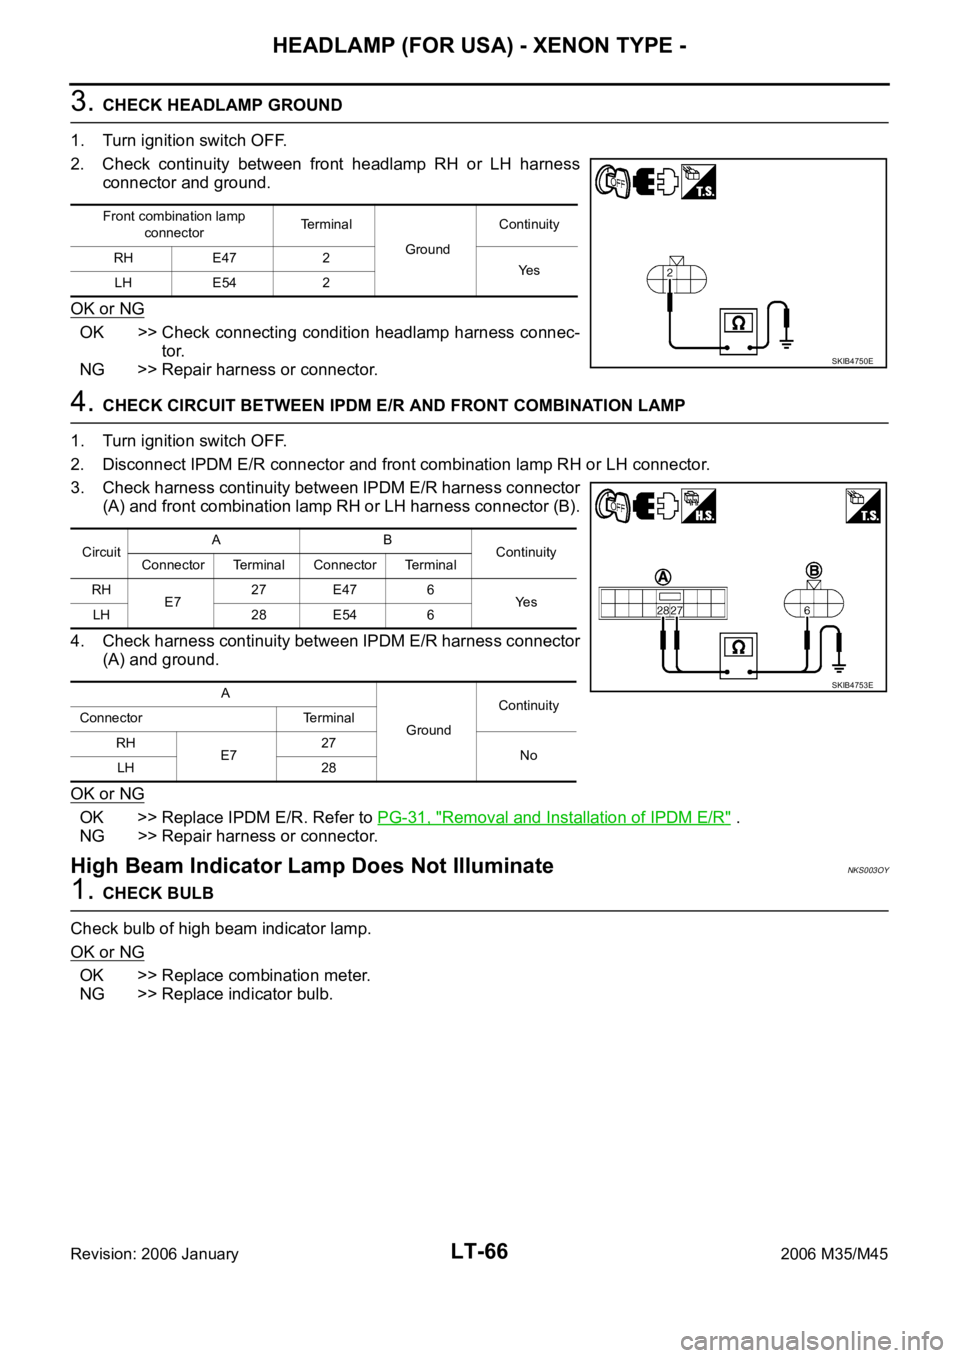
3. CHECK HEADLAMP GROUND
1. Turn ignition switch OFF.
2. Check continuity between front headlamp RH or LH harness
connector and ground.
OK or NG
OK >> Check connecting condition headlamp harness connec-
tor.
NG >> Repair harness or connector.
4. CHECK CIRCUIT BETWEEN IPDM E/R AND FRONT COMBINATION LAMP
1. Turn ignition switch OFF.
2. Disconnect IPDM E/R connector and front combination lamp RH or LH connector.
3. Check harness continuity between IPDM E/R harness connector
(A) and front combination lamp RH or LH harness connector (B).
4. Check harness continuity between IPDM E/R harness connector
(A) and ground.
OK or NG
OK >> Replace IPDM E/R. Refer to PG-31, "Removal and Installation of IPDM E/R" .
NG >> Repair harness or connector.
High Beam Indicator Lamp Does Not IlluminateNKS003OY
1. CHECK BULB
Check bulb of high beam indicator lamp.
OK or NG
OK >> Replace combination meter.
NG >> Replace indicator bulb.
Front combination lamp
connectorTerminal
GroundContinuity
RH E47 2
Ye s
LH E54 2
SKIB4750E
CircuitAB
Continuity
Connector Terminal Connector Terminal
RH
E727 E47 6
Ye s
LH 28 E54 6
A
GroundContinuity
Connector Terminal
RH
E727
No
LH 28
SKIB4753E
Page 4518 of 5621
HEADLAMP (FOR CANADA) - DAYTIME LIGHT SYSTEM -
LT-91
C
D
E
F
G
H
I
J
L
MA
B
LT
Revision: 2006 January2006 M35/M45
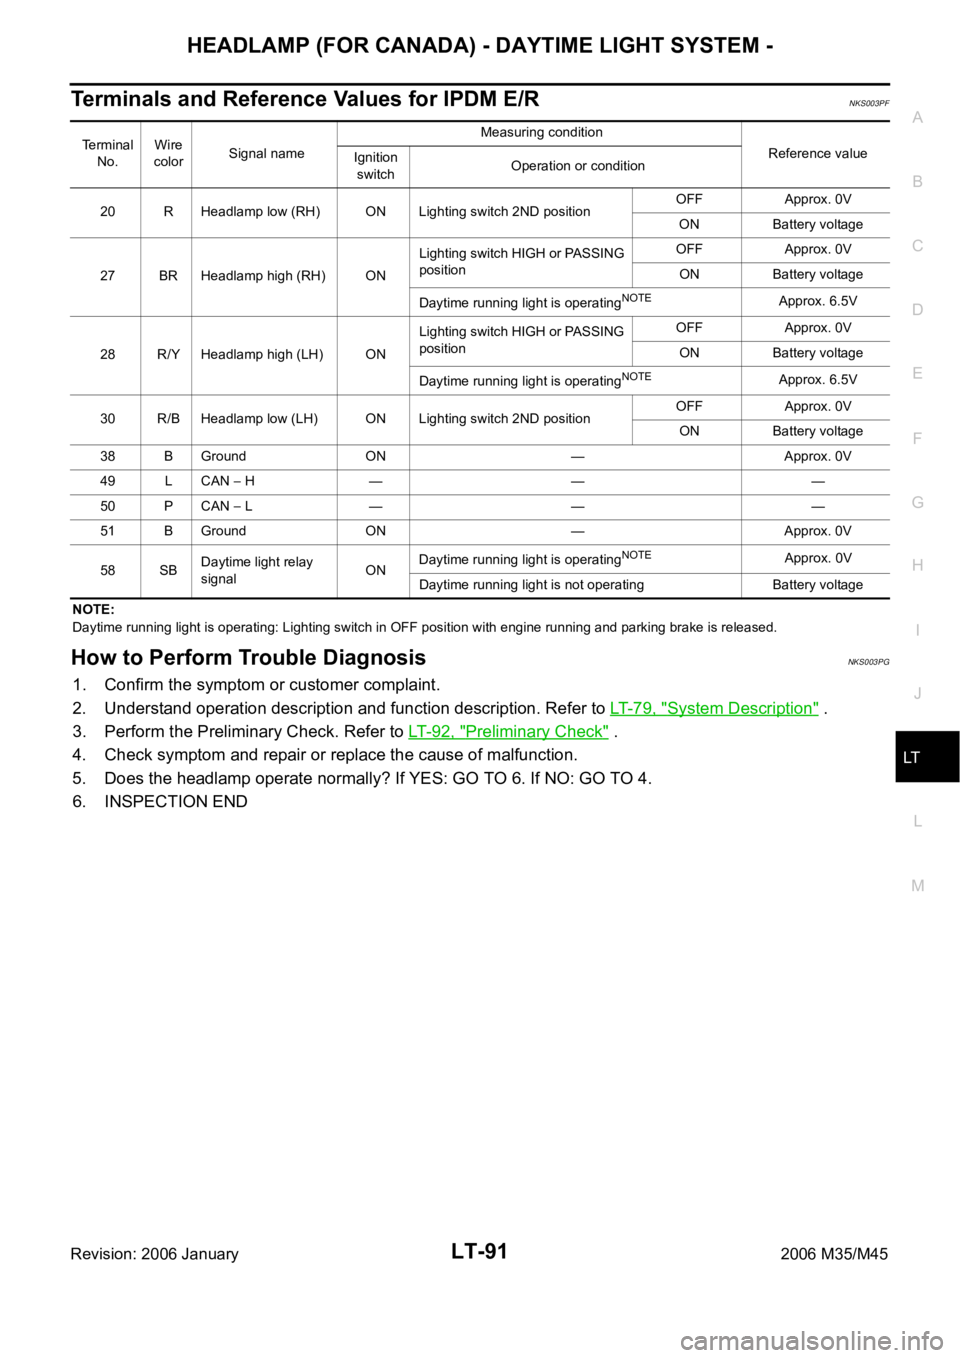
Terminals and Reference Values for IPDM E/RNKS003PF
NOTE:
Daytime running light is operating: Lighting switch in OFF position with engine running and parking brake is released.
How to Perform Trouble DiagnosisNKS003PG
1. Confirm the symptom or customer complaint.
2. Understand operation description and function description. Refer to LT- 7 9 , "
System Description" .
3. Perform the Preliminary Check. Refer to LT-92, "
Preliminary Check" .
4. Check symptom and repair or replace the cause of malfunction.
5. Does the headlamp operate normally? If YES: GO TO 6. If NO: GO TO 4.
6. INSPECTION END
Terminal
No.Wire
colorSignal nameMeasuring condition
Reference value
Ignition
switchOperation or condition
20 R Headlamp low (RH) ON Lighting switch 2ND positionOFF Approx. 0V
ON Battery voltage
27 BR Headlamp high (RH) ONLighting switch HIGH or PASSING
positionOFF Approx. 0V
ON Battery voltage
Daytime running light is operating
NOTEApprox. 6.5V
28 R/Y Headlamp high (LH) ONLighting switch HIGH or PASSING
positionOFF Approx. 0V
ON Battery voltage
Daytime running light is operating
NOTEApprox. 6.5V
30 R/B Headlamp low (LH) ON Lighting switch 2ND positionOFF Approx. 0V
ON Battery voltage
38 B Ground ON — Approx. 0V
49 L CAN
H — — —
50 P CAN
L — — —
51 B Ground ON — Approx. 0V
58 SBDaytime light relay
signalONDaytime running light is operating
NOTEApprox. 0V
Daytime running light is not operating Battery voltage
Page 4531 of 5621
LT-104
HEADLAMP (FOR CANADA) - DAYTIME LIGHT SYSTEM -
Revision: 2006 January2006 M35/M45
6. CHECK HEADLAMP (RH SIDE) GROUND
1. Remove daytime light relay.
2. Check continuity between front headlamp RH harness connec-
tor (A) E47 terminal 2 and daytime light relay harness connector
(B) E34 terminal 3.
3. Check continuity between daytime light relay harness connector
E34 terminal 4 and ground.
OK or NG
OK >> GO TO 7.
NG >> Repair harness or connector.
7. CHECK DAYTIME LIGHT RELAY
Check continuity between terminal 3 and 4.
OK >> Check headlamp bulb and connecting condition combi-
nation lamp terminal connector.
NG >> Replace daytime light relay.2 – 3 : Continuity should exist.
SKIB4751E
4 – Ground : Continuity should exist.
SKIB4674E
3 – 4 : Continuity should exist.
SKIB4660E