Page 4535 of 5621
LT-108
HEADLAMP (FOR CANADA) - DAYTIME LIGHT SYSTEM -
Revision: 2006 January2006 M35/M45
3. CHECK HEADLAMP GROUND
1. Turn ignition switch OFF.
2. Check continuity headlamp harness connector E54 terminal 2
and ground.
OK or NG
OK >> Check connecting condition front headlamp LH connec-
tor harness.
NG >> Repair harness or connector.
4. CHECK CIRCUIT BETWEEN IPDM E/R AND FRONT COMBINATION LAMP
1. Turn ignition switch OFF.
2. Disconnect IPDM E/R connector and front combination lamp LH connector.
3. Check continuity between IPDM E/R harness connector (A) E7
terminal 28 and front combination lamp LH harness connector
(B) E54 terminal 6.
4. Check continuity between IPDM E/R harness connector (A) E7
terminal 28 and ground.
OK or NG
OK >> Replace IPDM E/R. Refer to PG-31, "Removal and
Installation of IPDM E/R" .
NG >> Repair harness or connector.2 – Ground : Continuity should exist.
SKIB4750E
28 – 6 : Continuity should exist.
28 – Ground : Continuity should not exist.
SKIB4757E
Page 4540 of 5621
HEADLAMP (FOR CANADA) - DAYTIME LIGHT SYSTEM -
LT-113
C
D
E
F
G
H
I
J
L
MA
B
LT
Revision: 2006 January2006 M35/M45
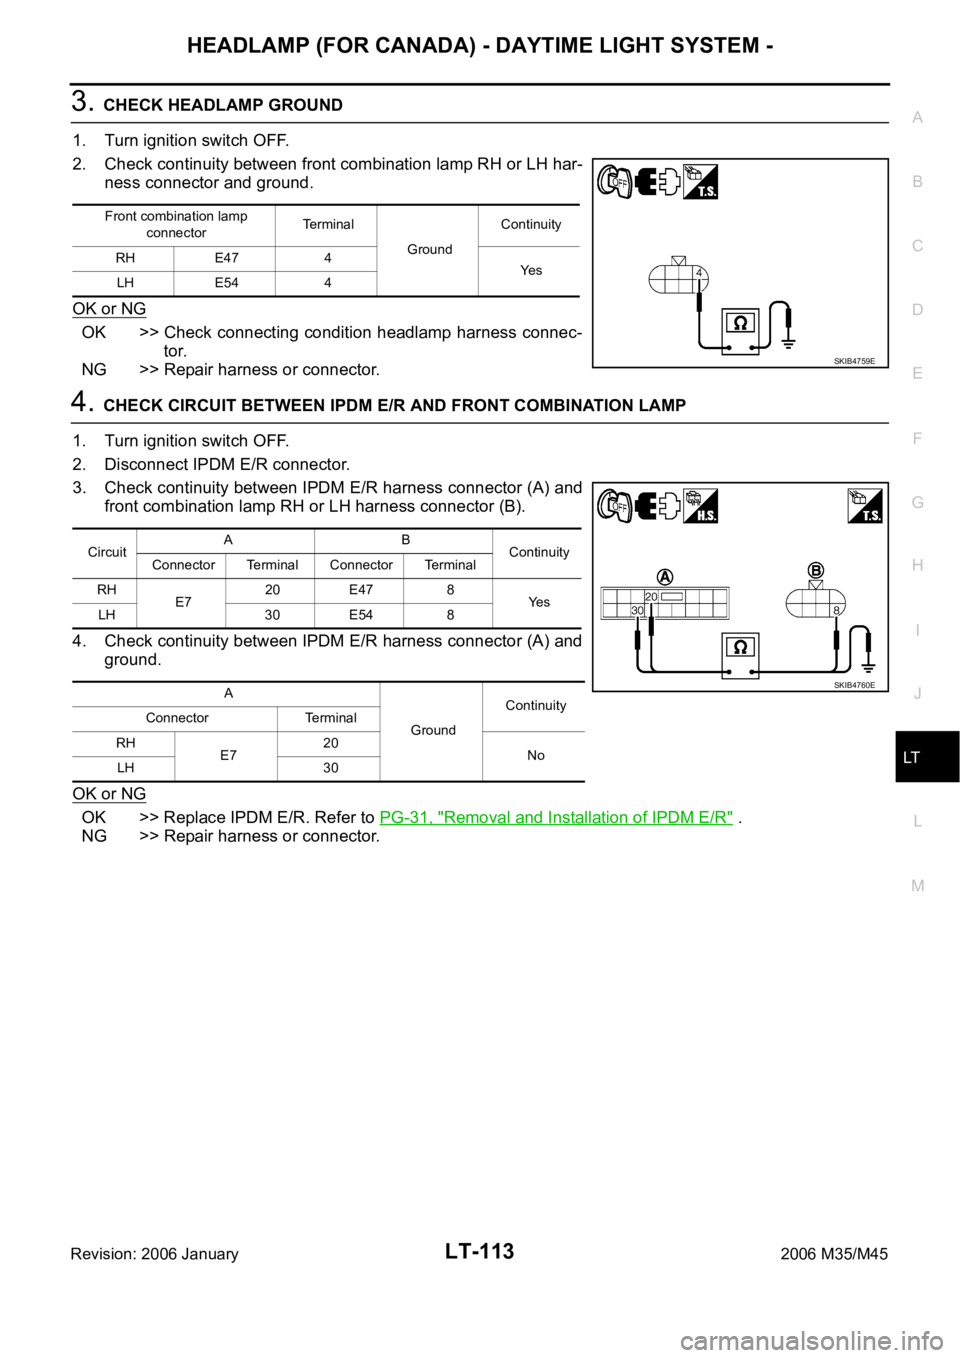
3. CHECK HEADLAMP GROUND
1. Turn ignition switch OFF.
2. Check continuity between front combination lamp RH or LH har-
ness connector and ground.
OK or NG
OK >> Check connecting condition headlamp harness connec-
tor.
NG >> Repair harness or connector.
4. CHECK CIRCUIT BETWEEN IPDM E/R AND FRONT COMBINATION LAMP
1. Turn ignition switch OFF.
2. Disconnect IPDM E/R connector.
3. Check continuity between IPDM E/R harness connector (A) and
front combination lamp RH or LH harness connector (B).
4. Check continuity between IPDM E/R harness connector (A) and
ground.
OK or NG
OK >> Replace IPDM E/R. Refer to PG-31, "Removal and Installation of IPDM E/R" .
NG >> Repair harness or connector.
Front combination lamp
connectorTe r m i n a l
GroundContinuity
RH E47 4
Ye s
LH E54 4
SKIB4759E
CircuitAB
Continuity
Connector Terminal Connector Terminal
RH
E720 E47 8
Ye s
LH 30 E54 8
A
GroundContinuity
Connector Terminal
RH
E720
No
LH 30
SKIB4760E
Page 4552 of 5621

AUTO LIGHT SYSTEM
LT-125
C
D
E
F
G
H
I
J
L
MA
B
LT
Revision: 2006 January2006 M35/M45
Terminals and Reference Values for IPDM E/RNKS003Q6
How to Perform Trouble DiagnosesNKS003Q7
1. Confirm the symptom or customer complaint.
2. Understand operation description and function description. Refer to LT- 11 6 , "
System Description" .
3. Perform the Preliminary Check. Refer to LT- 1 2 6 , "
Preliminary Check" .
4. Check symptom and repair or replace the cause of malfunction. Refer to LT-130, "
Symptom Chart" .
5. Does the auto light system operate normally? If YES, GO TO 6. If NO, GO TO 4.
6. INSPECTION END.
Terminal
No.Wire
colorSignal nameMeasuring condition
Reference value
Ignition
switchOperation or condition
20 R Headlamp low (RH) ONLighting switch 2ND
positionOFF Approx. 0V
ON Battery voltage
21 R/LParking, license plate,
and tail lampONLighting switch 1ST
positionOFF Approx. 0V
ON Battery voltage
27 BR Headlamp high (RH) ONLighting switch HIGH
or PASSING positionOFF Approx. 0V
ON Battery voltage
28 R/Y Headlamp high (LH) ONLighting switch HIGH
or PASSING positionOFF Approx. 0V
ON Battery voltage
30 R/B Headlamp low (LH) ONLighting switch 2ND
positionOFF Approx. 0V
ON Battery voltage
38 B Ground ON — Approx. 0V
49 L CAN
H — — —
50 P CAN
L — — —
51 B Ground ON — Approx. 0V
Page 4594 of 5621
ACTIVE AFS
LT-167
C
D
E
F
G
H
I
J
L
MA
B
LT
Revision: 2006 January2006 M35/M45
14. CHECK DIAGNOSIS RESULT 1
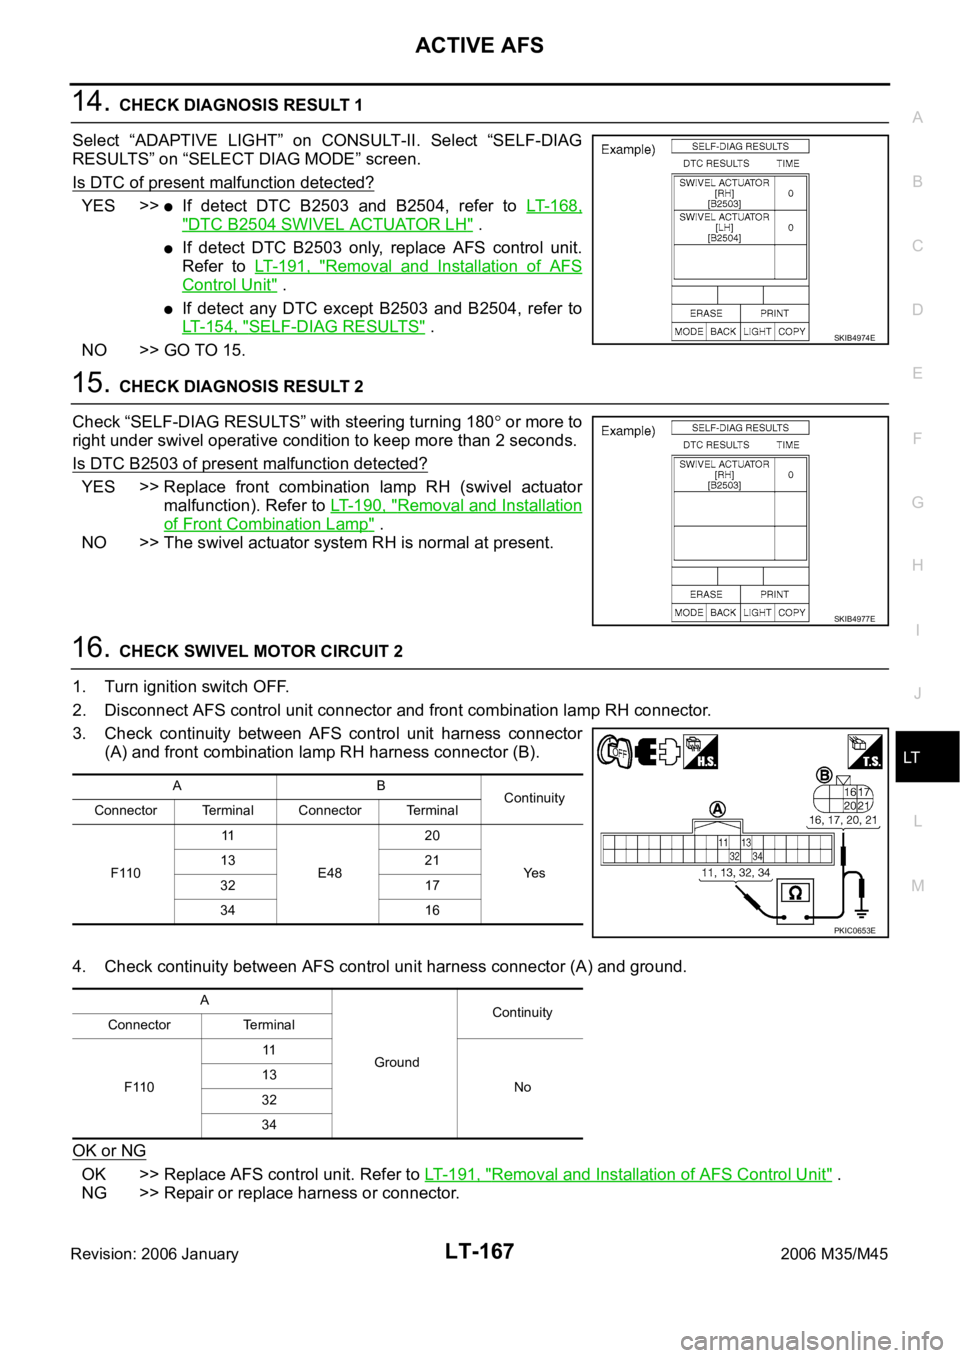
Select “ADAPTIVE LIGHT” on CONSULT-II. Select “SELF-DIAG
RESULTS” on “SELECT DIAG MODE” screen.
Is DTC of present malfunction detected?
YES >>If detect DTC B2503 and B2504, refer to LT- 1 6 8 ,
"DTC B2504 SWIVEL ACTUATOR LH" .
If detect DTC B2503 only, replace AFS control unit.
Refer to LT- 1 9 1 , "
Removal and Installation of AFS
Control Unit" .
If detect any DTC except B2503 and B2504, refer to
LT- 1 5 4 , "
SELF-DIAG RESULTS" .
NO >> GO TO 15.
15. CHECK DIAGNOSIS RESULT 2
Check “SELF-DIAG RESULTS” with steering turning 180
or more to
right under swivel operative condition to keep more than 2 seconds.
Is DTC B2503 of present malfunction detected?
YES >> Replace front combination lamp RH (swivel actuator
malfunction). Refer to LT- 1 9 0 , "
Removal and Installation
of Front Combination Lamp" .
NO >> The swivel actuator system RH is normal at present.
16. CHECK SWIVEL MOTOR CIRCUIT 2
1. Turn ignition switch OFF.
2. Disconnect AFS control unit connector and front combination lamp RH connector.
3. Check continuity between AFS control unit harness connector
(A) and front combination lamp RH harness connector (B).
4. Check continuity between AFS control unit harness connector (A) and ground.
OK or NG
OK >> Replace AFS control unit. Refer to LT-191, "Removal and Installation of AFS Control Unit" .
NG >> Repair or replace harness or connector.
SKIB4974E
SKIB4977E
AB
Continuity
Connector Terminal Connector Terminal
F11011
E4820
Ye s 13 21
32 17
34 16
PKIC0653E
A
GroundContinuity
Connector Terminal
F11011
No 13
32
34
Page 4600 of 5621
ACTIVE AFS
LT-173
C
D
E
F
G
H
I
J
L
MA
B
LT
Revision: 2006 January2006 M35/M45
14. CHECK DIAGNOSIS RESULT 1
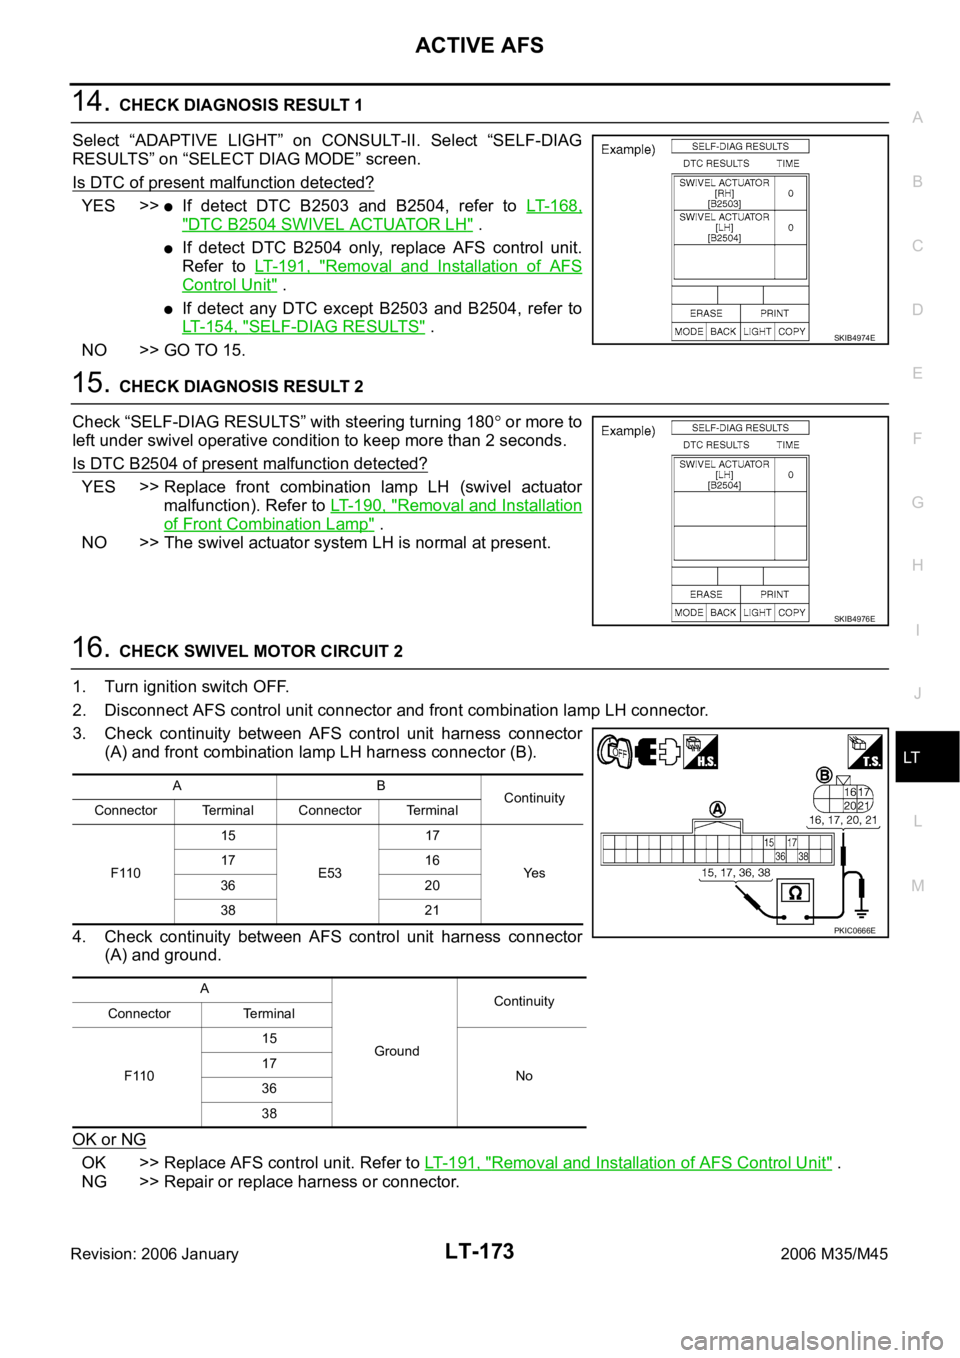
Select “ADAPTIVE LIGHT” on CONSULT-II. Select “SELF-DIAG
RESULTS” on “SELECT DIAG MODE” screen.
Is DTC of present malfunction detected?
YES >>If detect DTC B2503 and B2504, refer to LT- 1 6 8 ,
"DTC B2504 SWIVEL ACTUATOR LH" .
If detect DTC B2504 only, replace AFS control unit.
Refer to LT- 1 9 1 , "
Removal and Installation of AFS
Control Unit" .
If detect any DTC except B2503 and B2504, refer to
LT- 1 5 4 , "
SELF-DIAG RESULTS" .
NO >> GO TO 15.
15. CHECK DIAGNOSIS RESULT 2
Check “SELF-DIAG RESULTS” with steering turning 180
or more to
left under swivel operative condition to keep more than 2 seconds.
Is DTC B2504 of present malfunction detected?
YES >> Replace front combination lamp LH (swivel actuator
malfunction). Refer to LT- 1 9 0 , "
Removal and Installation
of Front Combination Lamp" .
NO >> The swivel actuator system LH is normal at present.
16. CHECK SWIVEL MOTOR CIRCUIT 2
1. Turn ignition switch OFF.
2. Disconnect AFS control unit connector and front combination lamp LH connector.
3. Check continuity between AFS control unit harness connector
(A) and front combination lamp LH harness connector (B).
4. Check continuity between AFS control unit harness connector
(A) and ground.
OK or NG
OK >> Replace AFS control unit. Refer to LT-191, "Removal and Installation of AFS Control Unit" .
NG >> Repair or replace harness or connector.
SKIB4974E
SKIB4976E
AB
Continuity
Connector Terminal Connector Terminal
F11015
E5317
Ye s 17 16
36 20
38 21
A
GroundContinuity
Connector Terminal
F11015
No 17
36
38
PKIC0666E
Page 4614 of 5621
ACTIVE AFS
LT-187
C
D
E
F
G
H
I
J
L
MA
B
LT
Revision: 2006 January2006 M35/M45
Auto Aiming Does Not Operate (Check Aiming Motor System Circuit)NKS003QV
1. CHECK AIMING MOTOR
1. Start engine and turn lighting switch to 2ND position.
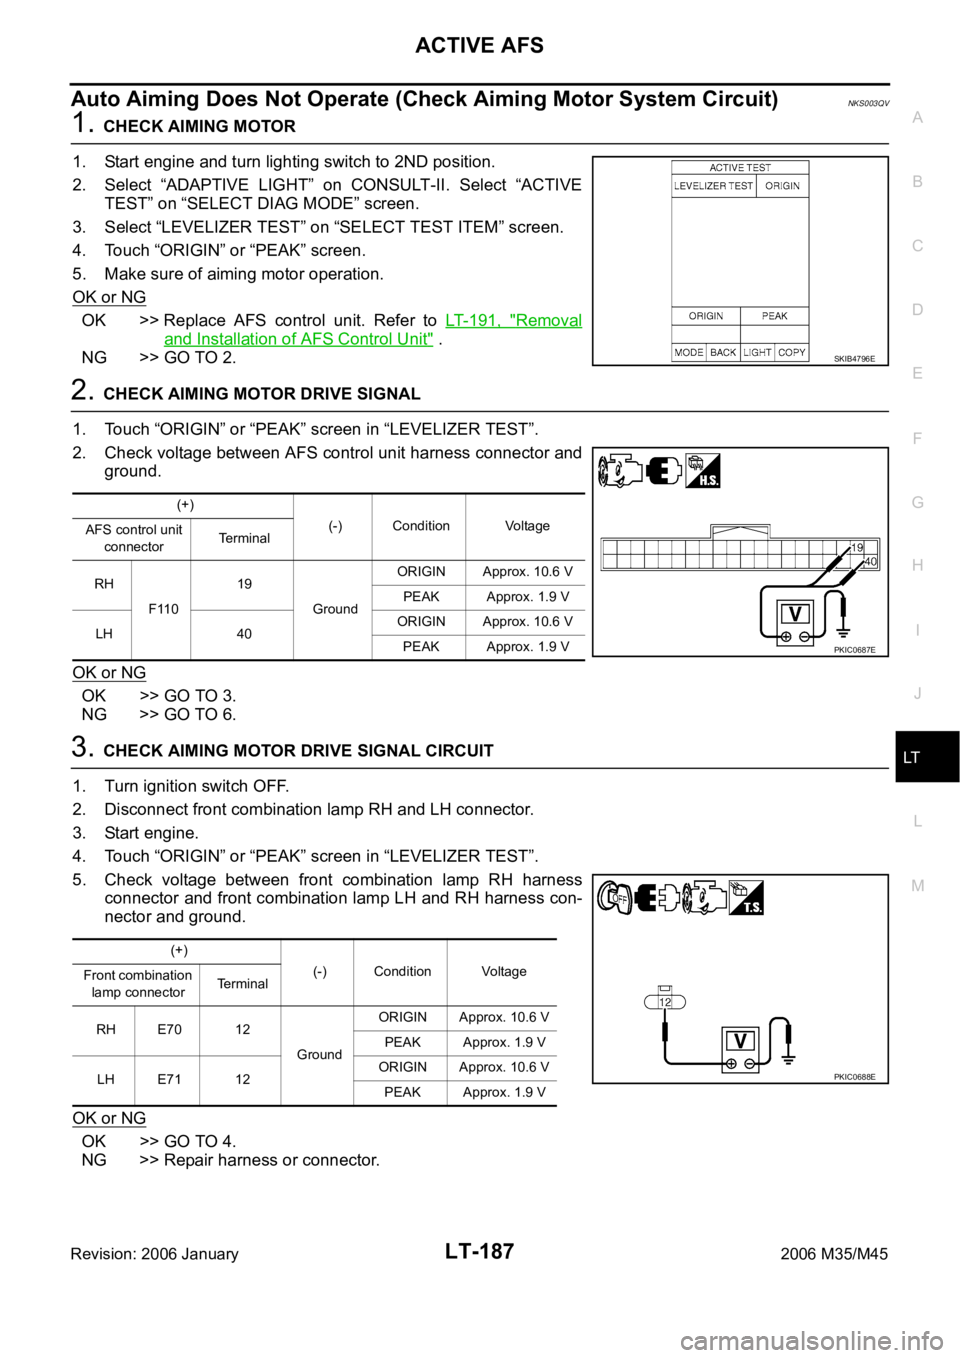
2. Select “ADAPTIVE LIGHT” on CONSULT-II. Select “ACTIVE
TEST” on “SELECT DIAG MODE” screen.
3. Select “LEVELIZER TEST” on “SELECT TEST ITEM” screen.
4. Touch “ORIGIN” or “PEAK” screen.
5. Make sure of aiming motor operation.
OK or NG
OK >> Replace AFS control unit. Refer to LT- 1 9 1 , "Removal
and Installation of AFS Control Unit" .
NG >> GO TO 2.
2. CHECK AIMING MOTOR DRIVE SIGNAL
1. Touch “ORIGIN” or “PEAK” screen in “LEVELIZER TEST”.
2. Check voltage between AFS control unit harness connector and
ground.
OK or NG
OK >> GO TO 3.
NG >> GO TO 6.
3. CHECK AIMING MOTOR DRIVE SIGNAL CIRCUIT
1. Turn ignition switch OFF.
2. Disconnect front combination lamp RH and LH connector.
3. Start engine.
4. Touch “ORIGIN” or “PEAK” screen in “LEVELIZER TEST”.
5. Check voltage between front combination lamp RH harness
connector and front combination lamp LH and RH harness con-
nector and ground.
OK or NG
OK >> GO TO 4.
NG >> Repair harness or connector.
SKIB4796E
(+)
(-) Condition Voltage
AFS control unit
connectorTerminal
RH
F11019
GroundORIGIN Approx. 10.6 V
PEAK Approx. 1.9 V
LH 40ORIGIN Approx. 10.6 V
PEAK Approx. 1.9 V
PKIC0687E
(+)
(-) Condition Voltage
Front combination
lamp connectorTerminal
RH E70 12
GroundORIGIN Approx. 10.6 V
PEAK Approx. 1.9 V
LH E71 12ORIGIN Approx. 10.6 V
PEAK Approx. 1.9 V
PKIC0688E
Page 4615 of 5621
LT-188
ACTIVE AFS
Revision: 2006 January2006 M35/M45
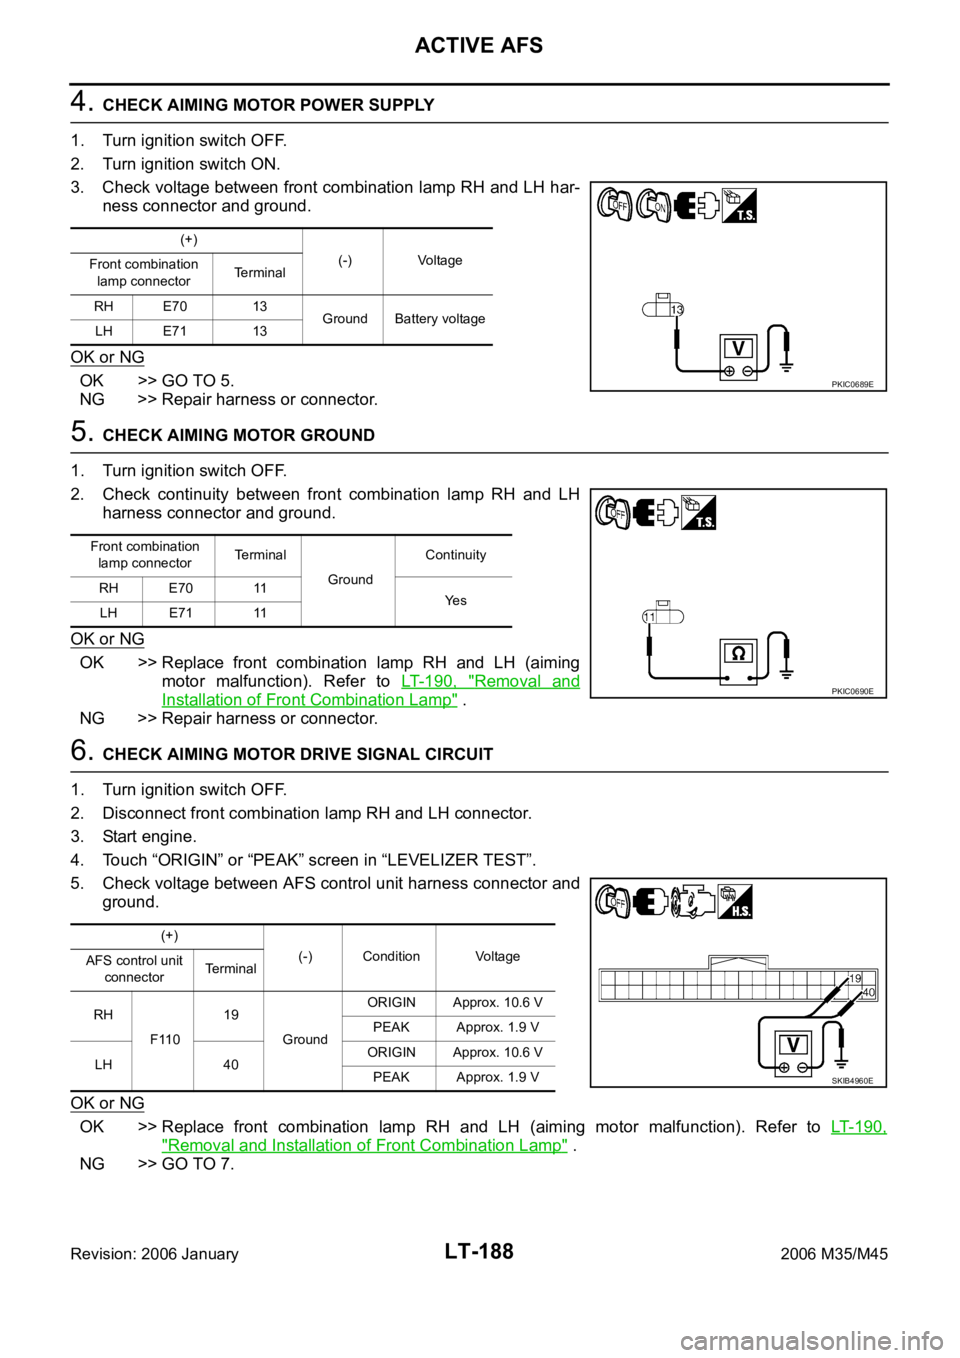
4. CHECK AIMING MOTOR POWER SUPPLY
1. Turn ignition switch OFF.
2. Turn ignition switch ON.
3. Check voltage between front combination lamp RH and LH har-
ness connector and ground.
OK or NG
OK >> GO TO 5.
NG >> Repair harness or connector.
5. CHECK AIMING MOTOR GROUND
1. Turn ignition switch OFF.
2. Check continuity between front combination lamp RH and LH
harness connector and ground.
OK or NG
OK >> Replace front combination lamp RH and LH (aiming
motor malfunction). Refer to LT- 1 9 0 , "
Removal and
Installation of Front Combination Lamp" .
NG >> Repair harness or connector.
6. CHECK AIMING MOTOR DRIVE SIGNAL CIRCUIT
1. Turn ignition switch OFF.
2. Disconnect front combination lamp RH and LH connector.
3. Start engine.
4. Touch “ORIGIN” or “PEAK” screen in “LEVELIZER TEST”.
5. Check voltage between AFS control unit harness connector and
ground.
OK or NG
OK >> Replace front combination lamp RH and LH (aiming motor malfunction). Refer to LT- 1 9 0 ,
"Removal and Installation of Front Combination Lamp" .
NG >> GO TO 7.
(+)
(-) Voltage
Front combination
lamp connectorTerminal
RH E70 13
Ground Battery voltage
LH E71 13
PKIC0689E
Front combination
lamp connectorTerminal
GroundContinuity
RH E70 11
Ye s
LH E71 11
PKIC0690E
(+)
(-) Condition Voltage
AFS control unit
connectorTerminal
RH
F11019
GroundORIGIN Approx. 10.6 V
PEAK Approx. 1.9 V
LH 40ORIGIN Approx. 10.6 V
PEAK Approx. 1.9 V
SKIB4960E
Page 4629 of 5621

LT-202
FRONT FOG LAMP
Revision: 2006 January2006 M35/M45
Terminals and Reference Values for IPDM E/RNKS003R9
How to Perform Trouble DiagnosesNKS003RA
1. Confirm the symptom or customer complaint.
2. Understand operation description and function description. Refer to LT- 1 9 3 , "
System Description" .
3. Perform the Preliminary Check. Refer to LT-202, "
Preliminary Check" .
4. Check symptom and repair or replace the cause of malfunction.
5. Does the front fog lamp operate normally? If YES, GO TO 6. If NO, GO TO 4.
6. INSPECTION END
Preliminary CheckNKS003RB
CHECK POWER SUPPLY AND GROUND CIRCUIT
1. CHECK FUSE
Check for blown fuses.
Refer to LT-197, "Wiring Diagram — F/FOG —" .
OK or NG
OK >> GO TO 2.
NG >> If fuse or fusible link is blown, be sure to eliminate cause of malfunction before installing new fuse
or fusible link. Refer to PG-3, "
POWER SUPPLY ROUTING CIRCUIT" .
Terminal
No.Wire
colorSignal nameMeasuring condition
Reference value
Ignition
switchOperation or condition
36 L/Y Front fog lamp (LH) ONLighting switch must be in
the 2ND position or AUTO
position (headlamp is ON)Front fog lamp switch: OFF Approx. 0V
Front fog lamp switch: ON Battery voltage
37 W/R Front fog lamp (RH) ONLighting switch must be in
the 2ND position or AUTO
position (headlamp is ON)Front fog lamp switch: OFF Approx. 0V
Front fog lamp switch: ON Battery voltage
38 B Ground ON — Approx. 0V
49 L CAN
H — — —
50 P CAN
L — — —
51 B Ground ON — Approx. 0V
Unit Power source Fuse and fusible link No.
BCMBatteryF
21
Ignition switch ON or START position 1
Ignition switch ACC or ON position 6
IPDM E/R Battery71
88
78