Page 1327 of 5267
4.(K900) SENSOR GROUND CIRCUIT VOLTAGE DROP
Turn the ignition off.
Backprobe the (K900) Sensor ground circuit at the O2 Sensor harness connector and PCM harness connector.
NOTE: Make sure the voltmeter leads are connected for positive polarity, meet the terminals in the connec-
tor, and that there is good terminal to wire connection.
NOTE: Make sure the voltmeter leads are connected for positive polarity
Start the engine.
Allow the engine to idle.
Is the voltage below 0.10 of a volt?
Ye s>>
Go To 5
No>>
Repair the excessive resistance in the (K900) Sensor ground circuit.
Perform the POWERTRAIN VERIFICATION TEST. (Refer to 9 - ENGINE - STANDARD PROCEDURE)
5.O2 SENSOR
Turn the ignition off.
If there are no possible causes remaining, view repair.
Repair
Replace the O2 Sensor
Perform the POWERTRAIN VERIFICATION TEST. (Refer to 9 - ENGINE - STANDARD PROCEDURE)
Page 1329 of 5267
When Monitored:
With the engine running, coolant greater than 170°F, open throttle, steady to slightly increasing vehicle speed
greater than 18 mph but less than 55 mph, with a light load on the engine, for aperiod no less than 5 minutes.
Set Condition:
The oxygen sensor signal voltage is switching from below 0.39 of a volt to above 0.6 of a volt and back fewer
times than required.
Possible Causes
EXHAUST LEAK
RESISTANCE IN THE (K43) O2 SENSOR 2/1 SIGNAL CIRCUIT
RESISTANCE IN THE (K900) SENSOR GROUND CIRCUIT
O2 SENSOR
Always perform the Pre-Diagnostic Troubleshooting procedure before proceeding. (Refer to 9 - ENGINE -
DIAGNOSIS AND TESTING)
Diagnostic Test
1.GOOD TRIP EQUAL TO ZERO
Ignition on, engine not running.
With the scan tool, read DTCs and record the related Freeze Frame data.
Is the Good Trip Counter displayed and equal to zero?
Ye s>>
Go To 2
No>>
Refer to the INTERMITTENT CONDITION Diagnostic Procedure.
Perform the POWERTRAIN VERIFICATION TEST. (Refer to 9 - ENGINE - STANDARD PROCEDURE)
2.EXHAUST LEAK
Start the engine.
Inspect the exhaust for leaks between the engine and the appropriate O2 Sensor.
Are there any exhaust leaks?
Ye s>>
Repair or replace the leaking exhaust parts as necessary.
Perform the POWERTRAIN VERIFICATION TEST. (Refer to 9 - ENGINE - STANDARD PROCEDURE)
No>>
Go To 3
3.(K43) O2 SENSOR 2/1 SIGNAL CIRCUIT VOLTAGE DROP
Turn the ignition off.
Backprobe the (K43) O2 Sensor 2/1 Signal circuit at the 2/1 O2 Sensor harness connector and PCM harness con-
nector.
NOTE: Make sure the voltmeter leads are connected for positive polarity, meet the terminals in the connec-
tor, and that there is good terminal to wire connection.
NOTE: Make sure the voltmeter leads are connected for positive polarity
Start the engine.
Allow the engine to idle.
Is the voltage below 0.10 of a volt?
Ye s>>
Go To 4
No>>
Repair the excessive resistance on the (K43) O2 Sensor 2/1 Signal circuit.
Perform the POWERTRAIN VERIFICATION TEST. (Refer to 9 - ENGINE - STANDARD PROCEDURE)
Page 1330 of 5267
4.(K900) SENSOR GROUND CIRCUIT VOLTAGE DROP
Turn the ignition off.
Backprobe the (K900) Sensor ground circuit at the 2/1 O2 Sensor harness connector and PCM harness connector.
NOTE: Make sure the voltmeter leads are connected for positive polarity, meet the terminals in the connec-
tor, and that there is good terminal to wire connection.
NOTE: Make sure the voltmeter leads are connected for positive polarity
Start the engine.
Allow the engine to idle.
Is the voltage below 0.10 of a volt?
Ye s>>
Go To 5
No>>
Repair the excessive resistance in the (K900) Sensor ground circuit.
Perform the POWERTRAIN VERIFICATION TEST. (Refer to 9 - ENGINE - STANDARD PROCEDURE)
5.O2 SENSOR
Turn the ignition off.
If there are no possible causes remaining, view repair.
Repair
Replace the O2 Sensor
Perform the POWERTRAIN VERIFICATION TEST. (Refer to 9 - ENGINE - STANDARD PROCEDURE)
Page 1332 of 5267
When Monitored:
With the ignition on. Battery voltage greater than 10 volts.
Set Condition:
A shorted condition is detected in the ASD control circuit. One Trip Fault.Three good trips to turn off the MIL.
Possible Causes
(K342) ASD CONTROL OUTPUT CIRCUIT SHORTED TO GROUND
FUEL INJECTOR
IGNITION COIL
PCM
TIPM
Always perform the Pre-Diagnostic Troubleshooting procedure before proceeding. (Refer to 9 - ENGINE -
DIAGNOSIS AND TESTING).
Diagnostic Test
1.ASD OPERATION
Ignition on, engine not running.
With a scan tool under the ECM Actuators, actuate the ASD Circuit.
Are the Injectors actuating?
Ye s>>
Refer to the INTERMITTENT CONDITION Diagnostic Procedure.
Perform the POWERTRAIN VERIFICATION TEST. (Refer to 9 - ENGINE - STANDARD PROCEDURE)
No>>
Go To 2
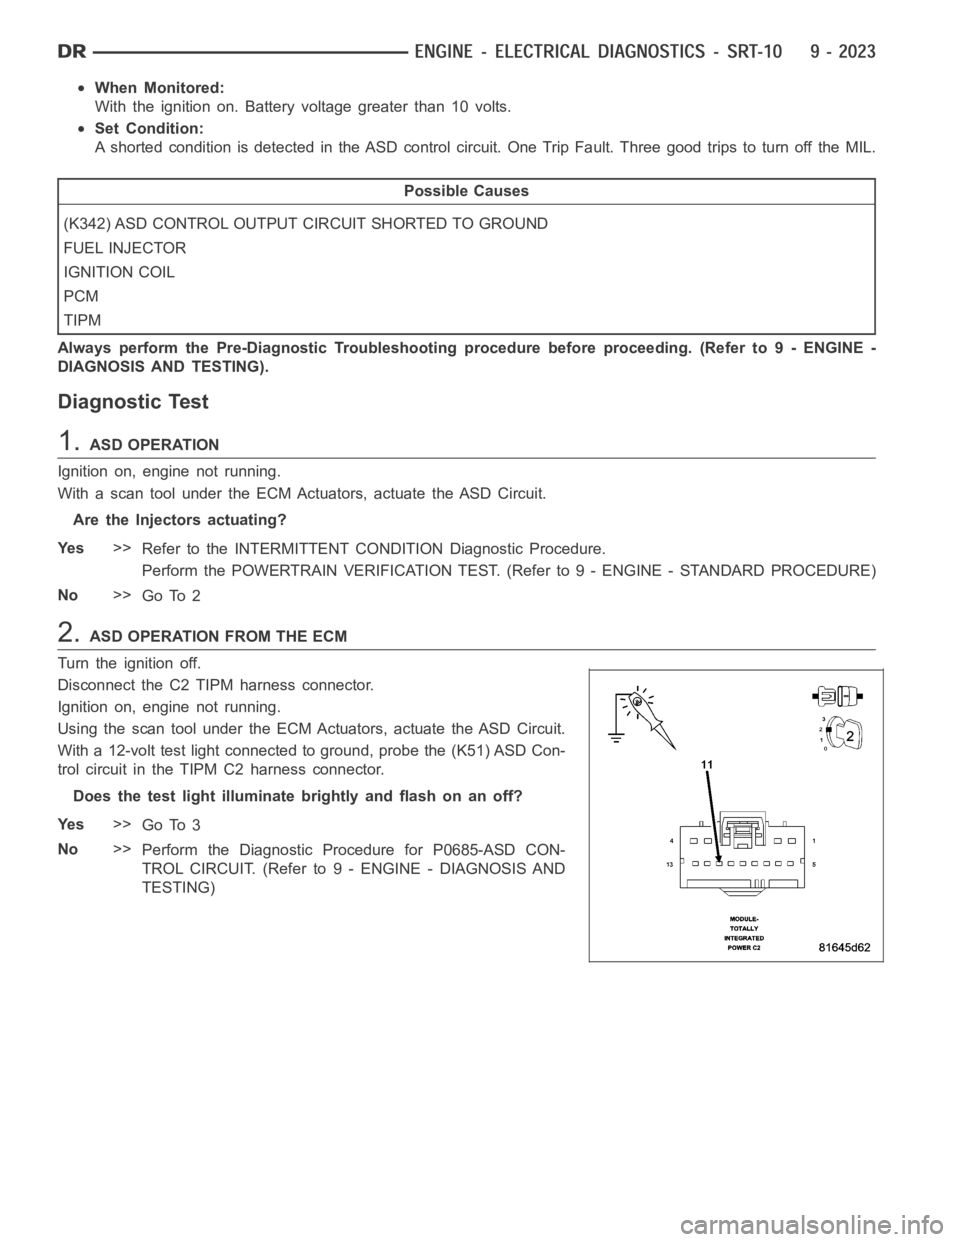
2.ASD OPERATION FROM THE ECM
Turn the ignition off.
Disconnect the C2 TIPM harness connector.
Ignition on, engine not running.
Using the scan tool under the ECM Actuators, actuate the ASD Circuit.
With a 12-volt test light connected to ground, probe the (K51) ASD Con-
trol circuit in the TIPM C2 harness connector.
Does the test light illuminate brightly and flash on an off?
Ye s>>
Go To 3
No>>
Perform the Diagnostic Procedure for P0685-ASD CON-
TROL CIRCUIT. (Refer to 9 - ENGINE - DIAGNOSIS AND
TESTING)
Page 1333 of 5267
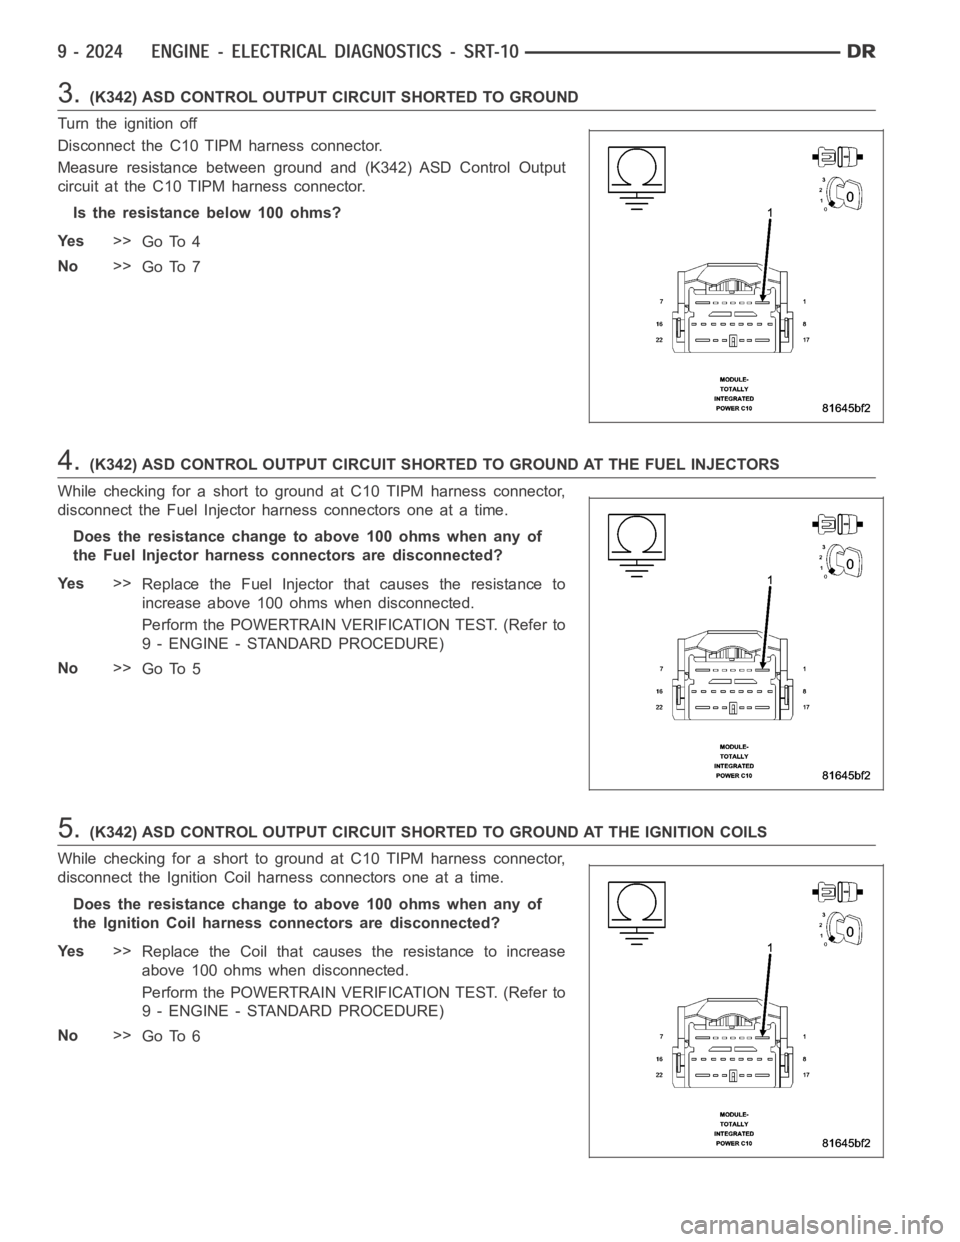
3.(K342) ASD CONTROL OUTPUT CIRCUIT SHORTED TO GROUND
Turn the ignition off
Disconnect the C10 TIPM harness connector.
Measure resistance between ground and (K342) ASD Control Output
circuit at the C10 TIPM harness connector.
Istheresistancebelow100ohms?
Ye s>>
Go To 4
No>>
Go To 7
4.(K342) ASD CONTROL OUTPUT CIRCUIT SHORTED TO GROUND AT THE FUEL INJECTORS
While checking for a short to ground at C10 TIPM harness connector,
disconnect the Fuel Injector harness connectors one at a time.
Does the resistance change to above 100 ohms when any of
the Fuel Injector harness connectors are disconnected?
Ye s>>
Replace the Fuel Injector that causes the resistance to
increase above 100 ohms when disconnected.
Perform the POWERTRAIN VERIFICATION TEST. (Refer to
9 - ENGINE - STANDARD PROCEDURE)
No>>
Go To 5
5.(K342) ASD CONTROL OUTPUT CIRCUIT SHORTED TO GROUND AT THE IGNITION COILS
While checking for a short to ground at C10 TIPM harness connector,
disconnect the Ignition Coil harness connectors one at a time.
Does the resistance change to above 100 ohms when any of
the Ignition Coil harness connectors are disconnected?
Ye s>>
Replace the Coil that causes the resistance to increase
above 100 ohms when disconnected.
Perform the POWERTRAIN VERIFICATION TEST. (Refer to
9 - ENGINE - STANDARD PROCEDURE)
No>>
Go To 6
Page 1336 of 5267
When Monitored:
With the ignition on. Battery voltage greater than 10 volts.
Set Condition:
A shorted condition is detected in the ASD control circuit. One Trip Fault.Three good trips to turn off the MIL.
Possible Causes
(K342) ASD CONTROL OUTPUT CIRCUIT SHORTED TO VOLTAGE
FUEL INJECTOR
IGNITION COIL
ECM
TIPM
Always perform the Pre-Diagnostic Troubleshooting procedure before proceeding. (Refer to 9 - ENGINE -
DIAGNOSIS AND TESTING).
Diagnostic Test
1.ACTIVE DTC
Ignition on, engine not running.
With a scan tool, read DTCs.
Is the DTC active at this time?
Ye s>>
Go To 2
No>>
Refer to the INTERMITTENT CONDITION Diagnostic Procedure.
Perform the POWERTRAIN VERIFICATION TEST. (Refer to 9 - ENGINE - STANDARD PROCEDURE)
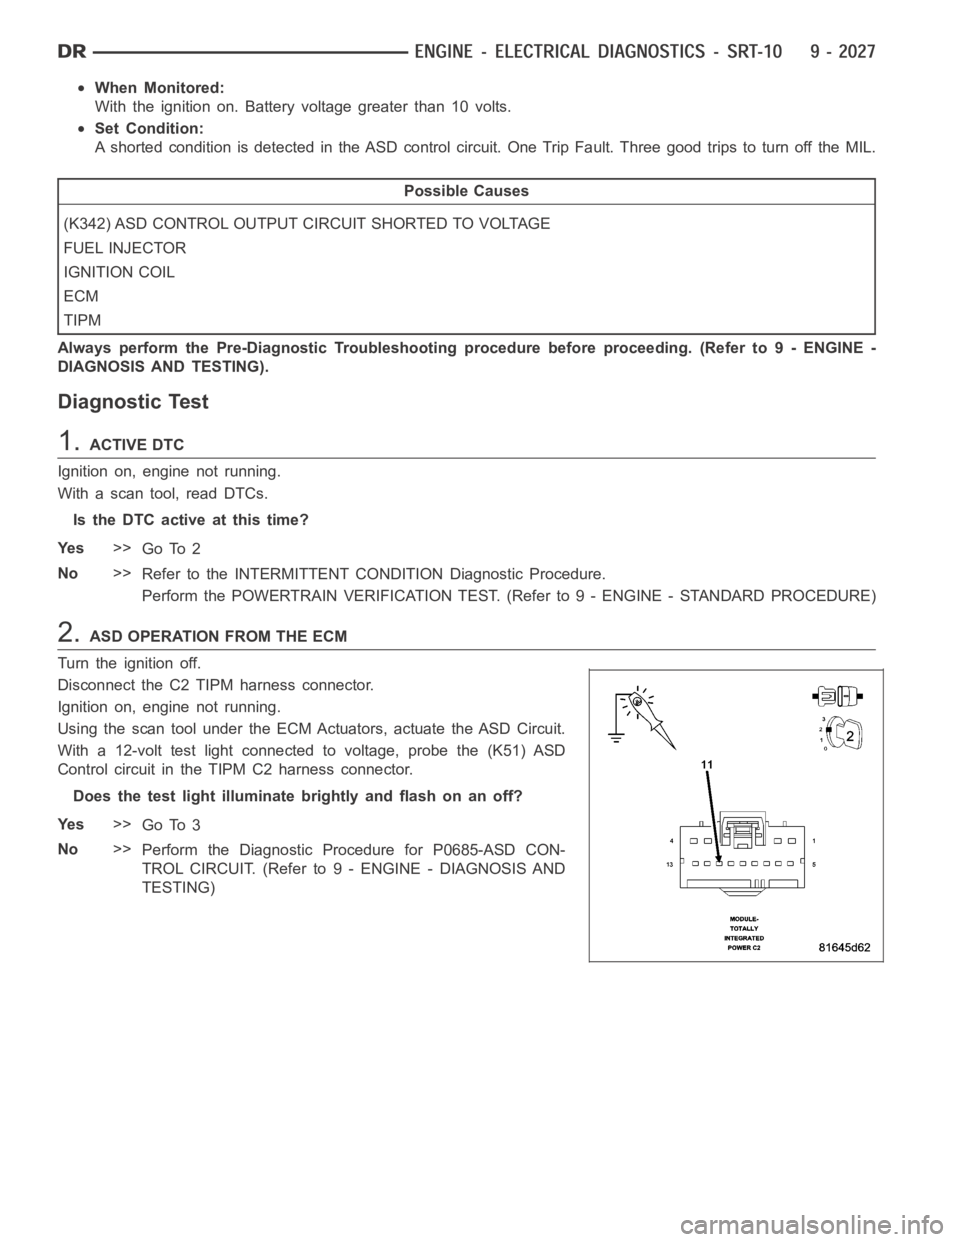
2.ASD OPERATION FROM THE ECM
Turn the ignition off.
Disconnect the C2 TIPM harness connector.
Ignition on, engine not running.
Using the scan tool under the ECM Actuators, actuate the ASD Circuit.
With a 12-volt test light connected to voltage, probe the (K51) ASD
Control circuit in the TIPM C2 harness connector.
Does the test light illuminate brightly and flash on an off?
Ye s>>
Go To 3
No>>
Perform the Diagnostic Procedure for P0685-ASD CON-
TROL CIRCUIT. (Refer to 9 - ENGINE - DIAGNOSIS AND
TESTING)
Page 1337 of 5267
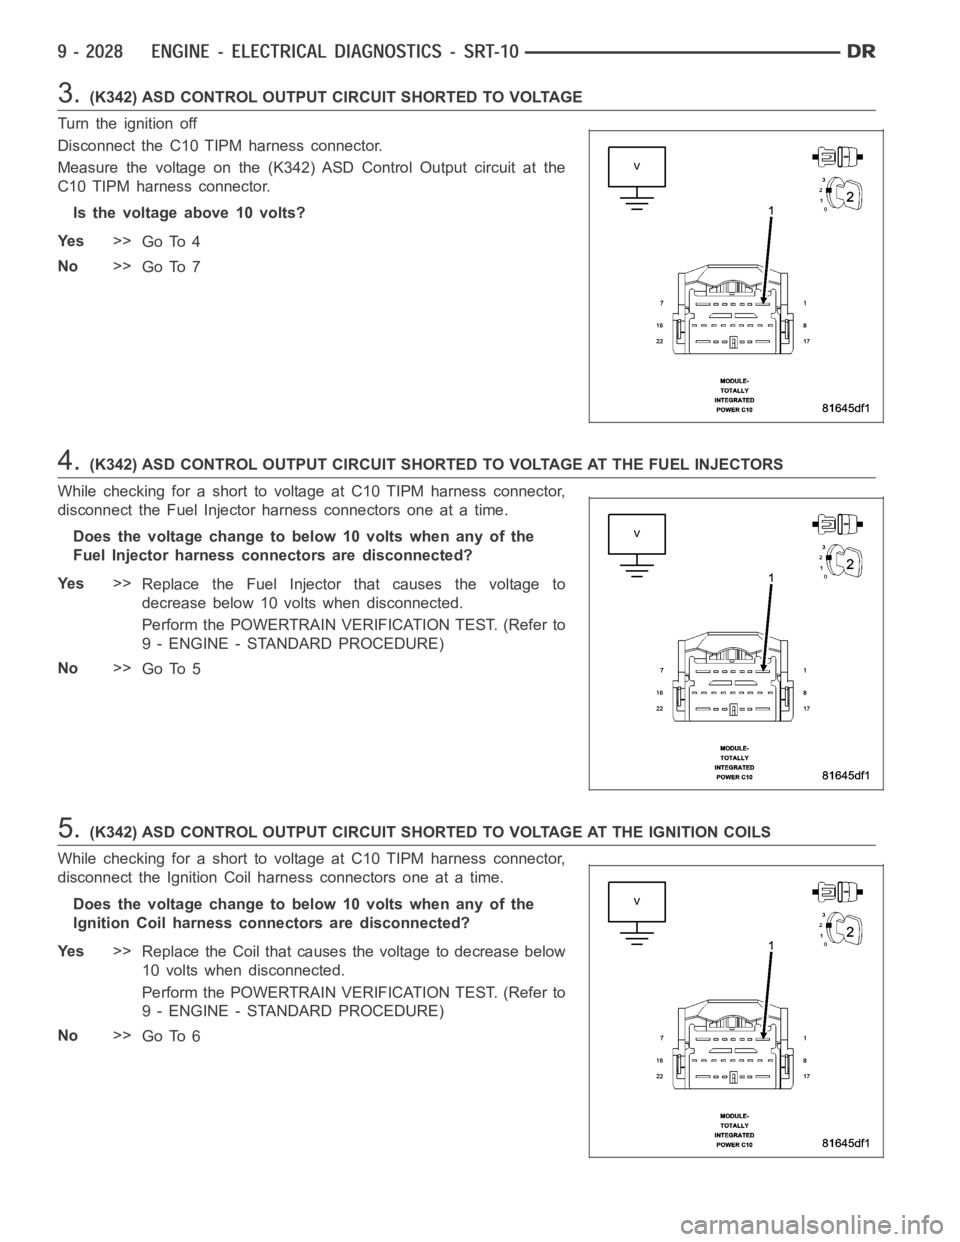
3.(K342) ASD CONTROL OUTPUT CIRCUIT SHORTED TO VOLTAGE
Turn the ignition off
Disconnect the C10 TIPM harness connector.
Measure the voltage on the (K342) ASD Control Output circuit at the
C10 TIPM harness connector.
Is the voltage above 10 volts?
Ye s>>
Go To 4
No>>
Go To 7
4.(K342) ASD CONTROL OUTPUT CIRCUIT SHORTED TO VOLTAGE AT THE FUEL INJECTORS
While checking for a short to voltage at C10 TIPM harness connector,
disconnect the Fuel Injector harness connectors one at a time.
Does the voltage change to below 10 volts when any of the
Fuel Injector harness connectors are disconnected?
Ye s>>
Replace the Fuel Injector that causes the voltage to
decrease below 10 volts when disconnected.
Perform the POWERTRAIN VERIFICATION TEST. (Refer to
9 - ENGINE - STANDARD PROCEDURE)
No>>
Go To 5
5.(K342) ASD CONTROL OUTPUT CIRCUIT SHORTED TO VOLTAGE AT THE IGNITION COILS
While checking for a short to voltage at C10 TIPM harness connector,
disconnect the Ignition Coil harness connectors one at a time.
Does the voltage change to below 10 volts when any of the
Ignition Coil harness connectors are disconnected?
Ye s>>
Replace the Coil that causes the voltage to decrease below
10 volts when disconnected.
Perform the POWERTRAIN VERIFICATION TEST. (Refer to
9 - ENGINE - STANDARD PROCEDURE)
No>>
Go To 6
Page 1340 of 5267
When Monitored:
With the ignition on. Battery voltage greater than 10 volts.
Set Condition:
An open condition is detected in the ASD control circuit. One Trip Fault. Three good trips to turn off the MIL.
Possible Causes
(K342) ASD CONTROL OUTPUT CIRCUIT OPEN
FUEL INJECTOR
IGNITION COIL
PCM
TIPM
Always perform the Pre-Diagnostic Troubleshooting procedure before proceeding. (Refer to 9 - ENGINE -
DIAGNOSIS AND TESTING).
Diagnostic Test
1.ACTIVE DTC
Ignition on, engine not running.
With a scan tool, read DTCs.
Is the DTC active at this time?
Ye s>>
Go To 2
No>>
Refer to the INTERMITTENT CONDITION Diagnostic Procedure.
Perform the POWERTRAIN VERIFICATION TEST. (Refer to 9 - ENGINE - STANDARD PROCEDURE)
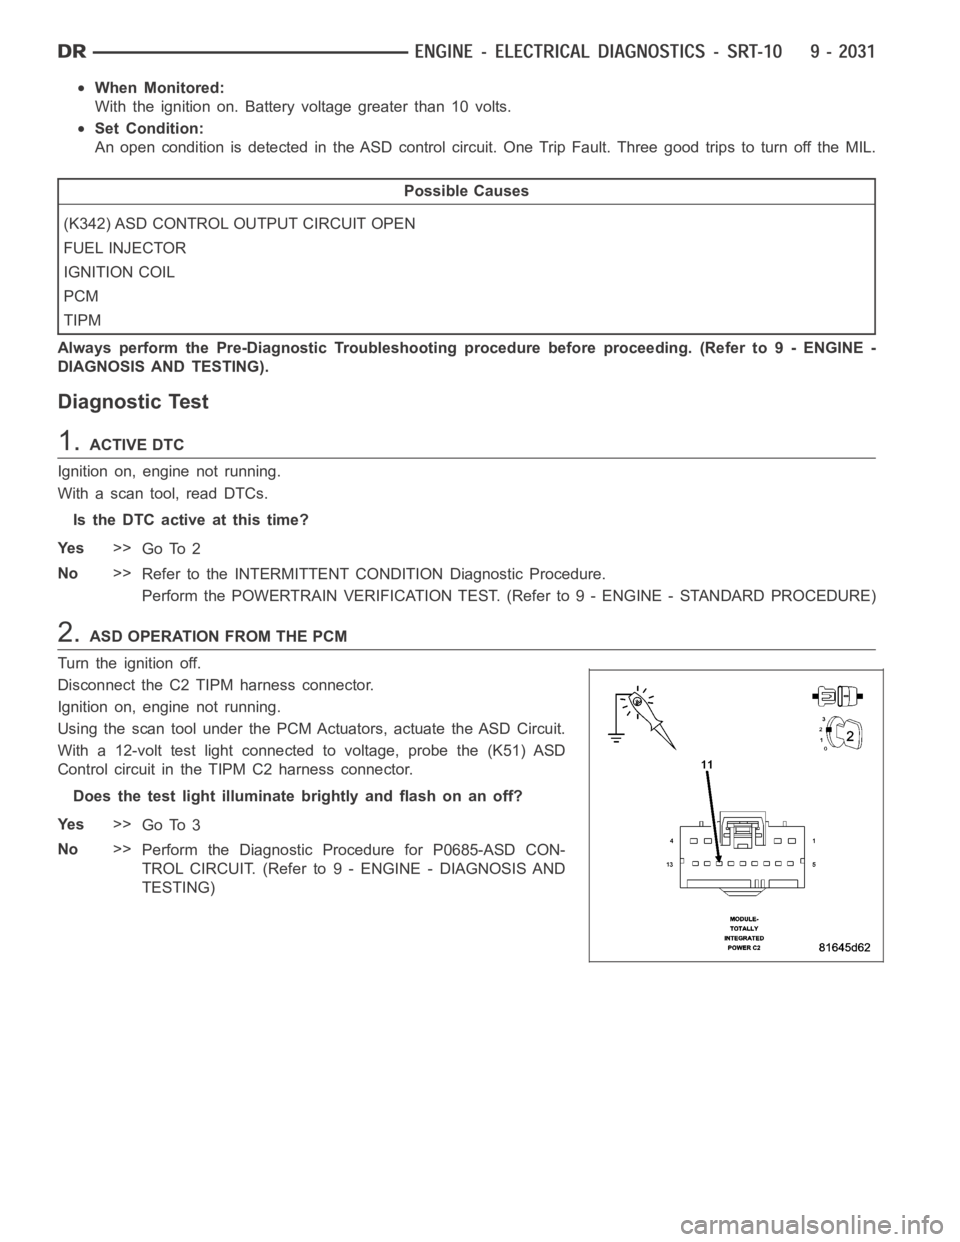
2.ASD OPERATION FROM THE PCM
Turn the ignition off.
Disconnect the C2 TIPM harness connector.
Ignition on, engine not running.
Using the scan tool under the PCM Actuators, actuate the ASD Circuit.
With a 12-volt test light connected to voltage, probe the (K51) ASD
Control circuit in the TIPM C2 harness connector.
Does the test light illuminate brightly and flash on an off?
Ye s>>
Go To 3
No>>
Perform the Diagnostic Procedure for P0685-ASD CON-
TROL CIRCUIT. (Refer to 9 - ENGINE - DIAGNOSIS AND
TESTING)