2006 DODGE RAM SRT-10 ignition
[x] Cancel search: ignitionPage 116 of 5267
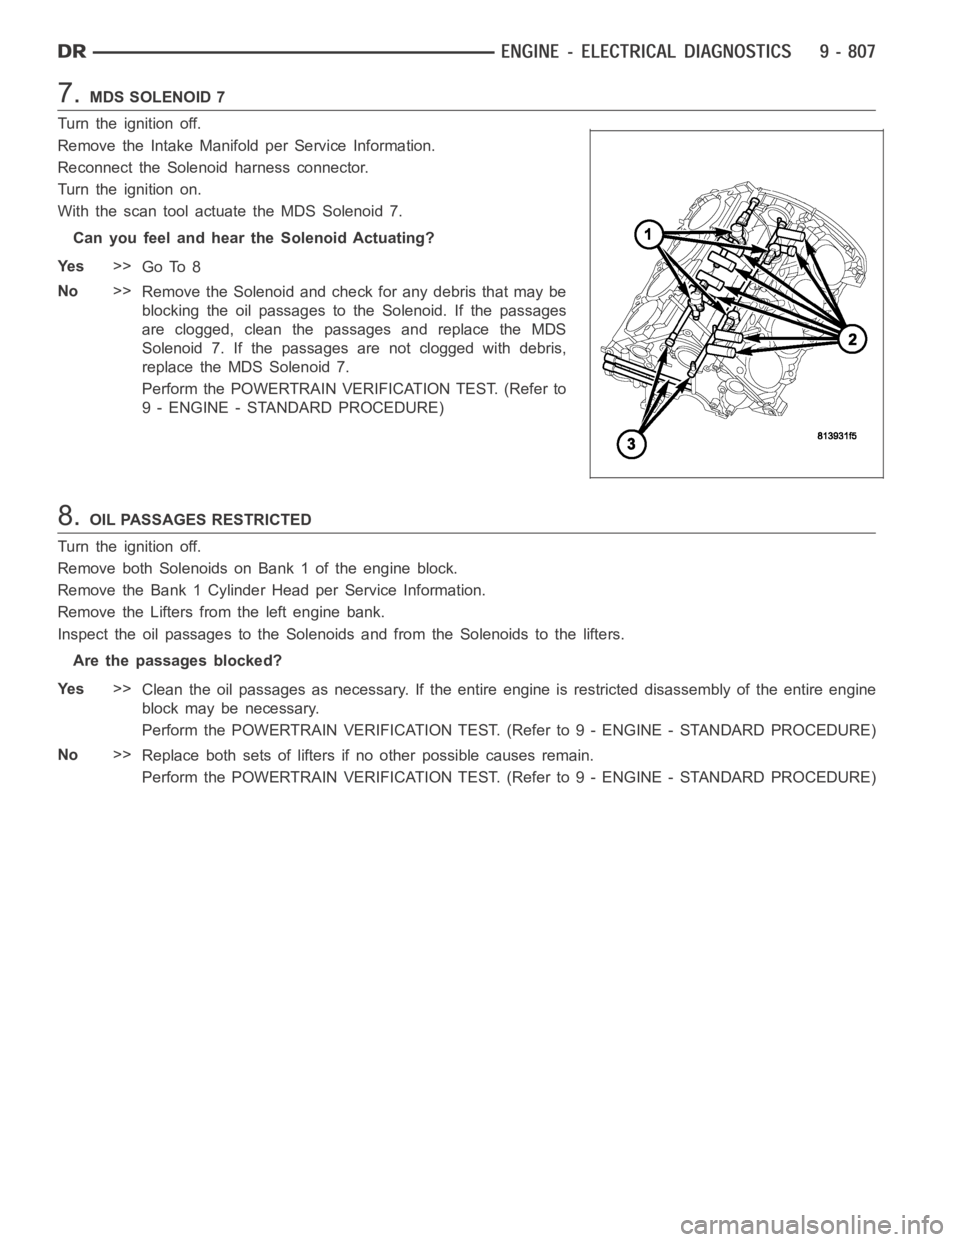
7.MDS SOLENOID 7
Turn the ignition off.
Remove the Intake Manifold per Service Information.
Reconnect the Solenoid harness connector.
Turn the ignition on.
With the scan tool actuate the MDS Solenoid 7.
Can you feel and hear the Solenoid Actuating?
Ye s>>
Go To 8
No>>
Remove the Solenoid and check for any debris that may be
blocking the oil passages to the Solenoid. If the passages
are clogged, clean the passages and replace the MDS
Solenoid 7. If the passages are not clogged with debris,
replace the MDS Solenoid 7.
Perform the POWERTRAIN VERIFICATION TEST. (Refer to
9 - ENGINE - STANDARD PROCEDURE)
8.OIL PASSAGES RESTRICTED
Turn the ignition off.
Remove both Solenoids on Bank 1 of the engine block.
Remove the Bank 1 Cylinder Head per Service Information.
Remove the Lifters from the left engine bank.
Inspect the oil passages to the Solenoids and from the Solenoids to the lifters.
Are the passages blocked?
Ye s>>
Clean the oil passages as necessary. If the entire engine is restricted disassembly of the entire engine
block may be necessary.
Perform the POWERTRAIN VERIFICATION TEST. (Refer to 9 - ENGINE - STANDARD PROCEDURE)
No>>
Replace both sets of lifters if no other possible causes remain.
Perform the POWERTRAIN VERIFICATION TEST. (Refer to 9 - ENGINE - STANDARD PROCEDURE)
Page 118 of 5267
When Monitored:
Ignition on and vehicle moving. Cruise is learned and customer is trying touse the Cruise.
Set Condition:
The PCM recognizes rear wheel speed is greater than front wheel speed. One trip fault.
Possible Causes
ACTIVE BUS OR COMMUNICATION DTCS
TIRE CIRCUMFERENCE
PCM
Always perform the Pre-Diagnostic Troubleshooting procedure before proceeding. (Refer to 9 - ENGINE -
DIAGNOSIS AND TESTING).
Diagnostic Test
1.ACTIVE DTC
Ignition on, engine not running.
NOTE: Check for any Bus Communication DTCs. If no Bus Communication DTCs are set, check for active
DTCs stored in the Ant-Lock Brake Module. Any Bus Communication DTCs or VSSDTCs in the Ant-Lock
Brake Module must be properly diagnosed before continuing.
With a scan tool, read DTCs.
Is the DTC active at this time?
Ye s>>
Go To 2
No>>
Refer to the INTERMITTENT CONDITION Diagnostic Procedure.
Perform the POWERTRAIN VERIFICATION TEST. (Refer to 9 - ENGINE - STANDARD PROCEDURE)
2.VISUAL INSPECTION
NOTE: This code can set due to tire circumference differences and from the front or rear wheels being on
a slippery surface while the opposite tires are not.
This code may also set on a hard acceleration on loose gravel or during otheroff road driving conditions.
Check tire pressure of all the tires.
Checktirewearonallthetires.
Ask the customer what the road and driving conditions were like when the fault set.
Were any problems found?
Ye s>>
Repair as necessary. If the code set during a front OR rear wheel spin condition, no repair is necessary.
Perform the POWERTRAIN VERIFICATION TEST. (Refer to 9 - ENGINE - STANDARD PROCEDURE)
No>>
Go To 3
Page 121 of 5267
When Monitored:
Ignition on and vehicle moving. Brake pedal must not be applied.
Set Condition:
The PCM recognizes front axle speed is greater than rear axle speed. One tripfault.
Possible Causes
ACTIVE BUS OR COMMUNICATION DTCS
TIRE CIRCUMFERENCE
PCM
Always perform the Pre-Diagnostic Troubleshooting procedure before proceeding. (Refer to 9 - ENGINE -
DIAGNOSIS AND TESTING).
Diagnostic Test
1.ACTIVE DTC
Ignition on, engine not running.
NOTE: Check for any Bus Communication DTCs. If no Bus Communication DTCs are set, check for active
DTCs stored in the Ant-Lock Brake Module. Any Bus Communication DTCs or VSSDTCs in the Ant-Lock
Brake Module must be properly diagnosed before continuing.
With a scan tool, read DTCs.
Is the DTC active at this time?
Ye s>>
Go To 2
No>>
Refer to the INTERMITTENT CONDITION Diagnostic Procedure.
Perform the POWERTRAIN VERIFICATION TEST. (Refer to 9 - ENGINE - STANDARD PROCEDURE)
2.VISUAL INSPECTION
NOTE: This code can set due to tire circumference differences and from the front or rear wheels being on
a slippery surface while the opposite tires are not.
This code may also set on a hard acceleration on loose gravel or during otheroff road driving conditions.
Check tire pressure of all the tires.
Checktirewearonallthetires.
Ask the customer what the road and driving conditions were like when the fault set.
Were any problems found?
Ye s>>
Repair as necessary. If the code set during a front OR rear wheel spin condition, no repair is necessary.
Perform the POWERTRAIN VERIFICATION TEST. (Refer to 9 - ENGINE - STANDARD PROCEDURE)
No>>
Go To 3
Page 123 of 5267

P1521–INCORRECT ENGINE OIL TYPE
When Monitored:
Engine Running.
Set Condition:
Using the oil pressure, oil temperature and other vital engine inputs the PCM can determine the engine oil
viscosity. Incorrect viscosity will effect the operation of the MDS by delaying cylinder activation.
Possible Causes
INCORRECT ENGINE OIL TYPE
ENGINE OIL CONTAMINATION
ENGINE OIL
Always perform the Pre-Diagnostic Troubleshooting procedure before proceeding. (Refer to 9 - ENGINE -
DIAGNOSIS AND TESTING).
Diagnostic Test
1.ACTIVE DTC
NOTE: Review the customers oil change history. Make sure the customers is using the correct engine oil
viscosity. If the incorrect oil is being used, change the oil, using the correct engine oil viscosity.
Ignition on, engine off.
With the scan tool, read DTCs.
Is the DTC active at this time?
Ye s>>
Go to 2
No>>
Te s t C o m p l e t e .
2.ENGINE OIL
NOTE: If any engine oil pressure or oil temperature DTCs set along with P1521, repair them before continu-
ing with the P1521 diagnostics.
The following conditions must be checked.
OEM recommended oil viscosity is being used.
Customer is following the oil change schedule.
Check the engine oil for contamination. (i.e., fuel and/or engine coolant)
Internal engine condition that may effect oil pressure.
Were any of the above condition found?
Ye s>>
Repair as necessary.
Perform the POWERTRAIN VERIFICATION TEST. (Refer to 9 - ENGINE - STANDARD PROCEDURE)
No>>
Change the engine oil using the correct oil viscosity.
Perform the POWERTRAIN VERIFICATION TEST. (Refer to 9 - ENGINE - STANDARD PROCEDURE)
Page 125 of 5267

When Monitored:
Ignition on. In plant mode only.
Set Condition:
PCM recognizes the Brake Pedal couldnot electrically indicate the applied (On) position with both switch
inputs. One trip fault.
Possible Causes
(B29) BRAKE SWITCH NO.1 SIGNAL CIRCUIT OPEN
(V32) BRAKE SWITCH NO.2 SIGNAL CIRCUIT OPEN
STOP LAMP SWITCH
PCM
Always perform the Pre-Diagnostic Troubleshooting procedure before proceeding. (Refer to 9 - ENGINE -
DIAGNOSIS AND TESTING).
Diagnostic Test
1.ACTIVE DTC
NOTE: Make sure the Stop Lamp Switch is adjusted properly before continuing.
Ignition on, engine not running.
With a scan tool, read DTCs.
Is the DTC active at this time?
Ye s>>
Go To 2
No>>
Refer to the INTERMITTENT CONDITION Diagnostic Procedure.
Perform the POWERTRAIN VERIFICATION TEST. (Refer to 9 - ENGINE - STANDARD PROCEDURE)
2.STOP LAMP SWITCH OPERATION
Turn the ignition off.
Disconnect the Stop Lamp Switch harness connector.
Measure the resistance between the (Z429) Ground circuit terminal and the(B29) Brake Switch No.1 Signal terminal
in the Stop Lamp Switch.
Apply and release the brake pedal while monitoring the ohmmeter.
Does the resistance change from below 5.0 ohms to open circuit when pressingandreleasingthe
brake pedal switch?
Ye s>>
Go To 3
No>>
Replace the Stop Lamp Switch.
Perform the POWERTRAIN VERIFICATION TEST. (Refer to 9 - ENGINE - STANDARD PROCEDURE)
3.STOP LAMP SWITCH OPERATION
Measure the resistance between the (V30) Fused Ignition Switch Output terminal and the (V32) Brake Switch No.2
Signal circuit terminal in the Stop Lamp Switch.
Apply and release the brake pedal while monitoring the ohmmeter.
Does the resistance change from below 5.0 ohms to open circuit when pressingandreleasingtheStop
Lamp switch?
Ye s>>
Go To 4
No>>
Replace the Stop Lamp Switch.
Perform the POWERTRAIN VERIFICATION TEST. (Refer to 9 - ENGINE - STANDARD PROCEDURE)
Page 129 of 5267

When Monitored:
Ignition on, In plant mode passed the Applied test.
Set Condition:
PCM recognizes the Brake Pedal could not electronically indicate the released (Off) position with both
switches. If P1572 sets, P1573 will also set. One trip fault.
Possible Causes
(V32) BRAKE SWITCH NO.2 SIGNAL CIRCUIT SHORTED TO BATTERY VOLTAGE
(B29) BRAKE SWITCH NO.1 SIGNAL CIRCUIT SHORTED TO GROUND
STOP LAMP SWITCH
PCM
Always perform the Pre-Diagnostic Troubleshooting procedure before proceeding. (Refer to 9 - ENGINE -
DIAGNOSIS AND TESTING).
Diagnostic Test
1.ACTIVE DTC
NOTE: Make sure the Stop Lamp Switch is adjusted properly before continuing.
Ignition on, engine not running.
With a scan tool, read DTCs.
Is the DTC active at this time?
Ye s>>
Go To 2
No>>
Refer to the INTERMITTENT CONDITION Diagnostic Procedure.
Perform the POWERTRAIN VERIFICATION TEST. (Refer to 9 - ENGINE - STANDARD PROCEDURE)
2.STOP LAMP SWITCH OPERATION
Turn the ignition off.
Disconnect the Stop Lamp Switch harness connectors.
Measure the resistance between the (Z429) Ground circuit terminal and the(B29) Brake Switch No.1 Signal terminal
in the Stop Lamp Switch.
Apply and release the brake pedal while monitoring the ohmmeter.
Does the resistance change from below 5.0 ohms to an open circuit when pressing and releasing the
brake switch?
Ye s>>
Go To 3
No>>
Replace the Stop Lamp Switch.
Perform the POWERTRAIN VERIFICATION TEST. (Refer to 9 - ENGINE - STANDARD PROCEDURE)
3.STOP LAMP SWITCH OPERATION
Measure the resistance between the (V30) Fused Ignition Switch Output circuit terminal and the (V32) Brake Switch
No.2 Signal terminal in the Stop Lamp Switch.
Apply and release the brake pedal while monitoring the ohmmeter.
Does the resistance change from below 5.0 ohms to an open circuit when pressing and releasing the
Stop Lamp switch?
Ye s>>
Go To 4
No>>
Replace the Stop Lamp Switch.
Perform the POWERTRAIN VERIFICATION TEST. (Refer to 9 - ENGINE - STANDARD PROCEDURE)
Page 130 of 5267
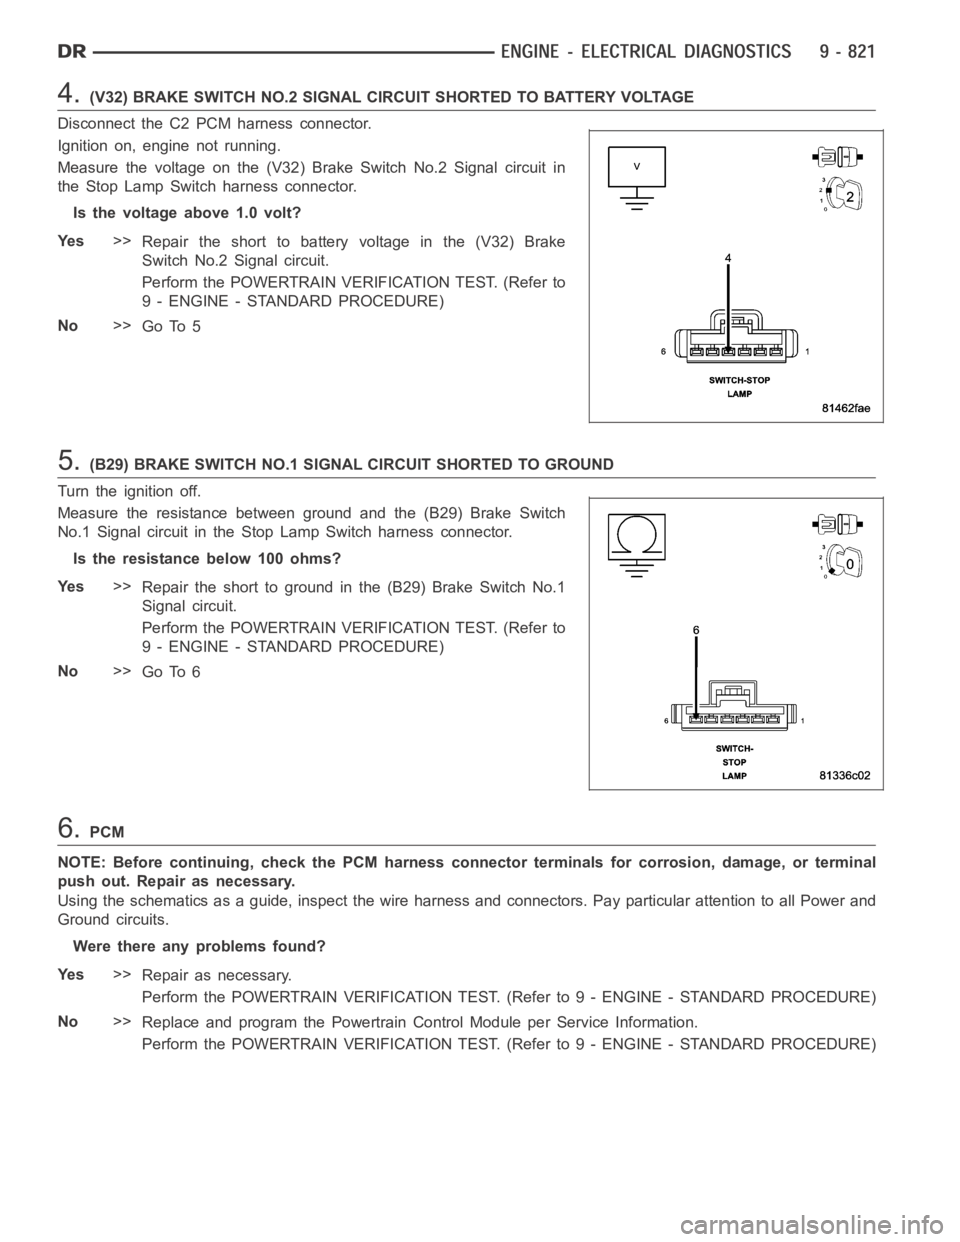
4.(V32) BRAKE SWITCH NO.2 SIGNAL CIRCUIT SHORTED TO BATTERY VOLTAGE
Disconnect the C2 PCM harness connector.
Ignition on, engine not running.
Measure the voltage on the (V32) Brake Switch No.2 Signal circuit in
the Stop Lamp Switch harness connector.
Is the voltage above 1.0 volt?
Ye s>>
Repair the short to battery voltage in the (V32) Brake
Switch No.2 Signal circuit.
Perform the POWERTRAIN VERIFICATION TEST. (Refer to
9 - ENGINE - STANDARD PROCEDURE)
No>>
Go To 5
5.(B29) BRAKE SWITCH NO.1 SIGNAL CIRCUIT SHORTED TO GROUND
Turn the ignition off.
Measure the resistance between ground and the (B29) Brake Switch
No.1 Signal circuit in the Stop Lamp Switch harness connector.
Istheresistancebelow100ohms?
Ye s>>
Repair the short to ground in the (B29) Brake Switch No.1
Signal circuit.
Perform the POWERTRAIN VERIFICATION TEST. (Refer to
9 - ENGINE - STANDARD PROCEDURE)
No>>
Go To 6
6.PCM
NOTE: Before continuing, check the PCM harness connector terminals for corrosion, damage, or terminal
push out. Repair as necessary.
Using the schematics as a guide, inspect the wire harness and connectors. Pay particular attention to all Power and
Ground circuits.
Were there any problems found?
Ye s>>
Repair as necessary.
Perform the POWERTRAIN VERIFICATION TEST. (Refer to 9 - ENGINE - STANDARD PROCEDURE)
No>>
Replace and program the Powertrain Control Module per Service Information.
Perform the POWERTRAIN VERIFICATION TEST. (Refer to 9 - ENGINE - STANDARD PROCEDURE)
Page 132 of 5267
When Monitored:
Ignition on.
Set Condition:
One of the S/C Switches is mechanically stuck in the On/Off, Resume/Accel,or Set position for too long. One
trip fault.
Possible Causes
(V37) S/C SWITCH NO.1 SIGNAL CIRCUIT OPEN
(V38) S/C SWITCH NO.2 SIGNAL CIRCUIT OPEN
(V937) SWITCH RETURN CIRCUIT OPEN
(V37) S/C SWITCH NO.1 SIGNAL CIRCUIT SHORTED TO BATTERY VOLTAGE
(V38) S/C SWITCH NO.2 SIGNAL CIRCUIT SHORTED TO BATTERY VOLTAGE
(V37) S/C SWITCH NO.1 SIGNAL CIRCUIT SHORTED TO GROUND
(V38) S/C SWITCH NO.2 SIGNAL CIRCUIT SHORTED TO GROUND
(V37) S/C SWITCH NO.1 SIGNAL CIRCUIT SHORTED TO THE (V937) S/C SWITCH RETURN CIRCUIT
(V38) S/C SWITCH NO.2 SIGNAL CIRCUIT SHORTED TO THE (V937) S/C SWITCH RETURN CIRCUIT
SPEED CONTROL SWITCH
PCM
Always perform the Pre-Diagnostic Troubleshooting procedure before proceeding. (Refer to 9 - ENGINE -
DIAGNOSIS AND TESTING).
Diagnostic Test
1.SPEED CONTROL SWITCH NO.1 STUCK
Start the engine.
With a scan tool, monitor each switch function for the Speed Control Switches.
Press and release each Speed Control Button.
Is Switch No.1 Stuck?
Ye s>>
Replace the Speed Control Switch.
Perform the POWERTRAIN VERIFICATION TEST. (Refer to 9 - ENGINE - STANDARD PROCEDURE)
No>>
Go To 2
2.SPEED CONTROL SWITCH STATUS
Start the engine.
With a scan tool, monitor each switch function for the Speed Control Switches.
Press and release each Speed Control Button.
- Resume/Accel
-Cancel
- Decel (Coast)
-On/Off
-Set
Does each switch function change status when pressing and releasing each switch?
Ye s>>
Refer to the INTERMITTENT CONDITION Diagnostic Procedure.
Perform the POWERTRAIN VERIFICATION TEST. (Refer to 9 - ENGINE - STANDARD PROCEDURE)
No>>
Go To 3