Page 2331 of 5267
4. Install 4 mounting bolts. (Refer to 14 - FUEL SYS-
TEM/FUEL DELIVERY - SPECIFICATIONS)
5. Install electrical connector.
6. Install air plenum.
7.If the throttle body has been changed, the fol-
lowing procedure must be performed:
a. Disconnect negative battery cable from battery.
Leave cable disconnected for approximately 90
seconds.
b. Reconnect cable to battery.
c. Turn ignition switch ON, but do not crank
engine.
d. Leave ignition switch ON for a minimum of 10
seconds. This will allow PCM to learn throttle
body electrical parameters.
8.3L - SRT-10
1. Mount throttle body and wiring clips , tighten bolts to 12 N.m (105 in. lbs.).
2. Connect electrical connector to throttle position sensor.
3. Install the throttle cable.
4. Install the air cleaner housing, refer to Engine/Air Intake System/AirCleaner Housing.
5. Connect the negative battery cable and install the battery cover.
Page 2333 of 5267

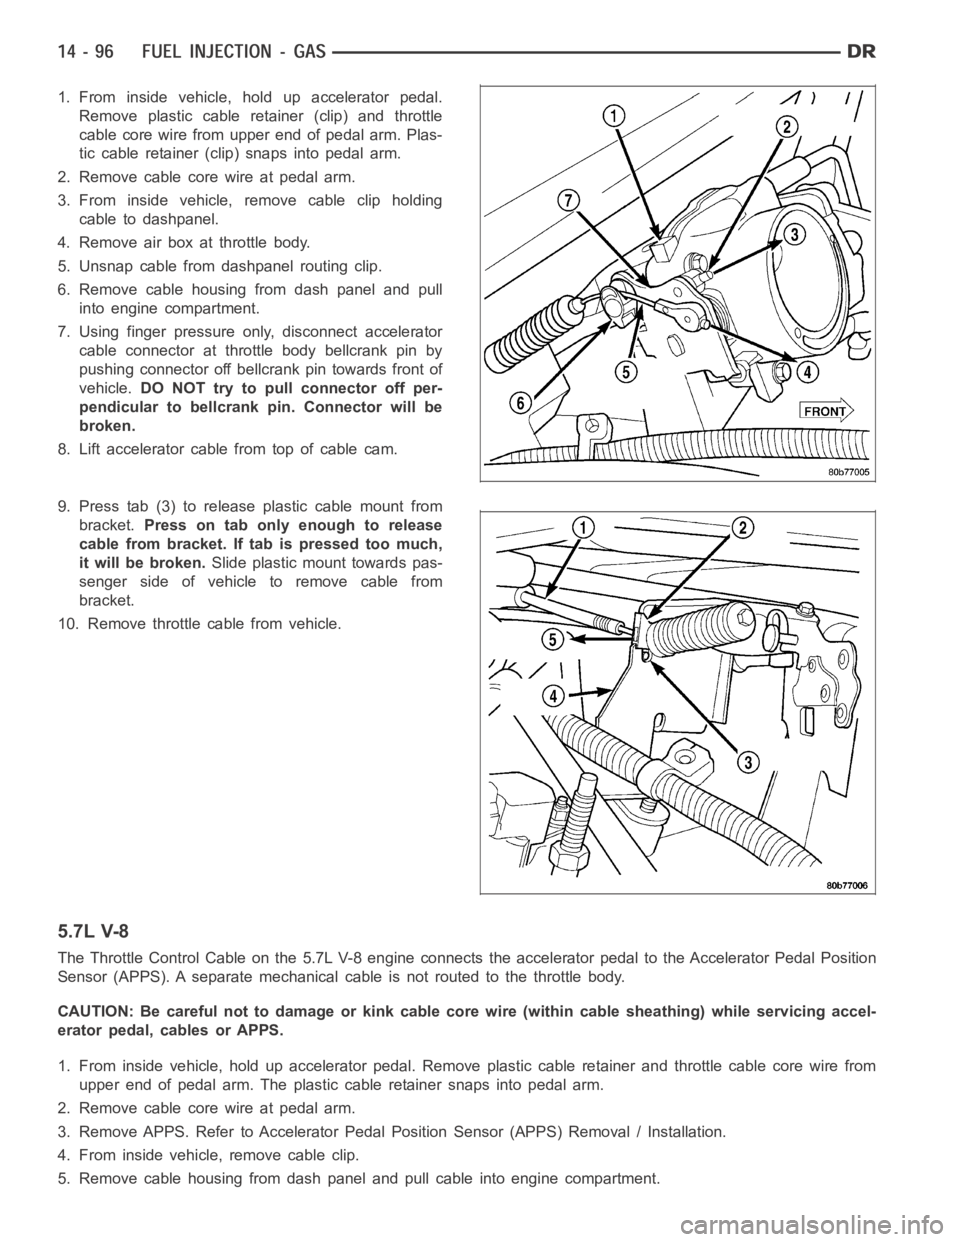
1. From inside vehicle, hold up accelerator pedal.
Remove plastic cable retainer (clip) and throttle
cable core wire from upper end of pedal arm. Plas-
tic cable retainer (clip) snaps into pedal arm.
2. Remove cable core wire at pedal arm.
3. From inside vehicle, remove cable clip holding
cable to dashpanel.
4. Remove air box at throttle body.
5. Unsnap cable from dashpanel routing clip.
6. Remove cable housing from dash panel and pull
into engine compartment.
7. Using finger pressure only, disconnect accelerator
cable connector at throttle body bellcrank pin by
pushing connector off bellcrank pin towards front of
vehicle.DO NOT try to pull connector off per-
pendicular to bellcrank pin. Connector will be
broken.
8. Lift accelerator cable from top of cable cam.
9. Press tab (3) to release plastic cable mount from
bracket.Press on tab only enough to release
cable from bracket. If tab is pressed too much,
it will be broken.Slide plastic mount towards pas-
senger side of vehicle to remove cable from
bracket.
10. Remove throttle cable from vehicle.
5.7L V-8
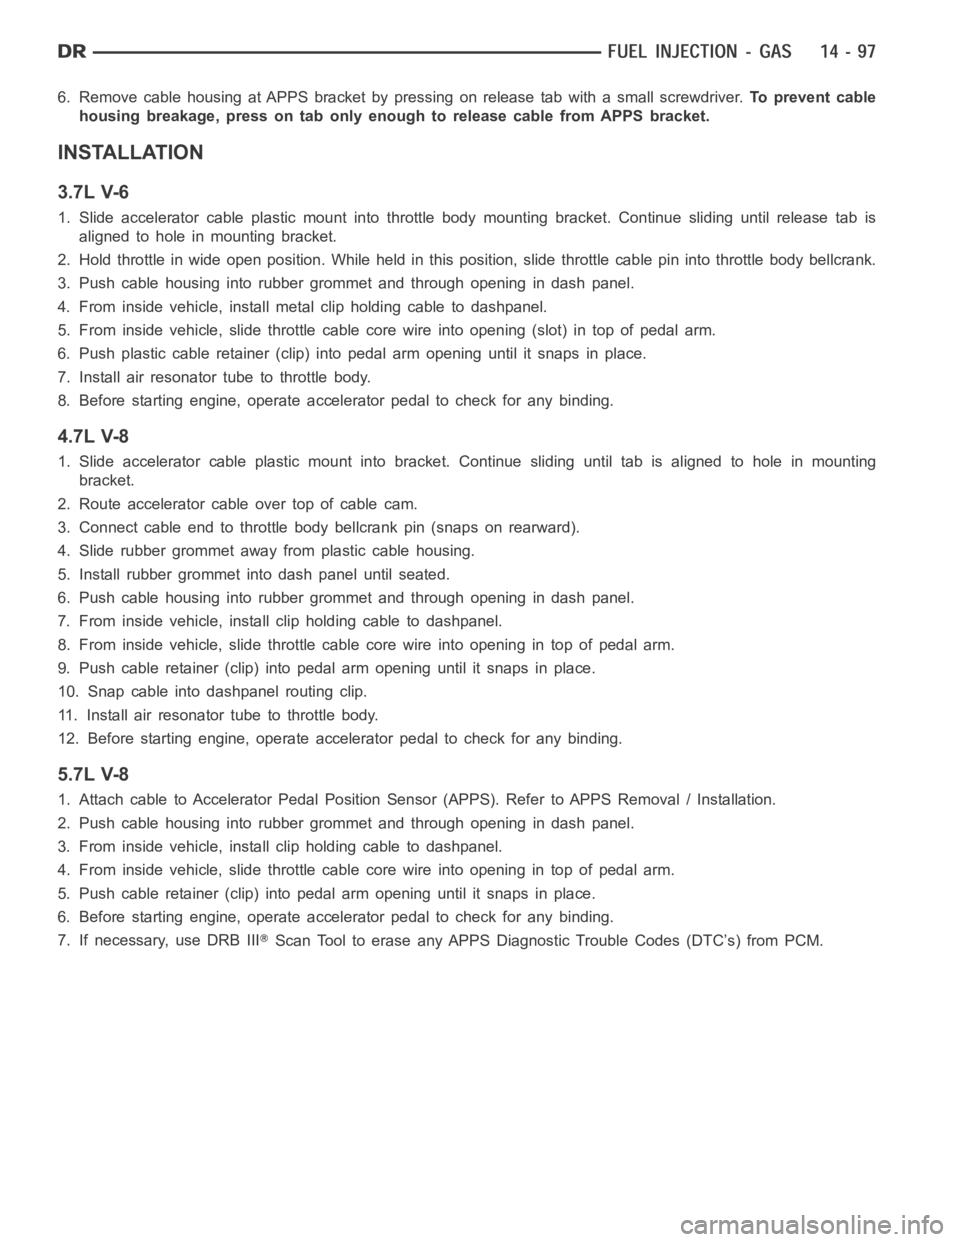
The Throttle Control Cable on the 5.7L V-8 engine connects the acceleratorpedal to the Accelerator Pedal Position
Sensor (APPS). A separate mechanical cable is not routed to the throttle body.
CAUTION: Be careful not to damage or kink cable core wire (within cable sheathing) while servicing accel-
erator pedal, cables or APPS.
1. From inside vehicle, hold up accelerator pedal. Remove plastic cable retainer and throttle cable core wire from
upper end of pedal arm. The plastic cable retainer snaps into pedal arm.
2. Remove cable core wire at pedal arm.
3. Remove APPS. Refer to Accelerator Pedal Position Sensor (APPS) Removal/ Installation.
4. From inside vehicle, remove cable clip.
5. Remove cable housing from dash panel and pull cable into engine compartment.
Page 2334 of 5267

6. Remove cable housing at APPS bracket by pressing on release tab with a small screwdriver.To prevent cable
housing breakage, press on tab only enough to release cable from APPS bracket.
INSTALLATION
3.7L V-6
1. Slide accelerator cable plastic mount into throttle body mounting bracket. Continue sliding until release tab is
aligned to hole in mounting bracket.
2. Hold throttle in wide open position. While held in this position, slide throttle cable pin into throttle body bellcrank.
3. Push cable housing into rubber grommet and through opening in dash panel.
4. From inside vehicle, install metal clip holding cable to dashpanel.
5. From inside vehicle, slide throttle cable core wire into opening (slot)in top of pedal arm.
6. Push plastic cable retainer (clip) into pedal arm opening until it snapsin place.
7. Install air resonator tube to throttle body.
8. Before starting engine, operate accelerator pedal to check for any binding.
4.7L V-8
1. Slide accelerator cable plastic mount into bracket. Continue sliding until tab is aligned to hole in mounting
bracket.
2. Route accelerator cable over top of cable cam.
3. Connect cable end to throttle body bellcrank pin (snaps on rearward).
4. Slide rubber grommet away from plastic cable housing.
5. Install rubber grommet into dash panel until seated.
6. Push cable housing into rubber grommet and through opening in dash panel.
7. From inside vehicle, install clip holding cable to dashpanel.
8. From inside vehicle, slide throttle cable core wire into opening in top of pedal arm.
9. Push cable retainer (clip) into pedal arm opening until it snaps in place.
10. Snap cable into dashpanel routing clip.
11. Install air resonator tube to throttle body.
12. Before starting engine, operate accelerator pedal to check for any binding.
5.7L V-8
1. Attach cable to Accelerator Pedal Position Sensor (APPS). Refer to APPSRemoval / Installation.
2. Push cable housing into rubber grommet and through opening in dash panel.
3. From inside vehicle, install clip holding cable to dashpanel.
4. From inside vehicle, slide throttle cable core wire into opening in top of pedal arm.
5. Push cable retainer (clip) into pedal arm opening until it snaps in place.
6. Before starting engine, operate accelerator pedal to check for any binding.
7. If necessary, use DRB III
Scan Tool to erase any APPS Diagnostic Trouble Codes (DTC’s) from PCM.
Page 2335 of 5267
SENSOR-THROTTLE POSITION
DESCRIPTION
3.7/4.7/5.7L
The 3-wire Throttle Position Sensor (TPS) (2) is
mounted on the throttle body and is connected to the
throttle blade shaft.
The 5.7L V-8 engine does not use a separate TPS on
the throttle body.
8.3L - SRT-10
The TPS (1) is mounted on the passenger side of the
throttle body. The sensor connects to the throttle blade
shaft. The TPS is a variable resistor that provides the
Powertrain Control Module (PCM) with an input signal
(voltage).
Page 2336 of 5267

OPERATION
The 5.7L V-8 engine does not use a separate Throttle Position Sensor (TPS) on the throttle body.
The 3-wire TPS provides the Powertrain Control Module (PCM) with an input signal (voltage) that represents the
throttle blade position of the throttle body. The sensor is connected to the throttle blade shaft. As the position of the
throttle blade changes, the output voltage of the TPS changes.
The PCM supplies approximately 5 volts to the TPS. The TPS output voltage (input signal to the PCM) represents
the throttle blade position. The PCM receives an input signal voltage fromthe TPS. This will vary in an approximate
range of from .26 volts at minimum throttle opening (idle), to 4.49 volts atwide open throttle. Along with inputs from
other sensors, the PCM uses the TPS input to determine current engine operating conditions. In response to engine
operating conditions, the PCM will adjust fuel injector pulse width and ignition timing.
The PCM needs to identify the actions and position of the throttle blade at all times. This information is needed to
assist in performing the following calculations:
Ignition timing advance
Fuel injection pulse-width
Idle (learned value or minimum TPS)
Off-idle (0.06 volt)
Wide Open Throttle (WOT) open loop (2.608 volts above learned idle voltage)
Deceleration fuel lean out
Fuel cutoff during cranking at WOT (2.608 volts above learned idle voltage)
A/C WOT cutoff (certain automatic transmissions only)
REMOVAL
3.7L V6
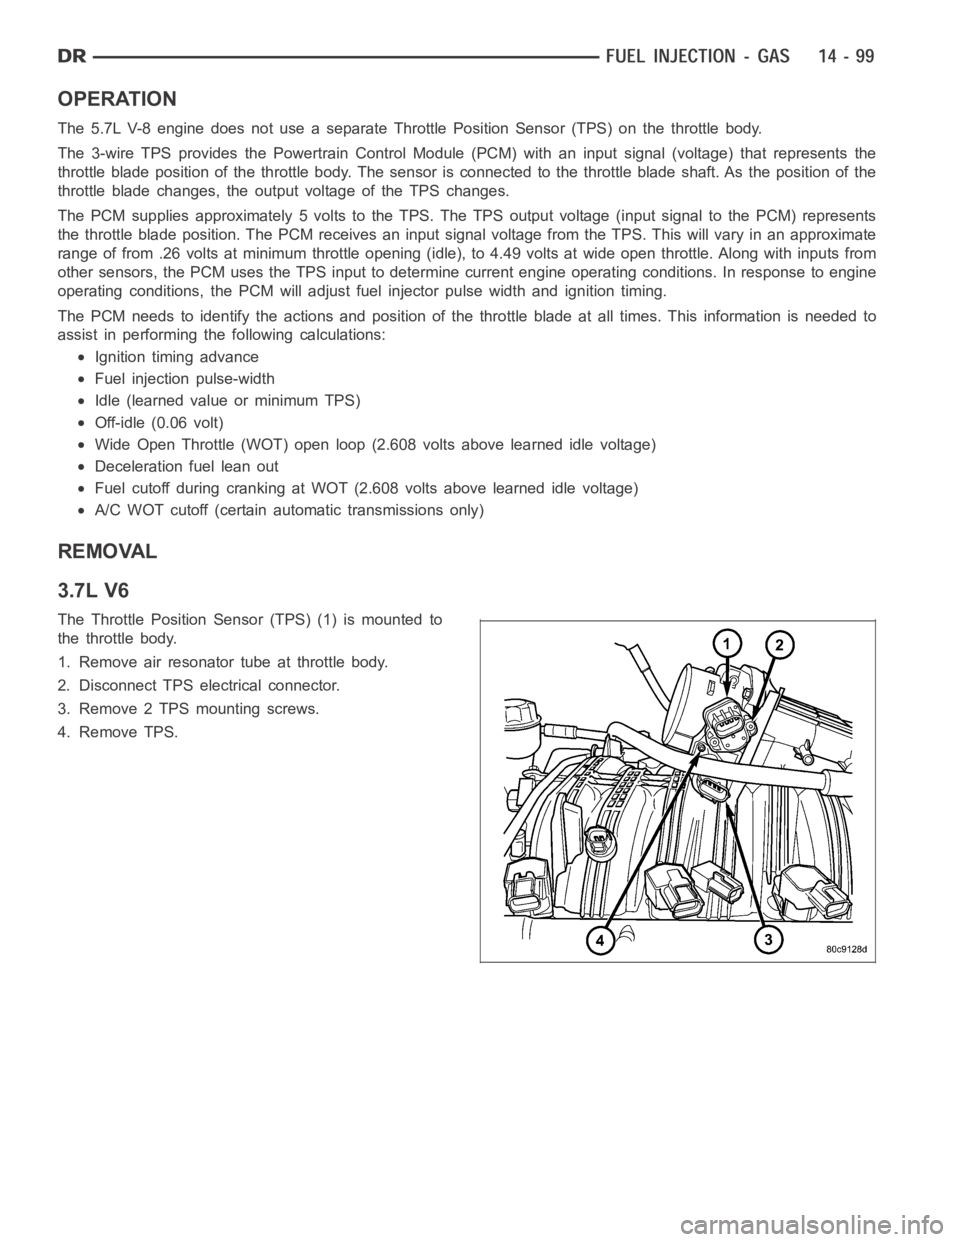
The Throttle Position Sensor (TPS) (1) is mounted to
the throttle body.
1. Remove air resonator tube at throttle body.
2. Disconnect TPS electrical connector.
3. Remove 2 TPS mounting screws.
4. Remove TPS.
Page 2337 of 5267
4.7L V-8
The TPS (2) is located on the throttle body.
1. Remove air duct and tube at throttle body.
2. Disconnect TPS electrical connector.
3. Remove two TPS mounting bolts (screws).
4. Remove TPS from throttle body.
5.7L V-8
The 5.7L V-8 engine does not use a separate Throttle Position Sensor (TPS) on the throttle body.
8.3L - SRT-10
The TPS is attached to the throttle body.
1. Disconnect the TPS electrical connector.
2. Remove the TPS mounting screws.
3. Remove the TPS.
Page 2338 of 5267
INSTALLATION
3.7L V-6
The Throttle Position Sensor (TPS) (1) is mounted to
the throttle body.
The throttle shaft end of throttle body slides into a
socket in TPS. The TPS must be installed so that it
can be rotated a few degrees. (If sensor will not
rotate, install sensor with throttle shaft on other side of
socket tangs). The TPS will be under slight tension
when rotated.
1. Install TPS and retaining screws.
2. Tighten screws to 7 Nꞏm (60 in. lbs.) torque.
3. Connect TPS electrical connector to TPS.
4. Manually operate throttle (by hand) to check for
any TPS binding before starting engine.
5. Install air cleaner tube to throttle body.
Page 2339 of 5267
4.7L V-8
The throttle shaft end of throttle body (5) slides into a
socket in TPS. The TPS must be installed so that it
can be rotated a few degrees. If sensor will not rotate,
install sensor with throttle shaft on other side of socket
tangs. The TPS will be under slight tension when
rotated.
1. Install TPS and two retaining bolts.
2. Tighten bolts to 7 Nꞏm (60 in. lbs.) torque.
3. Manually operate throttle control lever by hand to
check for any binding of TPS.
4. Connect TPS electrical connector to TPS.
5. Install air duct/air box to throttle body.