2006 DODGE RAM SRT-10 automatic transmission
[x] Cancel search: automatic transmissionPage 3174 of 5267
P0740-TCC OUT OF RANGE
For a complete wiring diagramRefer to Section 8W
When Monitored:
During Electronically Modulated Converter Clutch (EMCC) Operation.
Set Condition:
Transmission must be in EMCC, with input speed greater than 1750 RPM. TCC-LR Solenoid achieves the
maximum duty cycle and can not pull engine speed within 60 RPM of input speed. Also when the transmission
is in FEMCC and the engine slips TCC less than 100 RPM for 10 seconds. This DTCcantakeuptofive
minutes of problem identification before illuminating the MIL.
Possible Causes
RELATED DTC P0750 PRESENT
L/R SOLENOID
TCC SWITCH VALVE STUCK
T C C R E G U L AT O R VA LV E S T U C K
INPUT SHAFT SEAL RING CUT
TORQUE CONVERTER AND/OR INTERNAL TRANSMISSION
Always perform the 45RFE/545RFE Pre-Diagnostic Troubleshooting Procedure before proceeding. (Refer to
21 - TRANSMISSION/TRANSAXLE/AUTOMATIC - 45RFE/545RFE - STANDARD PROCEDURE)
Theory of Operation
When in 2nd, 2nd Prime, 3rd, 4th or 5th gear, the torque converter clutch (TCC) can be engaged when certain
conditions are met. The TCC piston is electronically modulated by increasing the duty cycle of the LR Solenoid until
the torque converter slip difference (difference between engine and transmission input speed) is within 60 RPM.
Then the LR solenoid is fully energized(FEMCC – 100% duty cycle). Torque converter slip is monitored in FEMCC
to ensure adequate clutch capacity.
Diagnostic Test
1.CHECKFORRELATEDDTCP0750
With the scan tool, read transmission DTCs.
Is the DTC P0750 present also?
Ye s>>
Refer to the Transmission category and perform the appropriate symptom.
No>>
Go To 2
2.CHECK IF DTC P0740 IS CURRENT
With the scan tool, Read and RECORD ALL Transmission DTC’s. After recording DTCs, erase DTCs.
Drive the vehicle until the transmission temperature is at least 43° C or 110° F and the engine temperature at least
49° C or 120° F.
Perform the following steps 3 times.
Drive the vehicle to the speed of at least 88 Kmh or 55 mph.
Allow 4th or 5th gear to engage for at least 10 seconds.
Close the throttle.
Tip back into the throttle until the TPS angle is between 25 and 29 degrees.
NOTE: If the throttle angle goes over 30 degrees, you must close the throttleandtryagain.
Did the TCC engage during any of the attempts, Engine speed approximately equal to input speed?
Ye s>>
Go To 3
No>>
Go To 4
Page 3175 of 5267
3.CHECK WIRING AND CONNECTORS
The conditions necessary to set this DTC are not present at this time. Usingthe schematics as a guide, inspect the
wiring and connectors specific to this circuit. Wiggle the wires while checking for shorts and open circuits.
Using the schematics as a guide, inspect the wiring and connectors specifictothiscircuit.
Wiggle the wires while checking for shorts and open circuits.
With the scan tool, check the DTC EVENT DATA to help identify the conditionsin which the DTC was set.
Were there any problems found?
Ye s>>
Repair as necessary.
Perform 45RFE/545RFE TRANSMISSION VERIFICATION TEST - VER 1. (Refer to 21- TRANSMIS-
SION/TRANSAXLE/AUTOMATIC - 45RFE/545RFE - STANDARD PROCEDURE)
No>>
Te s t C o m p l e t e .
4.CHECK THE LR SOLENOID
With the scan tool, check for other transmission DTC’s.
Are the DTCs P1775 and P0841 present also?
Ye s>>
Replace Transmission Solenoid/TRS Assembly per the Service Information. (Refer to 21 - TRANSMIS-
SION/TRANSAXLE/AUTOMATIC - 45RFE/545RFE/TRANS SOLENOID/TRS ASSY - REMOVAL)
Perform 45RFE/545RFE TRANSMISSION VERIFICATION TEST - VER 1. (Refer to 21- TRANSMIS-
SION/TRANSAXLE/AUTOMATIC - 45RFE/545RFE - STANDARD PROCEDURE)
No>>
Go To 5
5.CHECK THE TORQUE CONVERTER AND/OR INTERNAL TRANSMISSION
Repair internal transmission as necessary.
Check for the following possible causes. Refer to the Service informationfor the proper repair procedures.
Inspect the Transmission Oil Pump and Valve Body.
If no problems are found, replace the Transmission Solenoid/TRS Assembly.
Check the Torque Converter Switch Valve and the Torque Converter Clutch Control Valve for sticking in the bore.
Check the Teflon seal rings on the input shaft. Note: If one of the seal ringsis , the loose piece will often lodge in
the TCC switch valve, causing it to stick in it bore.
View repair
Repair
In all cases, replace the Torque Converter. Make sure to check all other possible causes in addition to
the Torque Converter.
Perform 45RFE/545RFE TRANSMISSION VERIFICATION TEST - VER 1. (Refer to 21- TRANSMIS-
SION/TRANSAXLE/AUTOMATIC - 45RFE/545RFE - STANDARD PROCEDURE)
Page 3177 of 5267
When Monitored:
Initially at power-up, then every 10 seconds thereafter. The solenoid circuits will also be tested immediately
after a gear ratio or pressure switch error is detected.
Set Condition:
After three consecutive solenoid continuity test failures, or one failure if test is run in response to a gear ratio
or pressure switch error.Note: This DTC is strictly an electrical fault and does not apply to any internal
transmission failures.
Possible Causes
RELATED TIPM TCM DTCS PRESENT
(T20) LR SOLENOID CONTROL CIRCUIT SHORT TO OTHER CIRCUITS
(T20) LR SOLENOID CONTROL CIRCUIT OPEN
(T20) LR SOLENOID CONTROL CIRCUIT SHORT TO GROUND
TRANSMISSION SOLENOID/TRS ASSEMBLY
POWERTRAIN CONTROL MODULE
Always perform the 45RFE/545RFE Pre-Diagnostic Troubleshooting Procedure before proceeding. (Refer to
21 - TRANSMISSION/TRANSAXLE/AUTOMATIC - 45RFE/545RFE - STANDARD PROCEDURE)
Theory of Operation
The Transmission Control System uses six electronically controlled solenoids that allow hydraulic fluid to be applied
to various friction elements (clutches), which enables the gear requested. The continuity of each solenoid circuit is
periodically tested. Each inactive solenoid is turned on for a few milliseconds, then off. Each active solenoid is
turned off for a few milliseconds, then on. This pulsing of voltage to the solenoid causes an inductive spike which
can be sensed by the Transmission Control System. If an inductive spike is not sensed by the Transmission Control
System during the continuity check, it is tested again. If the test fails three consecutive times, the appropriate Diag-
nostic Trouble Code (DTC) is set. If the solenoid test is run in response to agear ratio or pressure switch error, one
failure will result in setting the appropriate DTC.Note: This DTC is strictly an electrical fault and does not apply
to any internal transmission failures.
Diagnostic Test
1.CHECK FOR TIPM TCM DTCS
With the scan tool, check for other transmission DTCs.
Are there any TIPM TCM DTCs present?
Ye s>>
Refer to the Transmission category and perform the appropriate symptom.
No>>
Go To 2
2.CHECK TO SEE IF P0750 IS PRESENT
Ignition on, engine not running.
With the scan tool, erase all Transmission DTC’s.
Turn the ignition off to the lock position.
Remove the Ignition Switch Feed fuse from the TIPM.
CAUTION: Removal of the Ignition Switch Feed fuse from the TIPM will prevent the vehicle from being
startedingear.
WARNING: The Ignition Switch Feed fuse must be removed from the TIPM. Failure to do so can result in
personal injury or death.
Install the Transmission Simulator, Miller tool #8333.
Ignition on, engine not running.
With the scan tool, actuate the LR Solenoid.
Page 3178 of 5267
Monitor the LR Solenoid LED on the Transmission Simulator.
Did the LR Solenoid LED on the Transmission Simulator blink on and off?
Ye s>>
Go To 3
No>>
Go To 4
3.CHECK THE TRANSMISSION SOLENOID/TRS ASSEMBLY
With the scan tool, continue to actuate the LR Solenoid for the period of 2 minutes with the Transmission Simulator
still connected.
After 2 minutes of actuation, with the scan tool, stop the actuation and check for transmission DTCs.
Did the DTC P0750 reset during the actuation test?
Ye s>>
Go To 4
No>>
Replace the Transmission Solenoid/TRS Assembly per the Service Information. (Refer to 21 - TRANS-
MISSION/TRANSAXLE/AUTOMATIC - 45RFE/545RFE/TRANS SOLENOID/TRS ASSY -REMOVAL)
Perform 45RFE/545RFE TRANSMISSION VERIFICATION TEST - VER 1. (Refer to 21- TRANSMIS-
SION/TRANSAXLE/AUTOMATIC - 45RFE/545RFE - STANDARD PROCEDURE)
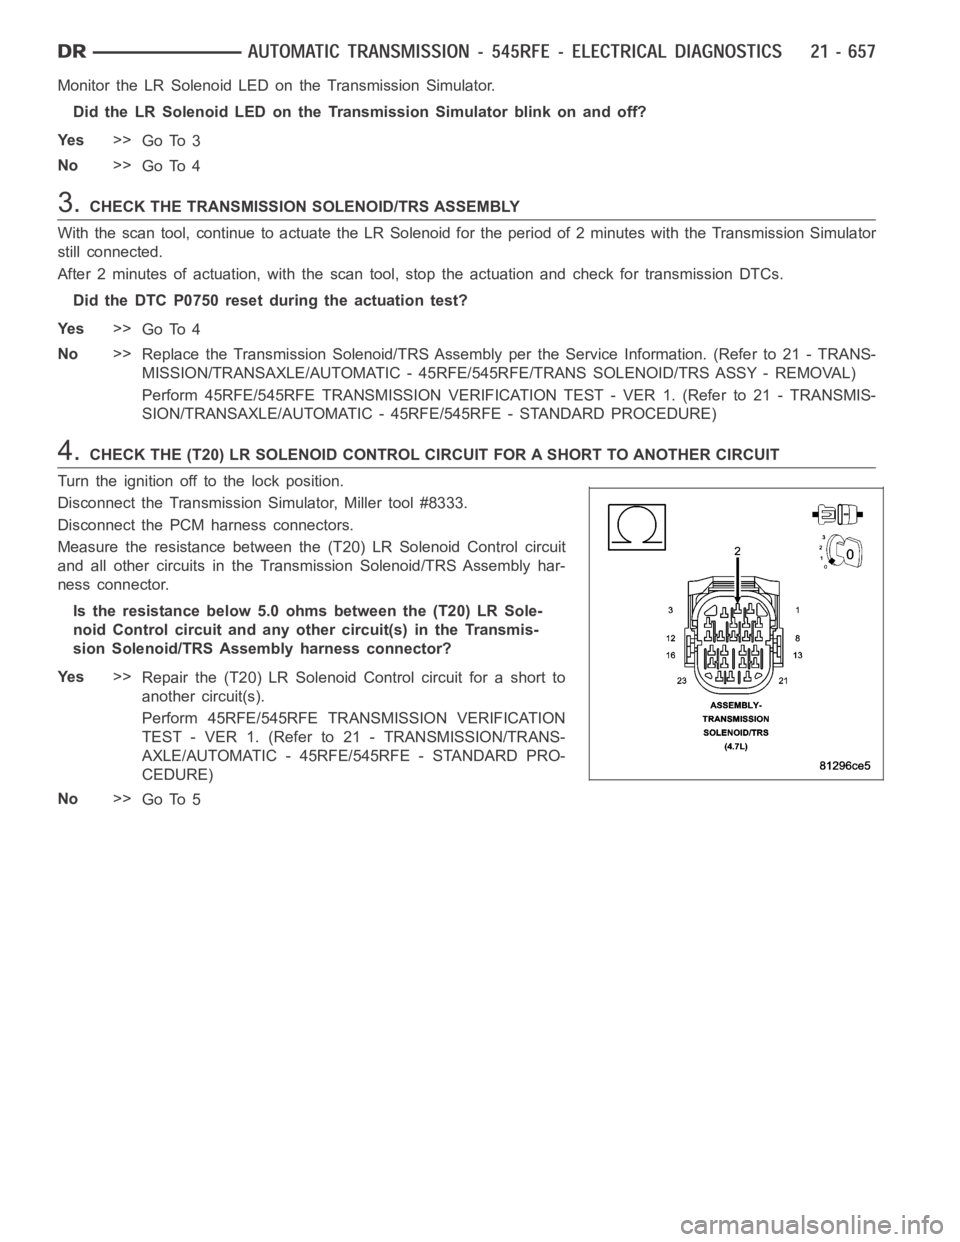
4.CHECK THE (T20) LR SOLENOID CONTROL CIRCUIT FOR A SHORT TO ANOTHER CIRCUIT
Turn the ignition off to the lock position.
Disconnect the Transmission Simulator, Miller tool #8333.
Disconnect the PCM harness connectors.
Measure the resistance between the (T20) LR Solenoid Control circuit
and all other circuits in the Transmission Solenoid/TRS Assembly har-
ness connector.
Is the resistance below 5.0 ohms between the (T20) LR Sole-
noid Control circuit and any other circuit(s) in the Transmis-
sion Solenoid/TRS Assembly harness connector?
Ye s>>
Repair the (T20) LR Solenoid Control circuit for a short to
another circuit(s).
Perform 45RFE/545RFE TRANSMISSION VERIFICATION
TEST - VER 1. (Refer to 21 - TRANSMISSION/TRANS-
AXLE/AUTOMATIC - 45RFE/545RFE - STANDARD PRO-
CEDURE)
No>>
Go To 5
Page 3179 of 5267
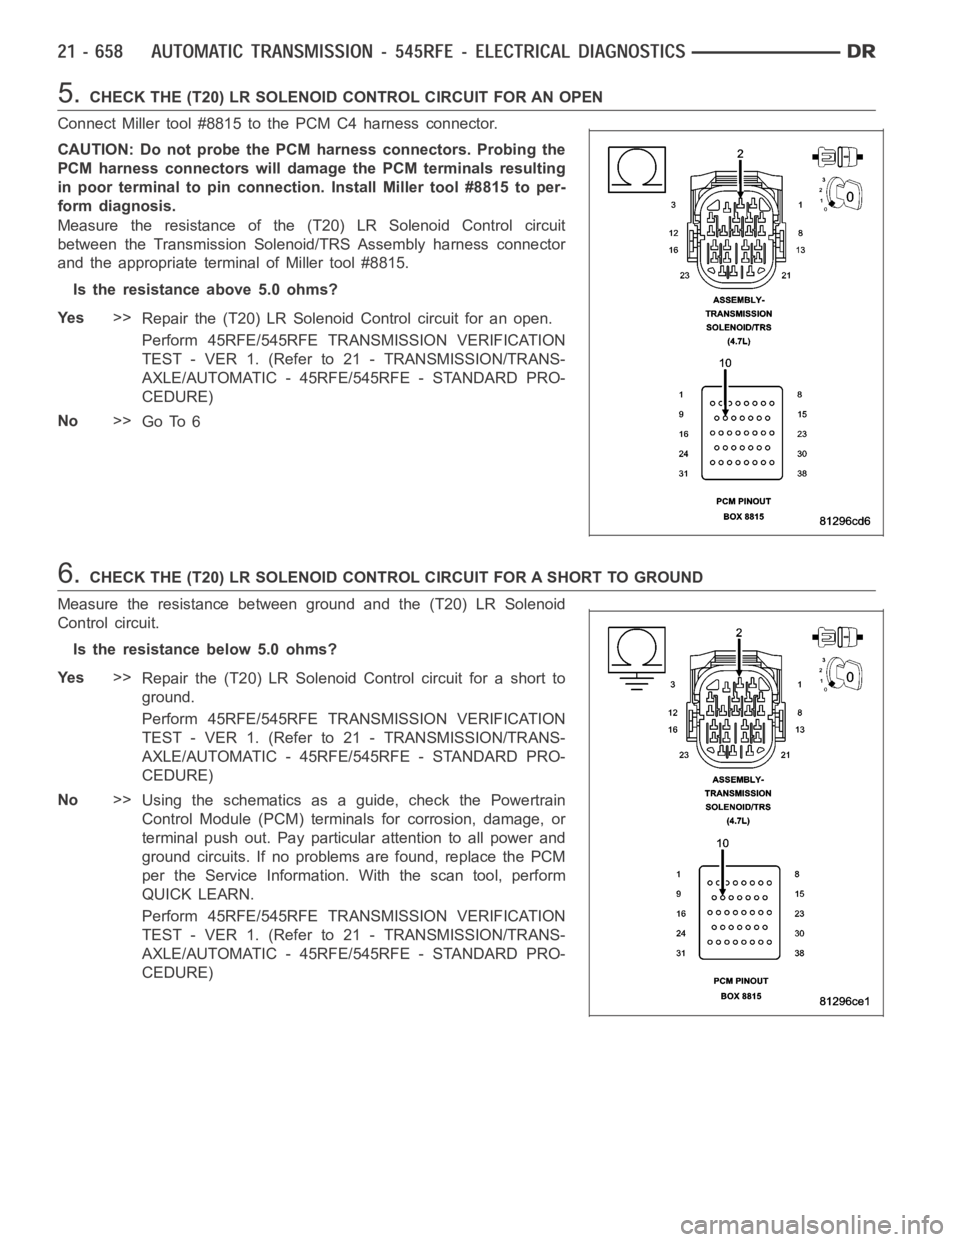
5.CHECK THE (T20) LR SOLENOID CONTROL CIRCUIT FOR AN OPEN
Connect Miller tool #8815 to the PCM C4 harness connector.
CAUTION: Do not probe the PCM harness connectors. Probing the
PCM harness connectors will damage the PCM terminals resulting
in poor terminal to pin connection. Install Miller tool #8815 to per-
form diagnosis.
Measure the resistance of the (T20) LR Solenoid Control circuit
between the Transmission Solenoid/TRS Assembly harness connector
and the appropriate terminal of Miller tool #8815.
Is the resistance above 5.0 ohms?
Ye s>>
Repair the (T20) LR Solenoid Control circuit for an open.
Perform 45RFE/545RFE TRANSMISSION VERIFICATION
TEST - VER 1. (Refer to 21 - TRANSMISSION/TRANS-
AXLE/AUTOMATIC - 45RFE/545RFE - STANDARD PRO-
CEDURE)
No>>
Go To 6
6.CHECK THE (T20) LR SOLENOID CONTROL CIRCUIT FOR A SHORT TO GROUND
Measure the resistance between ground and the (T20) LR Solenoid
Control circuit.
Is the resistance below 5.0 ohms?
Ye s>>
Repair the (T20) LR Solenoid Control circuit for a short to
ground.
Perform 45RFE/545RFE TRANSMISSION VERIFICATION
TEST - VER 1. (Refer to 21 - TRANSMISSION/TRANS-
AXLE/AUTOMATIC - 45RFE/545RFE - STANDARD PRO-
CEDURE)
No>>
Using the schematics as a guide, check the Powertrain
Control Module (PCM) terminals for corrosion, damage, or
terminal push out. Pay particular attention to all power and
ground circuits. If no problems are found, replace the PCM
per the Service Information.With the scan tool, perform
QUICK LEARN.
Perform 45RFE/545RFE TRANSMISSION VERIFICATION
TEST - VER 1. (Refer to 21 - TRANSMISSION/TRANS-
AXLE/AUTOMATIC - 45RFE/545RFE - STANDARD PRO-
CEDURE)
Page 3181 of 5267
When Monitored:
Initially at power-up, then every 10 seconds thereafter. The solenoid circuits will also be tested immediately
after a gear ratio or pressure switch error is detected.
Set Condition:
After three consecutive solenoid continuity test failures, or one failure if test is run in response to a gear ratio
or pressure switch error.Note: This DTC is strictly an electrical fault and does not apply to any internal
transmission failures.
Possible Causes
RELATED TIPM TCM DTCS PRESENT
(T219) 2C SOLENOID CONTROL CIRCUIT SHORT TO OTHER CIRCUITS
(T219) 2C SOLENOID CONTROL CIRCUIT OPEN
(T219) 2C SOLENOID CONTROL CIRCUIT SHORT TO GROUND
TRANSMISSION SOLENOID/TRS ASSEMBLY
POWERTRAIN CONTROL MODULE
Always perform the 45RFE/545RFE Pre-Diagnostic Troubleshooting Procedure before proceeding. (Refer to
21 - TRANSMISSION/TRANSAXLE/AUTOMATIC - 45RFE/545RFE - STANDARD PROCEDURE)
Theory of Operation
The Transmission Control System uses six electronically controlled solenoids that allow hydraulic fluid to be applied
to various friction elements (clutches), which enables the gear requested. The continuity of each solenoid circuit is
periodically tested. Each inactive solenoid is turned on for a few milliseconds, then off. Each active solenoid is
turned off for a few milliseconds, then on. This pulsing of voltage to the solenoid causes an inductive spike which
can be sensed by the Transmission Control System. If an inductive spike is not sensed by the Transmission Control
System during the continuity check, it is tested again. If the test fails three consecutive times, the appropriate Diag-
nostic Trouble Code (DTC) is set. If the solenoid test is run in response to agear ratio or pressure switch error, one
failure will result in setting the appropriate DTC.Note: This DTC is strictly an electrical fault and does not apply
to any internal transmission failures.
Diagnostic Test
1.CHECK FOR TCM TIPM DTCS
With the scan tool under TIPM, check for TCM Power Input DTCs.
Are there any TIPM TCM Power Input DTCs present?
Ye s>>
Refer to the Transmission category and perform the appropriate symptom.
No>>
Go To 2
2.CHECK TO SEE IF P0755 IS PRESENT
Turn the ignition off to the lock position.
Remove the Ignition Switch Feed fuse from the TIPM.
CAUTION: Removal of the Ignition Switch Feed fuse from the TIPM will prevent the vehicle from being
startedingear.
WARNING: The Ignition Switch Feed fuse must be removed from the TIPM. Failure to do so can result in
personal injury or death.
Install the Transmission Simulator, Miller tool #8333.
Ignition on, engine not running.
With the scan tool, actuate the 2C Solenoid.
Did the 2C Solenoid LED blink on and off on the Transmission Simulator?
Ye s>>
Go To 3
No>>
Go To 4
Page 3182 of 5267
3.CHECK THE TRANSMISSION SOLENOID/TRS ASSEMBLY
With the scan tool, continue to actuate the 2C Solenoid for the period of 2 minutes with the Transmission Simulator
still connected.
After 2 minutes of actuation, with the scan tool, stop the actuation and check for transmission DTCs.
Did the DTC P0755 reset during the actuation test?
Ye s>>
Go To 4
No>>
Replace the Transmission Solenoid/TRS Assembly per the Service Information. (Refer to 21 - TRANS-
MISSION/TRANSAXLE/AUTOMATIC - 45RFE/545RFE/TRANS SOLENOID/TRS ASSY -REMOVAL)
Perform 45RFE/545RFE TRANSMISSION VERIFICATION TEST - VER 1. (Refer to 21- TRANSMIS-
SION/TRANSAXLE/AUTOMATIC - 45RFE/545RFE - STANDARD PROCEDURE)
4.CHECK THE (T219) 2C SOLENOID CONTROL CIRCUIT FOR A SHORT TO ANOTHER CIRCUIT
Turn the ignition off to the lock position.
Disconnect the Transmission Simulator, Miller tool #8333.
Disconnect the PCM harness connectors.
Measure the resistance between the (T219) 2C Solenoid Control circuit
and all other circuits in the Transmission Solenoid/TRS Assembly har-
ness connector.
Is the resistance below 5.0 ohms between the (T219) 2C Sole-
noid Control circuit and any other circuit(s) in the Transmis-
sion Solenoid/TRS Assembly harness connector?
Ye s>>
Repair the (T219) 2C Solenoid Control circuit for a short to
another circuit(s).
Perform 45RFE/545RFE TRANSMISSION VERIFICATION
TEST - VER 1. (Refer to 21 - TRANSMISSION/TRANS-
AXLE/AUTOMATIC - 45RFE/545RFE - STANDARD PRO-
CEDURE)
No>>
Go To 5
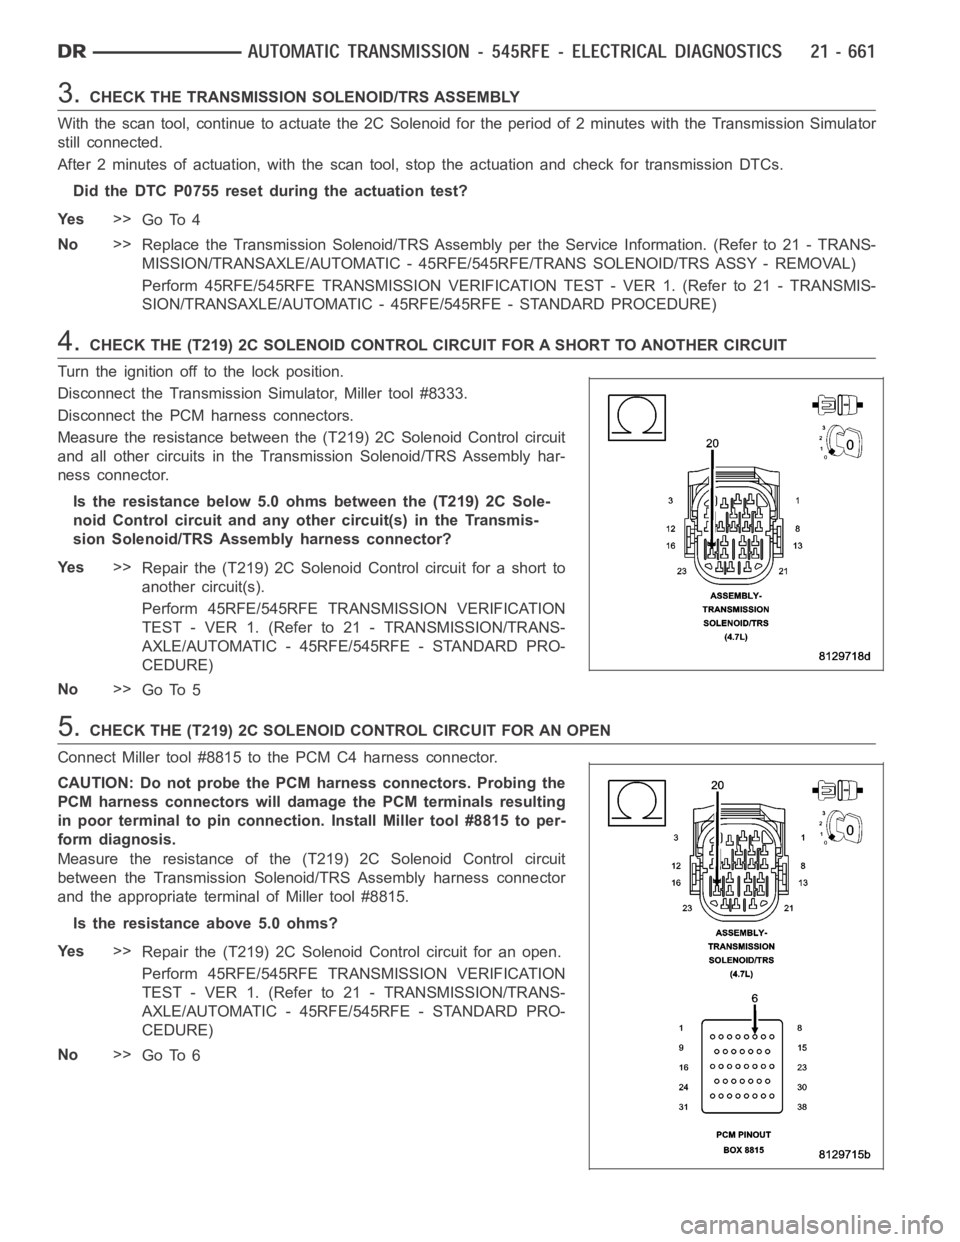
5.CHECK THE (T219) 2C SOLENOID CONTROL CIRCUIT FOR AN OPEN
Connect Miller tool #8815 to the PCM C4 harness connector.
CAUTION: Do not probe the PCM harness connectors. Probing the
PCM harness connectors will damage the PCM terminals resulting
in poor terminal to pin connection. Install Miller tool #8815 to per-
form diagnosis.
Measure the resistance of the (T219) 2C Solenoid Control circuit
between the Transmission Solenoid/TRS Assembly harness connector
and the appropriate terminal of Miller tool #8815.
Is the resistance above 5.0 ohms?
Ye s>>
Repair the (T219) 2C Solenoid Control circuit for an open.
Perform 45RFE/545RFE TRANSMISSION VERIFICATION
TEST - VER 1. (Refer to 21 - TRANSMISSION/TRANS-
AXLE/AUTOMATIC - 45RFE/545RFE - STANDARD PRO-
CEDURE)
No>>
Go To 6
Page 3183 of 5267
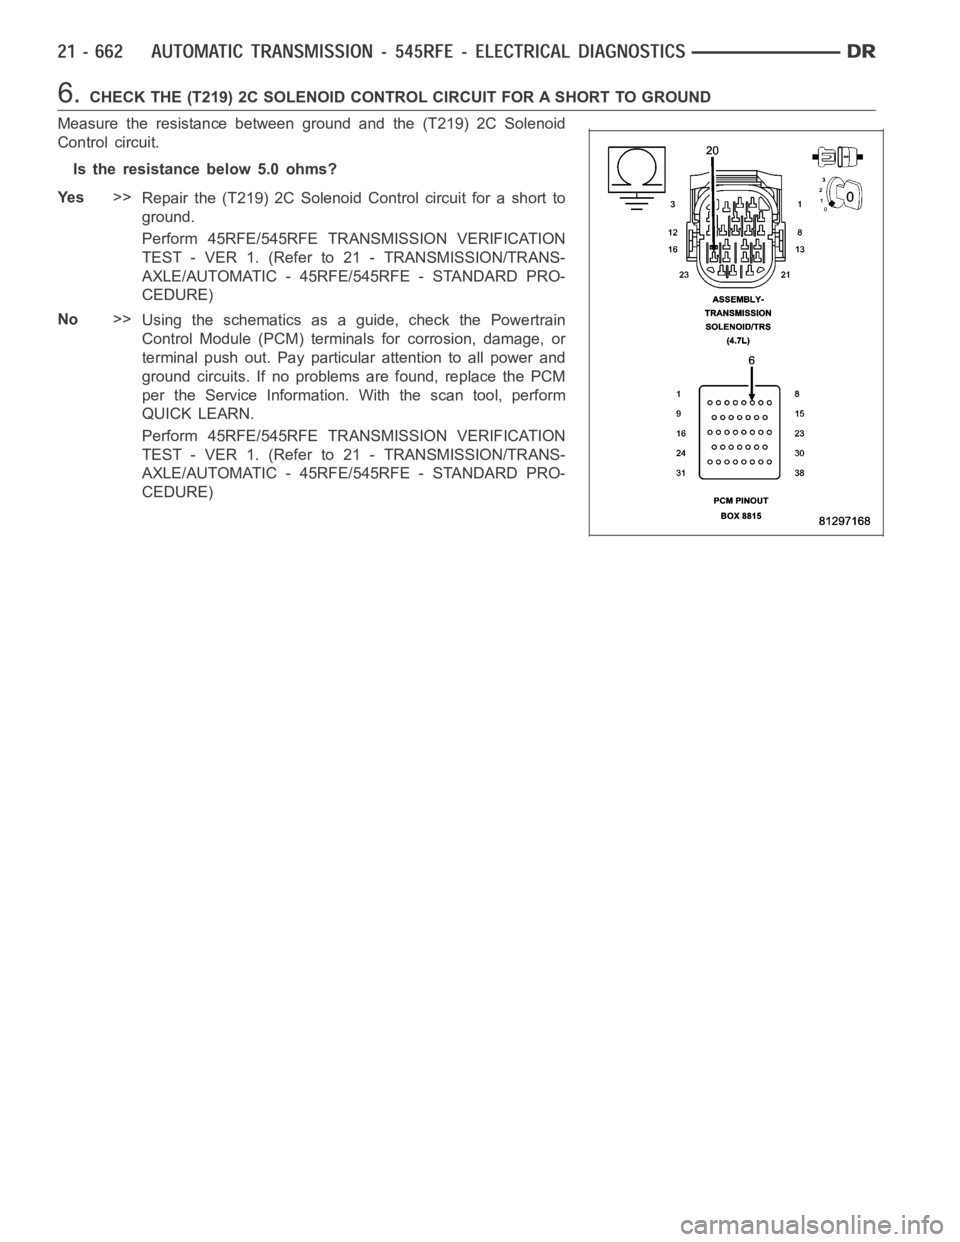
6.CHECK THE (T219) 2C SOLENOID CONTROL CIRCUIT FOR A SHORT TO GROUND
Measure the resistance between ground and the (T219) 2C Solenoid
Control circuit.
Is the resistance below 5.0 ohms?
Ye s>>
Repair the (T219) 2C Solenoid Control circuit for a short to
ground.
Perform 45RFE/545RFE TRANSMISSION VERIFICATION
TEST - VER 1. (Refer to 21 - TRANSMISSION/TRANS-
AXLE/AUTOMATIC - 45RFE/545RFE - STANDARD PRO-
CEDURE)
No>>
Using the schematics as a guide, check the Powertrain
Control Module (PCM) terminals for corrosion, damage, or
terminal push out. Pay particular attention to all power and
ground circuits. If no problems are found, replace the PCM
per the Service Information.With the scan tool, perform
QUICK LEARN.
Perform 45RFE/545RFE TRANSMISSION VERIFICATION
TEST - VER 1. (Refer to 21 - TRANSMISSION/TRANS-
AXLE/AUTOMATIC - 45RFE/545RFE - STANDARD PRO-
CEDURE)