2006 DODGE RAM SRT-10 sensor
[x] Cancel search: sensorPage 3337 of 5267
With the scan tool, monitor the Input and Output Speed Sensor state.
Does the Input speed read 3000 RPM and the Output speed read 1000 RPM, within50 RPM?
Ye s>>
Go To 6
No>>
Go To 3
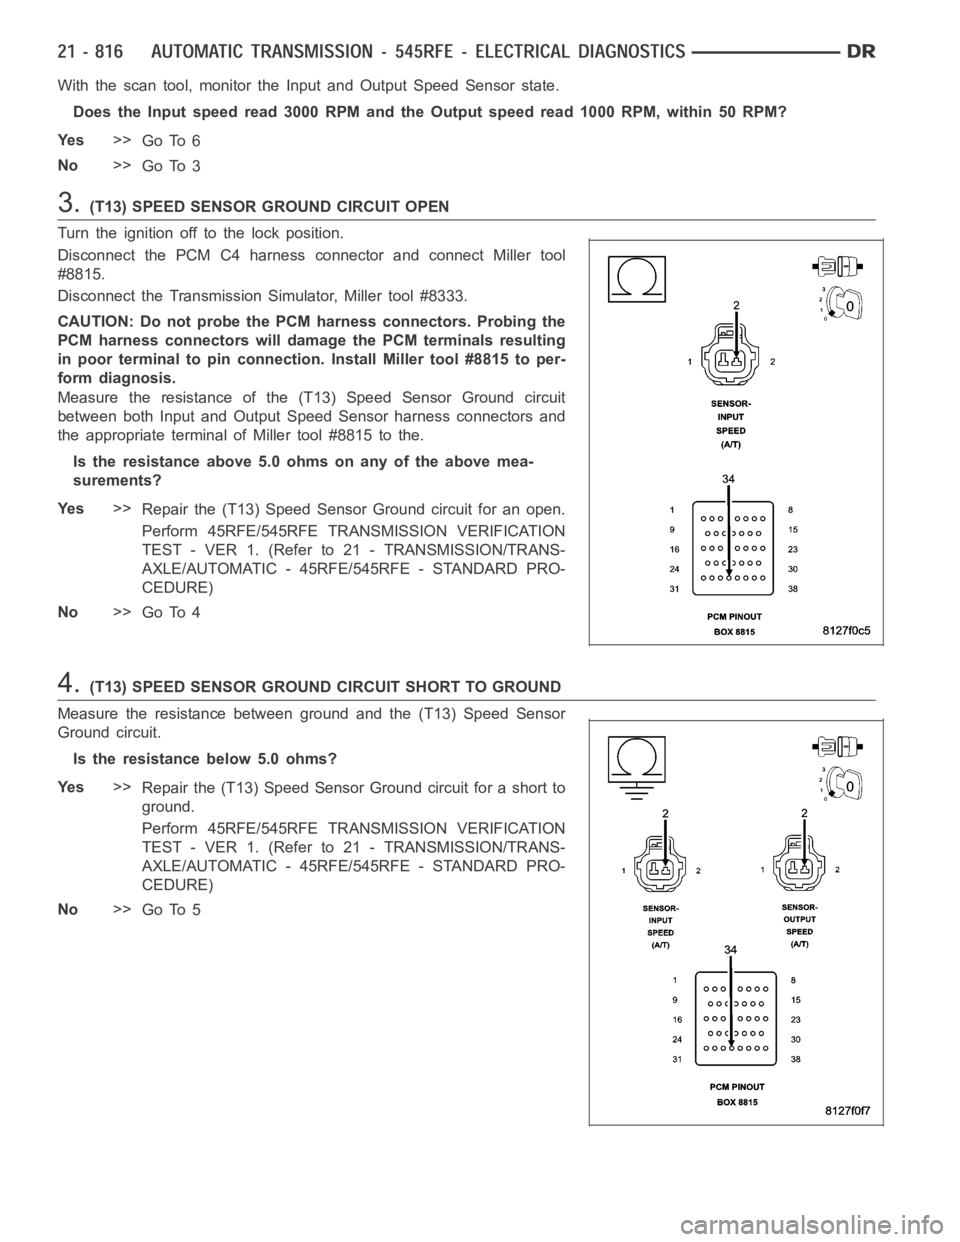
3.(T13) SPEED SENSOR GROUND CIRCUIT OPEN
Turn the ignition off to the lock position.
Disconnect the PCM C4 harness connector and connect Miller tool
#8815.
Disconnect the Transmission Simulator, Miller tool #8333.
CAUTION: Do not probe the PCM harness connectors. Probing the
PCM harness connectors will damage the PCM terminals resulting
in poor terminal to pin connection. Install Miller tool #8815 to per-
form diagnosis.
Measure the resistance of the (T13) Speed Sensor Ground circuit
between both Input and Output Speed Sensor harness connectors and
the appropriate terminalof Miller tool #8815 to the.
Is the resistance above 5.0 ohms on any of the above mea-
surements?
Ye s>>
Repair the (T13) Speed Sensor Ground circuit for an open.
Perform 45RFE/545RFE TRANSMISSION VERIFICATION
TEST - VER 1. (Refer to 21 - TRANSMISSION/TRANS-
AXLE/AUTOMATIC - 45RFE/545RFE - STANDARD PRO-
CEDURE)
No>>
Go To 4
4.(T13) SPEED SENSOR GROUND CIRCUIT SHORT TO GROUND
Measure the resistance between ground and the (T13) Speed Sensor
Ground circuit.
Is the resistance below 5.0 ohms?
Ye s>>
Repair the (T13) Speed Sensor Ground circuit for a short to
ground.
Perform 45RFE/545RFE TRANSMISSION VERIFICATION
TEST - VER 1. (Refer to 21 - TRANSMISSION/TRANS-
AXLE/AUTOMATIC - 45RFE/545RFE - STANDARD PRO-
CEDURE)
No>>
Go To 5
Page 3338 of 5267
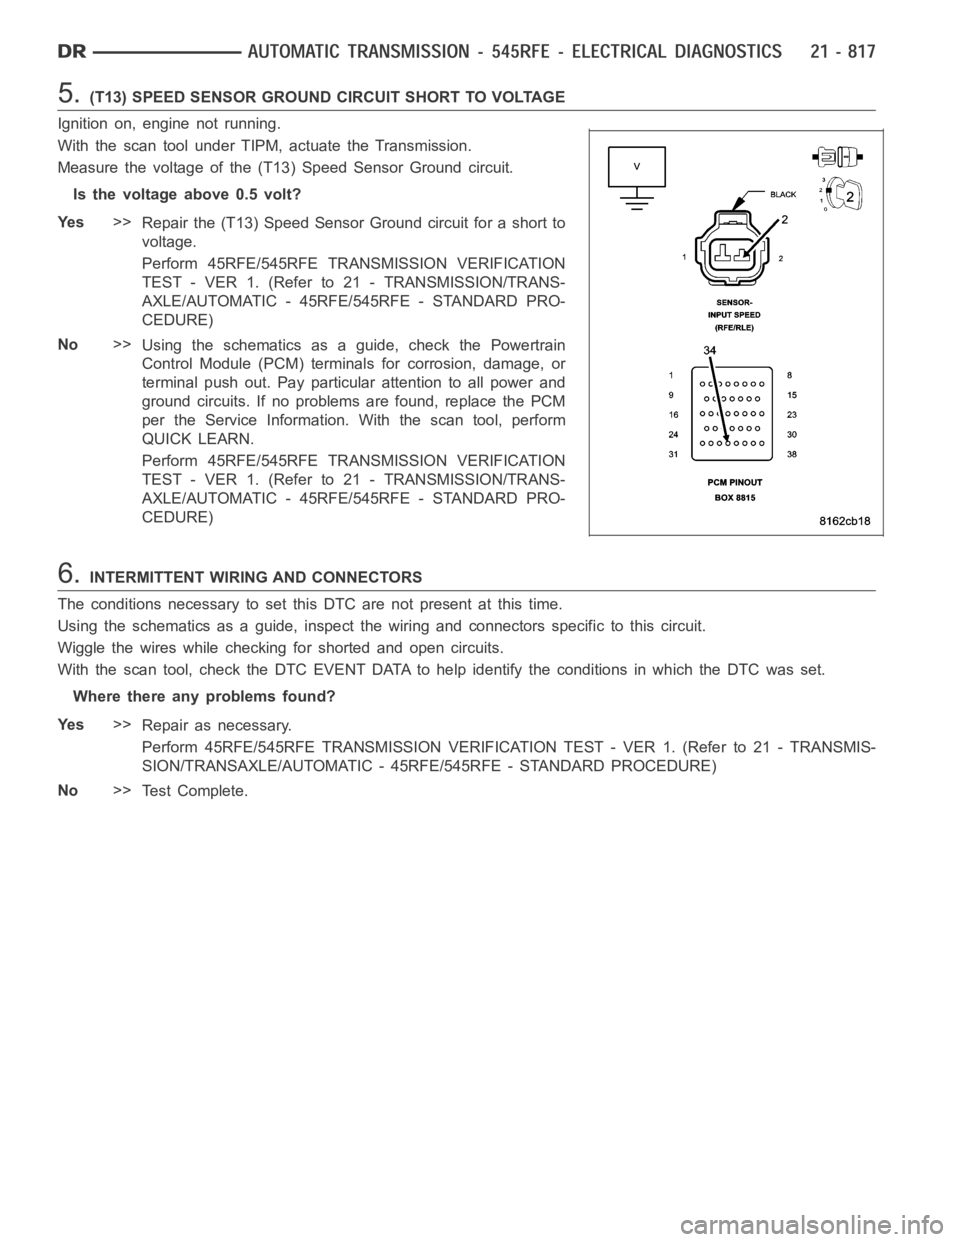
5.(T13) SPEED SENSOR GROUND CIRCUIT SHORT TO VOLTAGE
Ignition on, engine not running.
With the scan tool under TIPM, actuate the Transmission.
Measure the voltage of the (T13) Speed Sensor Ground circuit.
Is the voltage above 0.5 volt?
Ye s>>
Repair the (T13) Speed Sensor Ground circuit for a short to
voltage.
Perform 45RFE/545RFE TRANSMISSION VERIFICATION
TEST - VER 1. (Refer to 21 - TRANSMISSION/TRANS-
AXLE/AUTOMATIC - 45RFE/545RFE - STANDARD PRO-
CEDURE)
No>>
Using the schematics as a guide, check the Powertrain
Control Module (PCM) terminals for corrosion, damage, or
terminal push out. Pay particular attention to all power and
ground circuits. If no problems are found, replace the PCM
per the Service Information.With the scan tool, perform
QUICK LEARN.
Perform 45RFE/545RFE TRANSMISSION VERIFICATION
TEST - VER 1. (Refer to 21 - TRANSMISSION/TRANS-
AXLE/AUTOMATIC - 45RFE/545RFE - STANDARD PRO-
CEDURE)
6.INTERMITTENT WIRING AND CONNECTORS
The conditions necessary to set this DTC are not present at this time.
Using the schematics as a guide, inspect the wiring and connectors specifictothiscircuit.
Wiggle the wires while checking for shorted and open circuits.
With the scan tool, check the DTC EVENT DATA to help identify the conditionsin which the DTC was set.
Where there any problems found?
Ye s>>
Repair as necessary.
Perform 45RFE/545RFE TRANSMISSION VERIFICATION TEST - VER 1. (Refer to 21- TRANSMIS-
SION/TRANSAXLE/AUTOMATIC - 45RFE/545RFE - STANDARD PROCEDURE)
No>>
Te s t C o m p l e t e .
Page 3361 of 5267
45RFE/545RFE PRE-DIAGNOSTIC TROUBLESHOOTING PROCEDURE
For a complete wiring diagramRefer to Section 8W.
1.
Perform the following before attempting any diagnostic procedures:
Check the transmission fluid level. Ifthe fluid level is low, locate and repair any leaks and fill the transmission
to the proper level. Refer to the appropriate Service Information for procedures. Many transmission symptoms
can be caused by a low fluid level.
Check the battery. To avoid false diagnosis, testing should only be performed with the battery fully charged.
With the scan tool, read Engine (PCM) DTCs. If DTCs are present, refer to theDriveability Category and per-
form to the appropriate diagnostic procedure(s) before proceeding.
With the scan tool, read Transmission (TCM) DTCs. Record all Stored, Active, and Pending DTC information.
Diagnose any Pending DTC as a matured DTC.
With the scan tool, read DTC EVENT DATA.Use this data to identify the conditions in which the DTC was set.
Performing a Battery Disconnect will clear all DTC EVENT DATA and reset alllearned Transmission values to
the default values, which may temporarily result in erratic shift schedules.
With the scan tool, perform the Shift Lever Position Test. If the test does not pass, refer to the diagnostic
procedure for P0706 Transmission Range Sensor Rationality.
For Gear Ratio Error DTCs, use the scan tool to view CVI Monitor data. Read and record the Clutch Volume
Index information.
Use the wiring diagram as a guide. Inspect the wiring and connectors related to this circuit. Repair as neces-
sary.
Refer to the When Monitored and Set Conditions for this DTC. DTCs can set at ignition on, at start up, after
driving under specific conditions and after diagnostic monitors have beenrun.
Refer to applicable Technical Service Bulletins (TSBs) for controller software update information. Some condi-
tions can be corrected by upgrading the Engine (PCM) or Transmission (TCM)controller software.
Refer to any Service Information Tune Ups or Technical Service Bulletins that apply.
Were there any repairs made that fixed the vehicle?
Ye s>>
Testing complete.
Perform 45RFE/545RFE TRANSMISSION VERIFICATION TEST - VER 1. (Refer to 21- TRANSMIS-
SION/TRANSAXLE/AUTOMATIC - 45RFE/545RFE - STANDARD PROCEDURE)
No>>
Refer to the Transmission category and perform the appropriate diagnostic procedure(s).
Page 3363 of 5267
page page
AUTOMATIC TRANSMISSION - 45RFE/545RFE -
SERVICE INFORMATION
DESCRIPTION ............................... 844
OPERATION ................................. 845
DIAGNOSIS AND TESTING
AUTOMATIC TRANSMISSION ............... 845
PRELIMINARY ............................. 846
ROAD TESTING ........................... 846
HYDRAULIC PRESSURE TEST............. 847
AIR CHECKING TRANSMISSION CLUTCH
OPERATION............................... 850
CONVERTER HOUSING FLUID LEAK ....... 850
STANDARD PROCEDURE - ALUMINUM
THREAD REPAIR .......................... 851
REMOVAL ................................... 851
DISASSEMBLY .............................. 854
CLEANING .................................. 860
INSPECTION ................................ 861
ASSEMBLY .................................. 861
INSTALLATION .............................. 871
SCHEMATICS AND DIAGRAMS
HYDRAULIC SCHEMATICS ................. 874
SPECIFICATIONS
TRANSMISSION ........................... 896
SPECIAL TOOLS
AUTOMATIC TRANSMISSION - RFE ......... 898
RETAINER/BULKHEAD-4C
DISASSEMBLY .............................. 901
ASSEMBLY .................................. 903
SEAL-ADAPTER HOUSING
REMOVAL ................................... 906
INSTALLATION .............................. 906
SYSTEM-BRAKE TRANSMISSION SHIFT
INTERLOCK
DESCRIPTION ............................... 907
OPERATION ................................. 907
DIAGNOSIS AND TESTING - BRAKE
TRANSMISSION SHIFT INTERLOCK ......... 907
ADJUSTMENTS - BRAKE TRANSMISSION
SHIFT INTERLOCK ......................... 907
FLUID AND FILTER
DIAGNOSIS AND TESTING
EFFECTS OF INCORRECT FLUID LEVEL.... 909
CAUSES OF BURNT FLUID ................. 909
FLUID CONTAMINATION ................... 909
STANDARD PROCEDURE
FLUID LEVEL CHECK . ..................... 909
FLUID AND FILTER REPLACEMENT ......... 911
TRANSMISSION FILL ...................... 912CABLE-GEARSHIFT
DIAGNOSIS AND TESTING - GEARSHIFT
CABLE .................................... 913
REMOVAL ................................... 913
INSTALLATION .............................. 914
ADJUSTMENTS - GEARSHIFT CABLE ......... 915
CLUTCHES-HOLDING
DESCRIPTION ............................... 916
OPERATION ................................. 917
ASSEMBLY-INPUT CLUTCH
DESCRIPTION ............................... 918
OPERATION ................................. 920
DISASSEMBLY .............................. 920
ASSEMBLY .................................. 925
SENSOR-INPUT SPEED
DESCRIPTION ............................... 932
OPERATION ................................. 932
REMOVAL ................................... 932
INSTALLATION .............................. 933
SENSOR-LINE PRESSURE
DESCRIPTION ............................... 934
OPERATION ................................. 934
REMOVAL ................................... 934
INSTALLATION .............................. 935
CLUTCH-LOW/REVERSE
DISASSEMBLY .............................. 936
CLEANING .................................. 937
INSPECTION . . .............................. 937
ASSEMBLY .................................. 938
PUMP-OIL
DESCRIPTION ............................... 940
OPERATION ................................. 942
STANDARD PROCEDURE - OIL PUMP
VOLUME CHECK .......................... 942
DISASSEMBLY .............................. 943
CLEANING .................................. 945
INSPECTION . . .............................. 946
ASSEMBLY .................................. 946
SEAL-OIL PUMP FRONT
REMOVAL ................................... 950
INSTALLATION .............................. 950
SENSOR-OUTPUT SPEED
DESCRIPTION ............................... 951
OPERATION ................................. 951
REMOVAL ................................... 951
INSTALLATION .............................. 952
SWITCH-TOW/HAUL OVERDRIVE
DESCRIPTION ............................... 953
OPERATION ................................. 953
REMOVAL ................................... 953
Page 3364 of 5267
INSTALLATION .............................. 954
GEARTRAIN-PLANETARY
DESCRIPTION ............................... 955
OPERATION ................................. 956
DISASSEMBLY .............................. 957
CLEANING .................................. 957
INSPECTION ................................ 957
ASSEMBLY .................................. 958
MECHANISM-SHIFT
DESCRIPTION ............................... 959
OPERATION ................................. 959
VALVE-SOLENOID SWITCH
DESCRIPTION ............................... 960
OPERATION ................................. 960
CONVERTER-TORQUE
DESCRIPTION ............................... 961
OPERATION ................................. 964
REMOVAL ................................... 966
INSTALLATION .............................. 967
RELAY-TRANSMISSION CONTROL
DESCRIPTION ............................... 968OPERATION ................................. 968
SENSOR-TRANSMISSION RANGE
DESCRIPTION ............................... 969
OPERATION ................................. 969
ASSEMBLY-TRANSMISSION SOLENOID/TRS
DESCRIPTION ............................... 970
OPERATION ................................. 970
REMOVAL ................................... 971
INSTALLATION .............................. 972
SENSOR-TRANSMISSION TEMPERATURE
DESCRIPTION ............................... 973
OPERATION ................................. 973
BODY-VALVE
DESCRIPTION ............................... 974
OPERATION ................................. 975
REMOVAL ................................... 976
DISASSEMBLY .............................. 977
CLEANING .................................. 980
INSPECTION . . .............................. 981
ASSEMBLY .................................. 983
INSTALLATION .............................. 986
Page 3365 of 5267
AUTOMATIC TRANSMISSION - 45RFE/545RFE-SERVICEINFORMATION
DESCRIPTION
The 45RFE/545RFE automatic transmissions is a sophisticated, multi-range, electronically controlled transmission
which combines optimized gear ratios for responsive performance, state of the art efficiency features and low NVH.
Other features include driver adaptive shifting and three planetary gearsets to provide wide ratio capability with
precise ratio steps for optimum driveability. The three planetary gear sets also make available a unique alternate
second gear ratio. The primary 2nd gear ratio fits between 1st and 3rd gearsfor normal through-gear accelerations.
The alternate second gear ratio (2prime) allows smoother 4-2 kickdowns athigh speeds to provide 2nd gear pass-
ing performance over a wider highway cruising range.
The hydraulic portion of the transmission consists of the transmission fluid, fluid passages, hydraulic valves, and
various line pressure control components.
The primary mechanical components of the transmission consist of the following:
Three multiple disc input clutches
Three multiple disc holding clutches
Five hydraulic accumulators
Three planetary gear sets
Dual Stage Hydraulic oil pump
Valve body
Solenoid pack
The Transmission Control Module (TCM) is the “heart” or “brain” of the electronic control system and relies on infor-
mation from various direct and indirect inputs (sensors, switches, etc.)to determine driver demand and vehicle oper-
ating conditions. Depending on the vehicle configuration, the TCM may be astandalone module or it it may be
housed along with the Powertrain Control Module (PCM) in a single module. With this information, the TCM can
calculate and perform timely and quality shifts through various output orcontrol devices (solenoid pack, transmission
control relay, etc.).
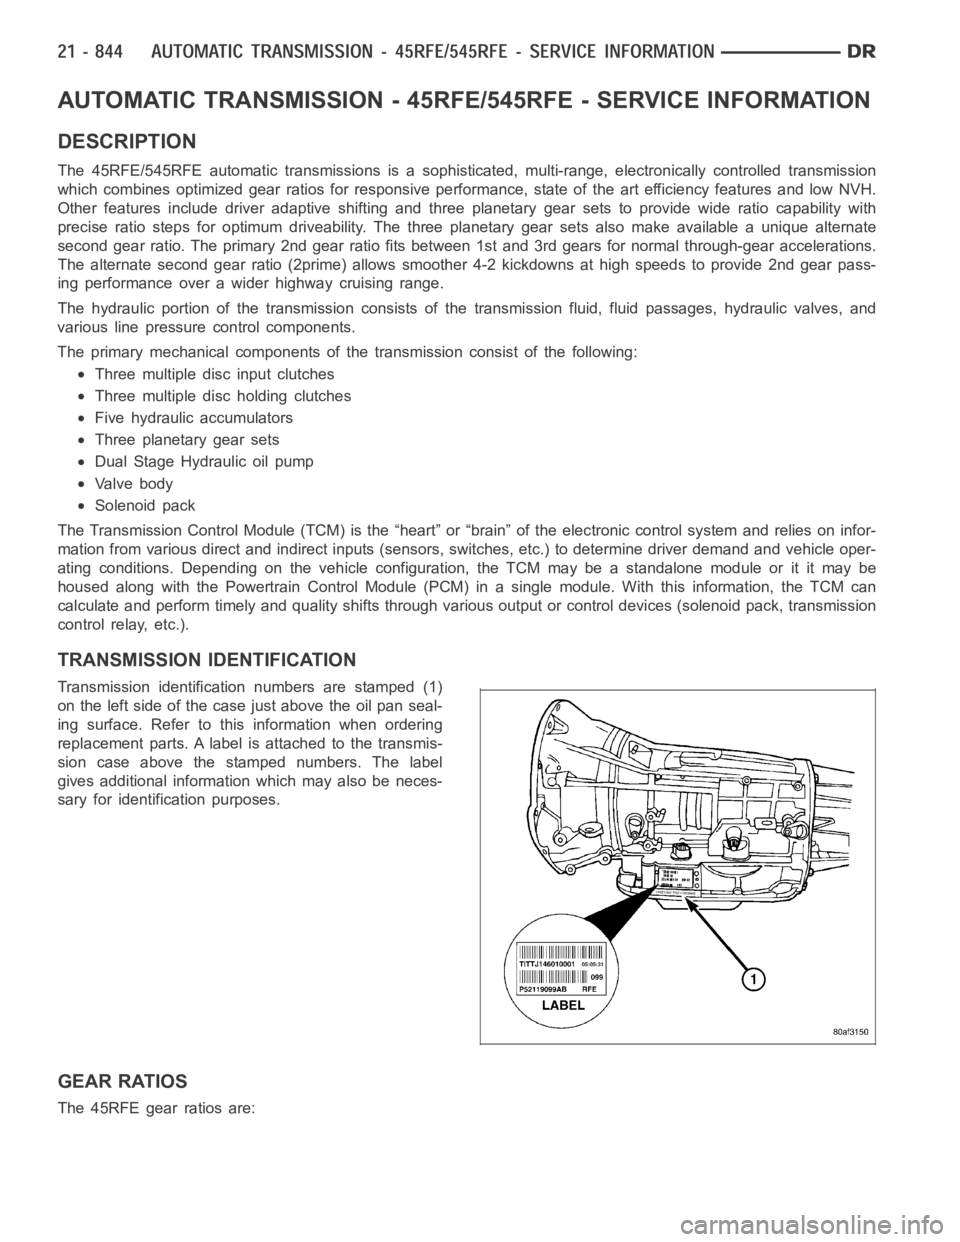
TRANSMISSION IDENTIFICATION
Transmission identification numbers are stamped (1)
on the left side of the case just above the oil pan seal-
ing surface. Refer to this information when ordering
replacement parts. A label is attached to the transmis-
sion case above the stamped numbers. The label
gives additional information which may also be neces-
sary for identification purposes.
GEAR RATIOS
The 45RFE gear ratios are:
Page 3366 of 5267

GEAR RATIOS
The 545RFE gear ratios are:
OPERATION
The 45RFE/545RFE offers full electronic control of all automatic up and downshifts, and features real-time adaptive
closed-loop shift and pressure control. Electronic shift and torque converter clutch controls help protect the trans-
mission from damage due to high temperatures, which can occur under severeoperating conditions. By altering shift
schedules, line pressure, and converter clutch control, these controls reduce heat generation and increase trans-
mission cooling.
To help reduce efficiency-robbing parasitic losses, the transmissions includes a dual-stage transmission fluid pump
with electronic output pressure control. Under most driving conditions,pump output capacity greatly exceeds that
which is needed to keep the clutches applied. The 45RFE/545RFE pump-pressure control system monitors input
torque and adjusts the pump pressure accordingly. The primary stage of thepump works continuously; the second
stage is bypassed when demand is low. The control system also monitors input and output speed and, if incipient
clutch slip is observed, the pressure control solenoid duty cycle is varied, increasing pressure in proportion to
demand.
A high-travel torque converter damper assembly allows earlier torque converter clutch engagement to reduce slip-
page. Needle-type thrust bearings reduce internal friction. The 45RFE/545RFE is packaged in a one-piece die-cast
aluminum case. To reduce NVH, the case has high lateral, vertical and torsional stiffness. It is also designed to
maximize the benefit of the structural dust cover that connects the bottomof the bell housing to the engine bed-
plate, enhancing overall power train stiffness. Dual filters protect thepump and other components. A cooler return
filter is added to the customary main sump filter. Independent lubrication and cooler circuits assure ample pressure
for normal transmission operation even if the cooler is obstructed or the fluid cannot flow due to extremely low
temperatures.
The hydraulic control system design (without electronic assist) provides the transmission with PARK, REVERSE,
NEUTRAL, SECOND, and THIRD gears, based solely on driver shift lever selection. This design allows the vehicle
to be driven (in “limp-in” mode) in the event of a electronic control systemfailure, or a situation that the Transmis-
sion Control Module (TCM) recognizes as potentially damaging to the transmission.
The TCM also performs certain self-diagnostic functions and provides comprehensive information (sensor data,
DTC’s, etc.) which is helpful in proper diagnosis and repair. This information can be viewed with the DRB
scan
tool.
DIAGNOSIS AND TESTING
AUTOMATIC TRANSMISSION
CAUTION: Before attempting any repair on a RFE automatic transmission, check for Diagnostic Trouble
Codes with the scan tool.
Transmission malfunctions may be caused by these general conditions:
Poor engine performance
Page 3369 of 5267
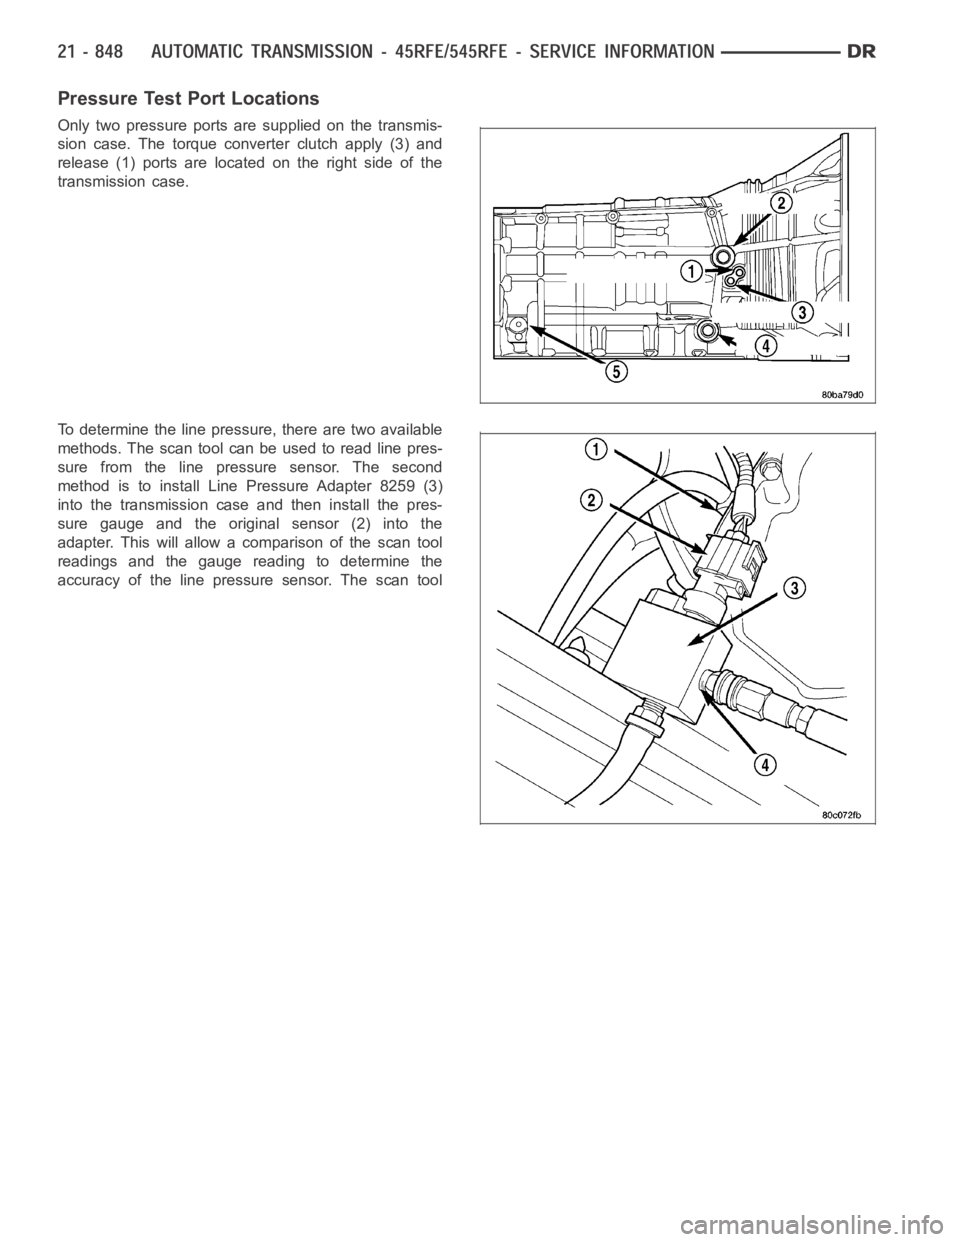
Pressure Test Port Locations
Only two pressure ports are supplied on the transmis-
sion case. The torque converter clutch apply (3) and
release(1)portsarelocatedontherightsideofthe
transmission case.
To determine the line pressure, there are two available
methods. The scan tool can be used to read line pres-
sure from the line pressure sensor. The second
method is to install Line Pressure Adapter 8259 (3)
into the transmission case and then install the pres-
sure gauge and the original sensor (2) into the
adapter. This will allow a comparison of the scan tool
readings and the gauge reading to determine the
accuracy of the line pressure sensor. The scan tool