Page 3490 of 5135
A77479
Upward
No. 1
No. 2
Painted Mark
Code Mark (2T)
A77480
Front
Side Rail UpperSide Rail Lower
No. 2 Expander
Compression No. 1 and
A53029
A33379
14±66
± ENGINE MECHANICALCYLINDER BLOCK ASSY
1AZ±FSE ENGINE REPAIR MANUAL (RM1019E)
30. INSTALL PISTON RING SET
(a) Install the oil ring expander and 2 side rails by hand.
(b) Using a piston ring expander, install the 2 compression
rings with the painted mark facing right side.
NOTICE:
Install the compression ring No. 2 with the code mark (2T)
upward.
(c) Position the piston rings so that the ring ends are as
shown.
31. INSTALL CRANKSHAFT BEARING
(a) Install the upper bearing with an oil groove on cylinder
block.
NOTICE:
Clean the back side of the bearing and the bearing surface
of the cylinder block and keep them free of oils.
32. INSTALL CRANKSHAFT BEARING NO.2
(a) Install the lower bearing on bearing cap.
NOTICE:
Clean the back side of the bearing and the bearing surface
of the cylinder block and keep them free of oils.
Page 3491 of 5135
A13501
A77275Front Mark and Journal Number
A77475
����
10 � � � �
A77470
90�
Engine FrontPaint
Mark
A77481
Claw
± ENGINE MECHANICALCYLINDER BLOCK ASSY
14±67
1AZ±FSE ENGINE REPAIR MANUAL (RM1019E)
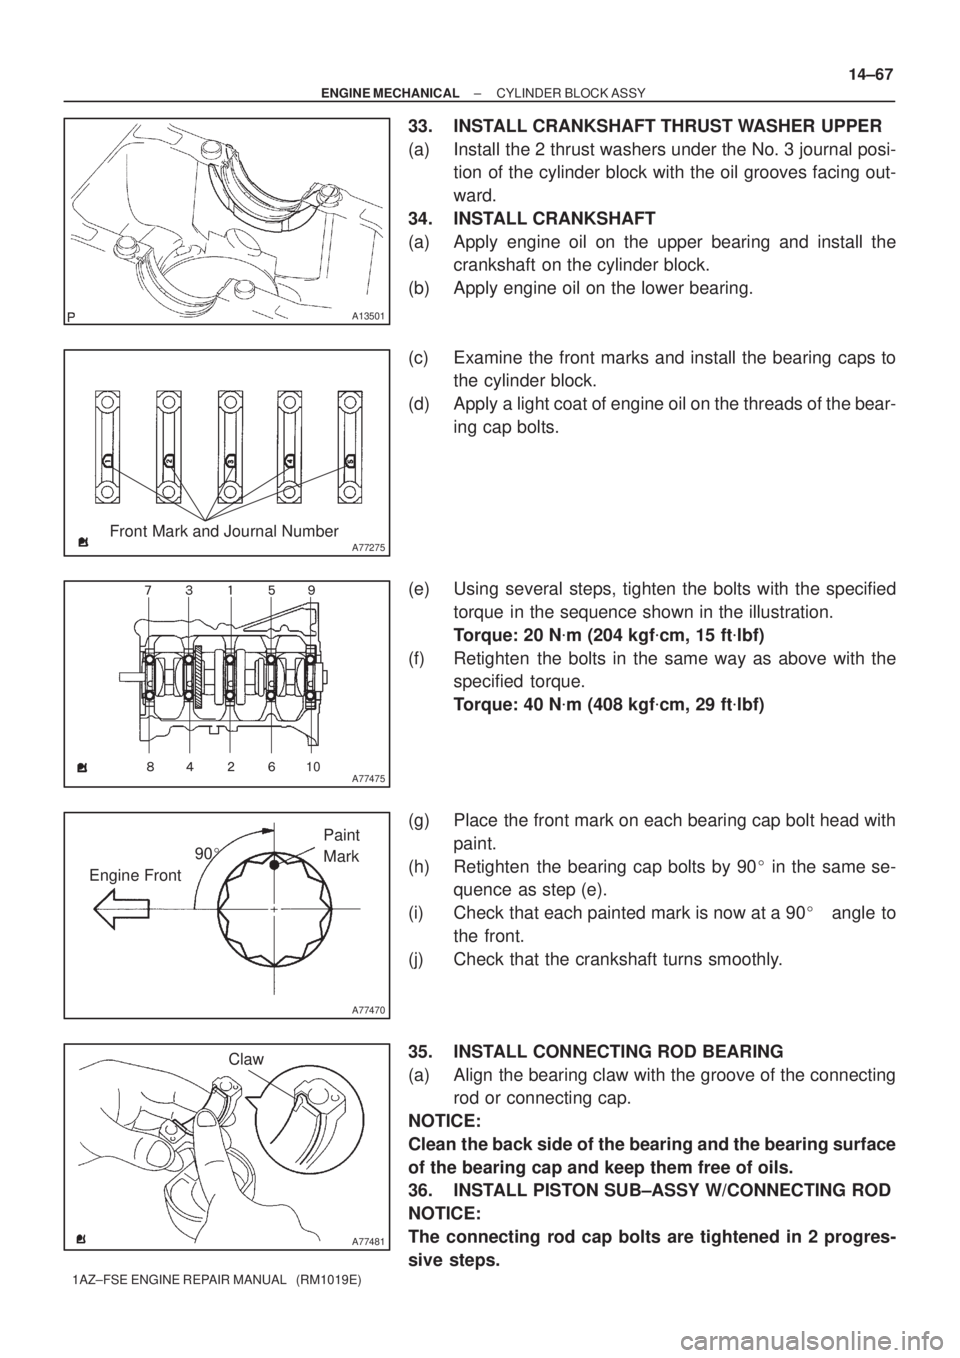
33. INSTALL CRANKSHAFT THRUST WASHER UPPER
(a) Install the 2 thrust washers under the No. 3 journal posi-
tion of the cylinder block with the oil grooves facing out-
ward.
34. INSTALL CRANKSHAFT
(a) Apply engine oil on the upper bearing and install the
crankshaft on the cylinder block.
(b) Apply engine oil on the lower bearing.
(c) Examine the front marks and install the bearing caps to
the cylinder block.
(d) Apply a light coat of engine oil on the threads of the bear-
ing cap bolts.
(e) Using several steps, tighten the bolts with the specified
torque in the sequence shown in the illustration.
Torque: 20 N�m (204 kgf�cm, 15 ft�lbf)
(f) Retighten the bolts in the same way as above with the
specified torque.
Torque: 40 N�m (408 kgf�cm, 29 ft�lbf)
(g) Place the front mark on each bearing cap bolt head with
paint.
(h) Retighten the bearing cap bolts by 90� in the same se-
quence as step (e).
(i) Check that each painted mark is now at a 90�angle to
the front.
(j) Check that the crankshaft turns smoothly.
35. INSTALL CONNECTING ROD BEARING
(a) Align the bearing claw with the groove of the connecting
rod or connecting cap.
NOTICE:
Clean the back side of the bearing and the bearing surface
of the bearing cap and keep them free of oils.
36. INSTALL PISTON SUB±ASSY W/CONNECTING ROD
NOTICE:
The connecting rod cap bolts are tightened in 2 progres-
sive steps.
Page 3492 of 5135
A77482
Front Mark
Front
A77483
Front Mark
A77470
90�
Engine FrontPaint
Mark 14±68
± ENGINE MECHANICALCYLINDER BLOCK ASSY
1AZ±FSE ENGINE REPAIR MANUAL (RM1019E)
(a) Apply engine oil on the cylinder walls, the pistons, and the
surfaces of connecting rod bearings.
(b) Check the position of the piston ring ends.
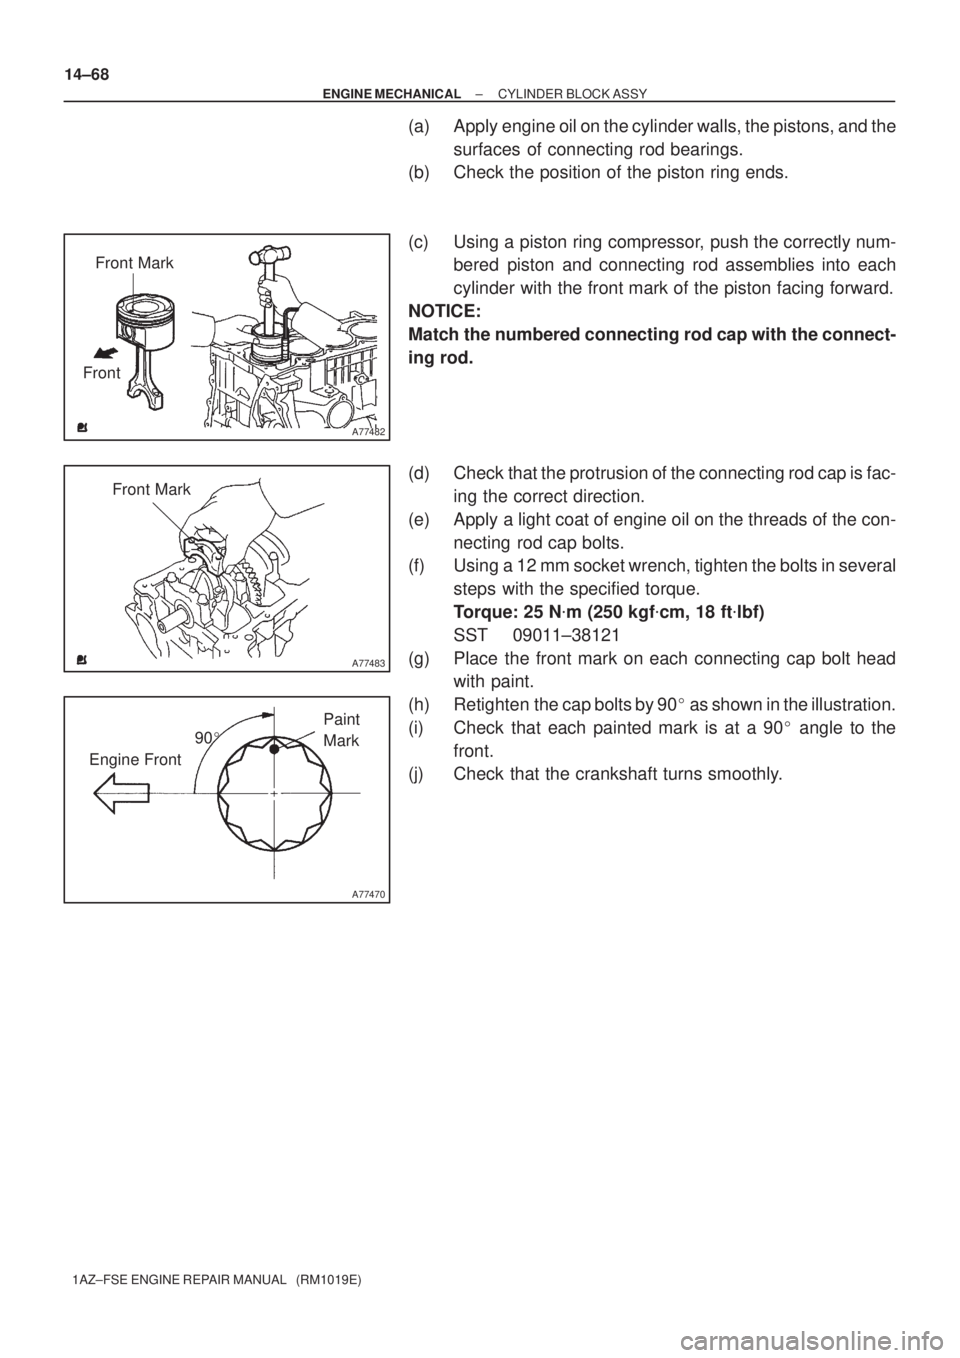
(c) Using a piston ring compressor, push the correctly num-
bered piston and connecting rod assemblies into each
cylinder with the front mark of the piston facing forward.
NOTICE:
Match the numbered connecting rod cap with the connect-
ing rod.
(d) Check that the protrusion of the connecting rod cap is fac-
ing the correct direction.
(e) Apply a light coat of engine oil on the threads of the con-
necting rod cap bolts.
(f) Using a 12 mm socket wrench, tighten the bolts in several
steps with the specified torque.
Torque: 25 N�m (250 kgf�cm, 18 ft�lbf)
SST 09011±38121
(g) Place the front mark on each connecting cap bolt head
with paint.
(h) Retighten the cap bolts by 90� as shown in the illustration.
(i) Check that each painted mark is at a 90� angle to the
front.
(j) Check that the crankshaft turns smoothly.
Page 3494 of 5135
141BW±01
A77455
SST
Wooden Blocks
A77456
SST
Wooden Blocks
A14202
± ENGINE MECHANICALCYLINDER HEAD ASSY
14±39
1AZ±FSE ENGINE REPAIR MANUAL (RM1019E)
OVERHAUL
1. REMOVE VALVE LIFTER
HINT:
Store the valve liters in correct order, so that they can be returned to the original locations when re±assem-
bling.
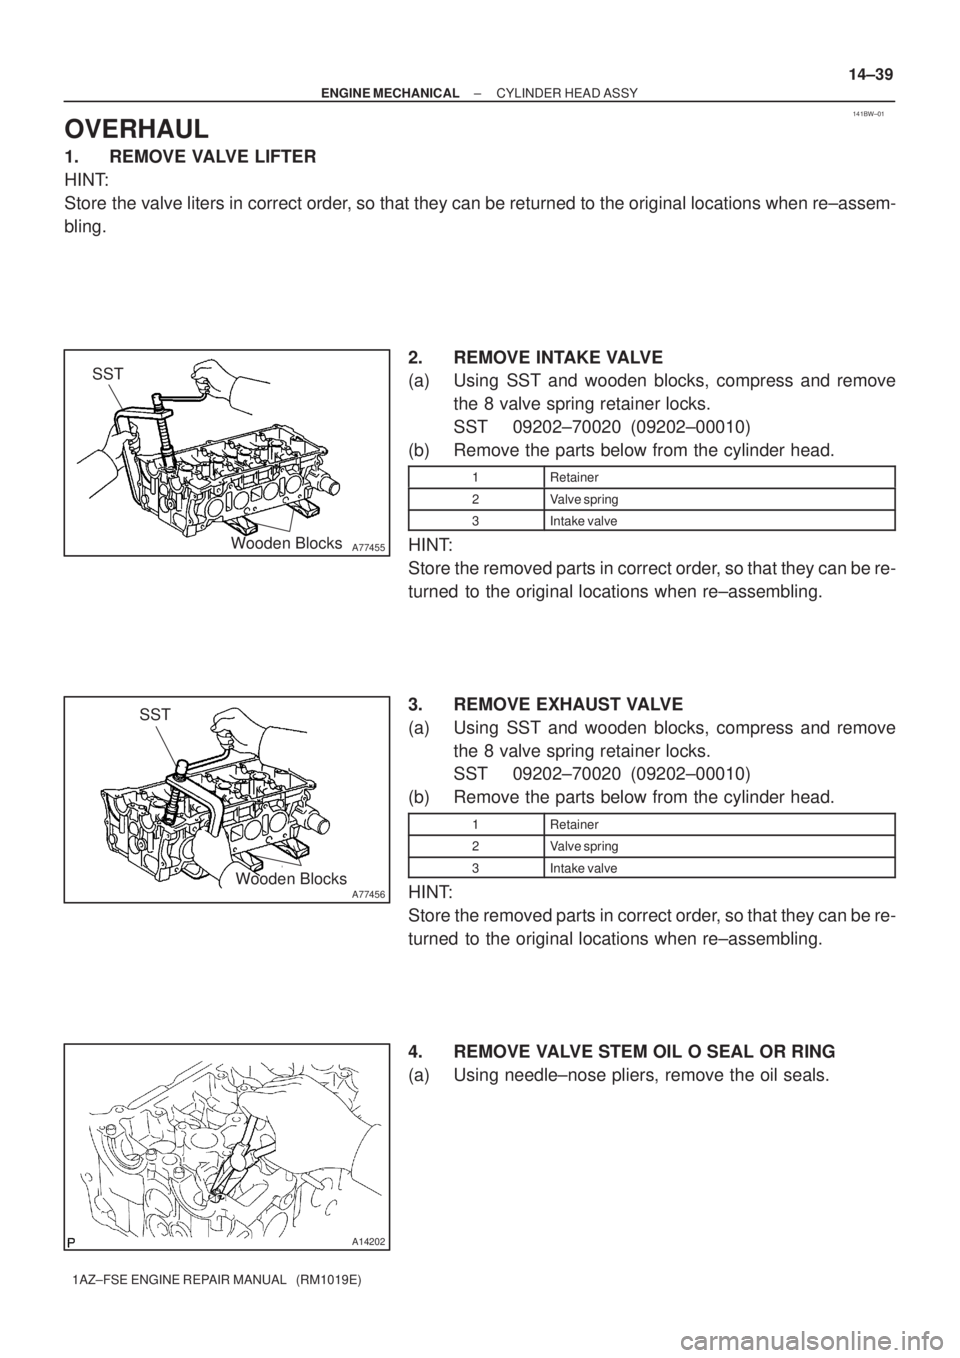
2. REMOVE INTAKE VALVE
(a) Using SST and wooden blocks, compress and remove
the 8 valve spring retainer locks.
SST 09202±70020 (09202±00010)
(b) Remove the parts below from the cylinder head.
1Retainer
2Valve spring
3Intake valve
HINT:
Store the removed parts in correct order, so that they can be re-
turned to the original locations when re±assembling.
3. REMOVE EXHAUST VALVE
(a) Using SST and wooden blocks, compress and remove
the 8 valve spring retainer locks.
SST 09202±70020 (09202±00010)
(b) Remove the parts below from the cylinder head.
1Retainer
2Valve spring
3Intake valve
HINT:
Store the removed parts in correct order, so that they can be re-
turned to the original locations when re±assembling.
4. REMOVE VALVE STEM OIL O SEAL OR RING
(a) Using needle±nose pliers, remove the oil seals.
Page 3497 of 5135
A775031.0 to1.4mm75�
45�
A36626
A36627
A32645
14±42
± ENGINE MECHANICALCYLINDER HEAD ASSY
1AZ±FSE ENGINE REPAIR MANUAL (RM1019E)
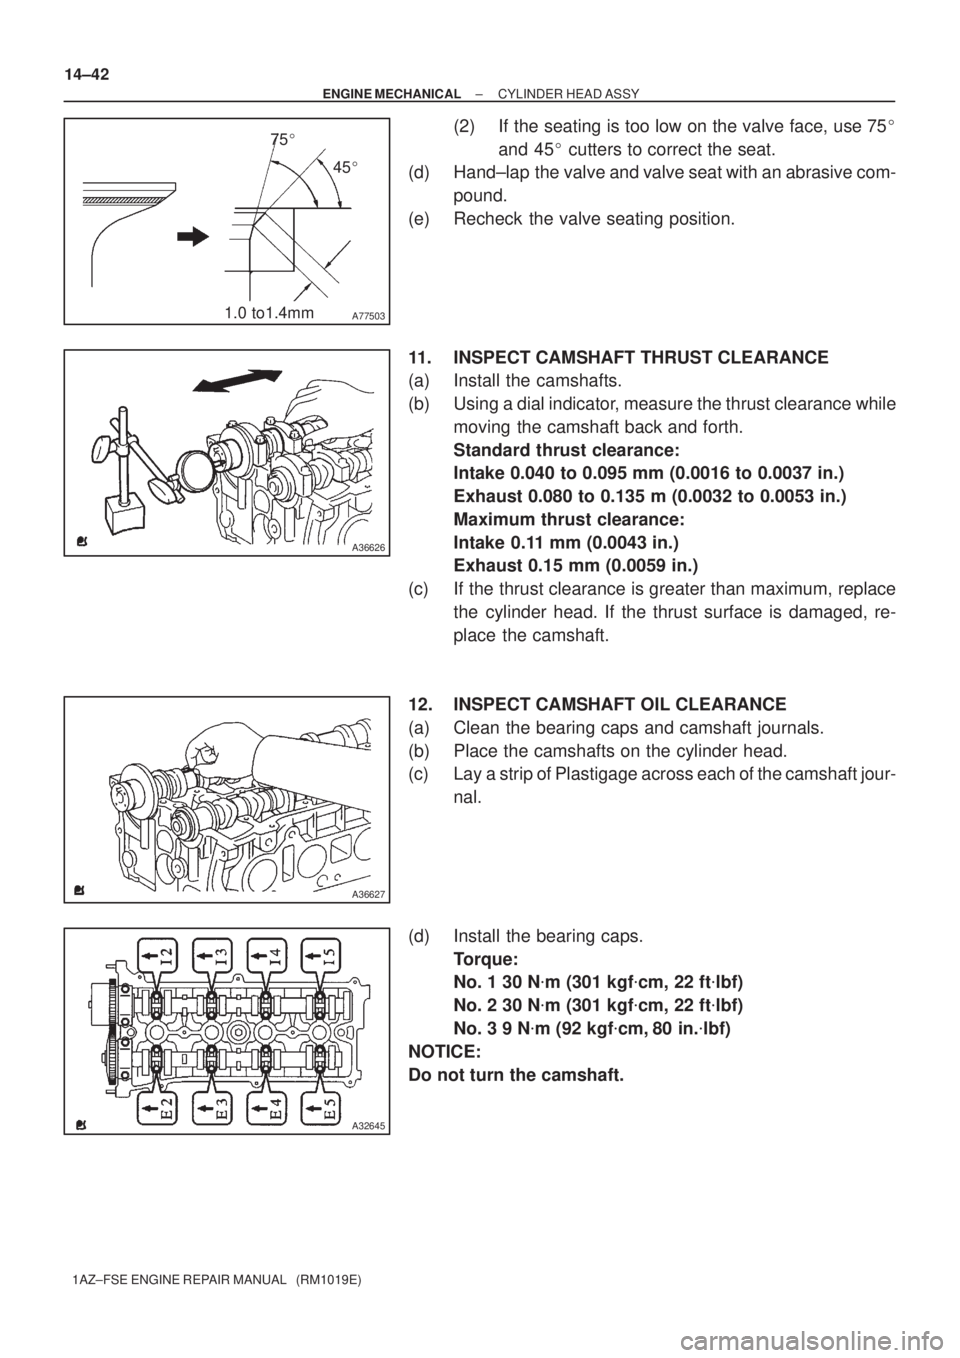
(2) If the seating is too low on the valve face, use 75�
and 45� cutters to correct the seat.
(d) Hand±lap the valve and valve seat with an abrasive com-
pound.
(e) Recheck the valve seating position.
11. INSPECT CAMSHAFT THRUST CLEARANCE
(a) Install the camshafts.
(b) Using a dial indicator, measure the thrust clearance while
moving the camshaft back and forth.
Standard thrust clearance:
Intake 0.040 to 0.095 mm (0.0016 to 0.0037 in.)
Exhaust 0.080 to 0.135 m (0.0032 to 0.0053 in.)
Maximum thrust clearance:
Intake 0.11 mm (0.0043 in.)
Exhaust 0.15 mm (0.0059 in.)
(c) If the thrust clearance is greater than maximum, replace
the cylinder head. If the thrust surface is damaged, re-
place the camshaft.
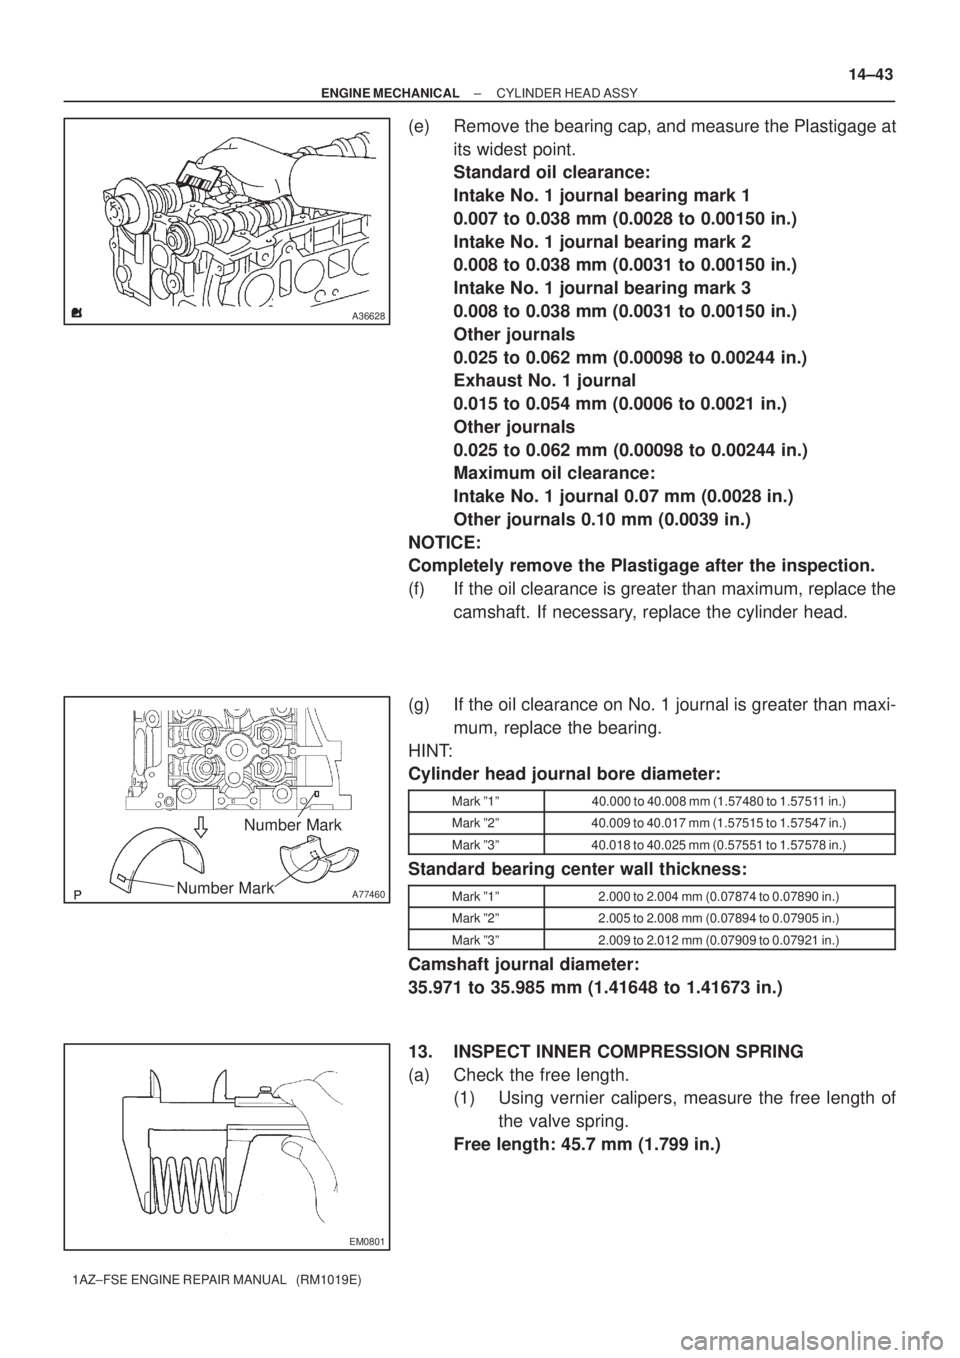
12. INSPECT CAMSHAFT OIL CLEARANCE
(a) Clean the bearing caps and camshaft journals.
(b) Place the camshafts on the cylinder head.
(c) Lay a strip of Plastigage across each of the camshaft jour-
nal.
(d) Install the bearing caps.
Torque:
No. 1 30 N�m (301 kgf�cm, 22 ft�lbf)
No. 2 30 N�m (301 kgf�cm, 22 ft�lbf)
No. 3 9 N�m (92 kgf�cm, 80 in.�lbf)
NOTICE:
Do not turn the camshaft.
Page 3498 of 5135
A36628
A77460
Number Mark
Number Mark
EM0801
± ENGINE MECHANICALCYLINDER HEAD ASSY
14±43
1AZ±FSE ENGINE REPAIR MANUAL (RM1019E)
(e) Remove the bearing cap, and measure the Plastigage at
its widest point.
Standard oil clearance:
Intake No. 1 journal bearing mark 1
0.007 to 0.038 mm (0.0028 to 0.00150 in.)
Intake No. 1 journal bearing mark 2
0.008 to 0.038 mm (0.0031 to 0.00150 in.)
Intake No. 1 journal bearing mark 3
0.008 to 0.038 mm (0.0031 to 0.00150 in.)
Other journals
0.025 to 0.062 mm (0.00098 to 0.00244 in.)
Exhaust No. 1 journal
0.015 to 0.054 mm (0.0006 to 0.0021 in.)
Other journals
0.025 to 0.062 mm (0.00098 to 0.00244 in.)
Maximum oil clearance:
Intake No. 1 journal 0.07 mm (0.0028 in.)
Other journals 0.10 mm (0.0039 in.)
NOTICE:
Completely remove the Plastigage after the inspection.
(f) If the oil clearance is greater than maximum, replace the
camshaft. If necessary, replace the cylinder head.
(g) If the oil clearance on No. 1 journal is greater than maxi-
mum, replace the bearing.
HINT:
Cylinder head journal bore diameter:
Mark º1º40.000 to 40.008 mm (1.57480 to 1.57511 in.)
Mark º2º40.009 to 40.017 mm (1.57515 to 1.57547 in.)
Mark º3º40.018 to 40.025 mm (0.57551 to 1.57578 in.)
Standard bearing center wall thickness:
Mark º1º2.000 to 2.004 mm (0.07874 to 0.07890 in.)
Mark º2º2.005 to 2.008 mm (0.07894 to 0.07905 in.)
Mark º3º2.009 to 2.012 mm (0.07909 to 0.07921 in.)
Camshaft journal diameter:
35.971 to 35.985 mm (1.41648 to 1.41673 in.)
13. INSPECT INNER COMPRESSION SPRING
(a) Check the free length.
(1) Using vernier calipers, measure the free length of
the valve spring.
Free length: 45.7 mm (1.799 in.)
Page 3500 of 5135
Z00052
A77462
Margin
Thickness
A13367
A13367
A13100
± ENGINE MECHANICALCYLINDER HEAD ASSY
14±45
1AZ±FSE ENGINE REPAIR MANUAL (RM1019E)
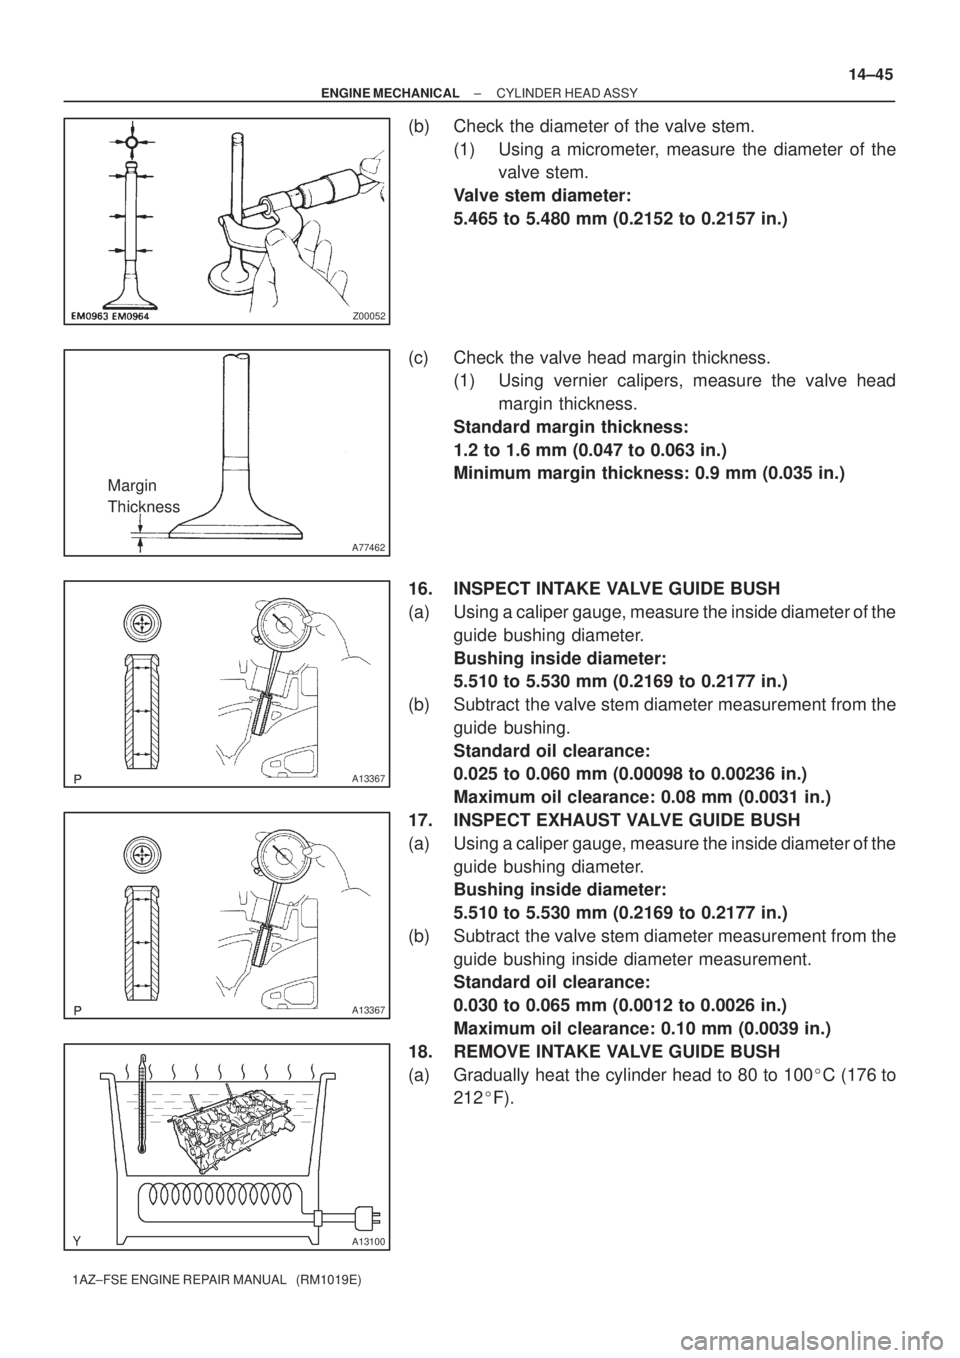
(b) Check the diameter of the valve stem.
(1) Using a micrometer, measure the diameter of the
valve stem.
Valve stem diameter:
5.465 to 5.480 mm (0.2152 to 0.2157 in.)
(c) Check the valve head margin thickness.
(1) Using vernier calipers, measure the valve head
margin thickness.
Standard margin thickness:
1.2 to 1.6 mm (0.047 to 0.063 in.)
Minimum margin thickness: 0.9 mm (0.035 in.)
16. INSPECT INTAKE VALVE GUIDE BUSH
(a) Using a caliper gauge, measure the inside diameter of the
guide bushing diameter.
Bushing inside diameter:
5.510 to 5.530 mm (0.2169 to 0.2177 in.)
(b) Subtract the valve stem diameter measurement from the
guide bushing.
Standard oil clearance:
0.025 to 0.060 mm (0.00098 to 0.00236 in.)
Maximum oil clearance: 0.08 mm (0.0031 in.)
17. INSPECT EXHAUST VALVE GUIDE BUSH
(a) Using a caliper gauge, measure the inside diameter of the
guide bushing diameter.
Bushing inside diameter:
5.510 to 5.530 mm (0.2169 to 0.2177 in.)
(b) Subtract the valve stem diameter measurement from the
guide bushing inside diameter measurement.
Standard oil clearance:
0.030 to 0.065 mm (0.0012 to 0.0026 in.)
Maximum oil clearance: 0.10 mm (0.0039 in.)
18. REMOVE INTAKE VALVE GUIDE BUSH
(a) Gradually heat the cylinder head to 80 to 100�C (176 to
212�F).
Page 3501 of 5135
A77463
SST
A13100
A77464
SST
A77465
SST 14±46
± ENGINE MECHANICALCYLINDER HEAD ASSY
1AZ±FSE ENGINE REPAIR MANUAL (RM1019E)
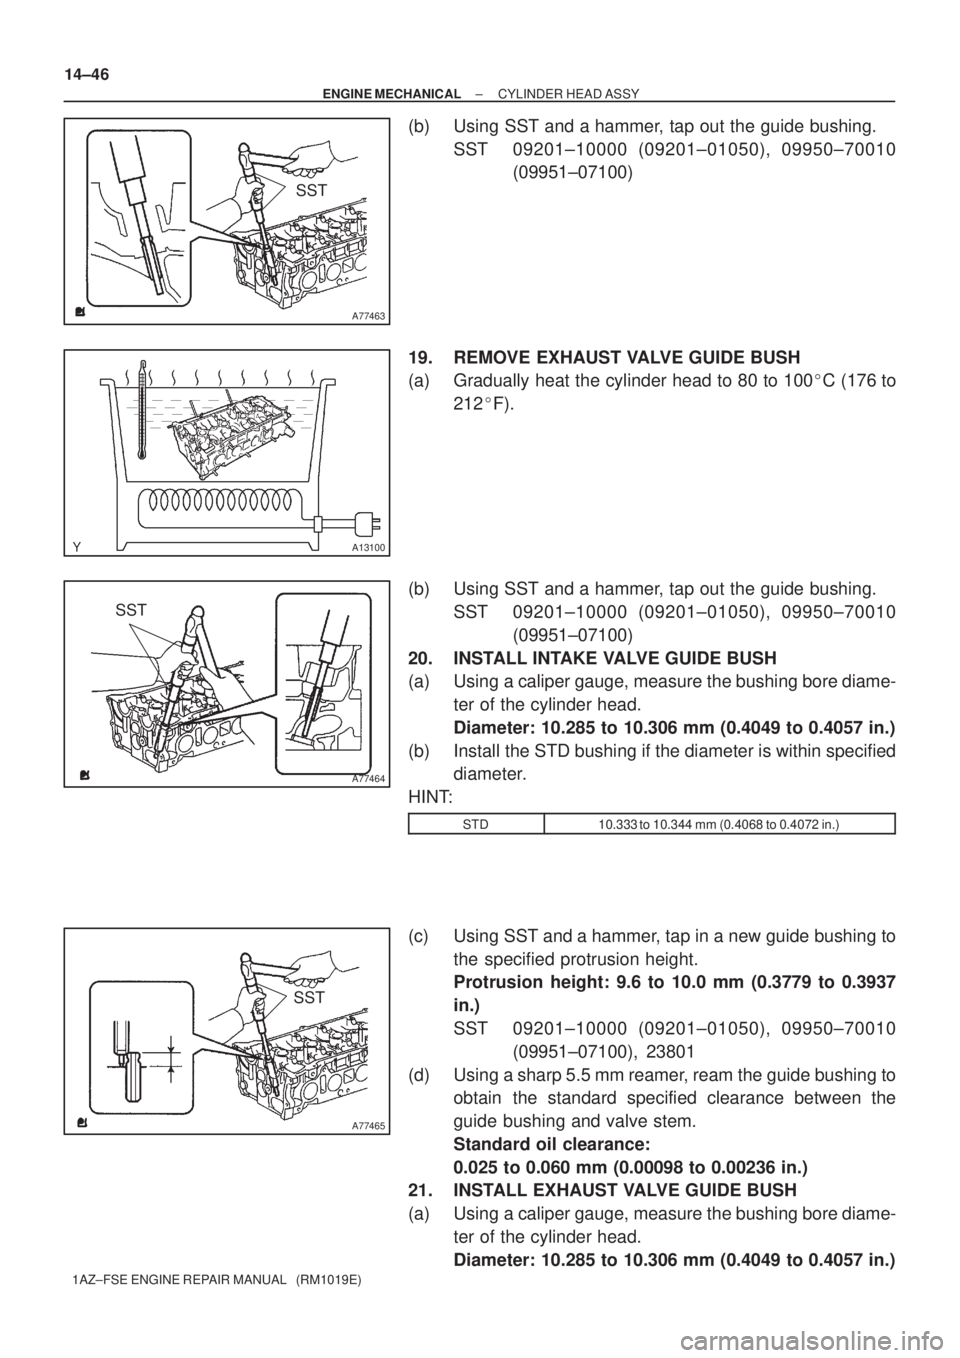
(b) Using SST and a hammer, tap out the guide bushing.
SST 09201±10000 (09201±01050), 09950±70010
(09951±07100)
19. REMOVE EXHAUST VALVE GUIDE BUSH
(a) Gradually heat the cylinder head to 80 to 100�C (176 to
212�F).
(b) Using SST and a hammer, tap out the guide bushing.
SST 09201±10000 (09201±01050), 09950±70010
(09951±07100)
20. INSTALL INTAKE VALVE GUIDE BUSH
(a) Using a caliper gauge, measure the bushing bore diame-
ter of the cylinder head.
Diameter: 10.285 to 10.306 mm (0.4049 to 0.4057 in.)
(b) Install the STD bushing if the diameter is within specified
diameter.
HINT:
STD10.333 to 10.344 mm (0.4068 to 0.4072 in.)
(c) Using SST and a hammer, tap in a new guide bushing to
the specified protrusion height.
Protrusion height: 9.6 to 10.0 mm (0.3779 to 0.3937
in.)
SST 09201±10000 (09201±01050), 09950±70010
(09951±07100), 23801
(d) Using a sharp 5.5 mm reamer, ream the guide bushing to
obtain the standard specified clearance between the
guide bushing and valve stem.
Standard oil clearance:
0.025 to 0.060 mm (0.00098 to 0.00236 in.)
21. INSTALL EXHAUST VALVE GUIDE BUSH
(a) Using a caliper gauge, measure the bushing bore diame-
ter of the cylinder head.
Diameter: 10.285 to 10.306 mm (0.4049 to 0.4057 in.)