Page 483 of 5135
05±346
± DIAGNOSTICSSFI SYSTEM (1AZ±FSE)
AVENSIS REPAIR MANUAL (RM1018E)
NG REPAIR OR REPLACE HARNESS OR
CONNECTOR
OK
REPLACE MANIFOLD ABSOLUTE PRESSURE SENSOR
Page 484 of 5135

�
���� �����
AB B+
Power Transistor
Platinum Hot Wire
(Heater)
Output
Voltage
Temperature
sensor
Platinum Hot Wire (Heater)
Temperature sensor
�
���� �����
AB B+
Power Transistor
Platinum Hot Wire
(Heater)
Output
Voltage
Temperature
sensor
Platinum Hot Wire (Heater)
Temperature sensor
�
���� �����
AB B+
Power Transistor
Platinum Hot Wire
(Heater)
Output
Voltage
Temperature
sensor
Platinum Hot Wire (Heater)
Temperature sensor
A53295
05±336
± DIAGNOSTICSSFI SYSTEM (1AZ±FSE)
AVENSIS REPAIR MANUAL (RM1018E)
DTC P0100 MASS OR VOLUME AIR FLOW CIRCUIT
DTC P0102 MASS OR VOLUME AIR FLOW CIRCUIT
LOW INPUT
DTC P0103 MASS OR VOLUME AIR FLOW CIRCUIT
HIGH INPUT
CIRCUIT DESCRIPTION
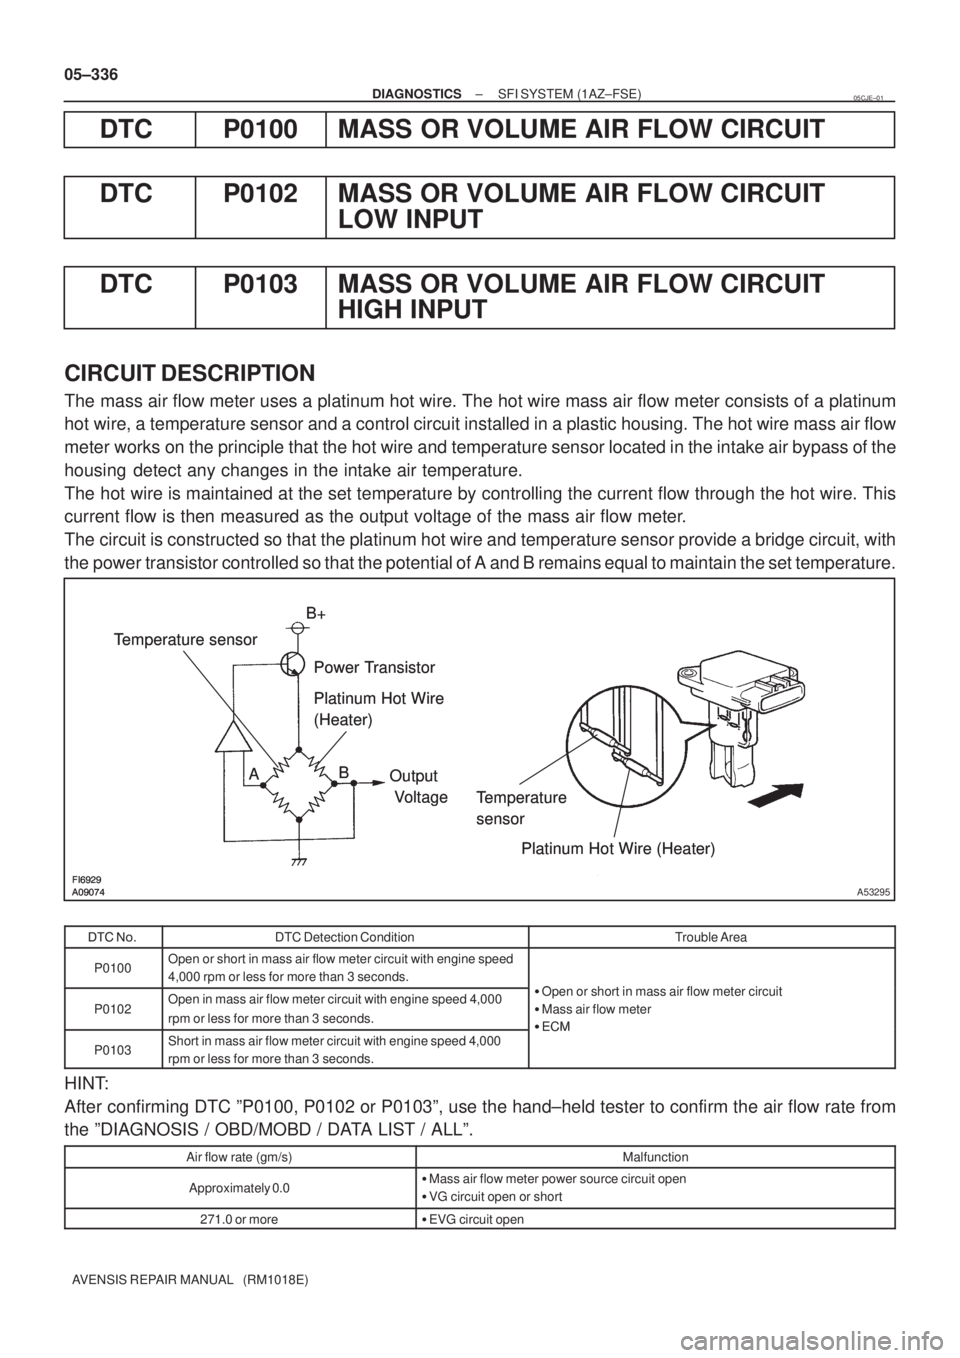
The mass air flow meter uses a platinum hot wire. The hot wire mass air flow meter consists of a platinum
hot wire, a temperature sensor and a control circuit installed in a plastic housing. The hot wire mass air flow
meter works on the principle that the hot wire and temperature sensor located in the intake air bypass of the
housing detect any changes in the intake air temperature.
The hot wire is maintained at the set temperature by controlling the current flow through the hot wire. This
current flow is then measured as the output voltage of the mass air flow meter.
The circuit is constructed so that the platinum hot wire and temperature sensor provide a bridge circuit, with
the power transistor controlled so that the potential of A and B remains equal to maintain the set temperature.
��
���DTC Detection ConditionTrouble Area
P0100Open or short in mass air flow meter circuit with engine speed
4,000 rpm or less for more than 3 seconds.
Ohti ifltiit
P0102Open in mass air flow meter circuit with engine speed 4,000
rpm or less for more than 3 seconds.�Open or short in mass air flow meter circuit
�Mass air flow meter
�
ECM
P0103Short in mass air flow meter circuit with engine speed 4,000
rpm or less for more than 3 seconds.�ECM
HINT:
After confirming DTC ºP0100, P0102 or P0103º, use the hand±held tester to confirm the air flow rate from
the ºDIAGNOSIS / OBD/MOBD / DATA LIST / ALLº.
Air flow rate (gm/s)Malfunction
Approximately 0.0�Mass air flow meter power source circuit open
�VG circuit open or short
271.0 or more�EVG circuit open
05CJE±01
Page 487 of 5135

A54396
VG
Wire Harness Side
Mass Air Flow Meter ConnectorE2G
A6
A81699
VG E13ECM Connector
EVG
A76903
EVG
E13ECM Connector
±
DIAGNOSTICS SFI SYSTEM(1AZ±FSE)
05±339
AVENSIS REPAIR MANUAL (RM1018E)
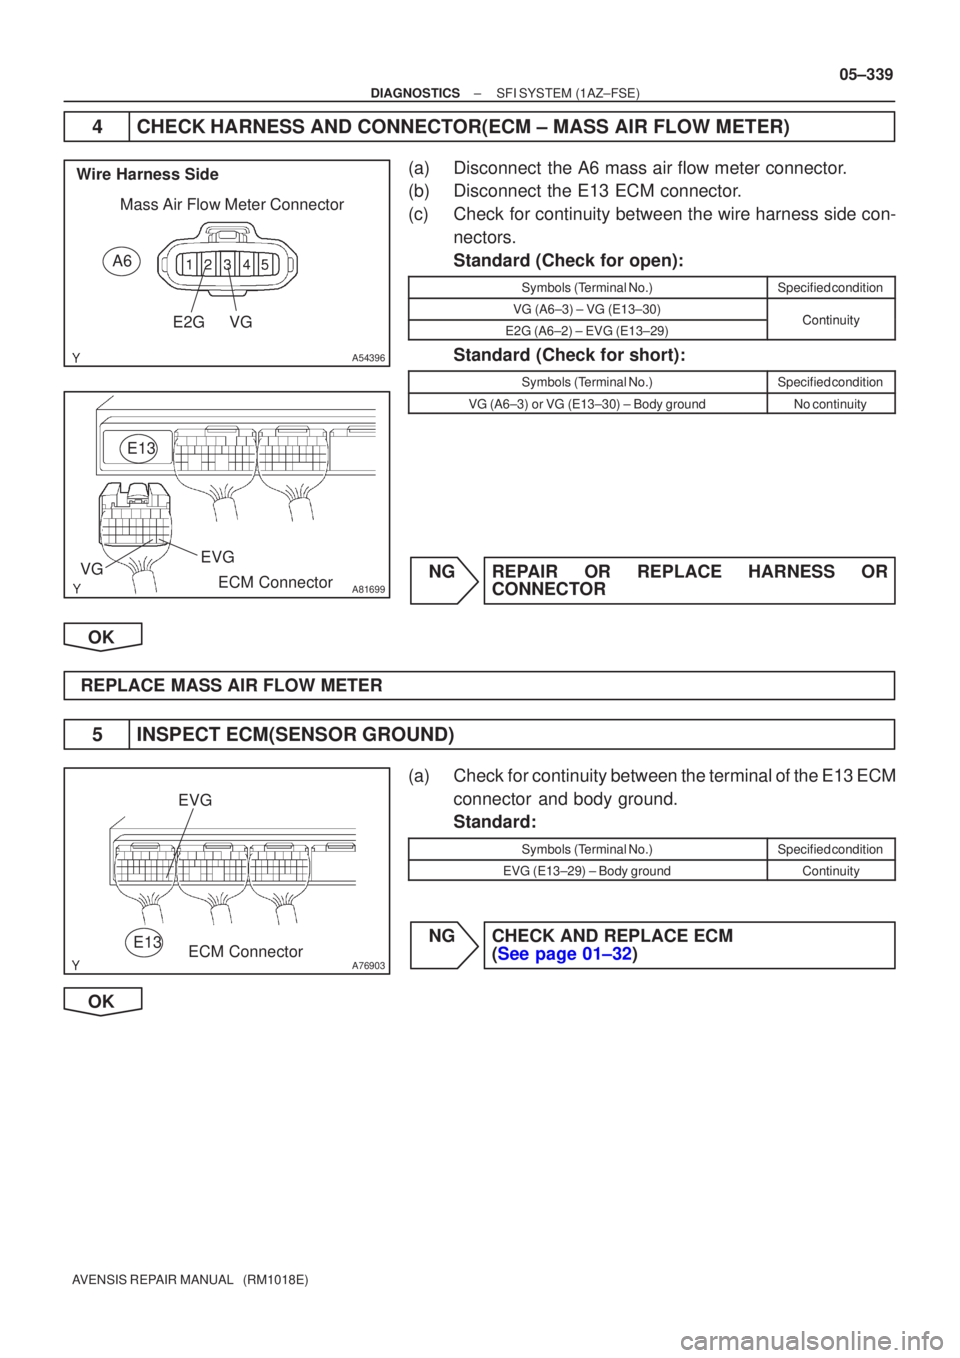
4CHECK HARNESS AND CONNECTOR(ECM ± MASS AIR FLOW METER)
(a)Disconnect the A6 mass air flow meter connector.
(b)Disconnect the E13 ECM connector.
(c)Check for continuity between the wire harness side con-
nectors.
Standard (Check for open):
Symbols (Terminal No.)Specified condition
VG (A6±3) ± VG (E13±30)ContinuityE2G (A6±2) ± EVG (E13±29)Continuity
Standard (Check for short):
Symbols (Terminal No.)Specified condition
VG (A6±3)or VG (E13±30) ± Body groundNo continuity
NGREPAIR OR REPLACE HARNESS OR CONNECTOR
OK
REPLACE MASS AIR FLOW METER
5INSPECT ECM(SENSOR GROUND)
(a)Check for continuity between the terminal of the E13 ECM connector and body ground.
Standard:
Symbols (Terminal No.)Specified condition
EVG (E13±29) ± Body groundContinuity
NGCHECK AND REPLACE ECM (See page 01±32)
OK
Page 490 of 5135
05±330
± DIAGNOSTICSSFI SYSTEM (1AZ±FSE)
AVENSIS REPAIR MANUAL (RM1018E)
DTC P0031 OXYGEN SENSOR HEATER CONTROL
CIRCUIT LOW (BANK 1 SENSOR 1)
DTC P0032 OXYGEN SENSOR HEATER CONTROL
CIRCUIT HIGH (BANK 1 SENSOR 1)
DTC P0037 OXYGEN SENSOR HEATER CONTROL
CIRCUIT LOW (BANK 1 SENSOR 2)
DTC P0038 OXYGEN SENSOR HEATER CONTROL
CIRCUIT HIGH (BANK 1 SENSOR 2)
DTC P0051 OXYGEN SENSOR HEATER CONTROL CIR-
CUIT LOW (BANK 2 SENSOR 1)
DTC P0052 OXYGEN SENSOR HEATER CONTROL
CIRCUIT HIGH (BANK 2 SENSOR 1)
DTC P0057 OXYGEN SENSOR HEATER CONTROL
CIRCUIT LOW (BANK 2 SENSOR 2)
DTC P0058 OXYGEN SENSOR HEATER CONTROL
CIRCUIT HIGH (BANK 2 SENSOR 2)
05CJD±01
Page 491 of 5135

A72920
Reference (Bank 1 Sensor 1 System Drawing)Heated Oxygen Sensor
EFI Relay
Heater
SensorOX1A HT1A
Duty
Control
ECM
From
Battery EFI Fuse
E2
EFI No. 2
Fuse
MREL
OX HT
E1
+B
±
DIAGNOSTICS SFI SYSTEM(1AZ±FSE)
05±331
AVENSIS REPAIR MANUAL (RM1018E)
CIRCUIT DESCRIPTION
Refer to DTC P0130 on page 05±363.
HINT:
The ECM provides a pulse width modulated control circuit to adjust current \
through the heater. The heated
oxygen sensor heater circuit uses a relay on the B+ side of the circuit.
DTC No.DTC Detection ConditionTrouble Area
P0031
P0037Heated current is 0.2 A or less when heater operates with +B >
10.5 V and < 11.5 V (1 trip detection logic)�Open in heater circuit of heated oxygen sensor
� Heated oxygen sensor heater
� EFI relay
P0037
P0051
P0057Heated current is 0.25 A or less when heater operates with +B
� 11.5 V (1 trip detection logic)
EFI relay
�EFI fuse
� EFI No. 2 fuse
� ECM
P0032
P0038
P0052
P0058
Heated current exceeds 2 A when heater operates.
(1 trip detection logic)�Short in heater circuit of heated oxygen sensor
� Heated oxygen sensor heater
� ECM
HINT:
�Bank 1 refers to the No. 1 and No. 4 cylinders.
�Bank 2 refers to the No. 2 and No. 3 cylinders.
�Sensor 1 refers to the sensor closest to the engine assembly.
�Sensor 2 refers to the sensor farthest away from the engine assembly.
WIRING DIAGRAM
Refer to DTC P0130 on page 05±363.
INSPECTION PROCEDURE
HINT:
�If different DTCs related to different systems that have terminal E2 as the ground terminal are output
simultaneously, terminal E2 may be open.
�Read freeze frame data using the hand±held tester. Freeze frame data records the engine conditions
when a malfunction is detected. When troubleshooting, it is useful for deter\
mining whether the vehicle
was running or stopped, the engine was warmed up or not, the air±fuel ra\
tio was lean or rich, etc. at
the time of the malfunction.
Page 492 of 5135

A61830
+BHT
E1 Component Side
Heated Oxygen Sensor H9B2S1
A62378
+B
HT
E1
� �
� �
Component Side
Heated Oxygen Sensor H7B1S1
H8B1S2
H10
B2S2
B16200
05±332
± DIAGNOSTICSSFI SYSTEM (1AZ±FSE)
AVENSIS REPAIR MANUAL (RM1018E)
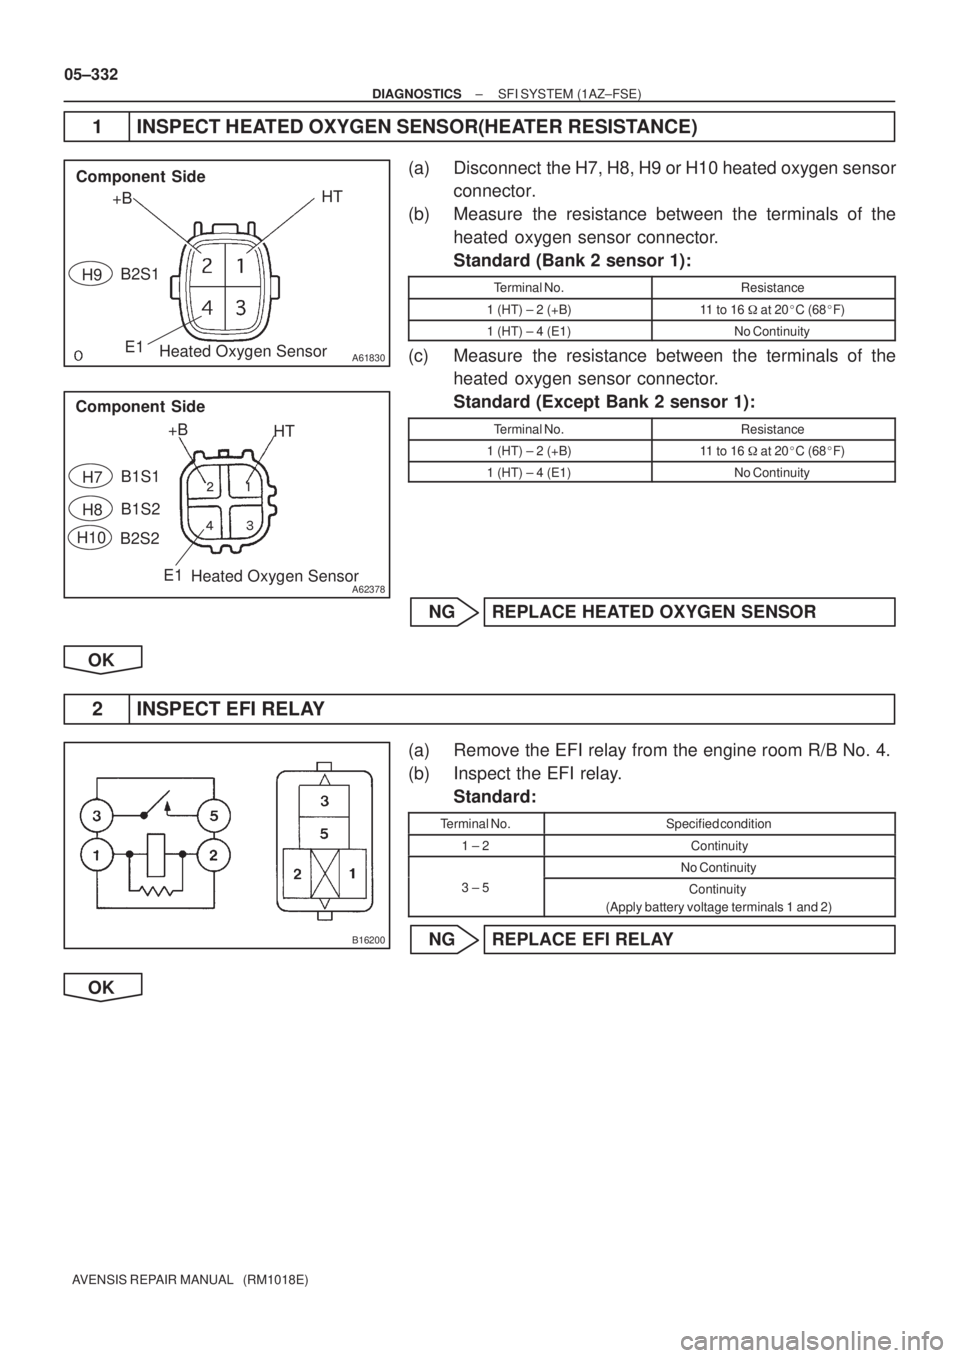
1 INSPECT HEATED OXYGEN SENSOR(HEATER RESISTANCE)
(a) Disconnect the H7, H8, H9 or H10 heated oxygen sensor
connector.
(b) Measure the resistance between the terminals of the
heated oxygen sensor connector.
Standard (Bank 2 sensor 1):
Terminal No.Resistance
1 (HT) ± 2 (+B)11 to 16 � at 20�C (68�F)
1 (HT) ± 4 (E1)No Continuity
(c) Measure the resistance between the terminals of the
heated oxygen sensor connector.
Standard (Except Bank 2 sensor 1):
Terminal No.Resistance
1 (HT) ± 2 (+B)11 to 16 � at 20�C (68�F)
1 (HT) ± 4 (E1)No Continuity
NG REPLACE HEATED OXYGEN SENSOR
OK
2 INSPECT EFI RELAY
(a) Remove the EFI relay from the engine room R/B No. 4.
(b) Inspect the EFI relay.
Standard:
Terminal No.Specified condition
1 ± 2Continuity
No Continuity
3 ± 5Continuity
(Apply battery voltage terminals 1 and 2)
NG REPLACE EFI RELAY
OK
Page 493 of 5135
A76903
HT1B (+)HT1A (+)
HT2A (+)
HT2B (+)
E1 (±)
ECM Connector
E12
E11
±
DIAGNOSTICS SFI SYSTEM(1AZ±FSE)
05±333
AVENSIS REPAIR MANUAL (RM1018E)
3INSPECT ECM(HT1A, HT1B, HT2A OR HT2B VOLTAGE)
(a)Turn the ignition switch ON.
(b)Measure the voltage between the applicable terminals of
the E11 and E12 ECM connectors.
Standard:
Symbols (Terminal No.)Specified condition
HT1A (E12±5) ± E1 (E11±1)
HT1B (E12±25) ± E1 (E11±1)9to14VHT2A (E12±4) ± E1 (E11±1)9 to 14 V
HT2B (E12±33) ± E1 (E11±1)
HINT:
�The HT1A means the heated oxygen sensor bank 1 sen-
sor 1.
�The HT1B means the heated oxygen sensor bank 1 sen-
sor 2.
�The HT2A means the heated oxygen sensor bank 2 sen-
sor 1.
�The HT2B means the heated oxygen sensor bank 2 sen-
sor 2.
OKCHECK AND REPLACE ECM (See page 01±32)
NG
Page 494 of 5135

A66290
Wire Harness Side
B1S1
B1S2
B2S1B2S2 H7
H9
H8
H10
Heated Oxygen Sensor Connector HT
HT
+B+B
A81695
HT1A
HT2BHT2A
HT1B
E12
ECM Connector
A66053
Engine Room R/B No. 4
EFI Relay
05±334
± DIAGNOSTICSSFI SYSTEM (1AZ±FSE)
AVENSIS REPAIR MANUAL (RM1018E)
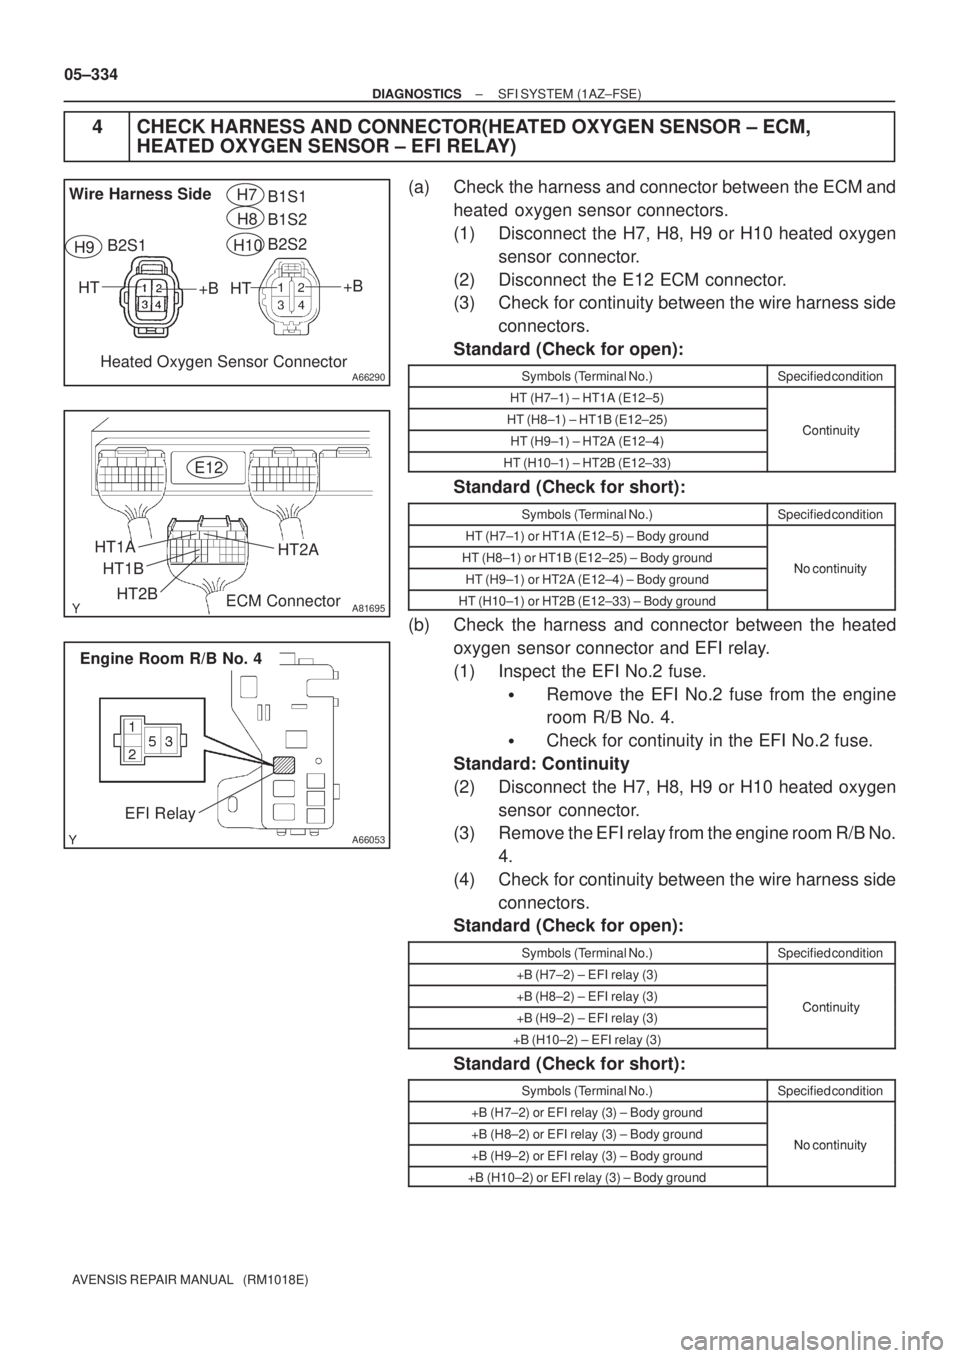
4 CHECK HARNESS AND CONNECTOR(HEATED OXYGEN SENSOR ± ECM,
HEATED OXYGEN SENSOR ± EFI RELAY)
(a) Check the harness and connector between the ECM and
heated oxygen sensor connectors.
(1) Disconnect the H7, H8, H9 or H10 heated oxygen
sensor connector.
(2) Disconnect the E12 ECM connector.
(3) Check for continuity between the wire harness side
connectors.
Standard (Check for open):
Symbols (Terminal No.)Specified condition
HT (H7±1) ± HT1A (E12±5)
HT (H8±1) ± HT1B (E12±25)ContinuityHT (H9±1) ± HT2A (E12±4)Continuity
HT (H10±1) ± HT2B (E12±33)
Standard (Check for short):
Symbols (Terminal No.)Specified condition
HT (H7±1) or HT1A (E12±5) ± Body ground
HT (H8±1) or HT1B (E12±25) ± Body groundNo continuityHT (H9±1) or HT2A (E12±4) ± Body groundNo continuity
HT (H10±1) or HT2B (E12±33) ± Body ground
(b) Check the harness and connector between the heated
oxygen sensor connector and EFI relay.
(1) Inspect the EFI No.2 fuse.
�Remove the EFI No.2 fuse from the engine
room R/B No. 4.
�Check for continuity in the EFI No.2 fuse.
Standard: Continuity
(2) Disconnect the H7, H8, H9 or H10 heated oxygen
sensor connector.
(3) Remove the EFI relay from the engine room R/B No.
4.
(4) Check for continuity between the wire harness side
connectors.
Standard (Check for open):
Symbols (Terminal No.)Specified condition
+B (H7±2) ± EFI relay (3)
+B (H8±2) ± EFI relay (3)Continuity+B (H9±2) ± EFI relay (3)Continuity
+B (H10±2) ± EFI relay (3)
Standard (Check for short):
Symbols (Terminal No.)Specified condition
+B (H7±2) or EFI relay (3) ± Body ground
+B (H8±2) or EFI relay (3) ± Body groundNo continuity+B (H9±2) or EFI relay (3) ± Body groundNo continuity
+B (H10±2) or EFI relay (3) ± Body ground