Page 2494 of 5135
������G24416
C96135
Front
23.7�
C95738
G23866
G23865
± REAR SUSPENSIONREAR SHOCK ABSORBER WITH COIL SPRING
27±11
AVENSIS REPAIR MANUAL (RM1018E)
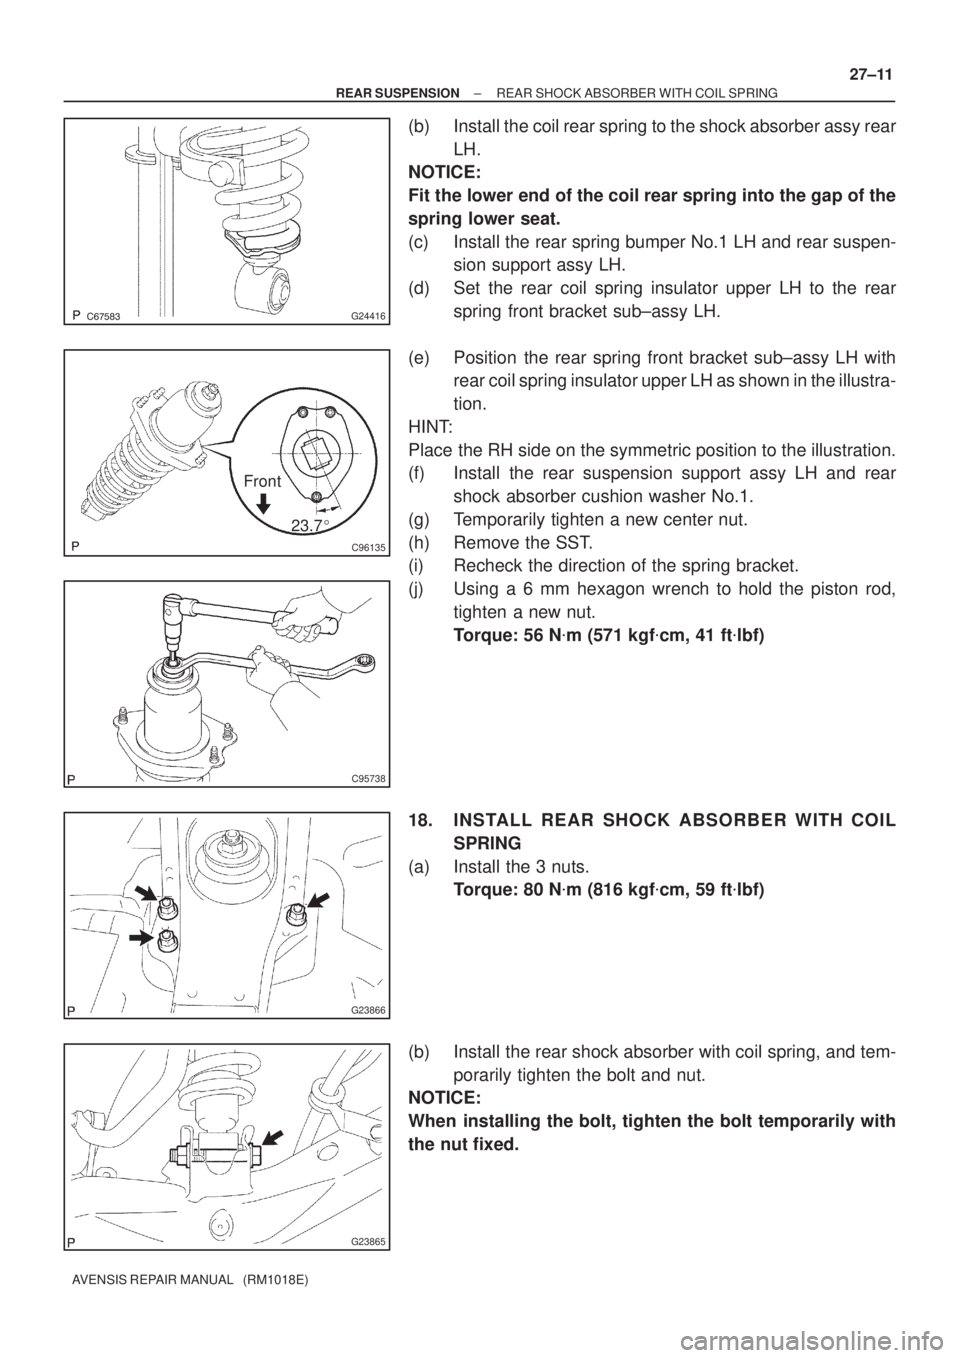
(b) Install the coil rear spring to the shock absorber assy rear
LH.
NOTICE:
Fit the lower end of the coil rear spring into the gap of the
spring lower seat.
(c) Install the rear spring bumper No.1 LH and rear suspen-
sion support assy LH.
(d) Set the rear coil spring insulator upper LH to the rear
spring front bracket sub±assy LH.
(e) Position the rear spring front bracket sub±assy LH with
rear coil spring insulator upper LH as shown in the illustra-
tion.
HINT:
Place the RH side on the symmetric position to the illustration.
(f) Install the rear suspension support assy LH and rear
shock absorber cushion washer No.1.
(g) Temporarily tighten a new center nut.
(h) Remove the SST.
(i) Recheck the direction of the spring bracket.
(j) Using a 6 mm hexagon wrench to hold the piston rod,
tighten a new nut.
Torque: 56 N�m (571 kgf�cm, 41 ft�lbf)
18. INSTALL REAR SHOCK ABSORBER WITH COIL
SPRING
(a) Install the 3 nuts.
Torque: 80 N�m (816 kgf�cm, 59 ft�lbf)
(b) Install the rear shock absorber with coil spring, and tem-
porarily tighten the bolt and nut.
NOTICE:
When installing the bolt, tighten the bolt temporarily with
the nut fixed.
Page 2495 of 5135
G23868
G23867
G25772
G25771
27±12
± REAR SUSPENSIONREAR SHOCK ABSORBER WITH COIL SPRING
AVENSIS REPAIR MANUAL (RM1018E)
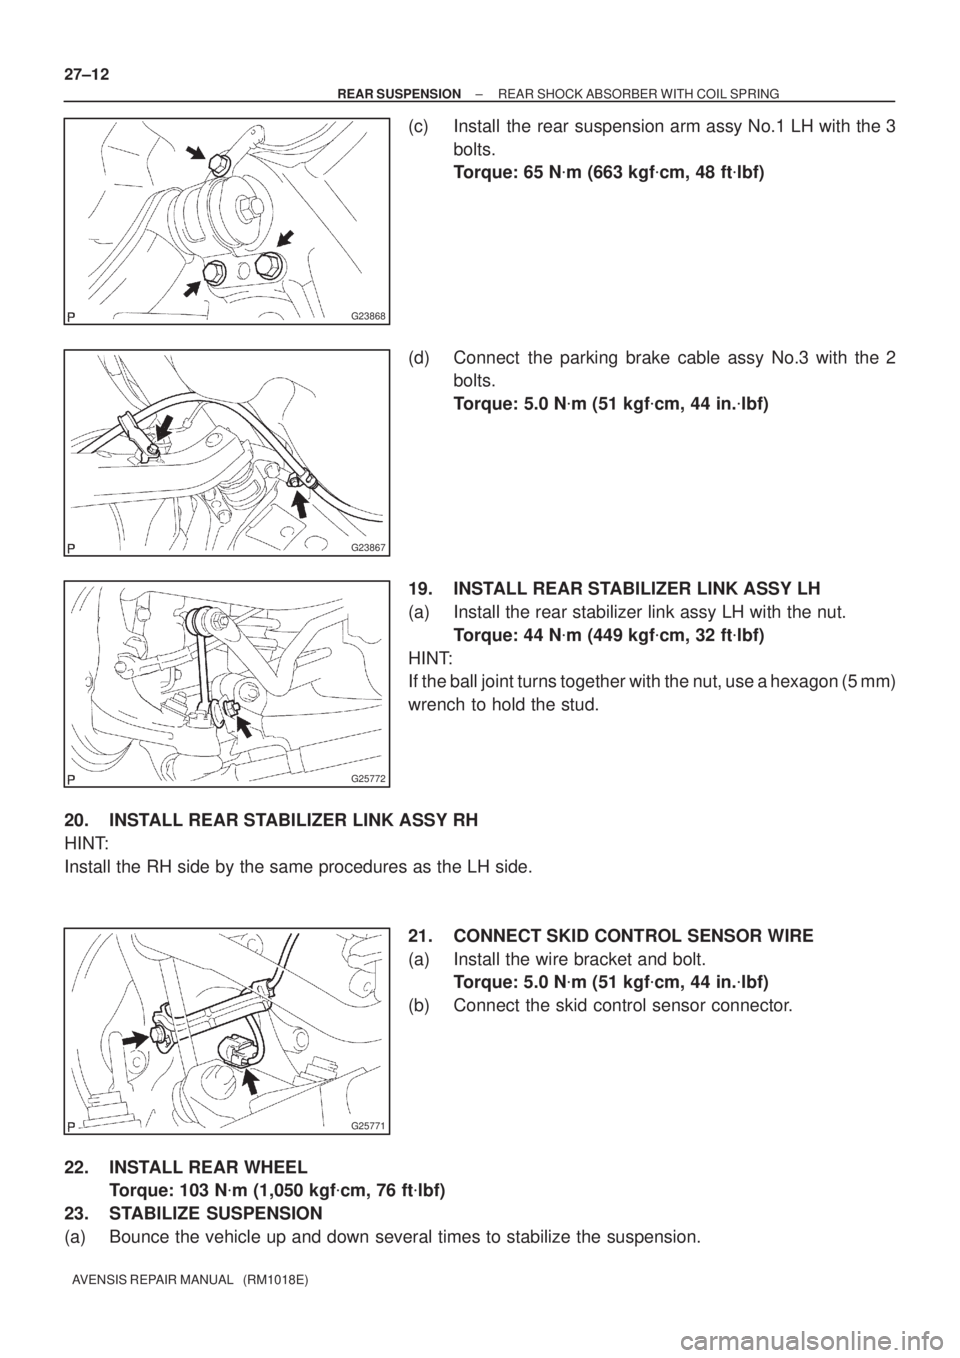
(c) Install the rear suspension arm assy No.1 LH with the 3
bolts.
Torque: 65 N�m (663 kgf�cm, 48 ft�lbf)
(d) Connect the parking brake cable assy No.3 with the 2
bolts.
Torque: 5.0 N�m (51 kgf�cm, 44 in.�lbf)
19. INSTALL REAR STABILIZER LINK ASSY LH
(a) Install the rear stabilizer link assy LH with the nut.
Torque: 44 N�m (449 kgf�cm, 32 ft�lbf)
HINT:
If the ball joint turns together with the nut, use a hexagon (5 mm)
wrench to hold the stud.
20. INSTALL REAR STABILIZER LINK ASSY RH
HINT:
Install the RH side by the same procedures as the LH side.
21. CONNECT SKID CONTROL SENSOR WIRE
(a) Install the wire bracket and bolt.
Torque: 5.0 N�m (51 kgf�cm, 44 in.�lbf)
(b) Connect the skid control sensor connector.
22. INSTALL REAR WHEEL
Torque: 103 N�m (1,050 kgf�cm, 76 ft�lbf)
23. STABILIZE SUSPENSION
(a) Bounce the vehicle up and down several times to stabilize the suspension.
Page 2496 of 5135
G23865
±
REAR SUSPENSION REAR SHOCK ABSORBER WITH COIL SPRING
27±13
AVENSIS REPAIR MANUAL (RM1018E)
24. FULLY TIGHTEN REAR SHOCK ABSORBER WITH
COIL SPRING
(a) Fully tighten the bolt and nut.
Torque: 160 N �m (1,632 kgf �cm, 118 ft �lbf)
NOTICE:
�When installing the bolt, hold the nut not to rotate.
�Be sure to empty the vehicle when fully tightening the
bolt and nut.
25.INSPECT AND ADJUST REAR WHEEL ALIGNMENT (See page 27±4)
26. CHECK ABS SPEED SENSOR SIGNAL
(a)ABD WITH EBD SYSTEM (See page 05±699)
(b)ABD WITH EBD & BA & TRC & VSC SYSTEM ( See page 05±756)
Page 2501 of 5135
270E0±01
������G26285
w/ Height Control Sensor:
5.8 (59, 51 in.�lbf)
80 (816, 59)
Rear Suspension Member Sub±assy
Rear Shock Absorber
Cushion Washer No.1
Coil Rear Spring
Rear Coil Spring Insulator Upper LH
Rear Spring Bumper No.1 LH
Rear Suspension Support Assy LH
Rear Spring Front Bracket
Sub±assy LH
Rear Shock
Absorber Cushion No.1
Lower Control Arm Assy RH
Rear Shock Absorber
Assy LH
160 (1,632, 118)
110 (1,122, 81)
65 (663, 48)
Rear Suspension
Support Stopper
Rear Suspension Arm
Bracket Assy LH
Rear Suspension
Arm Bush No.1�Camber Adjust Cam Assy
Rear Suspension Arm Assy No.1 LH
74 (755, 55)
105 (1,071, 77)
44 (449, 32)
74 (755, 55)
74 (755, 55)
Parking Brake Cable Assy No.3
5.0 (51, 44 in.�lbf)Rear Axle Carrier Sub±assy LH
Skid Control Sensor Wire
74 (755, 55)
Upper Control Arm Assy
Camber Adjust Cam No.2
Lower Control Arm Assy LH
105 (1,071, 77)
5.0 (51, 44 in.�lbf)
60 (612, 44)
N�m (kgf�cm, ft�lbf) : Specified torque
Non±reusable part �
56 (571, 41)
�56 (571, 41)
Clip
Clip 27±2
± REAR SUSPENSIONREAR SUSPENSION
AVENSIS REPAIR MANUAL (RM1018E)
REAR SUSPENSION
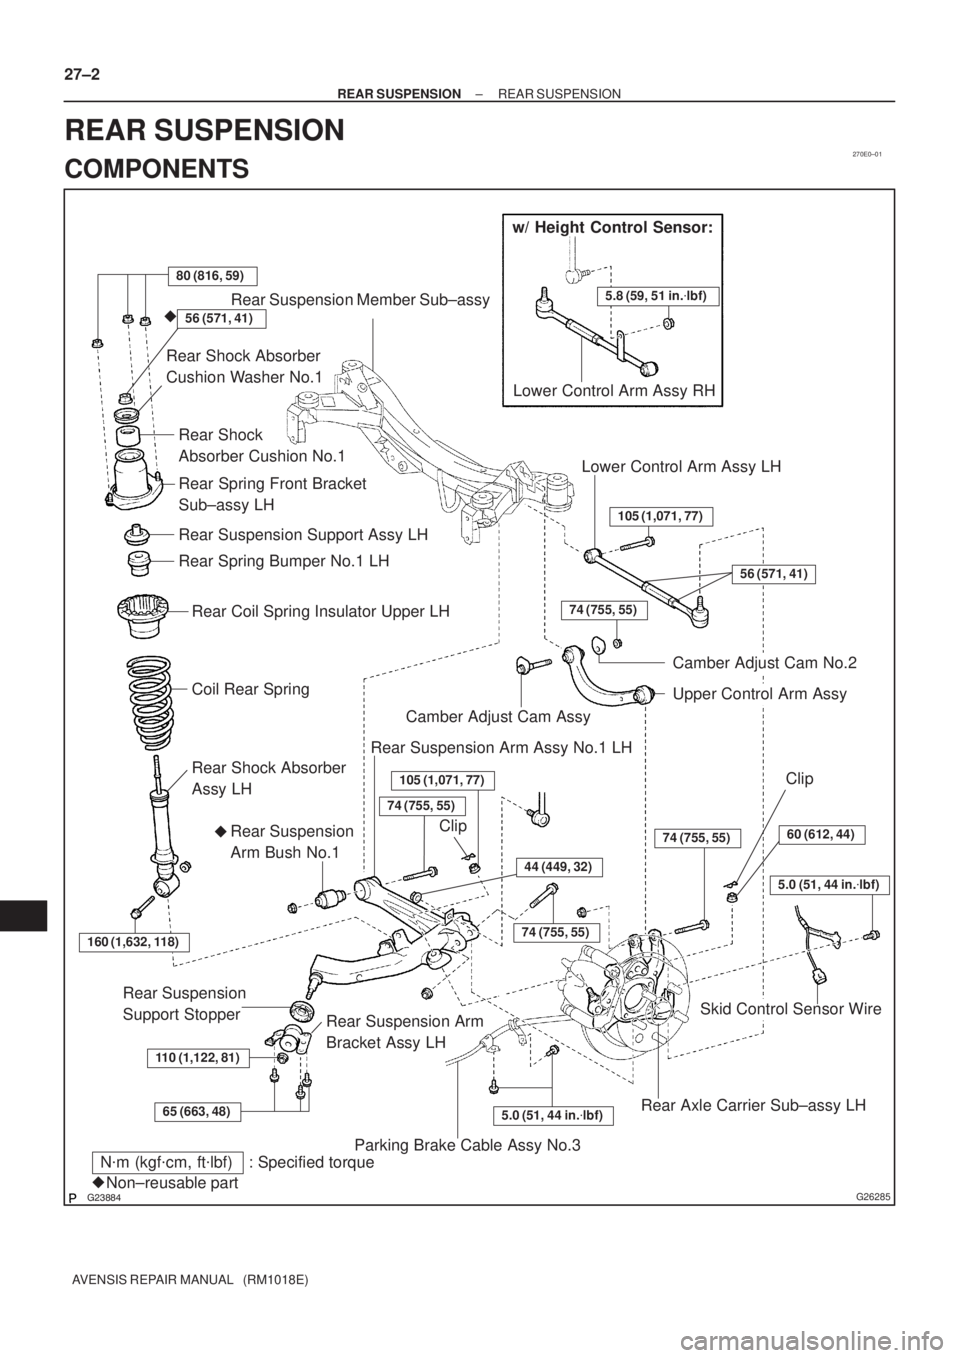
COMPONENTS
Page 2503 of 5135
270E7±01
±
REAR SUSPENSION REAR SUSPENSION SYSTEM
27±1
AVENSIS REPAIR MANUAL (RM1018E)
REAR SUSPENSION SYSTEM
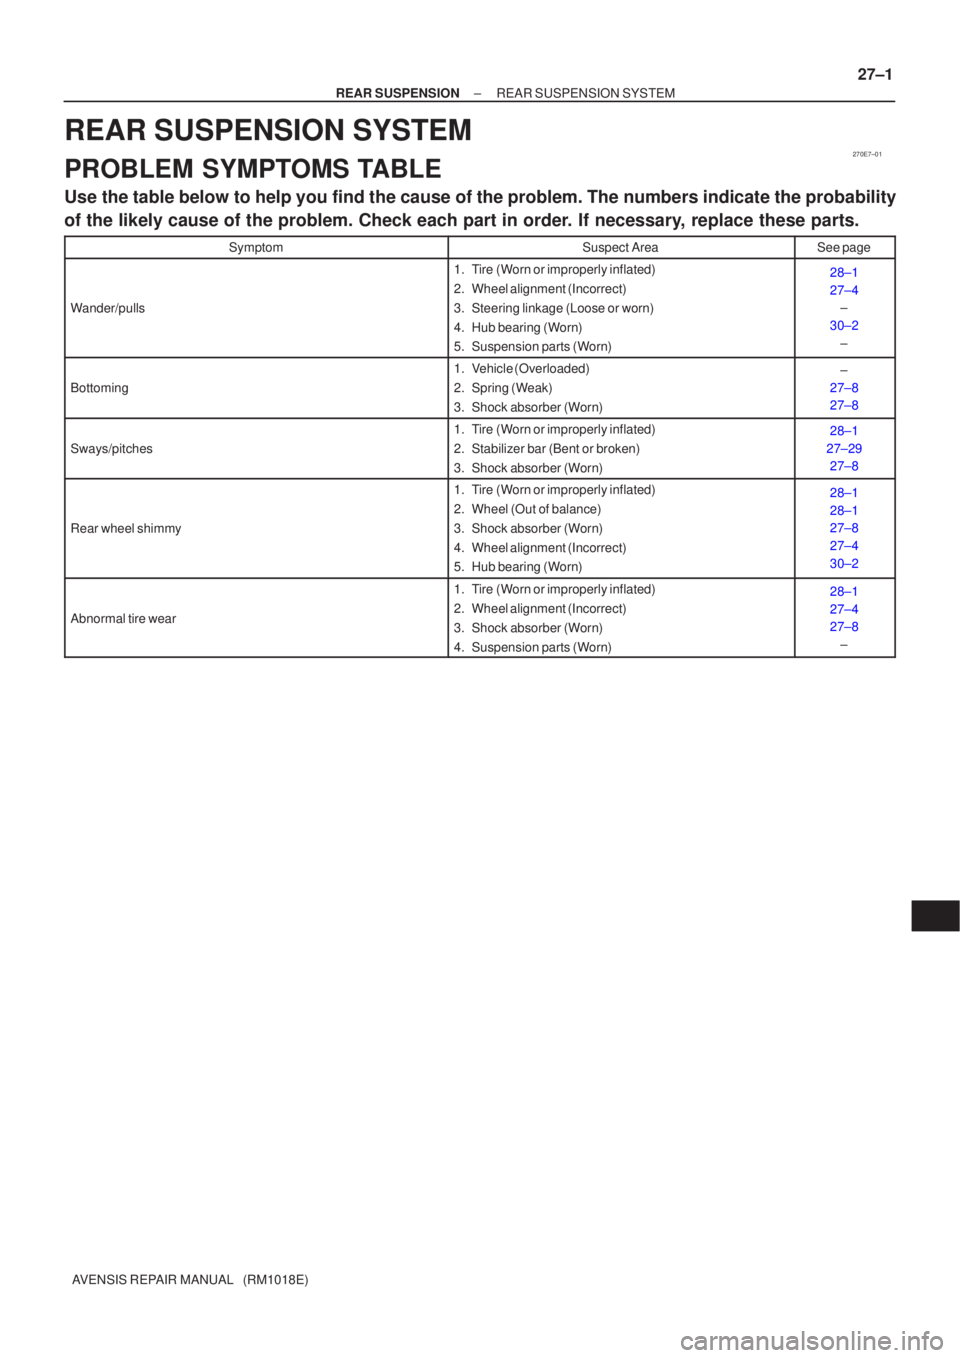
PROBLEM SYMPTOMS TABLE
Use the table below to help you find the cause of the problem. The numbers \
indicate the probability
of the likely cause of the problem. Check each part in order. If necessary, replace these parts.
SymptomSuspect AreaSee page
Wander/pulls
1. Tire (Worn or improperly inflated)
2. Wheel alignment (Incorrect)
3. Steering linkage (Loose or worn)
4. Hub bearing (Worn)
5. Suspension parts (Worn)28±1
27±4
±
30±2 ±
Bottoming
1. Vehicle (Overloaded)
2. Spring (Weak)
3. Shock absorber (Worn)±
27±8
27±8
Sways/pitches
1. Tire (Worn or improperly inflated)
2. Stabilizer bar (Bent or broken)
3. Shock absorber (Worn)28±1
27±29 27±8
Rear wheel shimmy
1. Tire (Worn or improperly inflated)
2. Wheel (Out of balance)
3. Shock absorber (Worn)
4. Wheel alignment (Incorrect)
5. Hub bearing (Worn)28±1
28±1
27±8
27±4
30±2
Abnormal tire wear
1. Tire (Worn or improperly inflated)
2. Wheel alignment (Incorrect)
3. Shock absorber (Worn)
4. Suspension parts (Worn)28±1
27±4
27±8
±
Page 2508 of 5135
±
FRONT SUSPENSION LOWER BALL JOINT ASSY FRONT LH
26±25
AVENSIS REPAIR MANUAL (RM1018E)
12. INSTALL LOWER BALL JOINT ASSY FRONT LH
(a) Install the lower ball joint assy front LH, and torque the nut.
Torque: 103 N �m (1,050 kgf �cm, 76 ft �lbf)
(b) Install a new cotter pin.
NOTICE:
If the holes for the cotter pin are not aligned, tighten the nut further\
up to 60 �.
13.INSTALL FRONT AXLE ASSY LH (See page 30±22)
14.INSTALL FRONT SUSPENSION ARM SUB±ASSY LOWER NO.1 LH (See page 30±22)
15.INSTALL TIE ROD END SUB±ASSY LH (See page 30±22)
16. INSTALL FRONT DISC
17.INSTALL FRONT DISC BRAKE CALIPER ASSY LH (See page 30±22)
18.CONNECT SPEED SENSOR FRONT LH (See page 30±6)
19.INSTALL FRONT AXLE HUB LH NUT (See page 30±6)
20. INSTALL FRONT WHEEL
Torque: 103 N �m (1,050 kgf �cm, 76 ft �lbf)
21.INSPECT AND ADJUST FRONT WHEEL ALIGNMENT (See page 26±6)
22. CHECK ABS SPEED SENSOR SIGNAL
(a)w/o VSC: See page 05±699
(b)w/ VSC: See page 05±756
Page 2509 of 5135
260DR±01
F13686
F41742
C80889
±
FRONT SUSPENSION FRONT SUSPENSION ARM SUB±ASSY LOWER NO.1
LH (MTM)26±21
AVENSIS REPAIR MANUAL (RM1018E)
FRONT SUSPENSION ARM SUB±ASSY LOWER NO.1
LH (MTM)
REPLACEMENT
HINT:
�COMPONENTS: See page 26±2
�Replace the RH side (Engine: 1AZ) by the same procedures as the LH (A\
TM) side.
�Replace the RH side (Engine: 1ZZ, 3ZZ, 1CD) by the same procedures as \
the LH (MTM) side.
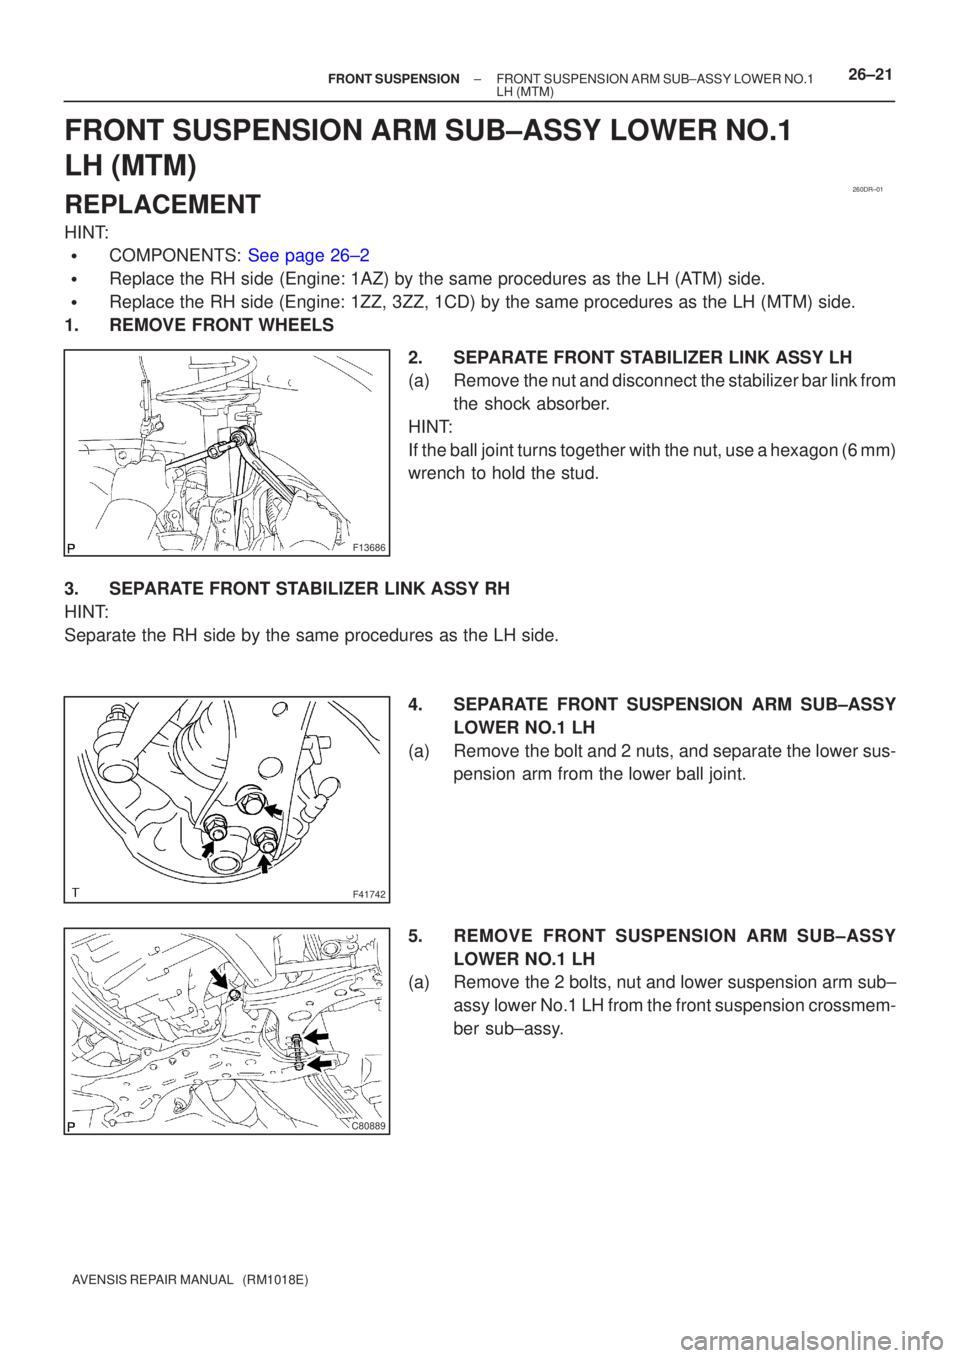
1. REMOVE FRONT WHEELS
2. SEPARATE FRONT STABILIZER LINK ASSY LH
(a) Remove the nut and disconnect the stabilizer bar link fromthe shock absorber.
HINT:
If the ball joint turns together with the nut, use a hexagon (6 mm)
wrench to hold the stud.
3. SEPARATE FRONT STABILIZER LINK ASSY RH
HINT:
Separate the RH side by the same procedures as the LH side. 4. SEPARATE FRONT SUSPENSION ARM SUB±ASSYLOWER NO.1 LH
(a) Remove the bolt and 2 nuts, and separate the lower sus- pension arm from the lower ball joint.
5. REMOVE FRONT SUSPENSION ARM SUB±ASSY LOWER NO.1 LH
(a) Remove the 2 bolts, nut and lower suspension arm sub±
assy lower No.1 LH from the front suspension crossmem-
ber sub±assy.
Page 2512 of 5135
260DQ±01
F13686
C80293
26±16±
FRONT SUSPENSION FRONT SUSPENSION ARM SUB±ASSY LOWER NO.1
LH (ATM)
AVENSIS REPAIR MANUAL (RM1018E)
FRONT SUSPENSION ARM SUB±ASSY LOWER NO.1
LH (ATM)
REPLACEMENT
HINT:
�COMPONENTS: See page 26±2
�Replace the RH side (Engine: 1AZ) by the same procedures as the LH (A\
TM) side.
�Replace the RH side (Engine: 1ZZ) by the same procedures as the LH (M\
TM) side.
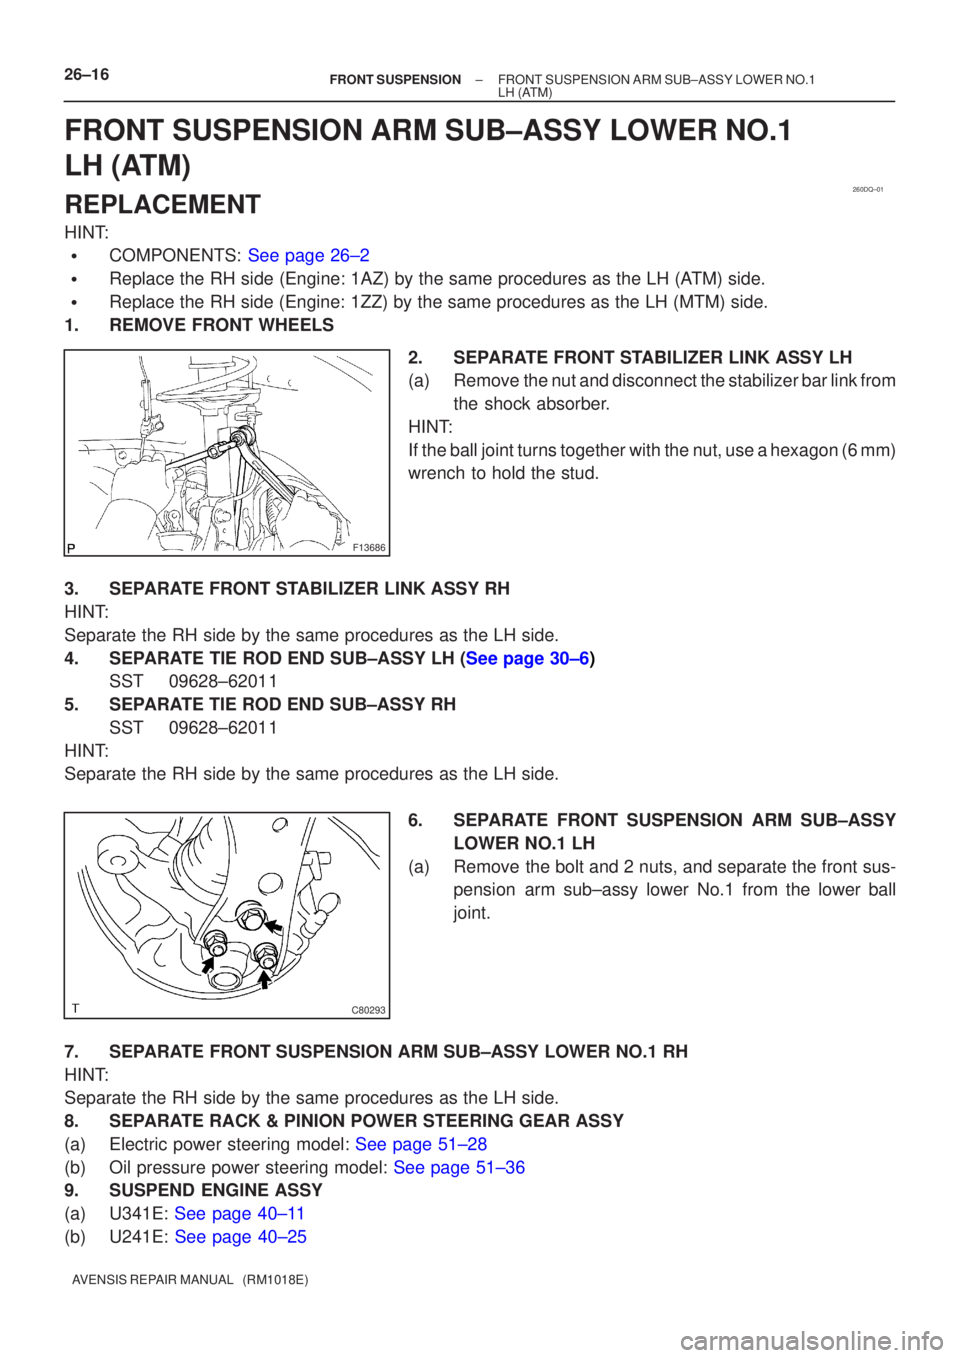
1. REMOVE FRONT WHEELS
2. SEPARATE FRONT STABILIZER LINK ASSY LH
(a) Remove the nut and disconnect the stabilizer bar link fromthe shock absorber.
HINT:
If the ball joint turns together with the nut, use a hexagon (6 mm)
wrench to hold the stud.
3. SEPARATE FRONT STABILIZER LINK ASSY RH
HINT:
Separate the RH side by the same procedures as the LH side.
4.SEPARATE TIE ROD END SUB±ASSY LH (See page 30±6) SST 09628±62011
5. SEPARATE TIE ROD END SUB±ASSY RH SST 09628±62011
HINT:
Separate the RH side by the same procedures as the LH side.
6. SEPARATE FRONT SUSPENSION ARM SUB±ASSYLOWER NO.1 LH
(a) Remove the bolt and 2 nuts, and separate the front sus- pension arm sub±assy lower No.1 from the lower ball
joint.
7. SEPARATE FRONT SUSPENSION ARM SUB±ASSY LOWER NO.1 RH
HINT:
Separate the RH side by the same procedures as the LH side.
8. SEPARATE RACK & PINION POWER STEERING GEAR ASSY
(a)Electric power steering model: See page 51±28
(b)Oil pressure power steering model: See page 51±36
9. SUSPEND ENGINE ASSY
(a)U341E: See page 40±11
(b)U241E: See page 40±25