Page 80 of 5135
022KP±01
02±62
± PREPARATIONEXTERIOR/INTERIOR TRIM
AVENSIS REPAIR MANUAL (RM1018E)
EXTERIOR/INTERIOR TRIM
PREPARATION
Recomended Tools
09070±20010Moulding RemoverFRONT DOOR BELT MOULDING
ASSY LH
REAR DOOR BELT MOULDING
ASSY LH
ROOF HEADLINING
ASSY(LIFTBACK MODELS)
ROOF HEADLINING ASSY(SEDAN
MODELS)
ROOF HEADLINING ASSY(WAGON
MODELS)
Equipment
Adhesive tapeTo avoid surface damage.
Clip remover
Piano wire
Protective tapeTo avoid surface damage.
Torque wrench
Wooden blockFor tying both piano wire ends
Page 197 of 5135
031GY±01
± SERVICE SPECIFICATIONSEXTERIOR/INTERIOR TRIM
03±75
AVENSIS REPAIR MANUAL (RM1018E)
EXTERIOR/INTERIOR TRIM
TORQUE SPECIFICATION
Part TightenedN�mkgf�cmft�lbf
FUEL LID CONTROL ASSY
Fuel lid control assy x Body8.08271 in.�lbf
REAR BUMPER COVER
Rear bumper cover x Body5.55649 in.�lbf
Rear bumper reinforcement No. 1 x Body11.511 516
BACK DOOR GARNISH OUTSIDE
Back door garnish � Body4.95043 in.�lbf
REAR SPOILER (WAGON MODELS)
Rear spoiler � Body9.89987 in.�lbf
Page 2491 of 5135

REAR SHOCK ABSORBER WITH COIL SPRING
OVERHAUL
HINT:
COMPONENTS: See page 27±2.")
270E8±01
G25771
G25772
27±8
±
REAR SUSPENSION REAR SHOCK ABSORBER WITH COIL SPRING
AVENSIS REPAIR MANUAL (RM1018E)
REAR SHOCK ABSORBER WITH COIL SPRING
OVERHAUL
HINT:
COMPONENTS: See page 27±2.
1. REMOVE REAR DOOR SCUFF PLATE LH
2. REMOVE REAR SEAT CUSHION ASSEMBLY
(a)40/60 FOLDING FLIP±UP CUSHION (See page 72±21)
(b)40/60 FOLDING (See page 72±27)
(c)UNITED FIXED (See page 72±32)
3. REMOVE REAR SEATBACK ASSY
(a)40/60 FOLDING FLIP±UP CUSHION (See page 72±21)
(b)40/60 FOLDING (See page 72±27)
(c)UNITED FIXED (See page 72±32)
4. REMOVE REAR FLOOR FINISH PLATE (SEDAN MODELS)
5. REMOVE LUGGAGE COMPARTMENT TRIM COVER INNER LH (SEDAN MODELS)
6. REMOVE REAR FLOOR FINISH PLATE (LIFTBACK MODELS)
7.REMOVE DECK TRIM SIDE BOARD LH (LIFTBACK MODELS) (See page 76±45)
8. REMOVE REAR FLOOR FINISH PLATE (WAGON MODELS)
9.REMOVE DECK TRIM SIDE PANEL ASSY LH (WAGON MODELS) (See page 76±54)
10. REMOVE REAR WHEEL 11. DISCONNECT SKID CONTROL SENSOR WIRE
(a) Disconnect the skid control sensor connector.
(b) Remove the bolt and wire bracket.
12. SEPARATE REAR STABILIZER LINK ASSY LH
(a) Remove the nut, and separate the rear stabilizer link assyLH.
HINT:
If the ball joint turns together with the nut, use a hexagon (5 mm)
wrench to hold the stud.
13. SEPARATE REAR STABILIZER LINK ASSY RH
HINT:
Separate the RH side by the same procedures as the LH side.
Page 3013 of 5135
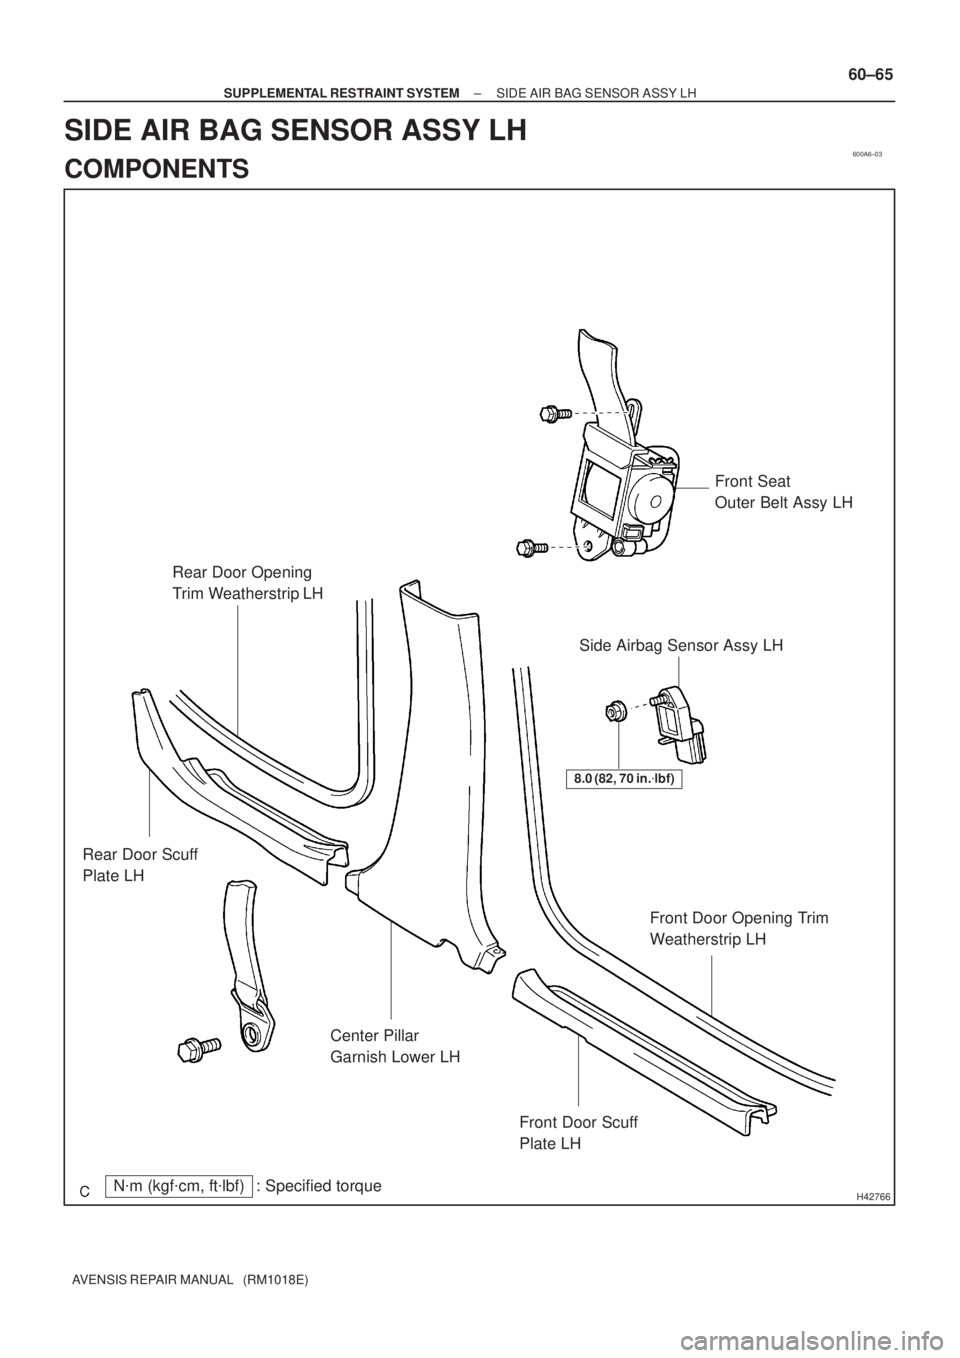
600A6±03
H42766N�m (kgf�cm, ft�lbf) : Specified torque Rear Door Opening
Trim Weatherstrip LH
Rear Door Scuff
Plate LH
Center Pillar
Garnish Lower LH
Front Door Scuff
Plate LHFront Door Opening Trim
Weatherstrip LHFront Seat
Outer Belt Assy LH
8.0 (82, 70 in.�lbf)
Side Airbag Sensor Assy LH
± SUPPLEMENTAL RESTRAINT SYSTEMSIDE AIR BAG SENSOR ASSY LH
60±65
AVENSIS REPAIR MANUAL (RM1018E)
SIDE AIR BAG SENSOR ASSY LH
COMPONENTS
Page 3057 of 5135

AVENSIS REPAIR MANUAL (RM1018E)
REPLACEMENT
HINT:
�The installation is in the reve")
610EC±01
B66569
Protrusion Part
Front
Front
Mark
Protrusion Part
61±24
±
SEAT BELT REAR SEAT BELT (WAGON MODELS)
AVENSIS REPAIR MANUAL (RM1018E)
REPLACEMENT
HINT:
�The installation is in the reverse order of the removal. However, when there is a special point concern-
ing the installation, it is indicated.
�Use the same procedures on the LH side as on the RH side.
1.REMOVE REAR DOOR SCUFF PLATE RH (See page 76±54)
2. REMOVE REAR DOOR OPENING TRIM WEATHERSTRIP RH
3.REMOVE REAR SEAT ASSY (See page 72±21)
4. REMOVE TONNEAU COVER ASSY
5. REMOVE BACK DOOR WEATHERSTRIP
6.REMOVE DECK BOARD SUB±ASSY (See page 76±54)
7.REMOVE DECK FLOOR BOX REAR (See page 76±54)
8.REMOVE DECK FLOOR BOX FRONT (See page 76±54)
9.REMOVE DECK FLOOR BOX RH (See page 76±54)
10.REMOVE REAR FLOOR FINISH PLATE (See page 76±54)
11.REMOVE DECK TRIM SIDE BOARD RH (See page 76±54)
12. REMOVE REAR SEAT 3 POINT TYPE BELT ASSY OUTER
(a) Remove the bolt and belt on the floor anchor side.
(b) Remove the 2 bolts and belt on the retractor side.
13. REMOVE REAR SEAT BELT ASSY OUTER CENTER
(a)Remove the rear seatback board RH (See page 72±21).
(b)Remove the rear seat shoulder belt cover (See page 72±21).
(c) Remove the bolt on the retractor side and remove the belt outer center c\
ompletely.
(d) Remove the bolt and belt outer center on the floor anchor side.
14. REMOVE REAR SEAT 3 POINT TYPE BELT ASSY INNER
(a) Remove the bolt and belt.
15. REMOVE REAR SEAT 3 POINT TYPE BELT ASSY INNER
(a) Remove the bolt and belt.
16. REMOVE CHILD RESTRAINT SEAT ANCHOR BRACKET SUB±ASSY RH
(a) Remove the 2 bolts and anchor bracket.
17. INSTALL CHILD RESTRAINT SEAT ANCHOR BRACKET SUB±ASSY RH
(a) Install the child restraint seat anchor bracket with the 2 bolts. Torque: 31 N �m (316 kgf �cm, 23 ft �lbf)
18. INSTALL REAR SEAT 3 POINT TYPE BELT ASSY INNER
(a) Install the belt with the bolt as shown in the illustration.
Torque: 42 N �m (430 kgf �cm, 31 ft �lbf)
NOTICE:
�Makesure that the anchor part does not run onto the
protrusion part of the floor panel.
�Do not disassemble the retractor.
19. INSTALL REAR SEAT BELT ASSY OUTER CENTER
(a) Install the belt with the bolt on the retractor side. Torque: 42 N �m (430 kgf �cm, 31 ft �lbf)
Page 3061 of 5135

AVENSIS REPAIR MANUAL (RM1018E)
REPLACEMENT
HINT:
�The installation is in the r")
610EA±01
B66569
Protrusion Part
Front
Front
Mark
Protrusion Part
61±20
±
SEAT BELT REAR SEAT BELT (LIFTBACK MODELS)
AVENSIS REPAIR MANUAL (RM1018E)
REPLACEMENT
HINT:
�The installation is in the reverse order of the removal. However, when there is a special point concern-
ing the installation, it is indicated.
�Use the same procedures on the LH side as on the RH side.
1.REMOVE REAR DOOR SCUFF PLATE RH (See page 76±45)
2. REMOVE REAR DOOR OPENING TRIM WEATHERSTRIP RH
3.REMOVE REAR SEAT ASSY (See page 72±21)
4.REMOVE PACKAGE TRAY TRIM PANEL ASSY (See page 76±45)
5. REMOVE BACK DOOR WEATHERSTRIP
6.REMOVE REAR FLOOR FINISH PLATE (See page 76±45)
7.REMOVE ROOF SIDE GARNISH INNER RH (See page 76±45)
8.REMOVE DECK TRIM SIDE PANEL ASSY RH (See page 76±45)
9. REMOVE REAR SEAT 3 POINT TYPE BELT ASSY OUTER
(a) Remove the bolt and belt on the floor anchor side.
(b) Remove the 2 bolts and belt on the retractor side.
10. REMOVE REAR SEAT BELT ASSY OUTER CENTER
(a)Remove the rear seatback board RH (See page 72±21).
(b)Remove the rear seat shoulder belt cover (See page 72±21).
(c) Remove the bolt on the retractor side and remove the belt completely.
(d) Remove the bolt and belt assy outer center on the floor anchor side.
11. REMOVE REAR SEAT 3 POINT TYPE BELT ASSY INNER
(a) Remove the bolt and belt.
12. REMOVE REAR SEAT 3 POINT TYPE BELT ASSY INNER
(a) Remove the bolt and belt.
13. REMOVE CHILD RESTRAINT SEAT ANCHOR BRACKET SUB±ASSY RH
(a) Remove the 2 bolts and anchor bracket.
14. INSTALL CHILD RESTRAINT SEAT ANCHOR BRACKET SUB±ASSY RH
(a) Install the child restraint seat anchor bracket with the 2 bolts. Torque: 31 N �m (316 kgf �cm, 23 ft �lbf)
15. INSTALL REAR SEAT 3 POINT TYPE BELT ASSY INNER
(a) Install the belt with the bolt as shown in the illustration.
Torque: 42 N �m (430 kgf �cm, 31 ft �lbf)
NOTICE:
Make sure that the anchor part does not run onto the protru-
sion part of the floor panel.
16. INSTALL REAR SEAT BELT ASSY OUTER CENTER
(a) Install the belt with the bolt on the retractor side. Torque: 42 N �m (430 kgf �cm, 31 ft �lbf)
Page 3065 of 5135

61±15
AVENSIS REPAIR MANUAL (RM1018E)
REPLACEMENT
HINT:
�The installation is in the reve")
610ED±01
B66569
Protrusion Part
Front
Front
Mark
Protrusion Part
±
SEAT BELT REAR SEAT BELT (SEDAN MODELS)
61±15
AVENSIS REPAIR MANUAL (RM1018E)
REPLACEMENT
HINT:
�The installation is in the reverse order of the removal. However, when there is a special point concern-
ing the installation, it is indicated.
�Use the same procedures on the LH side as on the RH side.
1.REMOVE REAR DOOR SCUFF PLATE RH (See page 76±36)
2.REMOVE REAR DOOR SCUFF PLATE LH (See page 76±36)
3. REMOVE REAR DOOR OPENING TRIM WEATHERSTRIP RH
4. REMOVE REAR DOOR OPENING TRIM WEATHERSTRIP LH
5.REMOVE REAR SEAT ASSY (See page 72±27, 72±32)
6.REMOVE ROOF SIDE GARNISH INNER RH (See page 76±36)
7.REMOVE ROOF SIDE GARNISH INNER LH (See page 76±36)
8.REMOVE PACKAGE TRAY TRIM PANEL ASSY (See page 76±36)
9. REMOVE REAR SEAT 3 POINT TYPE BELT ASSY OUTER
(a) Remove the bolt and belt on the floor anchor side.
(b) Remove the 2 bolts and belt on the retractor side.
10. REMOVE REAR SEAT BELT ASSY OUTER CENTER
(a) United fixed type: Remove the bolt and belt on the floor anchor side.
(b) United fixed type:
Remove the bolt and belt on the retractor side.
(c) 40/60 folding type: Remove the rear seatback board RH (See page 72±27).
(d) 40/60 folding type: Remove the rear seat shoulder belt cover (See page 72±27).
(e) 40/60 folding type: Remove the bolt on the retractor side and remove the belt completely.
(f) Remove the bolt and belt outer center on the floor anchor side.
11. REMOVE REAR SEAT 3 POINT TYPE BELT ASSY INNER
(a) Remove the bolt and belt.
12. REMOVE REAR SEAT 3 POINT TYPE BELT ASSY INNER
(a) Remove the bolt and belt.
13. REMOVE CHILD RESTRAINT SEAT ANCHOR BRACKET SUB±ASSY RH
(a) Remove the 2 bolts and anchor bracket.
14. INSTALL CHILD RESTRAINT SEAT ANCHOR BRACKET SUB±ASSY RH
(a) Install the child restraint seat anchor bracket with the 2 bolts. Torque: 31 N �m (316 kgf �cm, 23 ft �lbf)
15. INSTALL REAR SEAT 3 POINT TYPE BELT ASSY INNER
(a) Install the belt assy with the bolt as shown in the illustra-
tion.
Torque: 42 N �m (430 kgf �cm, 31 ft �lbf)
NOTICE:
Make sure that the anchor part does not run onto the protru-
sion part of the floor panel.
16. INSTALL REAR SEAT BELT ASSY OUTER CENTER (UNITED FIXED TYPE REAR SEAT)
Page 3077 of 5135
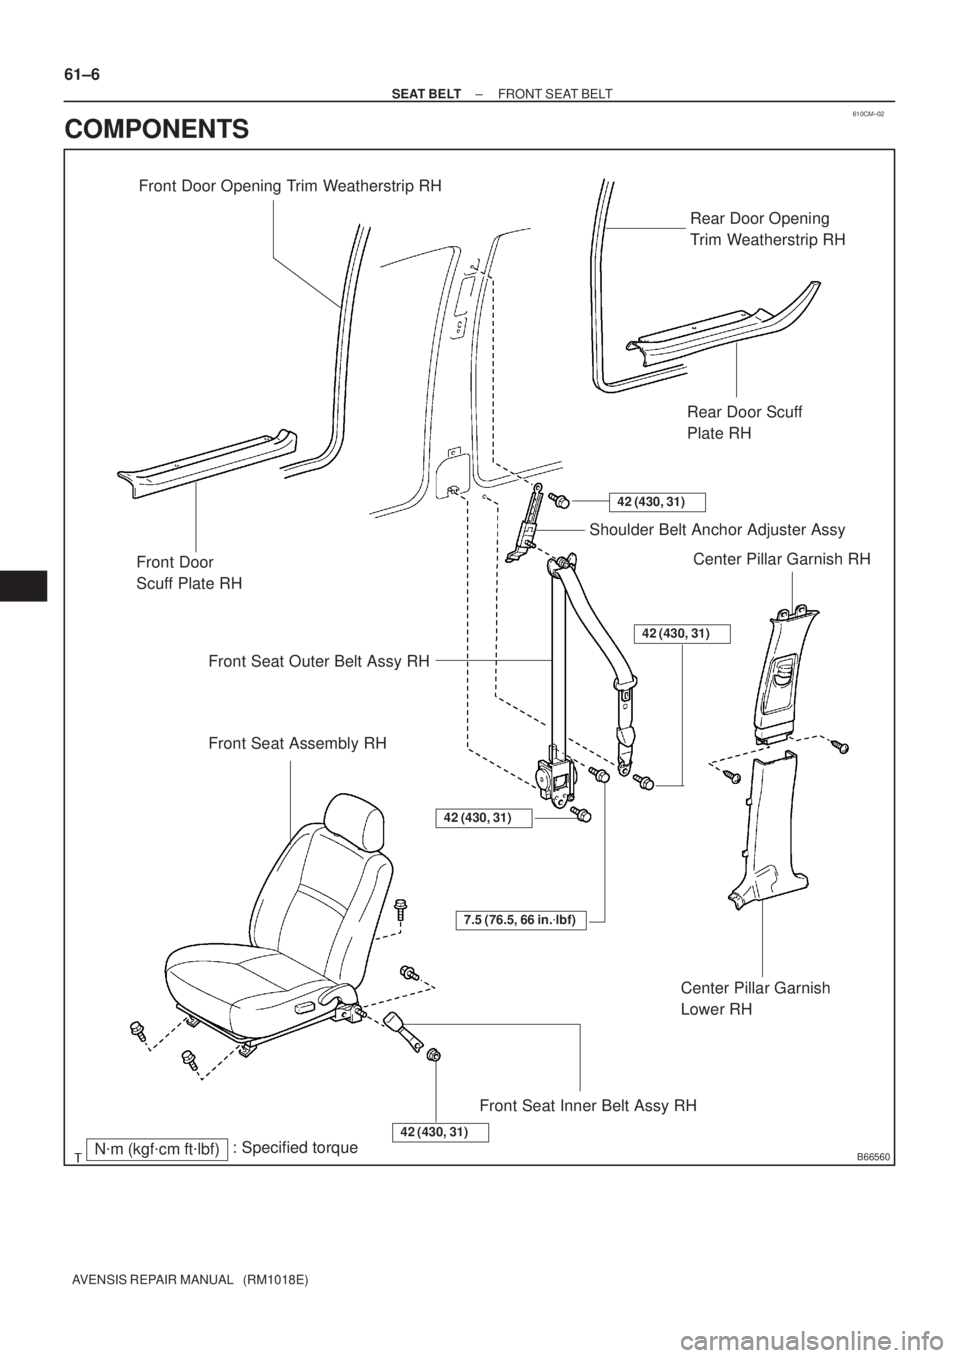
610CM±02
B66560N�m (kgf�cm ft�lbf): Specified torque Front Door
Scuff Plate RH
Center Pillar Garnish
Lower RH
Center Pillar Garnish RH
Rear Door Scuff
Plate RH
Shoulder Belt Anchor Adjuster Assy
Front Seat Assembly RH
Front Seat Inner Belt Assy RH
42 (430, 31)
7.5 (76.5, 66 in.�lbf)
42 (430, 31)
42 (430, 31)
Front Seat Outer Belt Assy RH
42 (430, 31)
Front Door Opening Trim Weatherstrip RH
Rear Door Opening
Trim Weatherstrip RH
61±6
± SEAT BELTFRONT SEAT BELT
AVENSIS REPAIR MANUAL (RM1018E)
COMPONENTS

EXTERIOR/INTERIOR TRIM
PREPARATION
Recomended Tools
09070±20010Moulding RemoverFRONT DOOR BELT MOULDING
ASSY")