Page 3100 of 5135
650T1±01
I352352Clamps
I35236
I35238
I35239
65±26
±
LIGHTING CENTER STOP LAMP ASSY
AVENSIS REPAIR MANUAL (RM1018E)
CENTER STOP LAMP ASSY
REPLACEMENT
1.REMOVE REAR SPOILER (WAGON MODELS) (See page 76±30)
2.REMOVE BACK DOOR TRIM BOARD ASSY (LIFTBACK MODELS) (See page 75±40) 3. REMOVE CENTER STOP LAMP ASSY (SEDANMODELS)
(a) Remove the center stop lamp assy as shown in the il- lustration.
(b) Disconnect the connector.
(c) Remove the center stop lamp bulb as shown in the il- lustration.
4. REMOVE CENTER STOP LAMP ASSY (WAGON MODELS)
(a) Remove the 2 screws and center stop lamp assy.
5. REMOVE CENTER STOP LAMP ASSY (LIFTBACK MODELS)
(a) Disconnect the connector.
(b) Remove the 3 screws and center stop lamp assy.
(c) Remove the center stop lamp socket and the bulb.
Page 3118 of 5135
670SB±01
I36707
±
AUDIO & VISUAL SYSTEM REAR SPEAKER ASSY NO.2
67±15
AVENSIS REPAIR MANUAL (RM1018E)
REAR SPEAKER ASSY NO.2
REPLACEMENT
1. REMOVE REAR DOOR WINDOW REGULATOR HANDLE ASSY (W/O POWER WINDOW)
(See page 75±22)
2. REMOVE POWER WINDOW REGULATOR SWITCH ASSY REAR (W/ POWER WINDOW) (See page 75±22)
3.REMOVE REAR DOOR TRIM BASE LH (See page 75±22)
4.REMOVE REAR DOOR TRIM BOARD SUB±ASSY LH (See page 75±22)
5. REMOVE REAR SPEAKER ASSY NO.2
(a) Disconnect the connector.
(b) Remove the screw and the rear No.2 speaker assy.
Page 3119 of 5135

(1)
(3)
H02440
Riveter
Mandrel
±
AUDIO & VISUAL SYSTEM REAR SPEAKER ASSY
67±13
AVENSIS REPAIR MANUAL (RM1018E)
REAR SPEAKER ASSY
REPLACEMENT
1.REMOVE REAR D")
670SA±01
������I35188
������I35189
(2)
(1)
(3)
H02440
Riveter
Mandrel
±
AUDIO & VISUAL SYSTEM REAR SPEAKER ASSY
67±13
AVENSIS REPAIR MANUAL (RM1018E)
REAR SPEAKER ASSY
REPLACEMENT
1.REMOVE REAR DOOR WINDOW REGULATOR HANDLE ASSY (See page 75±22)
2.REMOVE REAR DOOR TRIM BASE LH (See page 75±22)
3. REMOVE POWER WINDOW REGULATOR SWITCH ASSY REAR (W/ POWER WINDOW)
(See page 75±22)
4.REMOVE REAR DOOR TRIM BOARD SUB±ASSY LH (See page 75±22)
5. REMOVE REAR SPEAKER ASSY
(a) Disconnect the connector.
(b) Using a drill of less then � 4 mm (0.16 in.), drill out the 3
rivet heads and remove the rear speaker assy from the
rear door panel.
(c) Gently and vertically put the drill to the rivet, and cut the
rivet flanges.
NOTICE:
�Prizing the hole with a drill can lead to damage to the
rivet hole or breaking the drill.
�Take care as the cut rivet is hot.
(d) Even if flange is taken off, continue drilling and push out remaining fragments with the drill.
(e) Using a vacuum cleaner, remove the drilled rivets and their dust from the inside of the rear door panel.
6. INSTALL REAR SPEAKER ASSY
(a) Using an air riveter or a hand riveter, install 3 new strike rivets to install the rear speaker assy on the rear door pan-
el.
NOTICE:
�Install the new strike rivet in order shown in the il-
lustration to install the rear speaker assy.
�Do not prize a riveter, as the riveter could be dam-
aged, loosened and the mandrel could be bent.
Page 3122 of 5135

(1)
(3)
H02440
Riveter
Mandrel
67±10
±
AUDIO & VISUAL SYSTEM FRONT NO.1 SPEAKER ASSY
AVENSIS REPAIR MANUAL (RM1018E)
FRONT NO.1 SPEAKER ASSY
REPLACEMENT
1.")
670S8±01
������I35168
������I35169
(2)
(1)
(3)
H02440
Riveter
Mandrel
67±10
±
AUDIO & VISUAL SYSTEM FRONT NO.1 SPEAKER ASSY
AVENSIS REPAIR MANUAL (RM1018E)
FRONT NO.1 SPEAKER ASSY
REPLACEMENT
1. REMOVE REAR DOOR WINDOW REGULATOR HANDLE ASSY (W/O POWER WINDOW) (See page 75±8)
2.REMOVE FRONT DOOR LOWER FRAME BRACKET GARNISH LH (See page 75±8)
3.REMOVE FRONT DOOR TRIM BASE LH (See page 75±8)
4.REMOVE FUEL LID OPENER SWITCH (See page 75±8)
5. REMOVE POWER WINDOW REGULATOR SWITCH ASSY (W/ POWER WINDOW) (See page 75±8)
6.REMOVE FRONT DOOR TRIM BOARD SUB±ASSY LH (See page 75±8)
7. REMOVE FRONT NO.1 SPEAKER ASSY
(a) Disconnect the connector.
(b) Using a drill of less then � 4 mm (0.16 in.), drill out the 3
rivet heads and remove the front No.1 speaker assy from
the front door panel.
(c) Gently and vertically put the drill to the rivet, and cut the rivet flanges.
NOTICE:
�Prizing the hole with a drill can lead to damage to the
rivet hole or breaking the drill.
�Take care as the cut rivet is hot.
(d) Even if flange is taken off, continue drilling and push out remaining fragments with the drill.
(e) Using a vacuum cleaner, remove the drilled rivet and their
dust from the inside of the front door panel.
8. INSTALL FRONT NO.1 SPEAKER ASSY
(a) Using an air riveter or a hand riveter, install 3 new strike rivets to install the front No.1 speaker assy on the front
door panel.
NOTICE:
�Install the new strike rivet in order shown in the il-
lustration to install the front No.1 speaker assy.
�Do not prize a riveter, as the riveter could be dam-
aged, loosened and the mandrel could be bent.
Page 3142 of 5135
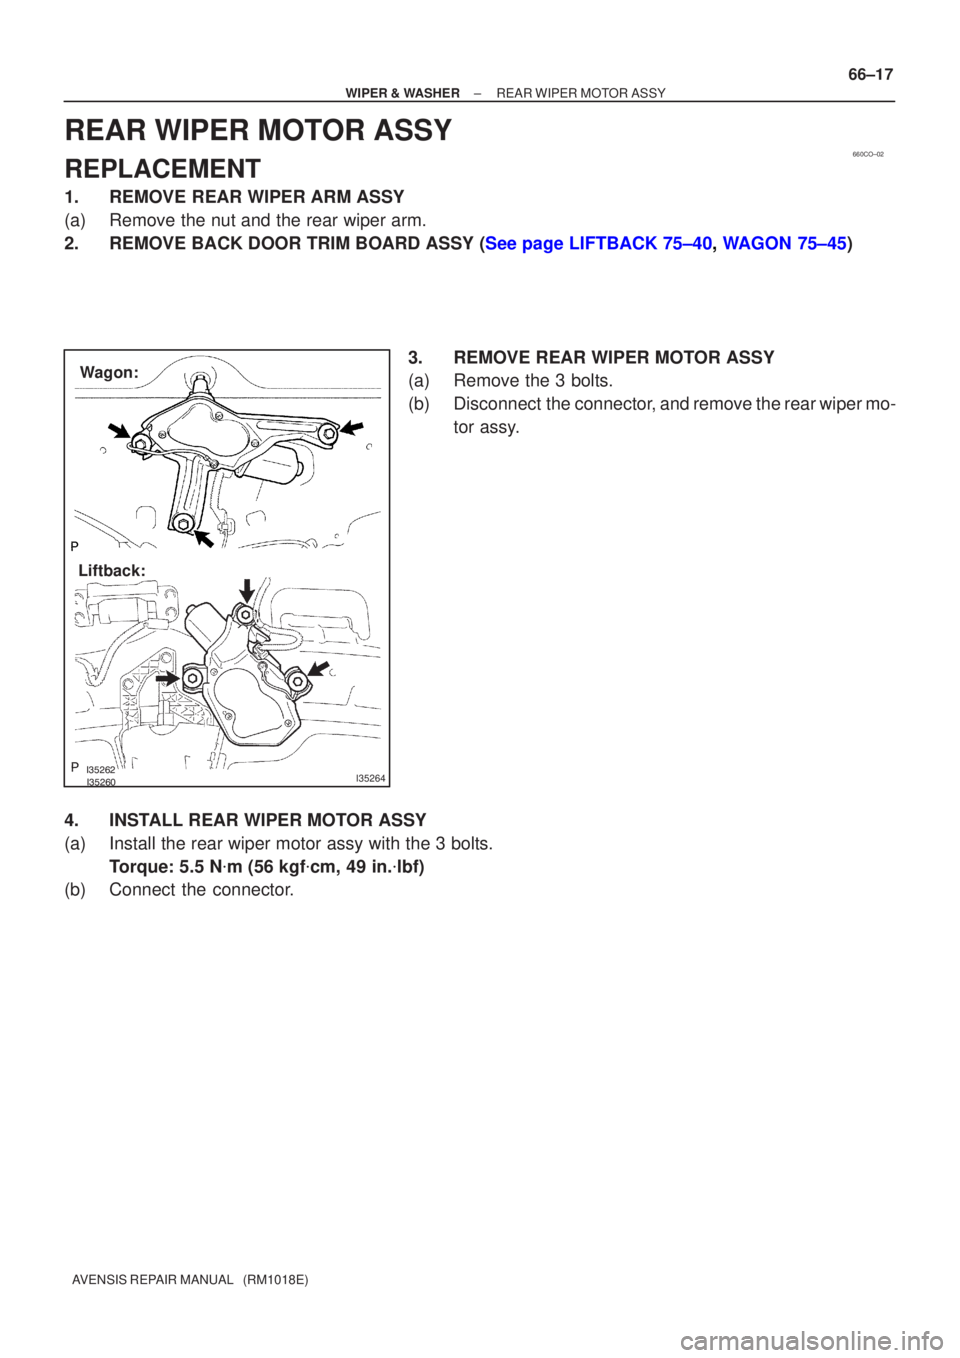
660CO±02
������������I35264
Wagon:
Liftback:
±
WIPER & WASHE R REAR WIPER MO TOR ASSY
66±17
A VENSIS RE PAIR MANUAL (RM1018E)
REA R WIPER MO TOR ASSY
REPLACEMENT
1 . REMOV E REAR WIPER ARM ASSY
(a ) Remove the nut and the rear wiper arm.
2 . REMOVE BACK DOOR TRIM BOARD ASSY ( See page LIFTBACK 75±40, W AGON 75±45 )
3. REMOVE REAR WIPER MOTOR ASSY
(a) Remove the 3 bolts.
(b) Disconnect the connector, and remove the rear wiper mo- tor assy.
4. INSTALL REAR WIPER MOTOR ASSY
(a) Install the rear wiper motor assy with the 3 bolts. Torque: 5.5 N �m (56 kgf �cm, 49 in. �lbf)
(b) Connect the connector.
Page 3168 of 5135

67±19
AVENSIS REPAIR MANUAL (RM1018E)
AMPLIFIER ANTENNA ASSY (WAGON MODELS)
REPLACEMENT
1. DISCONNEC T B ATTE RY NEG ATIVE T")
670SD±02
±
AUDIO & VISUAL SYSTEM AMPLIFIER ANTENNA ASSY (WAGON MODELS)
67±19
AVENSIS REPAIR MANUAL (RM1018E)
AMPLIFIER ANTENNA ASSY (WAGON MODELS)
REPLACEMENT
1. DISCONNEC T B ATTE RY NEG ATIVE TERMINAL ( See page 60±1)
2 . REMOVE INSTRUMENT CLUSTER FINISH P ANEL GARNISH NO.2 ( See page 71±11 )
3. REMOVE INSTRUMENT PANEL REGISTER ASSY CTR (W/ NAVIGATION SYSTEM) (See page 67±6 )
4 . REMOVE SHIFT LEVER KNOB SUB±ASSY (M/T TRANSAXLE) ( See page 41±11 )
5 . REMOVE CONSOLE PANEL SUB±ASSY UPPER ( See page 71±11 )
6 . REMOVE RADIO RECEIVER ASSEMB LY W/BRACKET ( See page 67±5)
7 . REMOVE CONSOLE BOX ASSY RR ( See page 71±11 )
8 . REMOVE HE ATER T O REGISTER DUCT NO.2 ( See page 71±11 )
9 . REMOVE FRONT SE AT ASSY RH ( See page POWER SE AT 72± 11 , MANUAL SE AT 72±16 )
10 . REMOVE FRONT DOOR SCUFF PL ATE RH ( See page 76±36 )
1 1 . REMOVE REAR DOOR SCUFF PL ATE RH ( See page 76±36 )
12 . REMOVE COWL SIDE TRIM BOARD RH ( See page 76±36)
13 . REMOVE FRONT DOOR OPENING TRIM WE ATHERSTRIP RH ( See page 76±36 )
14 . REMOVE REAR DOOR OPENING TRIM WE ATHERSTRIP RH ( See page 76±36 )
15. REMOVE REAR SEAT CUSHION ASSEMBLY (See page 40/60 FOLDING FLIP±UP CUSHION72±21 , 40/60 FOLDING 72±27 )
16. REMOVE REAR SEATBACK ASSY
(See page 40/60 FOLDING FLIP±UP CUSHION72±21 , 40/60 FOLDING 72±27 )
17. REMOVE REAR SIDE SEAT BACK ASSY RH (See page 40/60 FOLDING FLIP±UP CUSHION72±21 , 40/60 FOLDING 72±27 )
18. REMOVE TONNEAU COVER ASSY
19 . REMOVE BACK DOOR WE ATHERSTRIP ( See page 76±54 )
20 . REMOVE DECK BOARD SUB±ASSY ( See page 76±54)
21 . REMOVE DECK FLOOR BOX REAR ( See page 76±54)
22 . REMOVE DECK FLOOR BOX FRONT ( See page 76±54)
23 . REMOVE DECK FLOOR BOX RH ( See page 76±54)
24 . REMOVE REAR FLOOR FINISH PL ATE ( See page 76±54 )
25 . REMOVE DECK TRIM SIDE BOARD RH ( See page 76±54)
26 . REMOVE ROOF SIDE GARNISH INNER RH ( See page 76±54)
27. REMOVE FLOOR CARPET ASSY FRONT
Page 3174 of 5135

70±41
AVENSIS REPAIR MANUAL (RM1018E)
REPLACEMENT
HINT:
The installati")
700TA±01
B68025
Clip
Piano Wire
B69236
Protective Tape
BO4421
±
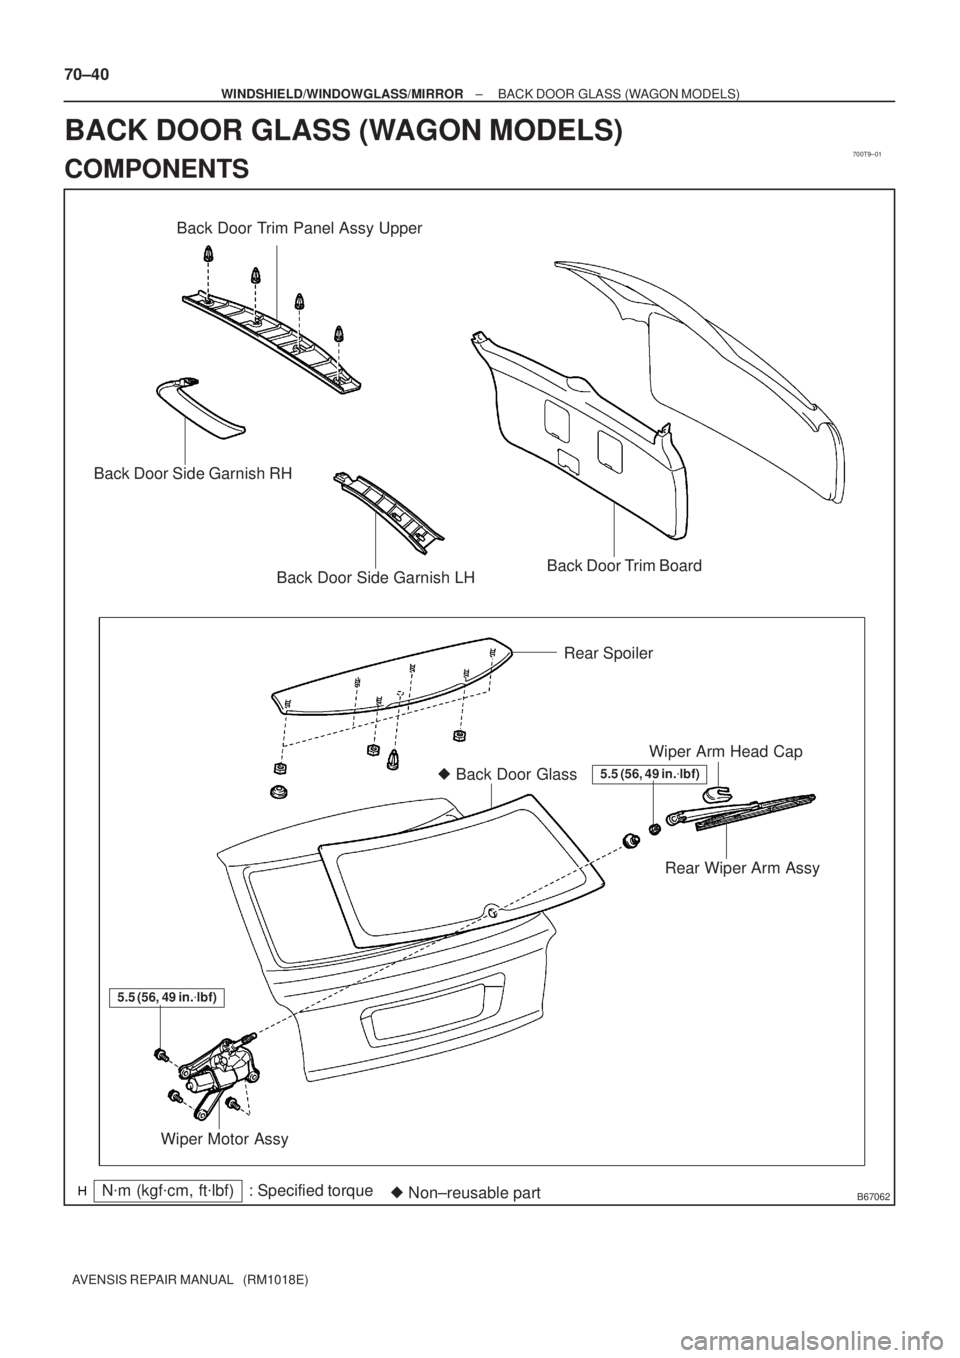
WINDSHIELD/WINDOWGLASS/MIRROR BACK DOOR GLASS (WAGON MODELS)
70±41
AVENSIS REPAIR MANUAL (RM1018E)
REPLACEMENT
HINT:
The installation is in the reverse order of the removal. However, when there is a special point concerning
the installation, it is indicated.
1.REMOVE BACK DOOR TRIM BOARD ASSY (See page 75±45)
(a) Remove the back door trim panel upper.
(b) Remove the back door side garnish LH.
(c) Remove the back door side garnish RH.
(d) Remove the back door trim board.
2.REMOVE REAR SPOILER (See page 76±30)
3.REMOVE REAR WIPER MOTOR ASSY (See page 66±17)
(a) Remove the wiper arm head cap.
(b) Remove the rear wiper arm.
(c) Remove the wiper motor.
4. REMOVE BACK DOOR GLASS
(a) Pass a piano wire between the body and glass from theinterior.
(b) Tie both wire ends to wooden blocks or similar objects.
HINT:
Apply protective tape to the outer surface to prevent the surface
from being scratched.
NOTICE:
When separating the glass, take care not to damage the
paint and interior and exterior ornaments.
(c) Cut off the adhesive by pulling the piano wire around it.
(d) Using a suction rubber, remove the glass.
NOTICE:
Leave as much adhesive on the body as possible when re-
moving the glass.
5. CLEAN BACK DOOR GLASS
(a) Clean the outer circumference of the glass with white gas- oline.
NOTICE:
�Do not touch the glass surface after cleaning it.
�Be careful not to damage the body.
Page 3179 of 5135
700T9±01
B67062
Back Door Trim Panel Assy Upper
Back Door Side Garnish RH
Back Door Side Garnish LHBack Door Trim Board
Rear Spoiler
� Back Door Glass
Wiper Motor AssyRear Wiper Arm Assy Wiper Arm Head Cap
: Specified torqueN�m (kgf�cm, ft�lbf)
� Non±reusable part
5.5 (56, 49 in.�lbf)
5.5 (56, 49 in.�lbf)
70±40
± WINDSHIELD/WINDOWGLASS/MIRRORBACK DOOR GLASS (WAGON MODELS)
AVENSIS REPAIR MANUAL (RM1018E)
BACK DOOR GLASS (WAGON MODELS)
COMPONENTS

CENTER STOP LAMP ASSY
REPLACEMENT
1.REMOVE REAR SPOILER (WAGON MODELS) (See page")

REAR SPEAKER ASSY NO.2
REPLACEMENT
1. REMOVE REAR DOOR WINDOW REGULATOR HANDLE ASSY (W/O POWER")