Page 3409 of 5135
750N3±01
B55944
B55945
± ENGINE HOOD/DOORLUGGAGE DOOR HINGE TORSION BAR
75±35
AVENSIS REPAIR MANUAL (RM1018E)
LUGGAGE DOOR HINGE TORSION BAR
REPLACEMENT
HINT:
�The installation is in the reverse order of the removal. However, when there is a special point concern-
ing the installation, it is indicated.
�Use the same procedures on the RH side as on the LH side.
�After removing the torsion bar, opening and closing door operation should be carried out while holding
the door with your hand in order to perform an accurate test by providing sliding resistance.
�The RH side torsion bar is on the upper side and the LH side torsion bar is on the lower side, thus the
installation should be performed in the order of RH to LH and removal should be performed in the order
of LH to RH.
1. REMOVE LUGGAGE DOOR HINGE TORSION BAR LH
(a) Remove the floor carpet.
(b) Remove the floor finish plate.
(1) Remove the 2 screws and 2 No. 2 trim hooks.
(2) Remove the 2 bolts and rope hook assy
(3) Using a clip remover, remove the 2 clips and floor
finish plate.
(c) Remove the clips and trim cover inner LH and RH.
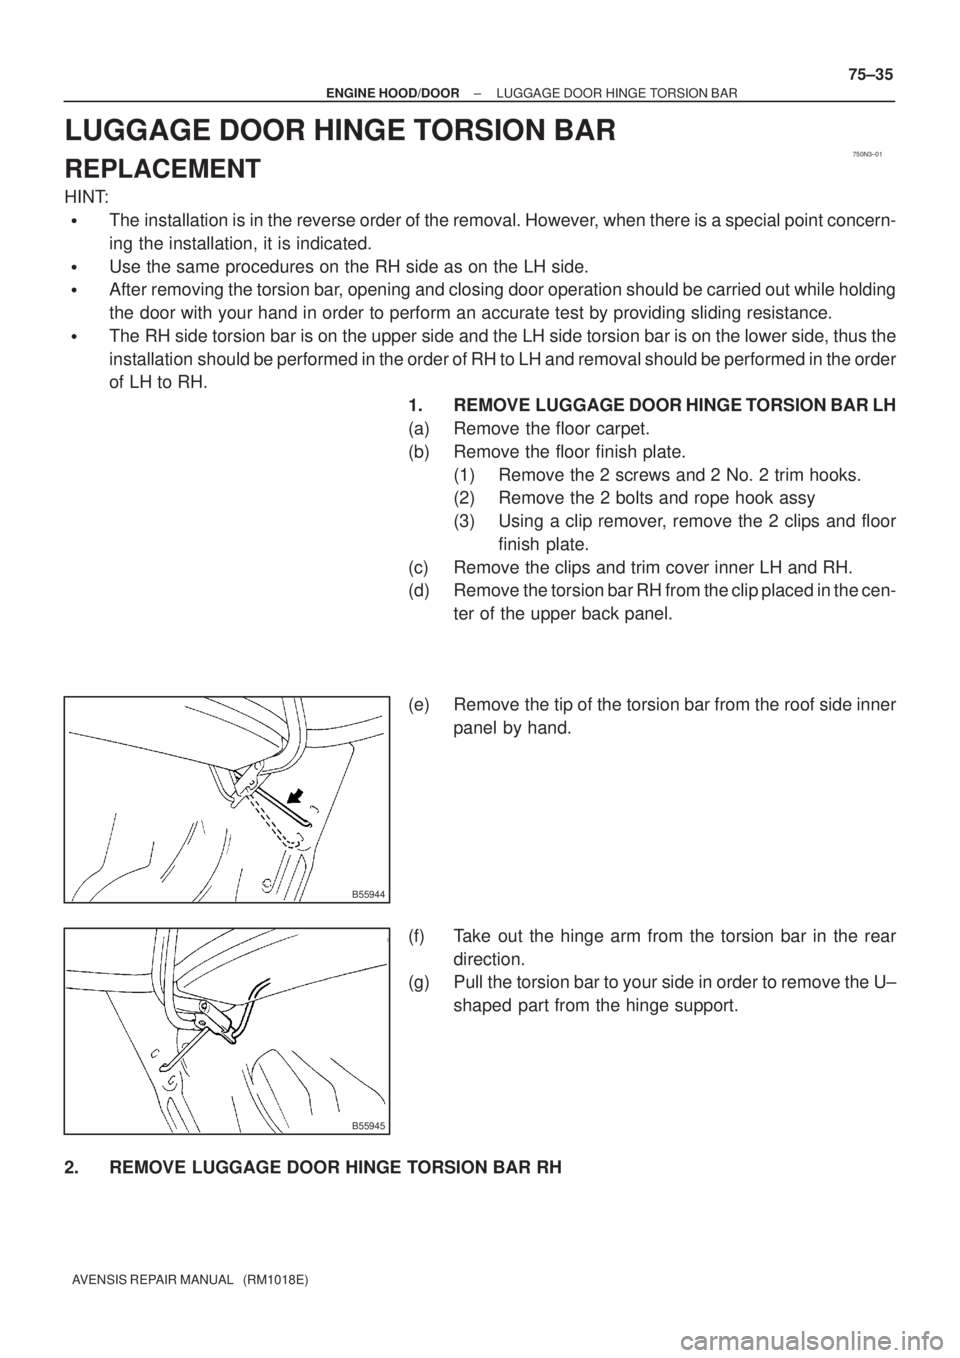
(d) Remove the torsion bar RH from the clip placed in the cen-
ter of the upper back panel.
(e) Remove the tip of the torsion bar from the roof side inner
panel by hand.
(f) Take out the hinge arm from the torsion bar in the rear
direction.
(g) Pull the torsion bar to your side in order to remove the U±
shaped part from the hinge support.
2. REMOVE LUGGAGE DOOR HINGE TORSION BAR RH
Page 3411 of 5135
760WZ±01
B70684
Front Pillar Garnish RH
Cowl Side Trim
Board RH
Front Door Opening Trim
Weatherstrip RH
Front Door
Scuff Plate RH
Center Pillar Garnish
Lower RH
Center Pillar Garnish
Upper RH
Rear Door
Opening Trim
Weatherstrip RH
Rear Door Scuff Plate RH
Front Door Scuff Plate LH
Rear Door Scuff Plate LH
Cowl Side Trim
Board LHFront Door Opening Trim
Weatherstrip LH
Rear Door
Opening Trim
Weatherstrip LH
Center Pillar Garnish Lower LH
Deck Floor
Box Rear
Tonneau Cover
Assy
Deck Board
Sub±assy
Deck Floor
Box Front
Deck Floor
Box RH
Deck Floor
Box LH
Deck Trim
Side Board RH
Deck Trim Side Board LH
Roof Side
Garnish Inner RH
Roof Side
Garnish Inner LHRear Window Side
Garnish RH
Rear Window Side
Garnish LH Center Pillar
Garnish
Upper LH
Front Pillar
Garnish LH
N�m (kgf�cm ft�lbf): Specified torque
41.2 (420, 30)
41.2 (420, 30)
± EXTERIOR/INTERIOR TRIMROOF HEADLINING ASSY (WAGON MODELS)
76±51
AVENSIS REPAIR MANUAL (RM1018E)
ROOF HEADLINING ASSY (WAGON MODELS)
COMPONENTS
Page 3414 of 5135
760WW±01
B66532
Clip
Claw
B66531
Clip
Claw
B66533
Clip
Claw
± EXTERIOR/INTERIOR TRIMROOF HEADLINING ASSY (LIFTBACK MODELS)
76±45
AVENSIS REPAIR MANUAL (RM1018E)
REPLACEMENT
HINT:
The installation is in the reverse order of the removal. However, when there is a special point concerning
the installation, it is indicated.
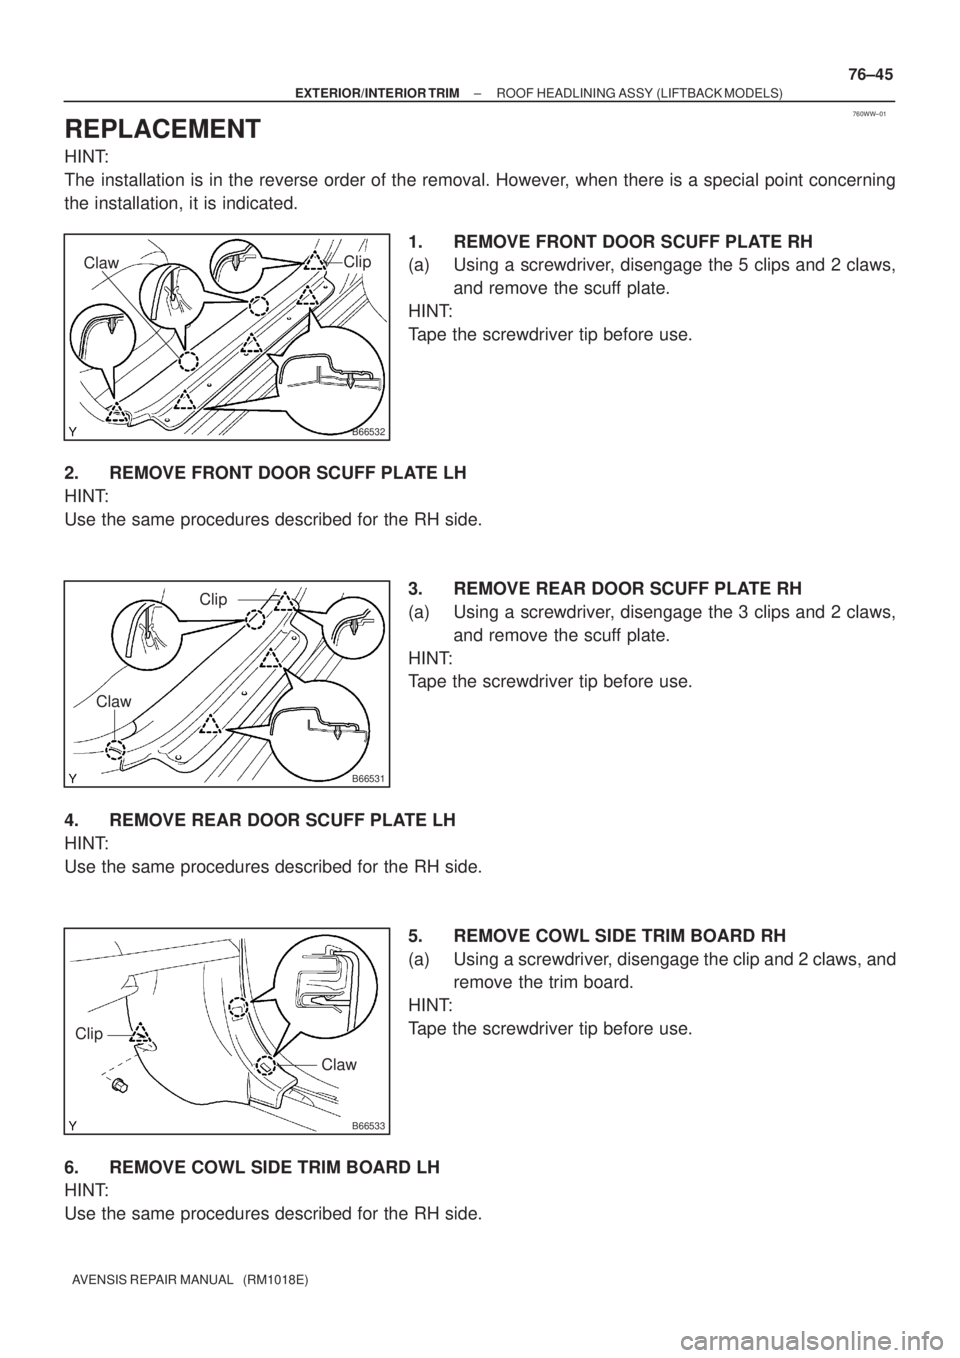
1. REMOVE FRONT DOOR SCUFF PLATE RH
(a) Using a screwdriver, disengage the 5 clips and 2 claws,
and remove the scuff plate.
HINT:
Tape the screwdriver tip before use.
2. REMOVE FRONT DOOR SCUFF PLATE LH
HINT:
Use the same procedures described for the RH side.
3. REMOVE REAR DOOR SCUFF PLATE RH
(a) Using a screwdriver, disengage the 3 clips and 2 claws,
and remove the scuff plate.
HINT:
Tape the screwdriver tip before use.
4. REMOVE REAR DOOR SCUFF PLATE LH
HINT:
Use the same procedures described for the RH side.
5. REMOVE COWL SIDE TRIM BOARD RH
(a) Using a screwdriver, disengage the clip and 2 claws, and
remove the trim board.
HINT:
Tape the screwdriver tip before use.
6. REMOVE COWL SIDE TRIM BOARD LH
HINT:
Use the same procedures described for the RH side.
Page 3415 of 5135
B66534
B66535
Clip
B66527
Clip
76±46
±
EXTERIOR/INTERIOR TRIM ROOF HEADLINING ASSY(LIFTBACK MODELS)
AVENSIS REPAIR MANUAL (RM1018E)
7.REMOVE FRONT DOOR OPENING TRIM WEATHERSTRIP RH
8.REMOVE FRONT DOOR OPENING TRIM WEATHERSTRIP LH
9.REMOVE REAR DOOR OPENING TRIM WEATHERSTRIP RH
10.REMOVE REAR DOOR OPENING TRIM WEATHERSTRIP LH 11.REMOVE CENTER PILLAR GARNISH LOWER RH
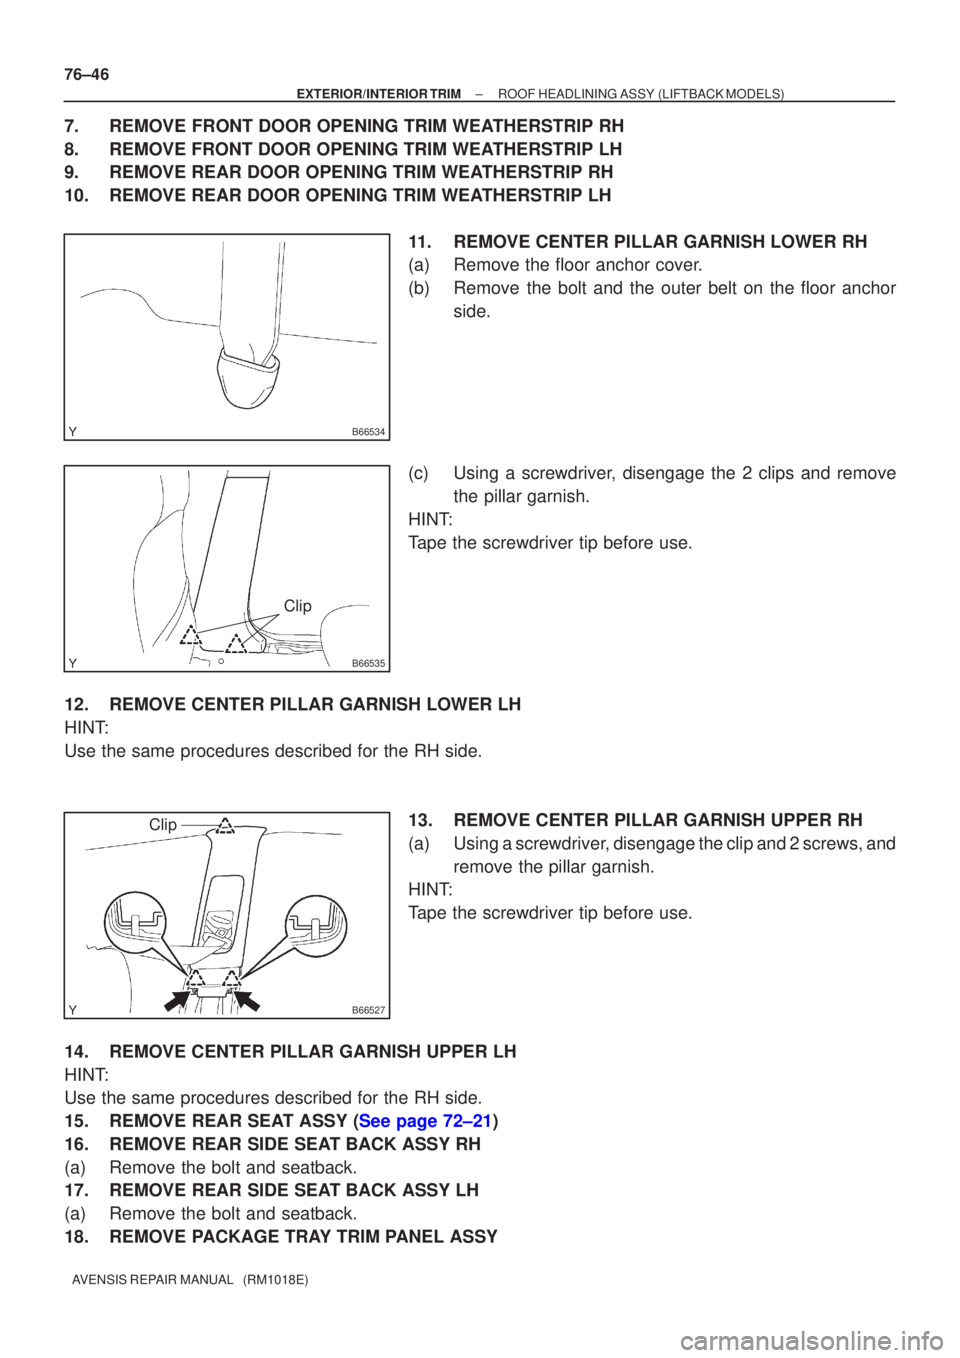
(a)Remove the floor anchor cover.
(b)Remove the bolt and the outer belt on the floor anchorside.
(c)Using a screwdriver, disengage the 2 clips and remove the pillar garnish.
HINT:
Tape the screwdriver tip before use.
12.REMOVE CENTER PILLAR GARNISH LOWER LH
HINT:
Use the same procedures described for the RH side. 13.REMOVE CENTER PILLAR GARNISH UPPER RH
(a)Using a screwdriver, disengage the clip and 2 screws, andremove the pillar garnish.
HINT:
Tape the screwdriver tip before use.
14.REMOVE CENTER PILLAR GARNISH UPPER LH
HINT:
Use the same procedures described for the RH side.
15.REMOVE REAR SEAT ASSY (See page 72±21)
16. REMOVE REAR SIDE SEAT BACK ASSY RH
(a) Remove the bolt and seatback.
17. REMOVE REAR SIDE SEAT BACK ASSY LH
(a) Remove the bolt and seatback.
18. REMOVE PACKAGE TRAY TRIM PANEL ASSY
Page 3420 of 5135
760WV±01
B70682
Roof Side Garnish Inner RH
Front Pillar Garnish RH
Front Door Opening Trim Weatherstrip RH
Center Pillar Garnish RHRear Door Opening Trim Weatherstrip RH
Front Door
Scuff Plate RH
Rear Door Scuff
Plate RH
Cowl Side Trim Board RH
41.2 (420, 30)Center Pillar Garnish
Lower RH
Front Pillar Garnish LH
Front Door Opening Trim
Weatherstrip LH
Cowl Side Trim Board LH
Front Door Scuff Plate LH
Center Pillar Garnish Lower LH
Rear Door Scuff Plate LH
Center Pillar Garnish LH
Rear Door Opening Trim
Weatherstrip LH
Roof Side Garnish Inner LH
Package Tray
Trim Panel Assy
N�m (kgf�cm ft�lbf): Specified torque
41.2 (420, 30)
Rear Floor Finish Plate
Deck Trim Side
Panel Assy RH
Deck Trim Side
Board LH
Rear Headlining Sub±assy 76±42
± EXTERIOR/INTERIOR TRIMROOF HEADLINING ASSY (LIFTBACK MODELS)
AVENSIS REPAIR MANUAL (RM1018E)
ROOF HEADLINING ASSY (LIFTBACK MODELS)
COMPONENTS
Page 3423 of 5135
760WU±01
B66532
Clip
Claw
B66531
Clip
Claw
B66533
Clip
Claw
76±36
± EXTERIOR/INTERIOR TRIMROOF HEADLINING ASSY (SEDAN MODELS)
AVENSIS REPAIR MANUAL (RM1018E)
REPLACEMENT
HINT:
The installation is in the reverse order of the removal. However, when there is a special point concerning
the installation, it is indicated.
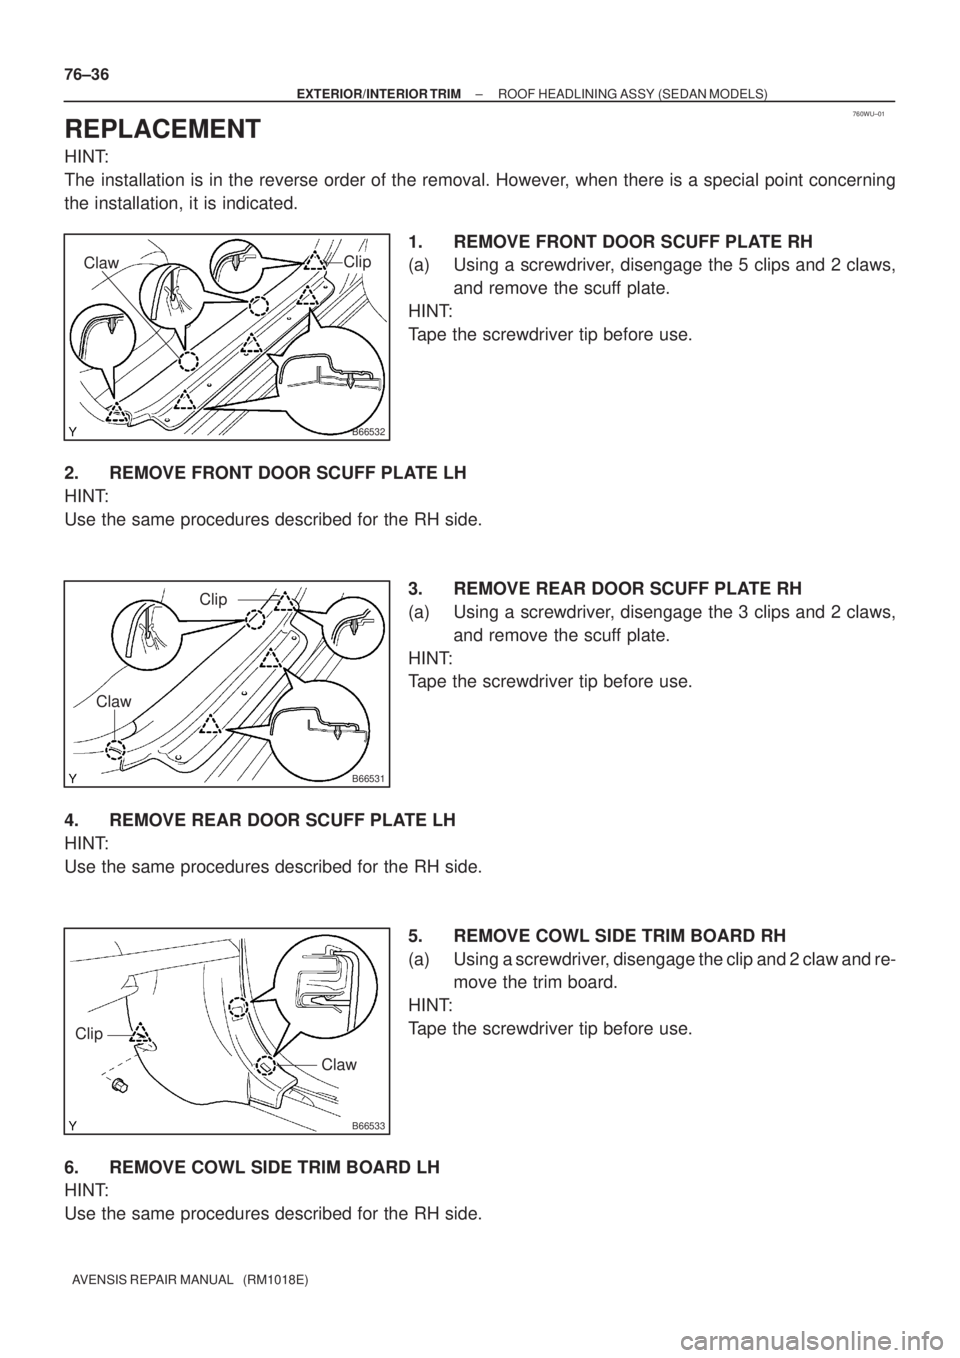
1. REMOVE FRONT DOOR SCUFF PLATE RH
(a) Using a screwdriver, disengage the 5 clips and 2 claws,
and remove the scuff plate.
HINT:
Tape the screwdriver tip before use.
2. REMOVE FRONT DOOR SCUFF PLATE LH
HINT:
Use the same procedures described for the RH side.
3. REMOVE REAR DOOR SCUFF PLATE RH
(a) Using a screwdriver, disengage the 3 clips and 2 claws,
and remove the scuff plate.
HINT:
Tape the screwdriver tip before use.
4. REMOVE REAR DOOR SCUFF PLATE LH
HINT:
Use the same procedures described for the RH side.
5. REMOVE COWL SIDE TRIM BOARD RH
(a) Using a screwdriver, disengage the clip and 2 claw and re-
move the trim board.
HINT:
Tape the screwdriver tip before use.
6. REMOVE COWL SIDE TRIM BOARD LH
HINT:
Use the same procedures described for the RH side.
Page 3424 of 5135
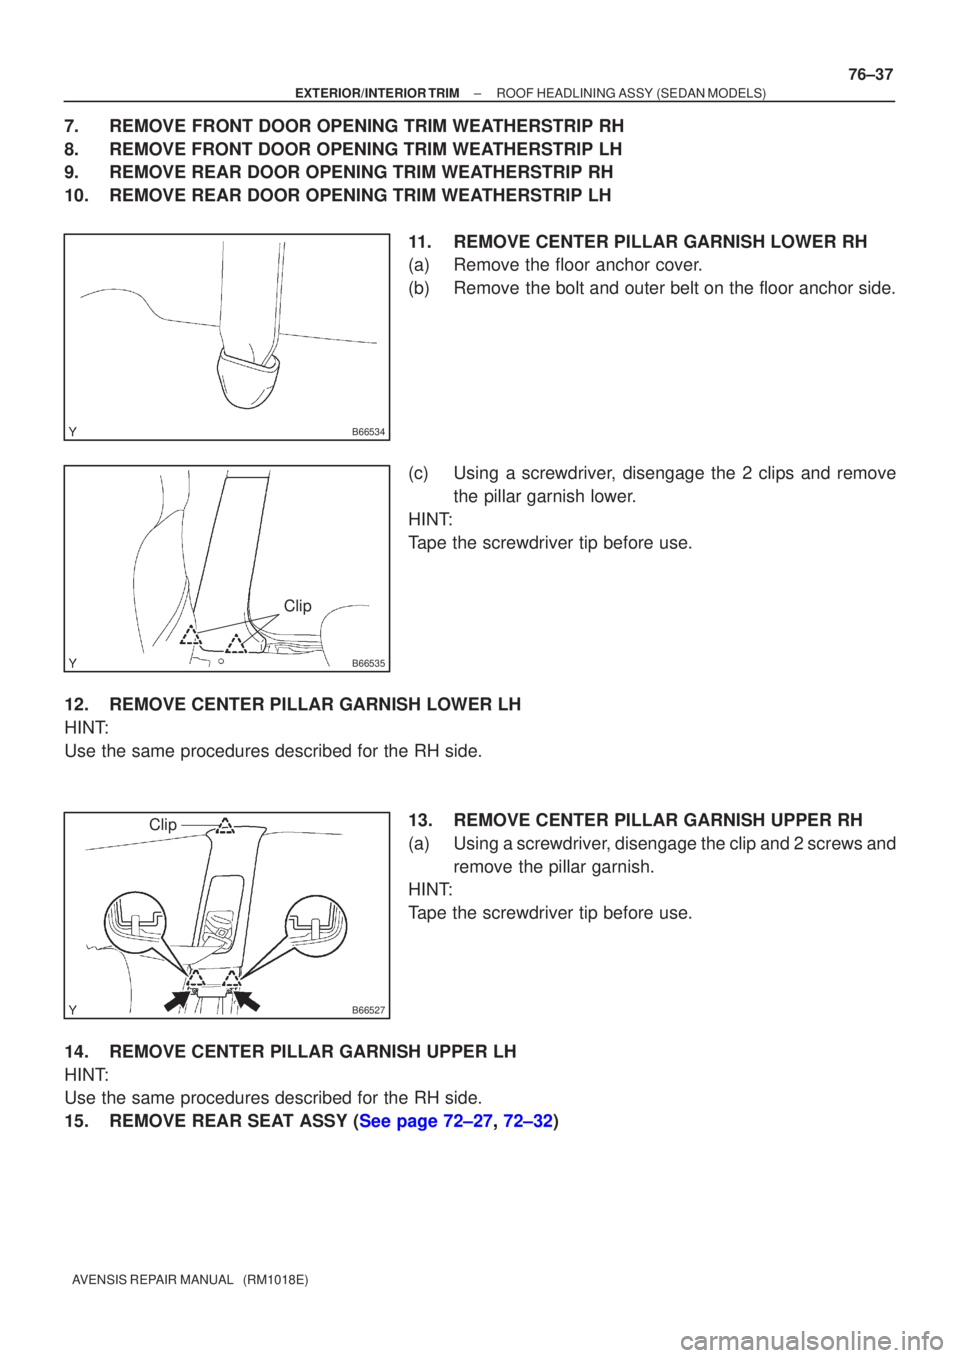
B66534
B66535
Clip
B66527
Clip
±
EXTERIOR/INTERIO R TRI M ROOF HEADLINING ASS Y(SEDAN MODELS)
76±37
A VENSIS RE PAIR MANUAL (RM1018E)
7. REMOV E FRONT DOOR OPENING TRIM WE ATHERSTRIP RH
8 . REMOVE FRONT DOOR OPENING TRIM WE ATHERSTRIP LH
9 . REMOVE REAR DOOR OPENING TRIM WE ATHERSTRIP RH
10 . REMOVE REAR DOOR OPENING TRIM WE ATHERSTRIP LH
1 1 . REMOVE CENTER PILLAR GARNISH LOWER RH
(a ) Remove the floor anchor cove r.
(b ) Remove the bolt and outer belt on the floor anchor side.
(c ) Usin g a screwdrive r, disengage the 2 clips and remove
th e pillar garnish lowe r.
HIN T:
T ape the screwdriver tip before use.
12 . REMOVE CENTER PILLAR GARNISH LOWER LH
HIN T:
Use the same procedures described for the RH side.
13. REMOVE CENTER PILLAR GARNISH UPPER RH
(a ) Usin g a screwdrive r, disengage the clip and 2 screws and
remov e the pillar garnish.
HIN T:
T ape the screwdriver tip before use.
14 . REMOVE CENTER PILLAR GARNISH UPPER LH
HIN T:
Use the same procedures described for the RH side.
15 . REMOVE REAR SE AT ASSY ( See page 72±27 , 72±32 )
Page 3429 of 5135
760WT±01
B66561
Roof Side Garnish Inner RH
Front Pillar Garnish RH
Front Door Opening Trim Weatherstrip RH
Center Pillar Garnish RH
Rear Door Opening Trim Weatherstrip RH
Front Door
Scuff Plate RH
Rear Door Scuff
Plate RH
Cowl Side Trim Board RH
41.2 (420, 30)
Center Pillar Garnish
Lower RH
Front Pillar Garnish LH
Front Door Opening Trim
Weatherstrip LH
Cowl Side Trim Board LH
Front Door Scuff Plate LH
Center Pillar Garnish Lower LH
Rear Door Scuff Plate LH
Center Pillar Garnish LH
Rear Door Opening Trim
Weatherstrip LH
Roof Side Garnish Inner LH
Package Tray
Trim Panel Assy
N�m (kgf�cm ft�lbf): Specified torque
41.2 (420, 30)
± EXTERIOR/INTERIOR TRIMROOF HEADLINING ASSY (SEDAN MODELS)
76±33
AVENSIS REPAIR MANUAL (RM1018E)
ROOF HEADLINING ASSY (SEDAN MODELS)
COMPONENTS