Page 3180 of 5135

70±35
AVENSIS REPAIR MANUAL (RM1018E)
REPLACEMENT
HINT:
The installation i")
700T8±01
B68025
Piano Wire
Clip
B69235
Protective Tape
±
WINDSHIELD/WINDOWGLASS/MIRROR BACK DOOR GLASS (LIFTBACK MODELS)
70±35
AVENSIS REPAIR MANUAL (RM1018E)
REPLACEMENT
HINT:
The installation is in the reverse order of the removal. However, when there is a special point concerning
the installation, it is indicated.
1.REMOVE BACK DOOR TRIM BOARD ASSY (See page 75±40)
(a) Remove the back door trim panel assy upper.
(b) Remove the back door side garnish LH.
(c) Remove the back door side garnish RH.
(d) Remove the back door trim board.
2.REMOVE CENTER STOP LAMP ASSY (See page 65±26)
3.REMOVE REAR WIPER MOTOR ASSY (
See page 66±17)
(a) Remove the wiper arm head cap.
(b) Remove the rear wiper arm.
(c) Remove the wiper motor.
4. REMOVE BACK DOOR GLASS
(a) Pass a piano wire between the body and glass from theinterior.
(b) Tie both wire ends to wooden blocks or similar objects.
HINT:
Apply protective tape to the outer surface to prevent the surface
from being scratched.
NOTICE:
When separating the glass, take care not to damage the
paint and interior and exterior ornaments.
(c) Cut off the adhesive by pulling the piano wire around the glass.
(d) Using a suction rubber, remove the glass.
NOTICE:
Leave as much adhesive on the body as possible when re-
moving the glass.
Page 3185 of 5135
700T7±01
B67059
Back Door Side Garnish RH
Center Stop Lamp Assy
Back Door Trim Board
Back Door Side Garnish LH Back Door Trim
Panel Assy Upper
Wiper Arm Head Cap
Rear Wiper Arm Assy
Wiper Motor Assy� Back Door Glass
: Specified torque
N�m (kgf�cm, ft�lbf)
� Non±reusable part
5.5 (56, 49 in.�lbf)5.5 (56, 49 in.�lbf)
5.5 (56, 49 in.�lbf)
70±34
± WINDSHIELD/WINDOWGLASS/MIRRORBACK DOOR GLASS (LIFTBACK MODELS)
AVENSIS REPAIR MANUAL (RM1018E)
BACK DOOR GLASS (LIFTBACK MODELS)
COMPONENTS
Page 3186 of 5135

AVENSIS REPAIR MANUAL (RM1018E)
REPLACEMENT
HINT:
The installation is in th")
700T6±01
B50453
CutCut
B62805
Stopper
Piano Wire
70±28
±
WINDSHIELD/WINDOWGLASS/MIRROR BACK WINDOW GLASS (SEDAN MODELS)
AVENSIS REPAIR MANUAL (RM1018E)
REPLACEMENT
HINT:
The installation is in the reverse order of the removal. However, when there is a special point concerning
the installation, it is indicated.
1 . REMOVE REAR SE AT CUSHION ASSY ( See page 72±27 or 72±32 )
2 . REMOVE REAR SE ATBACK ASSY ( See page 72±27 or 72±32 )
3 . REMOVE ROOF HEADLINING ASSY ( See page 76±36)
(a) Remove the rear door weatherstrip LH.
(b) Remove the rear door weatherstrip RH.
(c) Remove the roof side garnish inner LH.
(d) Remove the roof side garnish inner RH.
(e) Remove the 2 assist grips.
(f) Remove the rear map lamp.
(g) Remove the roof headlining assy.
4 . REMOVE CENTER S TOP LAMP ASSY ( See page 65±26)
5 . REMOVE P ACKAGE TR AY TRIM P ANEL ASSY ( See page 61±15 )
6. REMOVE BACK WINDOW MOULDING OUTSIDE UPPER
(a) Using a knife, cut off the moulding, as shown in the il- lustration.
NOTICE:
Do not damage the vehicle body with the knife.
(b) Remove the remaining moulding.
HINT:
When removing, make a partial cut, then pull and remove it by
hand.
7. REMOVE BACK WINDOW GLASS
(a) Pass a piano wire between the vehicle body and glass
from the interior.
(b) Tie both wire ends to wooden blocks or similar objects.
Page 3192 of 5135
700T5±01
B67036
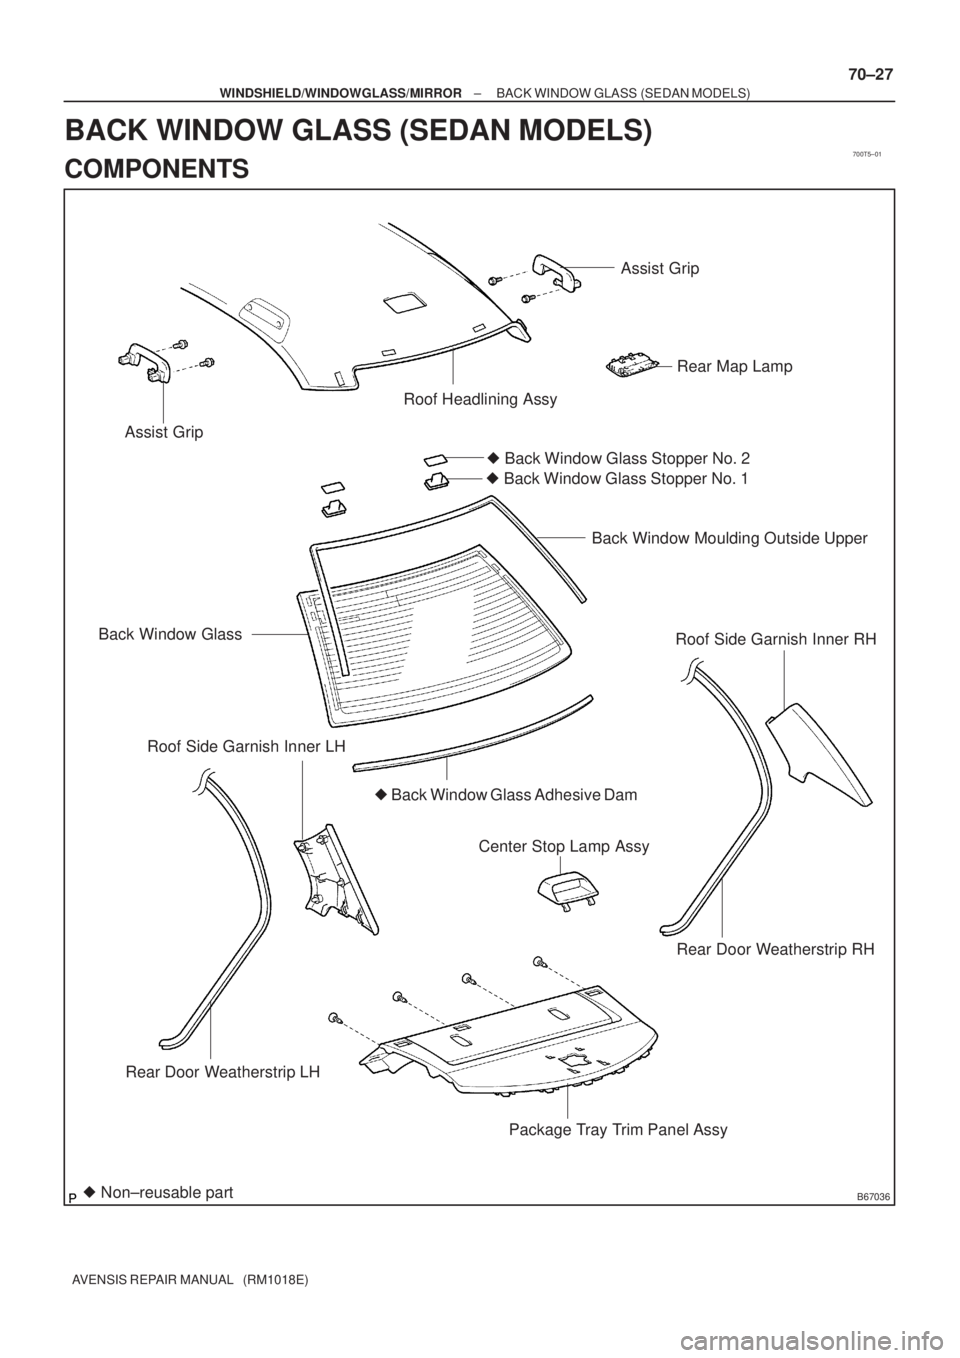
Assist Grip
Roof Headlining Assy
� Back Window Glass Stopper No. 2
Back Window Moulding Outside Upper
Center Stop Lamp AssyRoof Side Garnish Inner RH
Rear Door Weatherstrip RH
Package Tray Trim Panel Assy Rear Door Weatherstrip LH� Back Window Glass Stopper No. 1
� Back Window Glass Adhesive Dam
Roof Side Garnish Inner LH
� Non±reusable partBack Window Glass
Assist Grip
Rear Map Lamp
± WINDSHIELD/WINDOWGLASS/MIRRORBACK WINDOW GLASS (SEDAN MODELS)
70±27
AVENSIS REPAIR MANUAL (RM1018E)
BACK WINDOW GLASS (SEDAN MODELS)
COMPONENTS
Page 3193 of 5135

70±23
AVENSIS REPAIR MANUAL (RM1018E)
REPLACEMENT
HINT:
�The inst")
700T4±01
B68022
Piano Wire
Clip
Clip
B68023
Protective Tape
±
WINDSHIELD/WINDOWGLASS/MIRROR QUARTER WINDOW ASSY LH (WAGON MODELS)
70±23
AVENSIS REPAIR MANUAL (RM1018E)
REPLACEMENT
HINT:
�The installation is in the reverse order of the removal. However, when there is a special point concern-
ing the installation, it is indicated.
�Use the same procedures on the RH side as on the LH side.
1.REMOVE REAR WINDOW SIDE GARNISH LH (See page 76±54)
(a) Remove the rear door opening trim weatherstrip LH
(b) Remove the rear door scuff plate.
(c) Remove the tonneau cover.
(d) Remove the deck board.
(e) Remove the deck floor box rear.
(f) Remove the deck floor box.
(g) Remove the deck floor box front.
(h) Remove the rear floor finish plate.
(i) Remove the roof headlining retainer front.
(j) Remove the luggage compartment trim hook No. 2.
(k) Remove the deck trim side board.
(l) Remove the roof side garnish inner.
(m) Remove the rear window side garnish.
2. REMOVE QUARTER WINDOW ASSY LH
(a) Disconnect the connectors.
(b) Pass a piano wire between the vehicle body and glassfrom the interior.
(c) Tie both wire ends to wooden blocks or similar objects.
HINT:
Apply protective tape to the outer surface to prevent the surface
from being scratched.
NOTICE:
When separating the glass, take care not to damage the
paint and the interior and exterior ornaments.
(d) Cut off the adhesive by pulling the piano wire around the glass.
(e) Using a suction rubber, remove the glass.
NOTICE:
Leave as much adhesive on the body as possible when re-
moving the glass.
Page 3197 of 5135
700T3±01
B67165
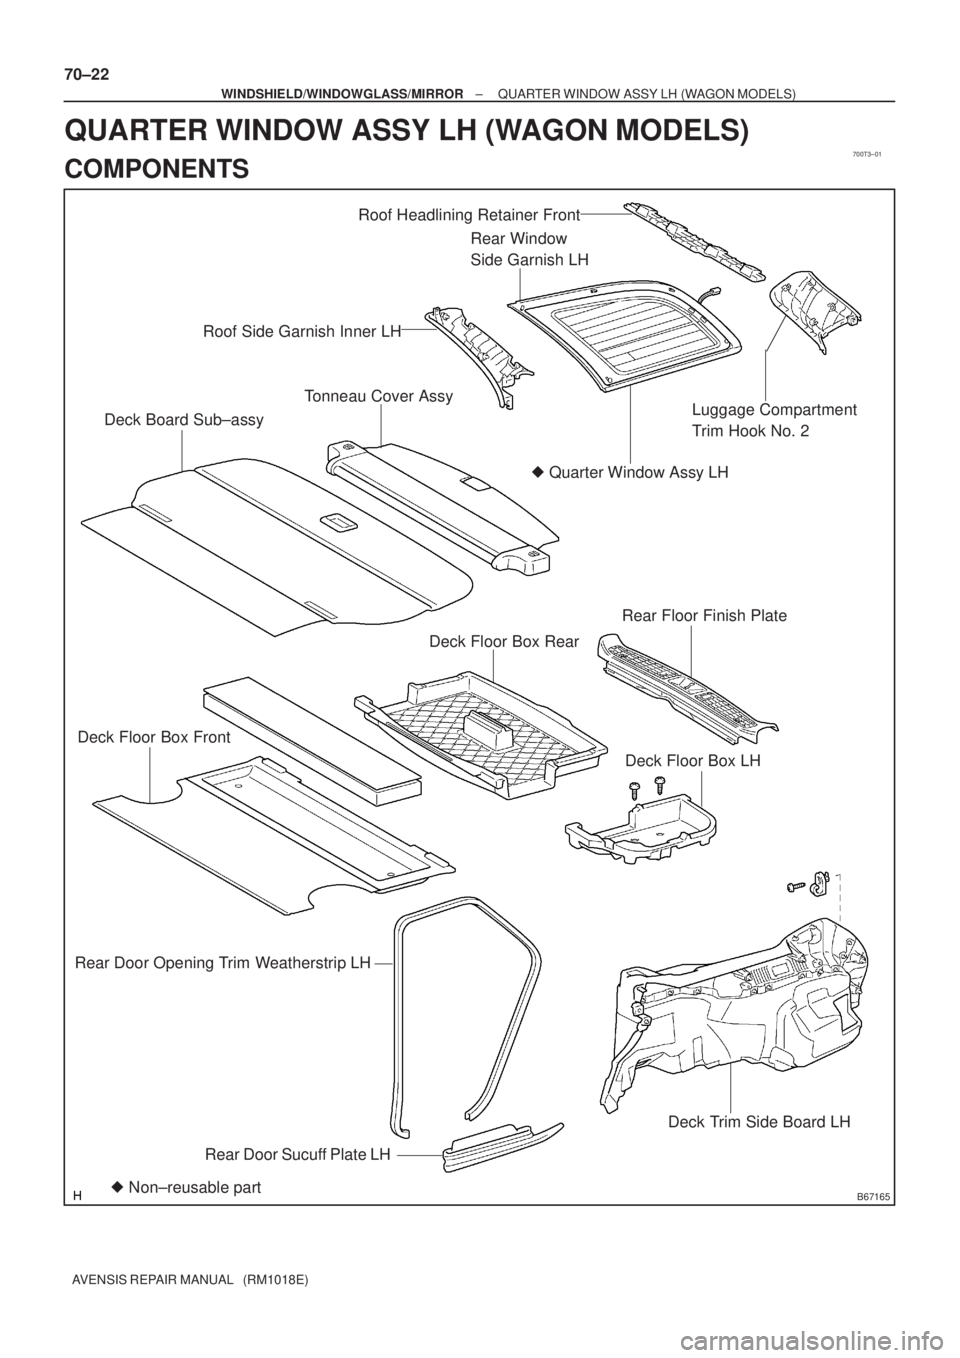
Roof Side Garnish Inner LH
Deck Trim Side Board LH � Quarter Window Assy LH Rear Window
Side Garnish LH
Luggage Compartment
Trim Hook No. 2
� Non±reusable partTonneau Cover Assy
Deck Board Sub±assy
Deck Floor Box Front
Deck Floor Box LH
Rear Floor Finish Plate
Deck Floor Box Rear
Roof Headlining Retainer Front
Rear Door Opening Trim Weatherstrip LH
Rear Door Sucuff Plate LH
70±22
± WINDSHIELD/WINDOWGLASS/MIRRORQUARTER WINDOW ASSY LH (WAGON MODELS)
AVENSIS REPAIR MANUAL (RM1018E)
QUARTER WINDOW ASSY LH (WAGON MODELS)
COMPONENTS
Page 3233 of 5135
B66038
Heater to Register Duct No.2
Instrument Panel Lower Assy
Cowl Side Trim
Board RH
Front Door
Scuff Plate
RH
Floor Shift
Shift Lever
Knob Sub±assy Console Panel
Sub±assy Upper
Console Panel Sub±assy Lower
Console Box Assy RR Front Door
Scuff Plate LHCowl Side Trim
Board LH
Instrument Panel Airbag Assy
Console Rear End
Panel
Radio Receiver
Assembly w/ Bracket
Windshield
Wiper Switch Assy
Instrument Panel
Hole CoverHead lamp
Dimmer Switch Assy
Instrument Panel Under
Cover Sub±assy No.2
Horn Button Assy Steering Wheel Assy
Instrument Panel Under Cover
Sub±assy No.1
H
N´m (kgf´cm, ft´lbf) : Specified torqueM/T Transaxle: A/T Transaxle:
A/T Only:
M/T Only:
50 (510, 37)
8.8 (90, 78 in.´lbf)
orEF
D
B
Bor
EF
I
or
EF
or
EF
H
HH
H
H
HH
H
H
CC
CC
H
HConsole Panel
Sub±assy Upper
18 (184, 13)
18 (184, 13)
71±8
± INSTRUMENT PANEL/METERINSTRUMENT PANEL/METER
AVENSIS REPAIR MANUAL (RM1018E)
Page 3241 of 5135

OUTER REAR VIEW MIRROR ASSY LH
REPLACEMENT
HINT:
�The installation is i")
700TI±01
B68929
B68929
±
WINDSHIELD/WINDOWGLASS/MIRROR OUTER REAR VIEW MIRROR ASSY LH
70±65
AVENSIS REPAIR MANUAL (RM1018E)
OUTER REAR VIEW MIRROR ASSY LH
REPLACEMENT
HINT:
�The installation is in the reverse order of the removal. However, when there is a special point concern-
ing the installation, it is indicated.
�Use the same procedures on the RH side as on the LH side.
1.REMOVE FRONT DOOR HOLE COVER SUB±ASSY NO.1 LH (See page 75±8)
(a) Remove the front door lower frame bracket garnish.
(b) Remove the front door trim base.
(c) Only driver side: Remove the fuel lid opener switch.
(d) w/ Power window: Remove the power window regulator switch.
(e) Remove the front door trim board sub.
(f) Remove the front door inside handle.
(g) remove the front service hole cover No. 1.
2. REMOVE OUTER REAR VIEW MIRROR ASSY LH
(a) Disconnect the connector.
(b) Remove the 3 screws and mirror .
3. INSTALL OUTER REAR VIEW MIRROR ASSY LH
(a) Install the mirror with the 3 screws.Torque: 10 N �m (102 kgf �cm, 7 ft �lbf)
(b) Connect the connector.