Page 3376 of 5135
B66546 B66546
Front Pillar Garnish RH
Cowl Side Trim
Board RH
Front Door Opening Trim
Weatherstrip RH
Front Door
Scuff Plate RH
Center Pillar Garnish
Lower RH
Center Pillar Garnish
Upper RH
Rear Door
Opening Trim
Weatherstrip RH
Rear Door
Scuff Plate RH
Front Door
Scuff Plate LH
Rear Door
Scuff Plate LH
Cowl Side Trim
Board LH
Front Door Opening Trim
Weatherstrip LHRear Door
Opening Trim
Weatherstrip LH
Center Pillar
Garnish
Lower LH Deck Floor
Box Rear
Tonneau Cover
Assy
Deck Board
Sub±assy
Deck Floor
Box Front
Deck Floor
Box RH
Deck Floor
Box LH
Deck Trim
Side Board RH
Deck Trim
Side Board LH
Roof Side
Garnish Inner RH
Roof Side
Garnish Inner LHRear Window Side
Garnish RH
Rear Window Side
Garnish LH Center Pillar
Garnish
Upper LH
Front Pillar Garnish LH
N�m (kgf�cm ft�lbf): Specified torque
74±12
± SLIDING ROOF/CONVERTIBLESLIDING ROOF
AVENSIS REPAIR MANUAL (RM1018E)
Page 3381 of 5135

760X6±01
B68949
B69147
76±14
±
EXTERIOR/INTERIOR TRIM FUEL LID LOCK CONTROL ASSY
AVENSIS REPAIR MANUAL (RM1018E)
REPLACEMENT
HINT:
The installation is in the reverse order of the removal. However, when there is a special point concerning
the installation, it is indicated.
1.REMOVE LUGGAGE COMPARTMENT TRIM COVER INNER LH (SEDAN MODELS) (See page 76±36)
(a) Remove the luggage compartment floor carpet.
(b) Remove the 2 rope hooks.
(c) Remove the rear floor finish plate.
(d) Remove the 2 luggage compartment trim hooks.
(e) Remove the luggage compartment trim inner.
2.REMOVE DECK TRIM SIDE BOARD LH (LIFTBACK MODELS) (See page 76±45)
(a) Remove the 2 rope hooks.
(b) Remove the rear floor finish plate.
(c) Remove the rear door opening trim weatherstrip LH.
(d) Remove the rear door scuff plate LH.
(e) Remove the deck trim side board.
3.REMOVE DECK TRIM SIDE PANEL ASSY LH (WAGON MODELS) (See page 76±54)
(a) Remove the rear door opening trim weatherstrip LH
(b) Remove the rear door scuff plate.
(c) Remove the tonneau cover.
(d) Remove the deck board.
(e) Remove the deck floor box rear.
(f) Remove the deck floor box LH.
(g) Remove the deck floor box front.
(h) Remove the rear floor finish plate.
(i) Remove the luggage compartment trim hook No. 2.
(j) Remove the deck trim side board.
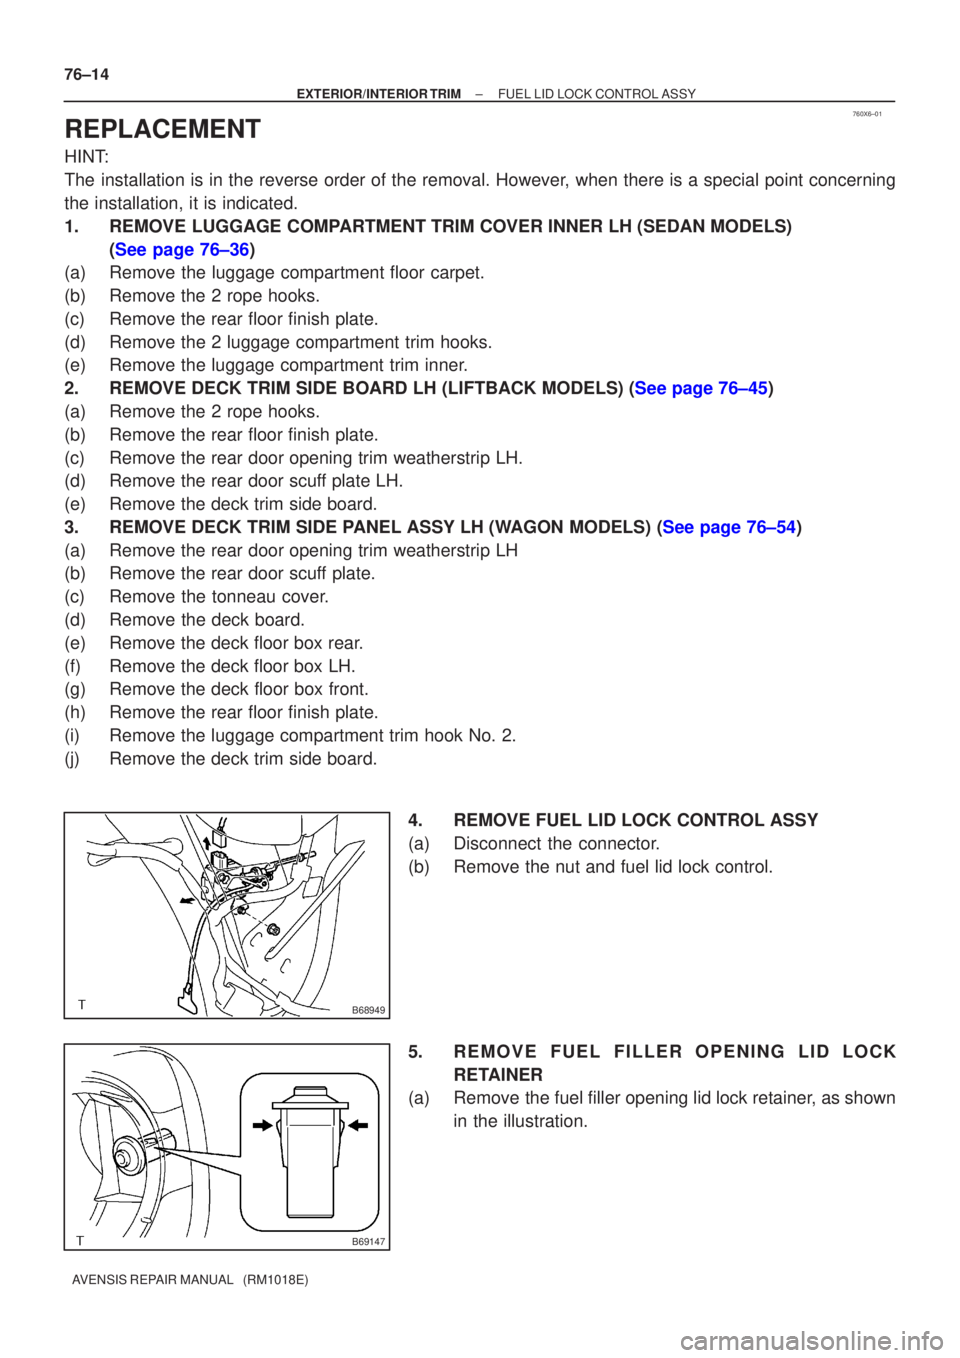
4. REMOVE FUEL LID LOCK CONTROL ASSY
(a) Disconnect the connector.
(b) Remove the nut and fuel lid lock control.
5. REMOVE FUEL FILLER OPENING LID LOCKRETAINER
(a) Remove the fuel filler opening lid lock retainer, as shown
in the illustration.
Page 3385 of 5135
B68947
Liftback Models
Fuel Lid Lock Control Assy
Fuel Filler Opening Lid Lock Retainer
Rear Floor Finish Plate
Rear Door Opening Trim Weatherstrip LH
Rear Door Scuff Plate LHDeck Trim Side Board LH Rope Hook Assy
Rope Hook Assy
: Specified torqueN�m (kgf�cm, ft�lbf)
5.5 (56, 49 in.´lbf)
76±12
± EXTERIOR/INTERIOR TRIMFUEL LID LOCK CONTROL ASSY
AVENSIS REPAIR MANUAL (RM1018E)
Page 3386 of 5135
B68946
Wagon Models
Fuel Lid Lock Control Assy
Fuel Filler Opening Lid Lock Retainer
Deck Trim Side Board LH
Luggage Compartment
Trim Hook No. 2 Tonneau Cover Assy
Deck Board Sub±assy Deck Floor Box Front
Deck Floor Box LHRear Floor Finish Plate
Deck Floor Box Rear
Rear Door Opening Trim Weatherstrip LH
Rear Door Scuff Plate LH
: Specified torqueN�m (kgf�cm, ft�lbf)
5.5 (56, 49 in.´lbf)
± EXTERIOR/INTERIOR TRIMFUEL LID LOCK CONTROL ASSY
76±13
AVENSIS REPAIR MANUAL (RM1018E)
Page 3399 of 5135

750N9±01
B66997: Clip
H19055Clip
B66998: Clip
������B68469: Clip
±
ENGINE HOOD/DOOR BACK DOOR(WAGON MODELS)
75±45
AVENSIS REPAIR MANUAL (RM1018E)
OVERHAUL
HINT:
The installation is in the reverse order of the removal. However, when there is a special point concerning
the installation, it is indicated.
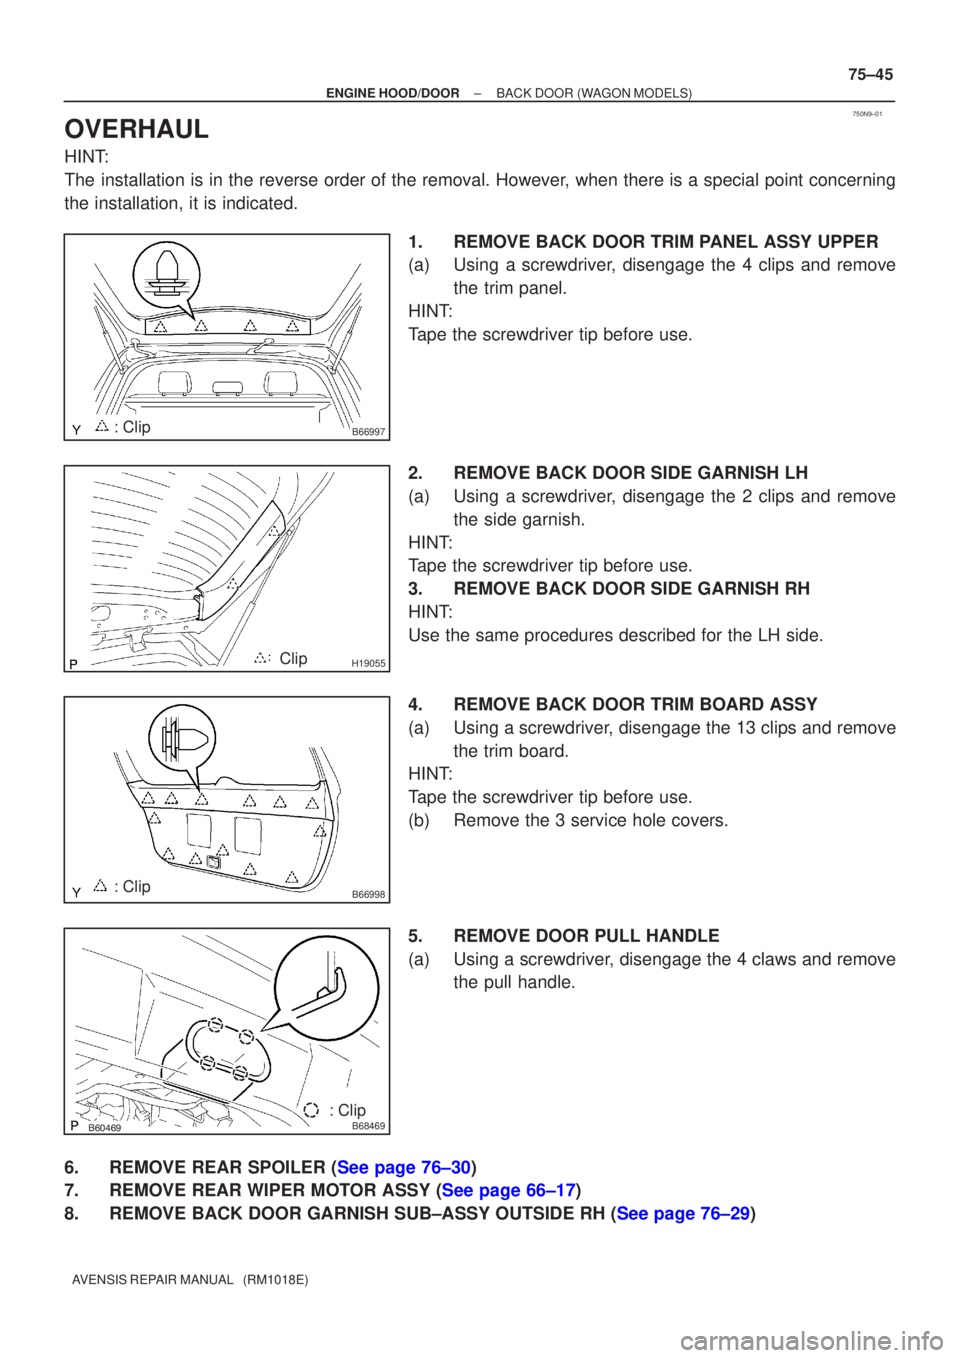
1.REMOVE BACK DOOR TRIM PANEL ASSY UPPER
(a)Using a screwdriver, disengage the 4 clips and removethe trim panel.
HINT:
Tape the screwdriver tip before use.
2.REMOVE BACK DOOR SIDE GARNISH LH
(a)Using a screwdriver, disengage the 2 clips and remove the side garnish.
HINT:
Tape the screwdriver tip before use.
3.REMOVE BACK DOOR SIDE GARNISH RH
HINT:
Use the same procedures described for the LH side.
4.REMOVE BACK DOOR TRIM BOARD ASSY
(a)Using a screwdriver, disengage the 13 clips and remove the trim board.
HINT:
Tape the screwdriver tip before use.
(b)Remove the 3 service hole covers.
5.REMOVE DOOR PULL HANDLE
(a)Using a screwdriver, disengage the 4 claws and remove the pull handle.
6.REMOVE REAR SPOILER (See page 76±30)
7.REMOVE REAR WIPER MOTOR ASSY (See page 66±17)
8.REMOVE BACK DOOR GARNISH SUB±ASSY OUTSIDE RH (See page 76±29)
Page 3403 of 5135
750N7±01
B66987
Back Door Trim Panel Assy Upper
Back Door Side Garnish LH Wiper Motor AssyRear Spoiler
Back Door Garnish Sub±assy Outside RH
Back Door Trim Board Assy
Door Pull Handle
Back Door Lock Striker Back Door Side Garnish RH
Door Pull Handle
: Specified torque
N´m (kgf´cm, ft´lbf)
Floor Finish Plate Rear Wiper Arm and Blade Assy
Wiper Arm Head Cap
5.5 (56, 49 in.´lbf)
Rear Wiper w/ Packing
Washer
Back Door
Stay Assy LH
7.0 (71, 62 in.´lbf)
22 (264, 19)
11.5 (120, 8)
Back Door Stay Assy RH
7.0 (71, 62 in.´lbf)
8.0 (82, 71 in.´lbf)
19.5 (200, 14)
Back Door Service Hole Cover
Back Door Lock Assy
4.9 (49, 43 in.´lbf)4.9 (49, 43 in.´lbf)
75±42
± ENGINE HOOD/DOORBACK DOOR (WAGON MODELS)
AVENSIS REPAIR MANUAL (RM1018E)
BACK DOOR (WAGON MODELS)
COMPONENTS
Page 3404 of 5135

750N6±01
B66988: Clip
B66989: Clip
Hook
B66990: Clip
B66991
75±40
±
ENGINE HOOD/DOOR BACK DOOR(LIFTBACK MODELS)
AVENSIS REPAIR MANUAL (RM1018E)
OVERHAUL
HINT:
The installation is in the reverse order of the removal. However, when there is a special point concerning
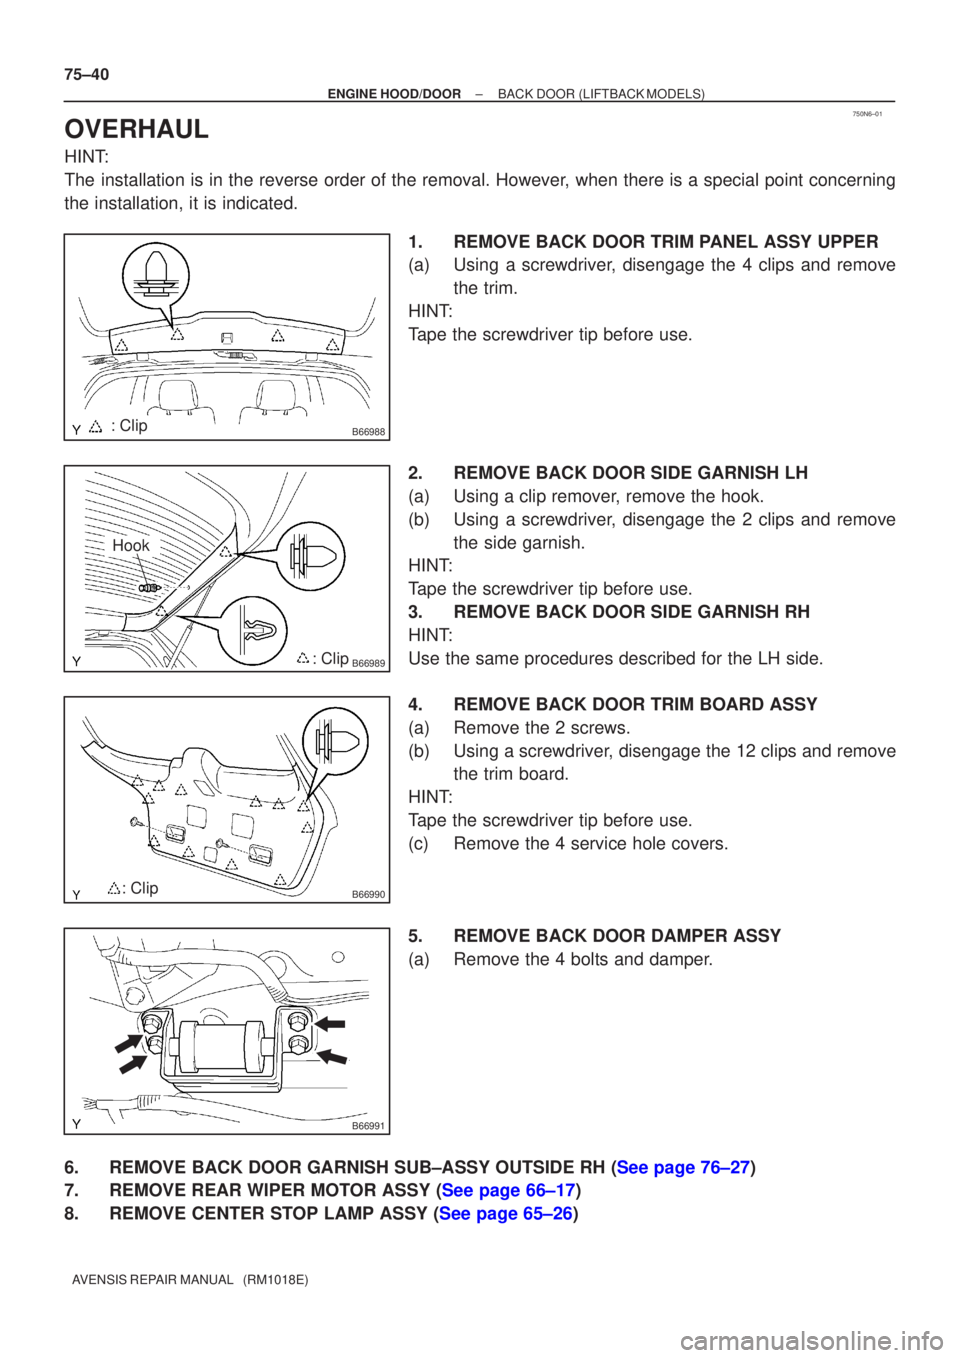
the installation, it is indicated. 1.REMOVE BACK DOOR TRIM PANEL ASSY UPPER
(a)Using a screwdriver, disengage the 4 clips and removethe trim.
HINT:
Tape the screwdriver tip before use.
2.REMOVE BACK DOOR SIDE GARNISH LH
(a)Using a clip remover, remove the hook.
(b)Using a screwdriver, disengage the 2 clips and remove the side garnish.
HINT:
Tape the screwdriver tip before use.
3.REMOVE BACK DOOR SIDE GARNISH RH
HINT:
Use the same procedures described for the LH side.
4.REMOVE BACK DOOR TRIM BOARD ASSY
(a)Remove the 2 screws.
(b)Using a screwdriver, disengage the 12 clips and remove the trim board.
HINT:
Tape the screwdriver tip before use.
(c)Remove the 4 service hole covers.
5.REMOVE BACK DOOR DAMPER ASSY
(a)Remove the 4 bolts and damper.
6.REMOVE BACK DOOR GARNISH SUB±ASSY OUTSIDE RH (See page 76±27)
7.REMOVE REAR WIPER MOTOR ASSY (See page 66±17)
8.REMOVE CENTER STOP LAMP ASSY (See page 65±26)
Page 3408 of 5135
750N4±01
B66986
Back Door Trim
Panel Assy Upper
Back Door Trim Board Assy Back Door Side
Garnish LHBack Door Garnish Sub±assy
Outside RH
Floor Finish Plate Center Stop Lamp Assy
Back Door Lock Striker Hook
Back Door Side
Garnish RHBack Door Stay Assy RH
Back Door Lock Assy Rear Wiper Motor Assy
Back Door
Stay Assy LH
Back Door Service
Hole Cover
: Specified torqueN´m (kgf´cm, ft´lbf)
19.5 (200, 14)
5.5 (56, 49 in.´lbf)
Hook Rear Wiper Arm and Blade Assy
Rear Wiper
w/ Packing Washer
Wiper Arm Head Cap
Nut5.5 (56, 49 in.´lbf)
5.5 (56, 49 in.´lbf)
Cushion Rubber
Cushion Rubber
Rope Hook Assy
11.5 (120, 8)
22 (264, 19)
7.0 (71, 62 in.´lbf)
5.5 (56, 49 in.´lbf)
8.0 (82, 71 in.´lbf)
7.0 (71, 62 in.´lbf)22 (264, 19)
Female
Stopper RH
Female
Stopper LH
4.9 (49, 43 in.´lbf)Back Door Damper Assy
5.5 (56, 49 in.´lbf)
± ENGINE HOOD/DOORBACK DOOR (LIFTBACK MODELS)
75±37
AVENSIS REPAIR MANUAL (RM1018E)
BACK DOOR (LIFTBACK MODELS)
COMPONENTS