Page 251 of 3171

AIR BREATHER HOSE
AT-243
D
E
F
G
H
I
J
K
L
MA
B
AT
AIR BREATHER HOSEPFP:31098
Removal and InstallationECS00GVO
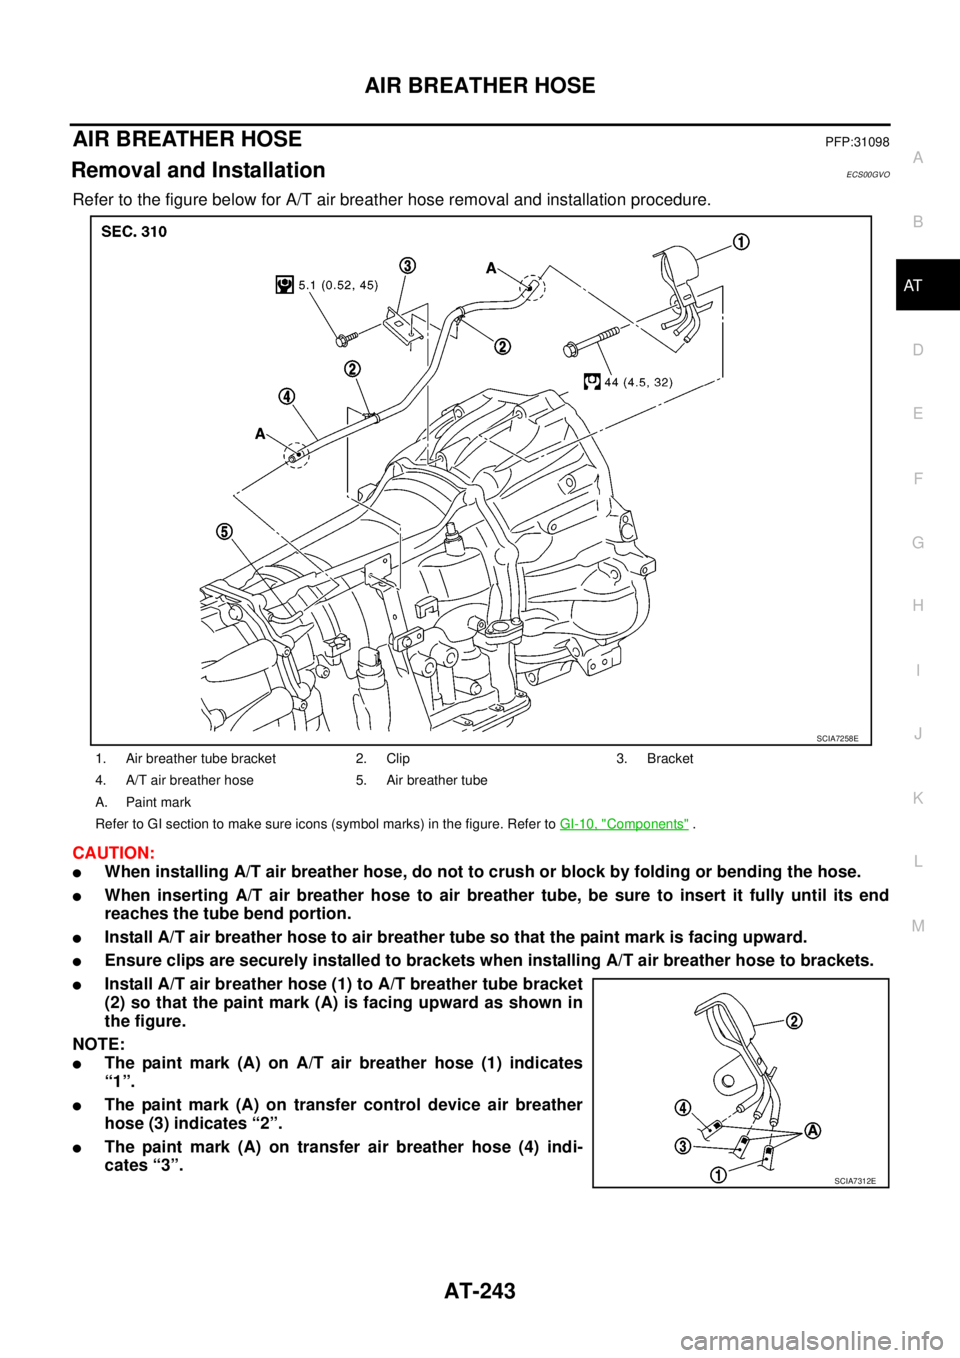
Refer to the figure below for A/T air breather hose removal and installation procedure.
CAUTION:
lWhen installing A/T air breather hose, do not to crush or block by folding or bending the hose.
lWhen inserting A/T air breather hose to air breather tube, be sure to insert it fully until its end
reaches the tube bend portion.
lInstall A/T air breather hose to air breather tube so that the paint mark is facing upward.
lEnsure clips are securely installed to brackets when installing A/T air breather hose to brackets.
lInstall A/T air breather hose (1) to A/T breather tube bracket
(2) so that the paint mark (A) is facing upward as shown in
the figure.
NOTE:
lThe paint mark (A) on A/T air breather hose (1) indicates
“1”.
lThe paint mark (A) on transfer control device air breather
hose (3) indicates “2”.
lThe paint mark (A) on transfer air breather hose (4) indi-
cates “3”.
1. Air breather tube bracket 2. Clip 3. Bracket
4. A/T air breather hose 5. Air breather tube
A. Paint mark
Refer to GI section to make sure icons (symbol marks) in the figure. Refer toGI-10, "
Components".
SCIA7258E
SCIA7312E
Page 257 of 3171

TRANSMISSION ASSEMBLY
AT-249
D
E
F
G
H
I
J
K
L
MA
B
AT
5. Remove front valance center, engine undercover front, engine under cover middle and engine under
coverrear.RefertoEI-15, "
FRONT BUMPER".
6. Remove front cross member.
7. Remove main muffler. Refer toEX-2, "
EXHAUST SYSTEM".
8. Remove rear propeller shaft. Refer toPR-8, "
Removal and Installation".
9. Remove front propeller shaft. Refer toPR-4, "
Removal and Installation".
10. Remove starter motor. Refer toSC-31, "
Removal and Installation".
11. Remove control cable and bracket. Refer toAT- 2 1 0 , "
Control Cable Removal and Installation".
12. Disconnect fluid cooler tube.
13. Remove A/T fluid charging pipe from A/T assembly.
14. Remove O-ring from A/T fluid charging pipe.
15. Plug up openings such as A/T fluid charging pipe hole, etc.
16. Remove rear plate cover from rear plate.
17. Turn crankshaft to access and remove the four bolts for drive
plate and torque converter.
CAUTION:
When turning crankshaft, turn it clockwise as viewed from
the front of engine.
18. Support A/T assembly using a transmission jack.
CAUTION:
When setting transmission jack, be careful not to allow it to
collide against drain plug.
19. Remove protector (fuel tube), and then disconnect fuel tubes.
Refer toFL-7, "
FUEL COOLER". (4WD models)
20. Remove A/T cross member.
21. Remove engine mounting insulator (rear) from A/T assembly.
22. Disconnect the following:
lA/T assembly harness connector
lATP switch connector
l4LO switch connector
lWait detection switch connector
lTransfer control device connector
23. Support transfer assembly using a transmission jack. (4WD models)
24. Remove the wiring harness from bracket.
25. Remove bolts fixing A/T assembly to engine assembly.
26. Remove A/T assembly from the vehicle.
CAUTION:
lSecure torque converter to prevent it from dropping.
lSecure A/T assembly to a transmission jack.
27. Remove A/T air breather hose. Refer toAT- 2 4 3 , "
AIR
BREATHER HOSE".
28. Remove transfer assembly from A/T assembly. Refer toT F - 111 ,
"Removal and Installation". (4WD models)
SCIA6828E
SCIA6927E
SCIA2203E
Page 274 of 3171
AT-266
DISASSEMBLY
14. Loosen lock nut and remove band servo anchor end pin from
transmission case.
15. Remove brake band from transmission case.
lTo prevent brake linings from cracking or peeling, do not
stretch the flexible band unnecessarily. When removing
brake band, always secure it with a clip as shown in the
figure at right.
Leave the clip in position after removing the brake band.
lCheck brake band facing for damage, cracks, wear or
burns.
16. Remove mid carrier assembly and rear carrier assembly as a
unit.
17. Remove mid carrier assembly from rear carrier assembly.
SCIA6512E
SCIA2580E
SAT655
SCIA5017E
SCIA5174E
Page 311 of 3171
ASSEMBLY
AT-303
D
E
F
G
H
I
J
K
L
MA
B
AT
15. Install seal rings to drum support.
16. Install return spring and spring retainer in transmission case.
17. Set the SST on spring retainer and install snap ring (fixing spring
retainer) in transmission case while compressing return spring.
CAUTION:
Securely assemble them using a flat-bladed screwdriver so
that snap ring tension is slightly weak.
SCIA3333E
SCIA2324E
SCIA6843E
Page 327 of 3171
ASSEMBLY
AT-319
D
E
F
G
H
I
J
K
L
MA
B
AT
g. Install control valve with TCM in transmission case.
CAUTION:
lMake sure that turbine revolution sensor securely installs
turbine revolution sensor hole.
lHang down revolution sensor harness toward outside so
as not to disturb installation of control valve with TCM.
lAdjust A/T assembly harness connector of control valve
with TCM to terminal hole of transmission case.
lAssemble it so that manual valve cutout is engaged with
manual plate projection.
h. Install bolts A, B and C to control valve with TCM.
i. Tighten bolt 1, 2 and 3 temporarily to prevent dislocation. After
that tighten them in order (1®2®3), and then tighten other
bolts to the specified torque. Refer toAT- 2 5 1 , "
Components".
10. Connect A/T fluid temperature sensor 2 connector.
SCIA5034E
SCIA5035E
Bolt symbol Length [mm (in)] Number of bolts
A42(1.65) 5
B55(2.17) 6
C40(1.57) 1
SCIA5025E
SCIA5037E
SCIA5023E
Page 328 of 3171
AT-320
ASSEMBLY
11. Securely fasten terminal cord assembly and A/T fluid tempera-
ture sensor 2 harness with terminal clips.
12. Connect revolution sensor connector.
13. Securely fasten revolution sensor harness with terminal clips.
14. Pull down A/T assembly harness connector.
CAUTION:
Be careful not to damage connector.
15. Install snap ring to A/T assembly harness connector.
SCIA5446E
SCIA5024E
SCIA7023E
SCIA5299E
SCIA5300E
Page 341 of 3171

PRECAUTIONS
ATC-7
C
D
E
F
G
H
I
K
L
MA
B
AT C
INSTALLATION
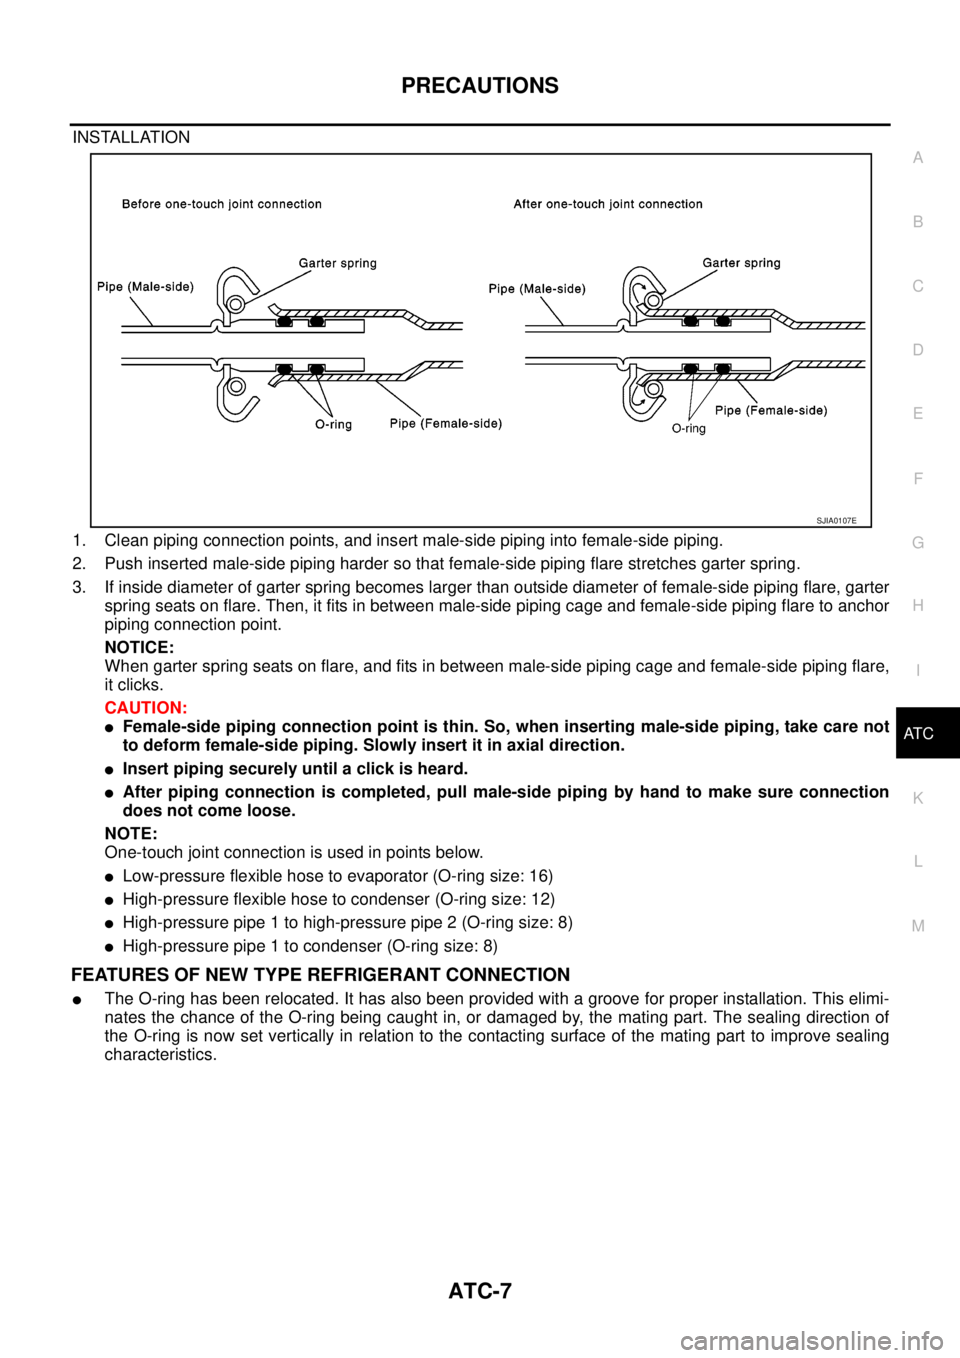
1. Clean piping connection points, and insert male-side piping into female-side piping.
2. Push inserted male-side piping harder so that female-side piping flare stretches garter spring.
3. If inside diameter of garter spring becomes larger than outside diameter of female-side piping flare, garter
spring seats on flare. Then, it fits in between male-side piping cage and female-side piping flare to anchor
piping connection point.
NOTICE:
When garter spring seats on flare, and fits in between male-side piping cage and female-side piping flare,
it clicks.
CAUTION:
lFemale-side piping connection point is thin. So, when inserting male-side piping, take care not
to deform female-side piping. Slowly insert it in axial direction.
lInsert piping securely until a click is heard.
lAfter piping connection is completed, pull male-side piping by hand to make sure connection
does not come loose.
NOTE:
One-touch joint connection is used in points below.
lLow-pressure flexible hose to evaporator (O-ring size: 16)
lHigh-pressure flexible hose to condenser (O-ring size: 12)
lHigh-pressure pipe 1 to high-pressure pipe 2 (O-ring size: 8)
lHigh-pressure pipe 1 to condenser (O-ring size: 8)
FEATURES OF NEW TYPE REFRIGERANT CONNECTION
lThe O-ring has been relocated. It has also been provided with a groove for proper installation. This elimi-
nates the chance of the O-ring being caught in, or damaged by, the mating part. The sealing direction of
the O-ring is now set vertically in relation to the contacting surface of the mating part to improve sealing
characteristics.
SJIA0107E
Page 367 of 3171

TROUBLE DIAGNOSIS
ATC-33
C
D
E
F
G
H
I
K
L
MA
B
AT C
TROUBLE DIAGNOSISPFP:00004
CONSULT-II Function (BCM)EJS006B8
CONSULT-II can display each diagnostic item using the diagnostic test modes shown following.
CONSULT-II BASIC OPERATION
CAUTION:
If CONSULT-II is used with no connection of CONSULT-II CONVERTER, malfunctions might be
detected in self-diagnosis depending on control unit which carry out CAN communication.
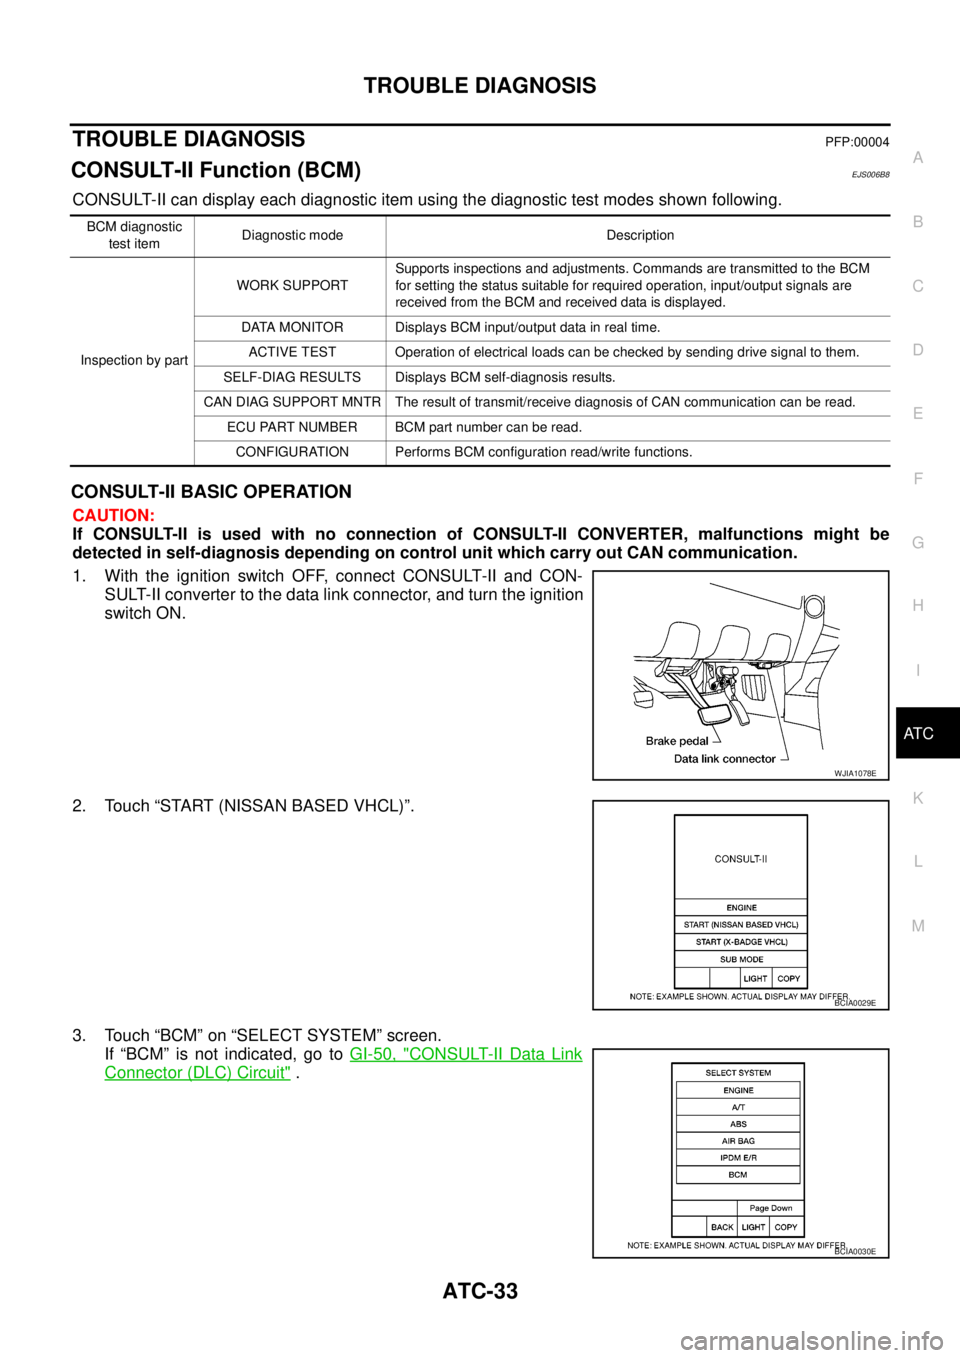
1. With the ignition switch OFF, connect CONSULT-II and CON-
SULT-II converter to the data link connector, and turn the ignition
switch ON.
2. Touch “START (NISSAN BASED VHCL)”.
3. Touch “BCM” on “SELECT SYSTEM” screen.
If “BCM” is not indicated, go toGI-50, "
CONSULT-II Data Link
Connector (DLC) Circuit".
BCM diagnostic
test itemDiagnostic mode Description
Inspection by partWORK SUPPORTSupports inspections and adjustments. Commands are transmitted to the BCM
for setting the status suitable for required operation, input/output signals are
received from the BCM and received data is displayed.
DATA MONITOR Displays BCM input/output data in real time.
ACTIVE TEST Operation of electrical loads can be checked by sending drive signal to them.
SELF-DIAG RESULTS Displays BCM self-diagnosis results.
CAN DIAG SUPPORT MNTR The result of transmit/receive diagnosis of CAN communication can be read.
ECU PART NUMBER BCM part number can be read.
CONFIGURATION Performs BCM configuration read/write functions.
WJIA1078E
BCIA0029E
BCIA0030E