2005 NISSAN NAVARA ECU
[x] Cancel search: ECUPage 2756 of 3171
![NISSAN NAVARA 2005 Repair Workshop Manual TROUBLE DIAGNOSIS
RFD-53
[WITH ELECTRONIC LOCKING DIFFERENTIAL]
C
E
F
G
H
I
J
K
L
MA
B
RFD
DATA MONITOR MODE
Operation Procedure
1. Perform “CONSULT-II SETTING PROCEDURE”. Refer toRFD-50, "CONSULT NISSAN NAVARA 2005 Repair Workshop Manual TROUBLE DIAGNOSIS
RFD-53
[WITH ELECTRONIC LOCKING DIFFERENTIAL]
C
E
F
G
H
I
J
K
L
MA
B
RFD
DATA MONITOR MODE
Operation Procedure
1. Perform “CONSULT-II SETTING PROCEDURE”. Refer toRFD-50, "CONSULT](/manual-img/5/57362/w960_57362-2755.png)
TROUBLE DIAGNOSIS
RFD-53
[WITH ELECTRONIC LOCKING DIFFERENTIAL]
C
E
F
G
H
I
J
K
L
MA
B
RFD
DATA MONITOR MODE
Operation Procedure
1. Perform “CONSULT-II SETTING PROCEDURE”. Refer toRFD-50, "CONSULT-II SETTING PROCE-
DURE".
2. Touch “DATA MONITOR”.
3. Select from “SELECT MONITOR ITEM”, screen of data monitor mode is displayed.
NOTE:
When malfunction is detected, CONSULT-II performs REAL-TIME DIAGNOSIS.
Also, any malfunction detected while in this mode will be displayed at real time.
Display Item List
´: Standard –: Not applicable
Monitor item (Unit)SELECT MONITOR ITEM
Remarks
ECU INPUT
SIGNALSMAIN
SIGNALSSELECTION
FROM MENU
BATTERY VOLT [V]´´´Power supply voltage for differential lock
control unit.
4WD MODE [2H/4H/4Lo]´´´4WD shift switch signal status via CAN
communication line is displayed.
VHCL S/SEN-R [km/h] or [mph]´–´Wheel speed calculated by rear wheel
sensor right signal is displayed.
VHCL S/SEN-L [km/h] or [mph]´–´Wheel speed calculated by rear wheel
sensor left signal is displayed.
VHCL S/SEN-RL [km/h] or [mph]´´´Average value between wheel speed cal-
culated by rear wheel sensor right signal
and rear wheel sensor left signal is dis-
played.
D-LOCK SW SIG [ON/OFF]´´´Condition of differential lock mode switch
is displayed.
D-LOCK SIG [ON/OFF]´´´Control status of differential lock is dis-
played.
RELAY ON [ON/OFF]´´´Operating condition of differential lock
solenoid relay is displayed (integrated in
differential lock control unit).
RELAY MTR [ON/OFF]´´´Control status of differential lock solenoid
relay is displayed (integrated in differential
lock control unit).
SOL MTR [ON/OFF]´´´Control status of differential lock solenoid
is displayed.
IND MTR [ON/OFF]´´´Control status of DIFF LOCK indicator
lamp is displayed.
D-LOCK POS SW [ON/OFF]´´´Condition of differential lock position switch
is displayed.
Voltage [V] – –´The value measured by the voltage probe
is displayed.
Frequency [Hz] – –´
The value measured by the pulse probe is
displayed. DUTY-HI (high) [%] – –´
DUTY-LOW (low) [%] – –´
PLS WIDTH-HI [msec] – –´
PLS WIDTH-LOW [msec] – –´
Page 2828 of 3171
SEAT BELTS
SB-11
C
D
E
F
G
I
J
K
L
MA
B
SB
Seat Belt InspectionEHS0026A
AFTER A COLLISION
WARNING:
Inspect all seat belt assemblies including retractors and attaching hardware after any collision.
NISSAN recommends that all seat belt assemblies in use during a collision be replaced unless the col-
lision was minor and the belts show no damage and continue to operate properly. Failure to do so
could result in serious personal injury in an accident. Seat belt assemblies not in use during a colli-
sion should also be replaced if either damage or improper operation is noted. Seat belt pre-tensioners
should be replaced even if the seat belts are not in use during a frontal collision in which the air bags
are deployed.
Replace any seat belt assembly (including anchor bolts) if:
lThe seat belt was in use at the time of a collision (except for minor collisions and the belts, retractors and
buckles show no damage and continue to operate properly).
lThe seat belt was damaged in an accident. (i.e. torn webbing, bent retractor or guide).
lThe seat belt attaching point was damaged in an accident. Inspect the seat belt attaching area for damage
or distortion and repair as necessary before installing a new seat belt assembly.
lAnchor bolts are deformed or worn out.
lThe seat belt pre-tensioner should be replaced even if the seat belts are not in use during the collision in
which the air bags are deployed.
PRELIMINARY CHECKS
1. Check the seat belt warning lamp for proper operation as follows:
a. Switch ignition ON. The seat belt warning lamp should illuminate.
b. Fasten driver's seat belt. The seat belt warning lamp should go out. If warning lamp remains illuminated,
Refer toDI-28, "
WARNING LAMPS".
2. If the air bag warning lamp is blinking, conduct self-diagnosis using CONSULT-II, and air bag warning
lamp. Refer toSRS-18, "
SRS Operation Check".
3. Check that the seat belt retractor, seat belt anchor and buckle bolts are securely attached.
4. Check the shoulder seat belt guide and shoulder belt height adjuster for front seats. Ensure guide swivels
freely and that belt lays flat and does not bind in guide. Ensure height adjuster operates properly and
holds securely.
5. Check retractor operation:
a. Fully extend the seat belt webbing and check for twists, tears or other damage.
b. Allow the seat belt to retract. Ensure that belt returns smoothly and completely into the retractor. If the
seat belt does not return smoothly, wipe the inside of the loops with a clean paper cloth, because dirt built
up in the loops of the upper anchors can cause the seat belts to retract slowly.
c. Fasten the seat belt. Check the seat belt returns smoothly and completely to the retractor. If the belt does
not return smoothly, the cause may be an accumulation of dust or dirt. Use the “SEAT BELT TAPE SET”
and perform the following steps.
Inspect the front seat belt through-anchor:
1. Pull the seat belt out to a length of 500 mm (19.69 in) or more.
2. Use a clip or other device to hold the seat belt at the center pillar belt opening.
3. Pass a thin wire through the through-anchor belt opening. Hold both ends of the wire and pull taut while
moving it up and down several times along the belt opening surface to remove dirt.
4. Any dirt that cannot be removed with the wire can be removed by cleaning the opening with a clean
cloth.
5. Apply tape at the point where the belt contacts the through-anchor belt opening.
NOTE:
Apply the tape so that there is no looseness or wrinkling.
6. Remove the clip holding the seat belt and check that the belt returns smoothly.
7. Repeat steps above as necessary to check the other seat belts.
Page 2855 of 3171
SC-22
CHARGING SYSTEM
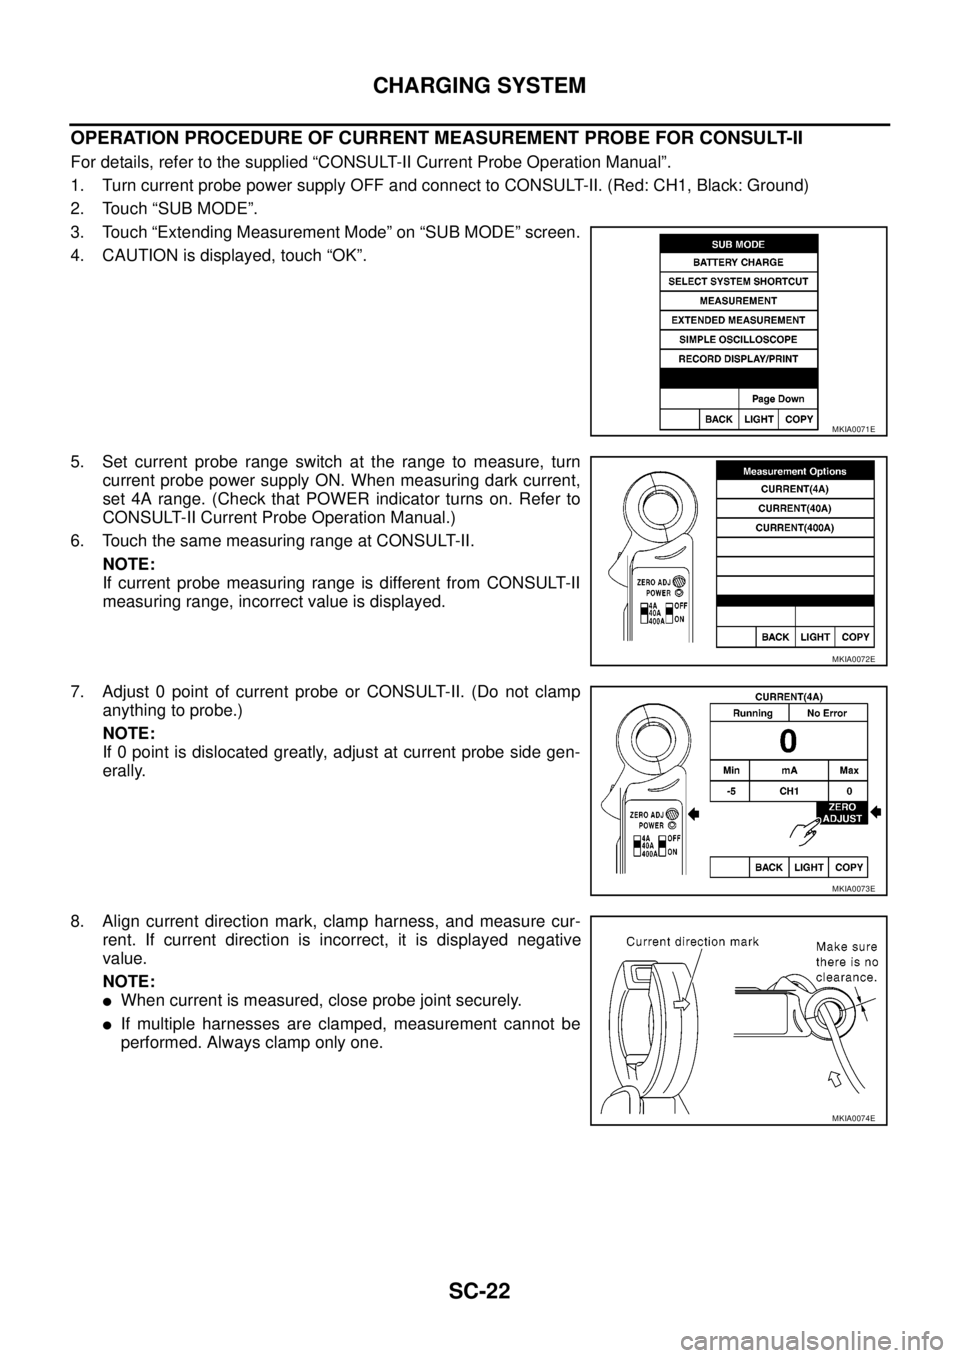
OPERATION PROCEDURE OF CURRENT MEASUREMENT PROBE FOR CONSULT-II
For details, refer to the supplied “CONSULT-II Current Probe Operation Manual”.
1. Turn current probe power supply OFF and connect to CONSULT-II. (Red: CH1, Black: Ground)
2. Touch “SUB MODE”.
3. Touch “Extending Measurement Mode” on “SUB MODE” screen.
4. CAUTION is displayed, touch “OK”.
5. Set current probe range switch at the range to measure, turn
current probe power supply ON. When measuring dark current,
set 4A range. (Check that POWER indicator turns on. Refer to
CONSULT-II Current Probe Operation Manual.)
6. Touch the same measuring range at CONSULT-II.
NOTE:
If current probe measuring range is different from CONSULT-II
measuring range, incorrect value is displayed.
7. Adjust 0 point of current probe or CONSULT-II. (Do not clamp
anything to probe.)
NOTE:
If 0 point is dislocated greatly, adjust at current probe side gen-
erally.
8. Align current direction mark, clamp harness, and measure cur-
rent. If current direction is incorrect, it is displayed negative
value.
NOTE:
lWhen current is measured, close probe joint securely.
lIf multiple harnesses are clamped, measurement cannot be
performed. Always clamp only one.
MKIA0071E
MKIA0072E
MKIA0073E
MKIA0074E
Page 2867 of 3171
SC-34
STARTING SYSTEM
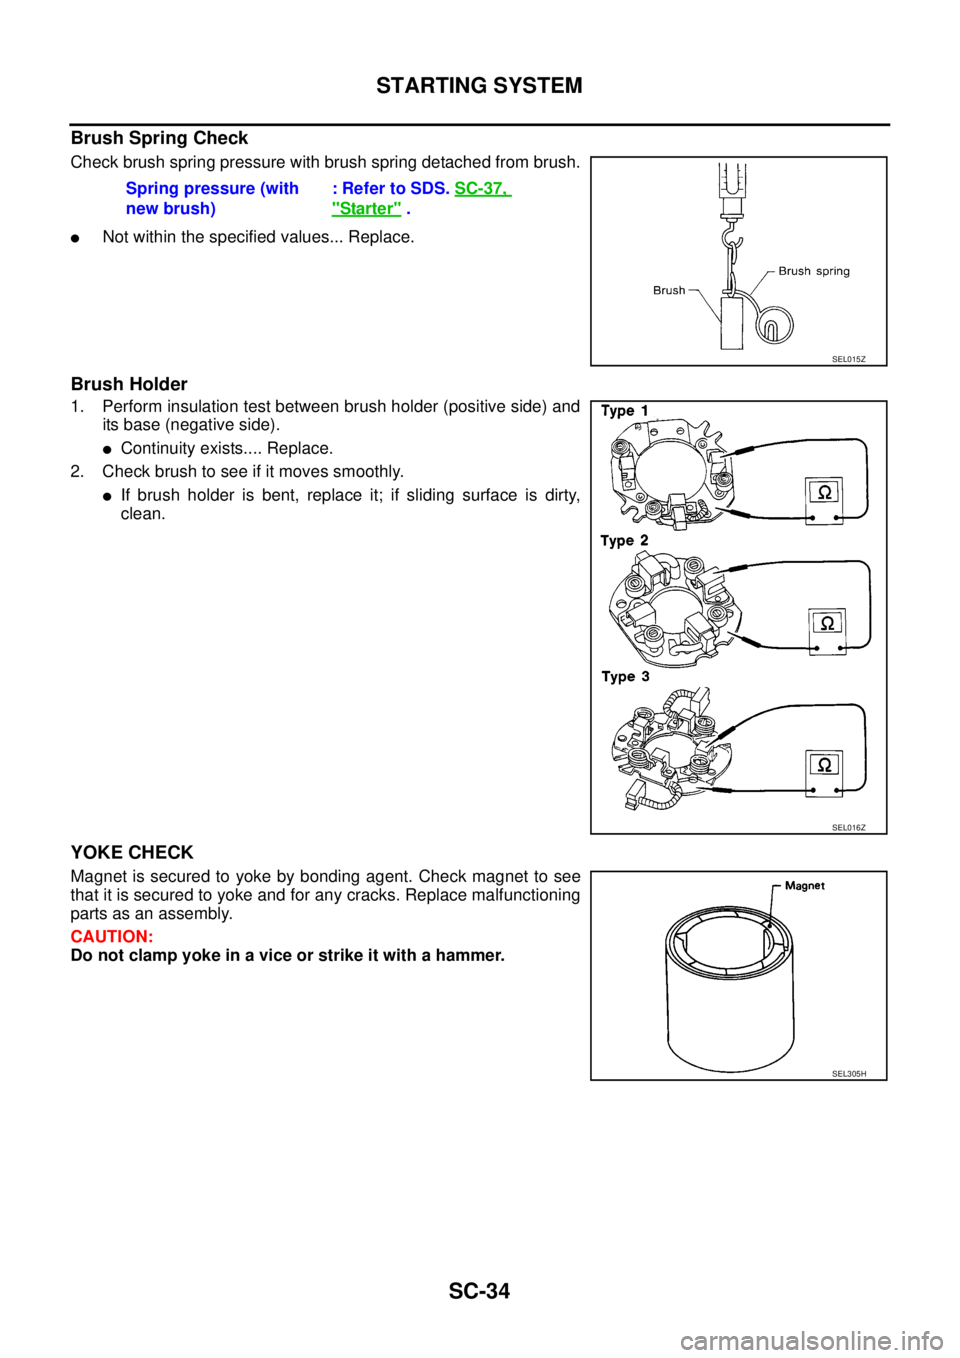
Brush Spring Check
Check brush spring pressure with brush spring detached from brush.
lNot within the specified values... Replace.
Brush Holder
1. Perform insulation test between brush holder (positive side) and
its base (negative side).
lContinuity exists.... Replace.
2. Check brush to see if it moves smoothly.
lIf brush holder is bent, replace it; if sliding surface is dirty,
clean.
YOKE CHECK
Magnet is secured to yoke by bonding agent. Check magnet to see
that it is secured to yoke and for any cracks. Replace malfunctioning
parts as an assembly.
CAUTION:
Do not clamp yoke in a vice or strike it with a hammer.Spring pressure (with
new brush): Refer to SDS.SC-37,
"Starter".
SEL015Z
SEL016Z
SEL305H
Page 2873 of 3171
SE-2
PRECAUTIONS
PRECAUTIONS
PFP:00001
Precautions for Supplemental Restraint System (SRS) “AIR BAG” and “SEAT
BELT PRE-TENSIONER”
EIS00CEB
The Supplemental Restraint System such as “AIR BAG” and “SEAT BELT PRE-TENSIONER”, used along
with a front seat belt, helps to reduce the risk or severity of injury to the driver and front passenger for certain
types of collision. Information necessary to service the system safely is included in the SRS and SB section of
this Service Manual.
WARNING:
lTo avoid rendering the SRS inoperative, which could increase the risk of personal injury or death
in the event of a collision which would result in air bag inflation, all maintenance must be per-
formed by an authorized NISSAN/INFINITI dealer.
lImproper maintenance, including incorrect removal and installation of the SRS, can lead to per-
sonal injury caused by unintentional activation of the system. For removal of Spiral Cable and Air
Bag Module, see the SRS section.
lDo not use electrical test equipment on any circuit related to the SRS unless instructed to in this
Service Manual. SRS wiring harnesses can be identified by yellow and/or orange harnesses or
harness connectors.
Precautions for WorkEIS00BAR
lWhen removing or disassembling each component, be careful not to damage or deform it. If a component
may be subject to interference, be sure to protect it with a shop cloth.
lWhen removing (disengaging) components with a screwdriver or similar tool, be sure to wrap the compo-
nent with a shop cloth or vinyl tape to protect it.
lProtect the removed parts with a shop cloth and keep them.
lReplace a deformed or damaged clip.
lIf a part is specified as a non-reusable part, always replace it with new one.
lBe sure to tighten bolts and nuts securely to the specified torque.
lAfter re-installation is completed, be sure to check that each part works normally.
lFollow the steps below to clean components.
–Water soluble foul: Dip a soft cloth into lukewarm water, and wring the water out of the cloth to wipe the
fouled area.
Then rub with a soft and dry cloth.
–Oily foul: Dip a soft cloth into lukewarm water with mild detergent (concentration: within 2 to 3%), and wipe
the fouled area.
Then dip a cloth into fresh water, and wring the water out of the cloth to wipe the detergent off. Then rub
with a soft and dry cloth.
lDo not use organic solvent such as thinner, benzene, alcohol, or gasoline.
lFor genuine leather seats, use a genuine leather seat cleaner.
Page 2876 of 3171
SQUEAK AND RATTLE TROUBLE DIAGNOSES
SE-5
C
D
E
F
G
H
J
K
L
MA
B
SE
DUPLICATE THE NOISE AND TEST DRIVE
If possible, drive the vehicle with the customer until the noise is duplicated. Note any additional information on
the Diagnostic Worksheet regarding the conditions or location of the noise. This information can be used to
duplicate the same conditions when you confirm the repair.
If the noise can be duplicated easily during the test drive, to help identify the source of the noise, try to dupli-
cate the noise with the vehicle stopped by doing one or all of the following:
1) Close a door.
2) Tap or push/pull around the area where the noise appears to be coming from.
3) Rev the engine.
4) Use a floor jack to recreate vehicle “twist”.
5) At idle, apply engine load (electrical load, half-clutch on M/T models, drive position on A/T models).
6) Raisethevehicleonahoistandhitatirewitharubberhammer.
lDrive the vehicle and attempt to duplicate the conditions the customer states exist when the noise occurs.
lIf it is difficult to duplicate the noise, drive the vehicle slowly on an undulating or rough road to stress the
vehicle body.
CHECK RELATED SERVICE BULLETINS
After verifying the customer concern or symptom, check ASIST for Technical Service Bulletins (TSBs) related
to that concern or symptom.
If a TSB relates to the symptom, follow the procedure to repair the noise.
LOCATE THE NOISE AND IDENTIFY THE ROOT CAUSE
1. Narrow down the noise to a general area. To help pinpoint the source of the noise, use a listening tool
(Engine Ear or mechanics stethoscope).
2. Narrow down the noise to a more specific area and identify the cause of the noise by:
lremoving the components in the area that you suspect the noise is coming from.
Do not use too much force when removing clips and fasteners, otherwise clips and fastener can be broken
or lost during the repair, resulting in the creation of new noise.
ltapping or pushing/pulling the component that you suspect is causing the noise.
Do not tap or push/pull the component with excessive force, otherwise the noise will be eliminated only
temporarily.
lfeeling for a vibration with your hand by touching the component(s) that you suspect is (are) causing the
noise.
lplacing a piece of paper between components that you suspect are causing the noise.
llooking for loose components and contact marks.
Refer toSE-6, "
Generic Squeak and Rattle Troubleshooting".
REPAIR THE CAUSE
lIf the cause is a loose component, tighten the component securely.
lIf the cause is insufficient clearance between components:
–separate components by repositioning or loosening and retightening the component, if possible.
–insulate components with a suitable insulator such as urethane pads, foam blocks, felt cloth tape or ure-
thane tape are available through your authorized Nissan Parts Department.
CAUTION:
Do not use excessive force as many components are constructed of plastic and may be damaged.
NOTE:
Always check with the Parts Department for the latest parts information.
Each item can be ordered separately as needed.
URETHANE PADS [1.5 mm (0.059 in) thick]
Insulates connectors, harness, etc.
76268-9E005: 100´135 mm (3.94´5.31 in)/76884-71L01: 60´85 mm (2.36´3.35 in)/76884-71L02: 15´
25 mm (0.59´0.98 in)
INSULATOR (Foam blocks)
Insulates components from contact. Can be used to fill space behind a panel.
73982-9E000: 45 mm (1.77 in) thick, 50´50 mm (1.97´1.97 in)/73982-50Y00: 10 mm (0.39 in) thick, 50
´50 mm (1.97´1.97 in)
INSULATOR (Light foam block)
80845-71L00: 30 mm (1.18 in) thick, 30´50 mm (1.18´1.97 in)
Page 2878 of 3171
SQUEAK AND RATTLE TROUBLE DIAGNOSES
SE-7
C
D
E
F
G
H
J
K
L
MA
B
SE
TRUNK
Trunk noises are often caused by a loose jack or loose items put into the trunk by the owner.
In addition look for:
1. Trunk lid dumpers out of adjustment
2. Trunk lid striker out of adjustment
3. Trunk lid torsion bars knocking together
4. A loose license plate or bracket
Most of these incidents can be repaired by adjusting, securing or insulating the item(s) or component(s) caus-
ing the noise.
SUNROOF/HEADLINING
Noises in the sunroof/headlining area can often be traced to one of the following:
1. Sunroof lid, rail, linkage or seals making a rattle or light knocking noise
2. Sunvisor shaft shaking in the holder
3. Front or rear windshield touching headlining and squeaking
Again, pressing on the components to stop the noise while duplicating the conditions can isolate most of these
incidents. Repairs usually consist of insulating with felt cloth tape.
SEATS
When isolating seat noise it's important to note the position the seat is in and the load placed on the seat when
the noise is present. These conditions should be duplicated when verifying and isolating the cause of the
noise.
Cause of seat noise include:
1. Headrest rods and holder
2. A squeak between the seat pad cushion and frame
3. Rear seatback lock and bracket
These noises can be isolated by moving or pressing on the suspected components while duplicating the con-
ditions under which the noise occurs. Most of these incidents can be repaired by repositioning the component
or applying urethane tape to the contact area.
UNDERHOOD
Some interior noise may be caused by components under the hood or on the engine wall. The noise is then
transmitted into the passenger compartment.
Causes of transmitted underhood noise include:
1. Any component mounted to the engine wall
2. Components that pass through the engine wall
3. Engine wall mounts and connectors
4. Loose radiator mounting pins
5. Hood bumpers out of adjustment
6. Hood striker out of adjustment
These noises can be difficult to isolate since they cannot be reached from the interior of the vehicle. The best
method is to secure, move or insulate one component at a time and test drive the vehicle. Also, engine RPM
or load can be changed to isolate the noise. Repairs can usually be made by moving, adjusting, securing, or
insulating the component causing the noise.
Page 2911 of 3171

SRS-2
DIAGNOSIS SENSOR UNIT ..................................... 48
Removal and Installation ........................................ 48
REMOVAL ........................................................... 48
INSTALLATION .................................................... 48
ECU DISCRIMINATED NO. ................................. 48
DISPOSAL OF AIR BAG MODULE AND SEAT BELT
PRE-TENSIONER ..................................................... 49
Caution for Air Bag Module and Seat Belt Pre-
tensioner ................................................................. 49
CHECKING DEPLOYMENT TOOL ..................... 49
DEPLOYMENT PROCEDURES FOR AIR BAG
MODULE (OUTSIDE OF VEHICLE) ................... 50
DEPLOYMENT PROCEDURES FOR SEAT
BELT PRE-TENSIONER (OUTSIDE OF VEHI-
CLE) .................................................................... 54
DEPLOYMENT OF AIR BAG MODULES ANDSEAT BELT PRE-TENSIONERS WHILE
MOUNTED IN VEHICLE ...................................... 54
DISPOSING OF AIR BAG MODULE AND SEAT
BELT PRE-TENSIONER ...................................... 55
COLLISION DIAGNOSIS .......................................... 56
For Frontal Collision ................................................ 56
SRS INSPECTION (FOR FRONTAL COLLI-
SION) ................................................................... 56
For Side Collision .................................................... 56
WHEN SRS IS ACTIVATED IN THE SIDE COL-
LISION ................................................................. 57
WHEN SRS IS NOT ACTIVATED IN THE SIDE
COLLISION .......................................................... 57
SRS INSPECTION (FOR SIDE COLLISION) ...... 57