Page 2617 of 3171
PR-2
NOISE, VIBRATION, AND HARSHNESS (NVH) TROUBLESHOOTING
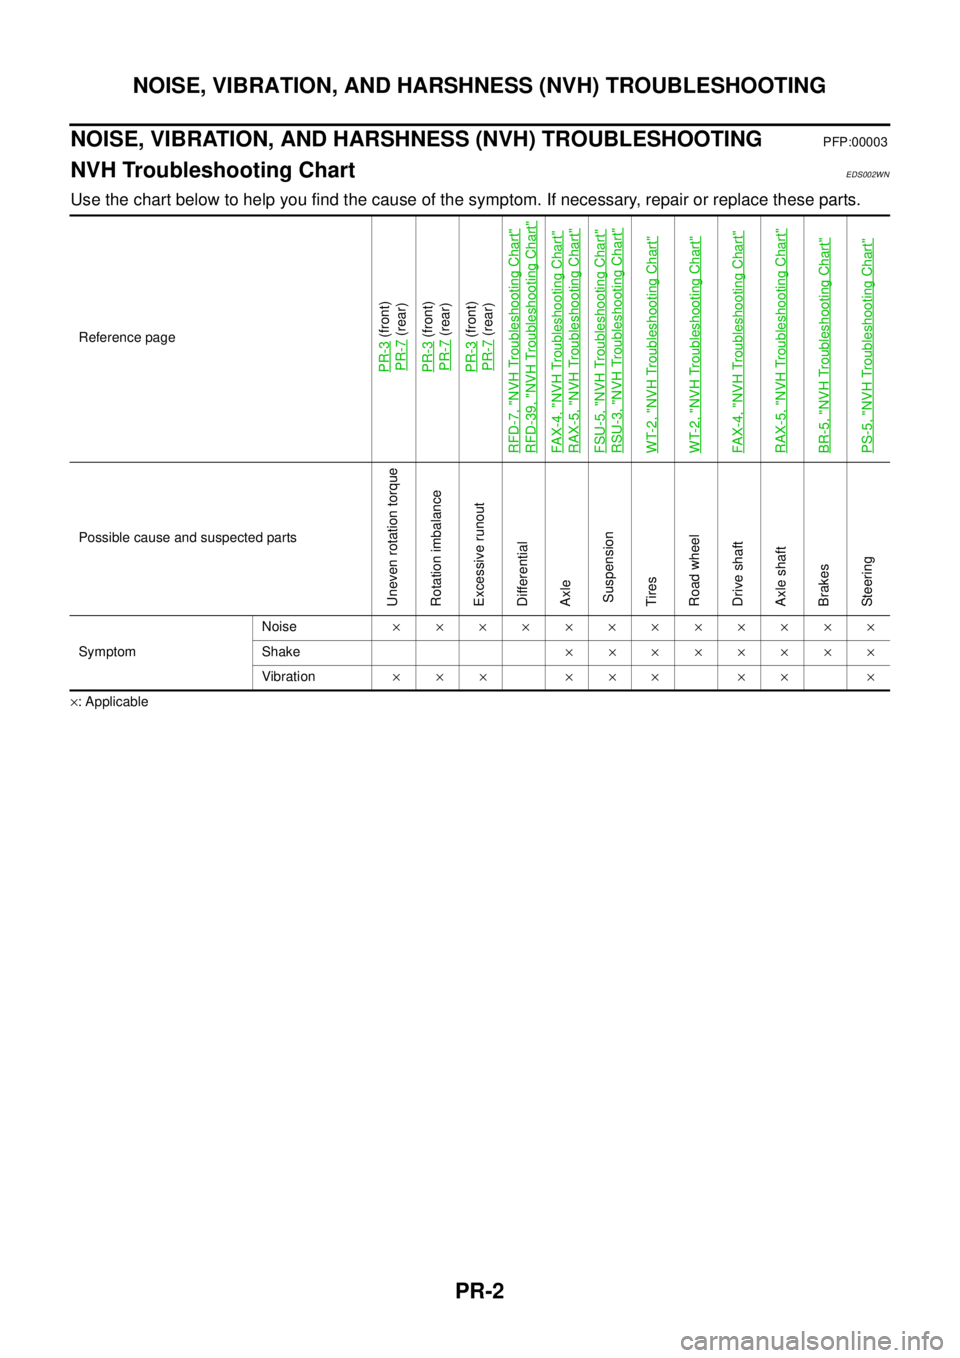
NOISE, VIBRATION, AND HARSHNESS (NVH) TROUBLESHOOTING
PFP:00003
NVH Troubleshooting ChartEDS002WN
Use the chart below to help you find the cause of the symptom. If necessary, repair or replace these parts.
´: ApplicableReference page
PR-3
(front)
PR-7(rear)
PR-3(front)
PR-7(rear)
PR-3(front)
PR-7(rear)
RFD-7, "
NVH Troubleshooting Chart
"
RFD-39, "
NVH Troubleshooting Chart
"
FA X -4 , "
NVH Troubleshooting Chart
"
RAX-5, "
NVH Troubleshooting Chart
"
FSU-5, "
NVH Troubleshooting Chart
"
RSU-3, "
NVH Troubleshooting Chart
"
WT-2, "
NVH Troubleshooting Chart
"
WT-2, "
NVH Troubleshooting Chart
"
FA X -4 , "
NVH Troubleshooting Chart
"
RAX-5, "
NVH Troubleshooting Chart
"
BR-5, "
NVH Troubleshooting Chart
"
PS-5, "
NVH Troubleshooting Chart
"
Possible cause and suspected parts
Uneven rotation torque
Rotation imbalance
Excessive runout
Differential
Axle
Suspension
Tires
Road wheel
Drive shaft
Axle shaft
Brakes
Steering
SymptomNoise´´´´´´´´´´´´
Shake´´´´´´´´
Vibration´´´ ´´´ ´´ ´
Page 2630 of 3171
PREPARATION
PS-3
C
D
E
F
H
I
J
K
L
MA
B
PS
PREPARATIONPFP:00002
Special Service Tools [SST]EGS001LA
Tool number
Tool nameDescription
ST27180001
Steering wheel pullerRemoving steering wheel
ST3127 S000
Preload gauge
1. GG9103000
Torque wrench
2. HT62940000
Socket adapter
3. HT62900000
Socket adapterInspecting of rotating torque for ball joint
KV489Q0030
Rear cover wrench
a: 19 mm (0.75 in)
b: 34.9 mm (1.374 in)Removing and installing rear cover
KV489Q0020
Teflon ring correcting tool
a: 50 mm (1.97 in) dia.
b: 36 mm (1.42 in) dia.
c: 100 mm (3.94 in) dia.Installing rack Teflon ring
KV48103400
Preload adapterInspecting rotating torque
KV48103500
Pressure gaugeMeasuring oil pump relief pressure
KV48102500
Pressure gauge adapterMeasuring oil pump relief pressure
S-NT544
S-NT541
SGIA0516E
S-NT550
ZZA0824D
S-NT547
S-NT542
Page 2632 of 3171
NOISE, VIBRATION, AND HARSHNESS (NVH) TROUBLESHOOTING
PS-5
C
D
E
F
H
I
J
K
L
MA
B
PS
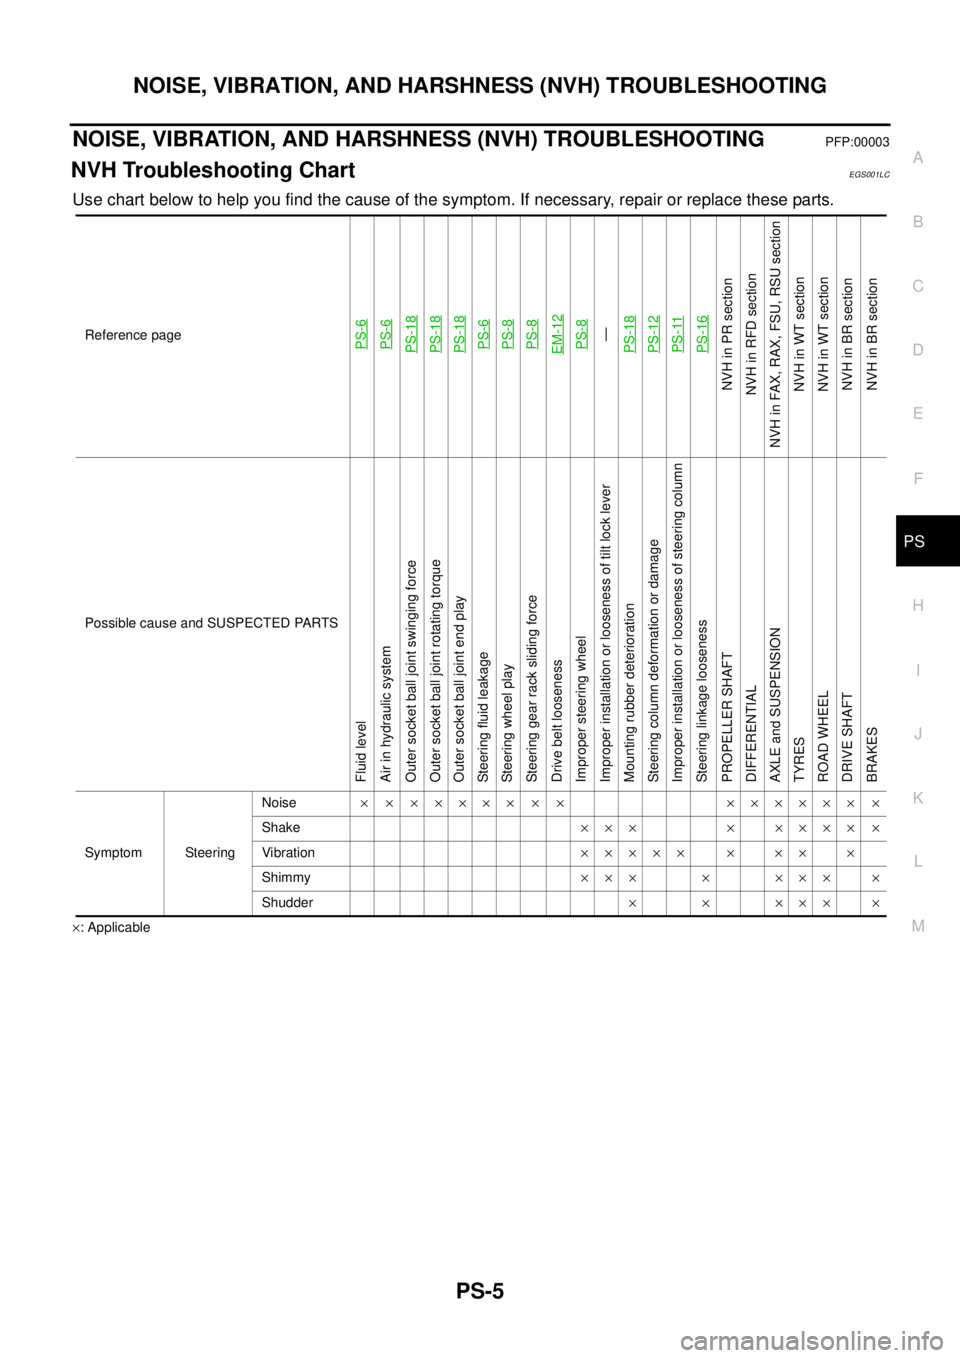
NOISE, VIBRATION, AND HARSHNESS (NVH) TROUBLESHOOTINGPFP:00003
NVH Troubleshooting ChartEGS001LC
Use chart below to help you find the cause of the symptom. If necessary, repair or replace these parts.
´: ApplicableReference page
PS-6PS-6PS-18PS-18PS-18PS-6PS-8PS-8EM-12PS-8—
PS-18PS-12PS-11PS-16
NVHinPRsection
NVH in RFD section
NVH in FAX, RAX, FSU, RSU section
NVH in WT section
NVH in WT section
NVHinBRsection
NVHinBRsection
Possible cause and SUSPECTED PARTS
Fluid level
Air in hydraulic system
Outer socket ball joint swinging force
Outer socket ball joint rotating torque
Outer socket ball joint end play
Steering fluid leakage
Steering wheel play
Steering gear rack sliding force
Drive belt looseness
Improper steering wheel
Improper installation or looseness of tilt lock lever
Mounting rubber deterioration
Steering column deformation or damage
Improper installation or looseness of steering column
Steering linkage looseness
PROPELLER SHAFT
DIFFERENTIAL
AXLE and SUSPENSION
TYRES
ROAD WHEEL
DRIVE SHAFT
BRAKES
Symptom SteeringNoise´ ´ ´´´´´ ´ ´ ´´´´´´ ´
Shake´´´ ´ ´´´´ ´
Vibration´´´´´ ´ ´´ ´
Shimmy´´´ ´ ´´´ ´
Shudder´ ´ ´´´ ´
Page 2639 of 3171
PS-12
STEERING COLUMN
9. Remove steering column assembly mounting nuts, and then remove steering column assembly from vehi-
cle.
10. Remove fixing bolt and nut of upper joint (lower side), and then remove upper joint and collar from upper
shaft.
11. Loosen clamp, and then remove hole cover seal from hole cover.
12. Remove mounting nuts of hole cover, and then remove clamp, hole cover mounting plate and hole cover
from dash panel.
13. Raise vehicle.
14. Remove fixing bolt of lower shaft (lower side), and then remove lower shaft and upper shaft from vehicle.
INSPECTION AFTER REMOVAL
lCheck component parts for damage or other malfunctions. Replace if there are.
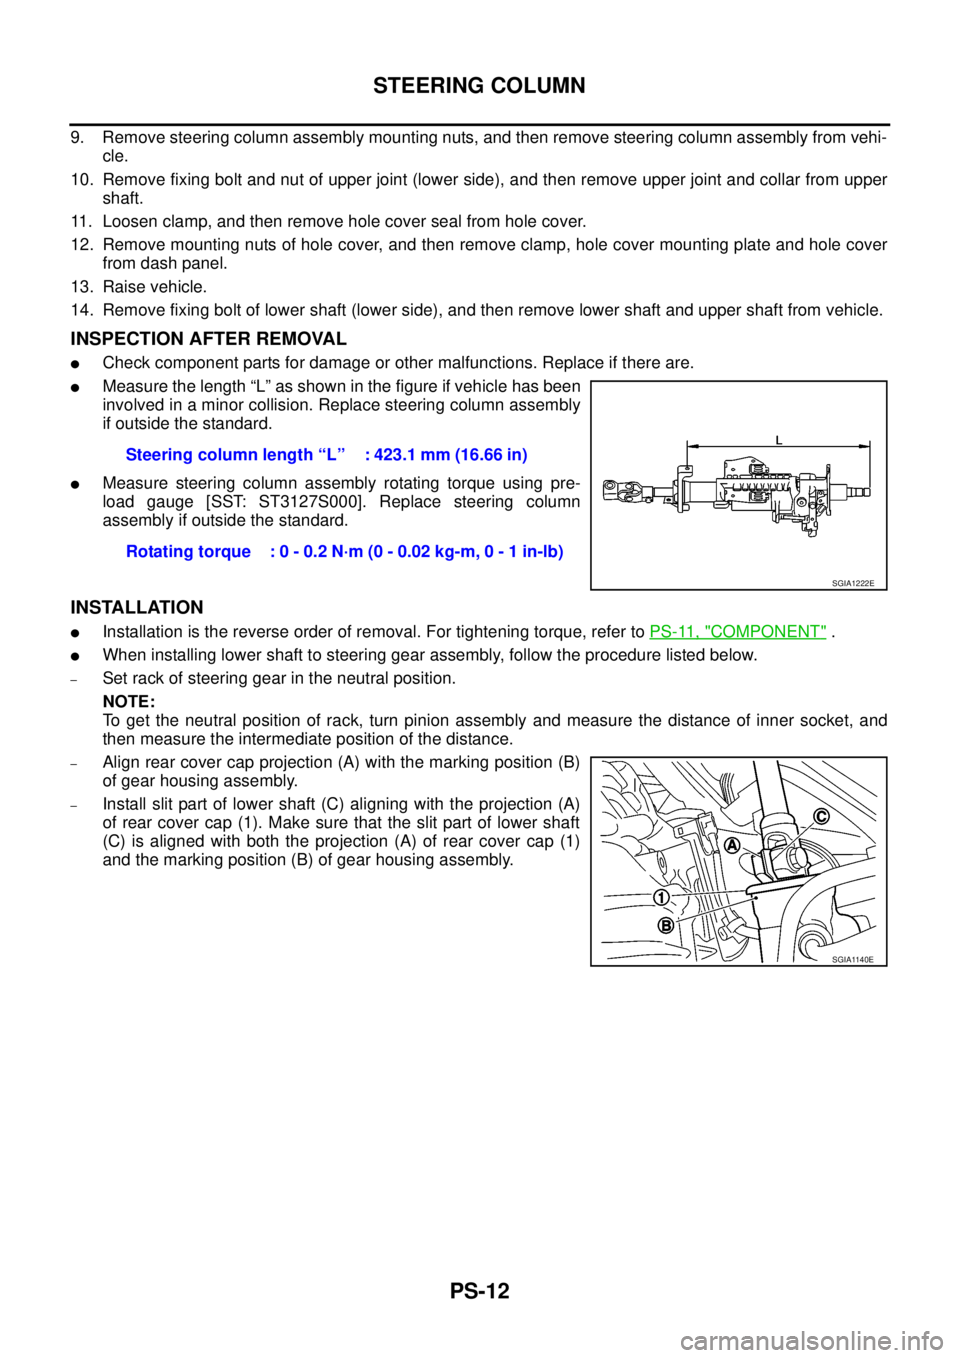
lMeasure the length “L” as shown in the figure if vehicle has been
involved in a minor collision. Replace steering column assembly
if outside the standard.
lMeasure steering column assembly rotating torque using pre-
load gauge [SST: ST3127S000]. Replace steering column
assembly if outside the standard.
INSTALLATION
lInstallation is the reverse order of removal. For tightening torque, refer toPS-11, "COMPONENT".
lWhen installing lower shaft to steering gear assembly, follow the procedure listed below.
–Set rack of steering gear in the neutral position.
NOTE:
To get the neutral position of rack, turn pinion assembly and measure the distance of inner socket, and
then measure the intermediate position of the distance.
–Align rear cover cap projection (A) with the marking position (B)
of gear housing assembly.
–Install slit part of lower shaft (C) aligning with the projection (A)
of rear cover cap (1). Make sure that the slit part of lower shaft
(C) is aligned with both the projection (A) of rear cover cap (1)
and the marking position (B) of gear housing assembly.Steering column length “L” : 423.1 mm (16.66 in)
Rotating torque : 0 - 0.2 N·m (0 - 0.02 kg-m, 0 - 1 in-lb)
SGIA1222E
SGIA1140E
Page 2642 of 3171
POWER STEERING GEAR AND LINKAGE
PS-15
C
D
E
F
H
I
J
K
L
MA
B
PS
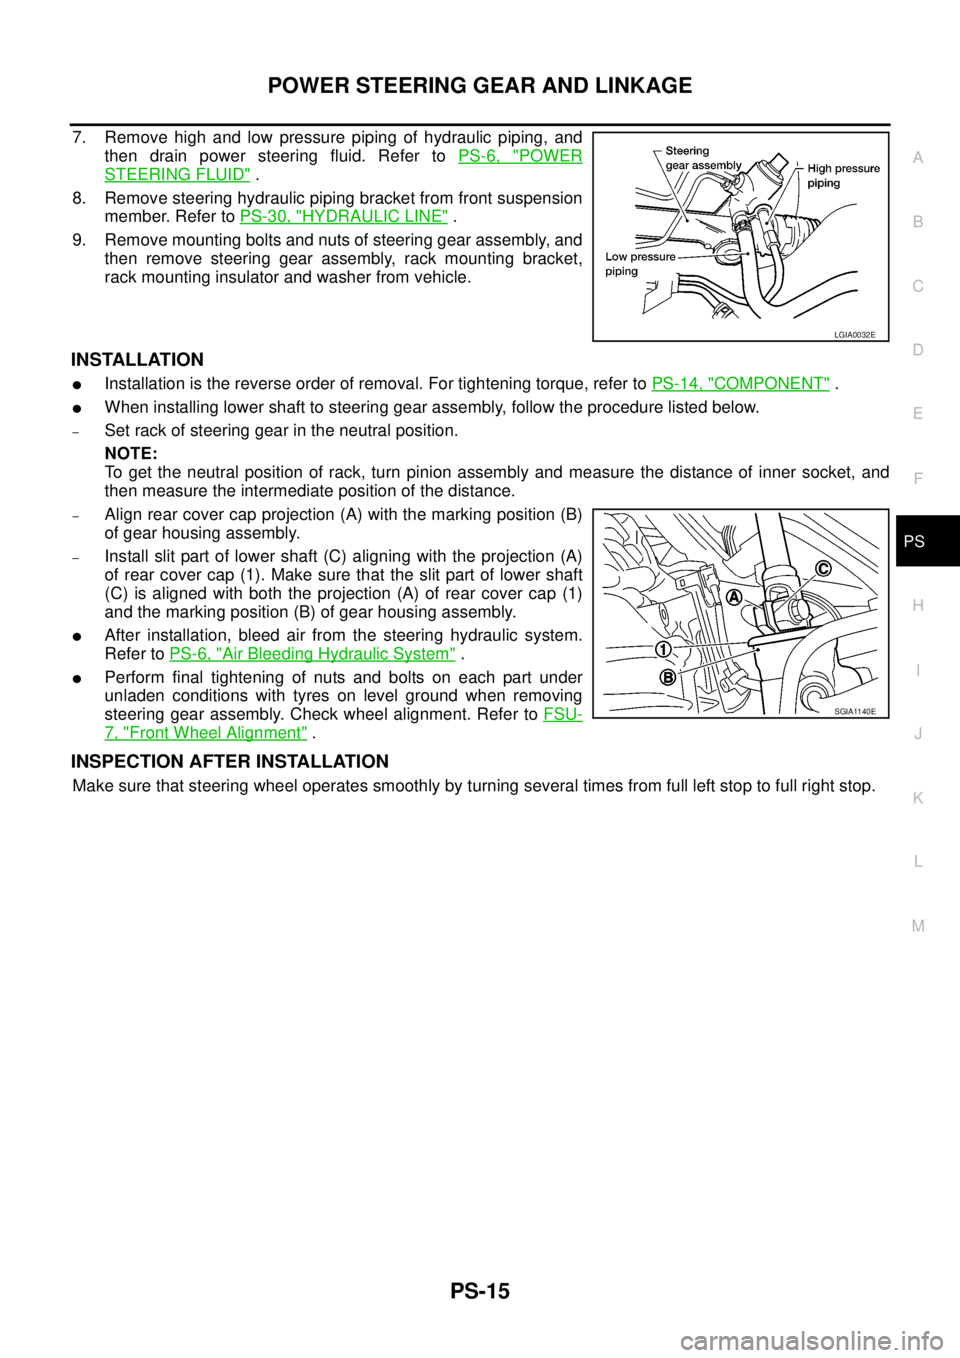
7. Remove high and low pressure piping of hydraulic piping, and
then drain power steering fluid. Refer toPS-6, "
POWER
STEERING FLUID".
8. Remove steering hydraulic piping bracket from front suspension
member. Refer toPS-30, "
HYDRAULIC LINE".
9. Remove mounting bolts and nuts of steering gear assembly, and
then remove steering gear assembly, rack mounting bracket,
rack mounting insulator and washer from vehicle.
INSTALLATION
lInstallation is the reverse order of removal. For tightening torque, refer toPS-14, "COMPONENT".
lWhen installing lower shaft to steering gear assembly, follow the procedure listed below.
–Set rack of steering gear in the neutral position.
NOTE:
To get the neutral position of rack, turn pinion assembly and measure the distance of inner socket, and
then measure the intermediate position of the distance.
–Align rear cover cap projection (A) with the marking position (B)
of gear housing assembly.
–Install slit part of lower shaft (C) aligning with the projection (A)
of rear cover cap (1). Make sure that the slit part of lower shaft
(C) is aligned with both the projection (A) of rear cover cap (1)
and the marking position (B) of gear housing assembly.
lAfter installation, bleed air from the steering hydraulic system.
Refer toPS-6, "
Air Bleeding Hydraulic System".
lPerform final tightening of nuts and bolts on each part under
unladen conditions with tyres on level ground when removing
steering gear assembly. Check wheel alignment. Refer toFSU-
7, "Front Wheel Alignment".
INSPECTION AFTER INSTALLATION
Make sure that steering wheel operates smoothly by turning several times from full left stop to full right stop.
LGIA0032E
SGIA1140E
Page 2645 of 3171
PS-18
POWER STEERING GEAR AND LINKAGE
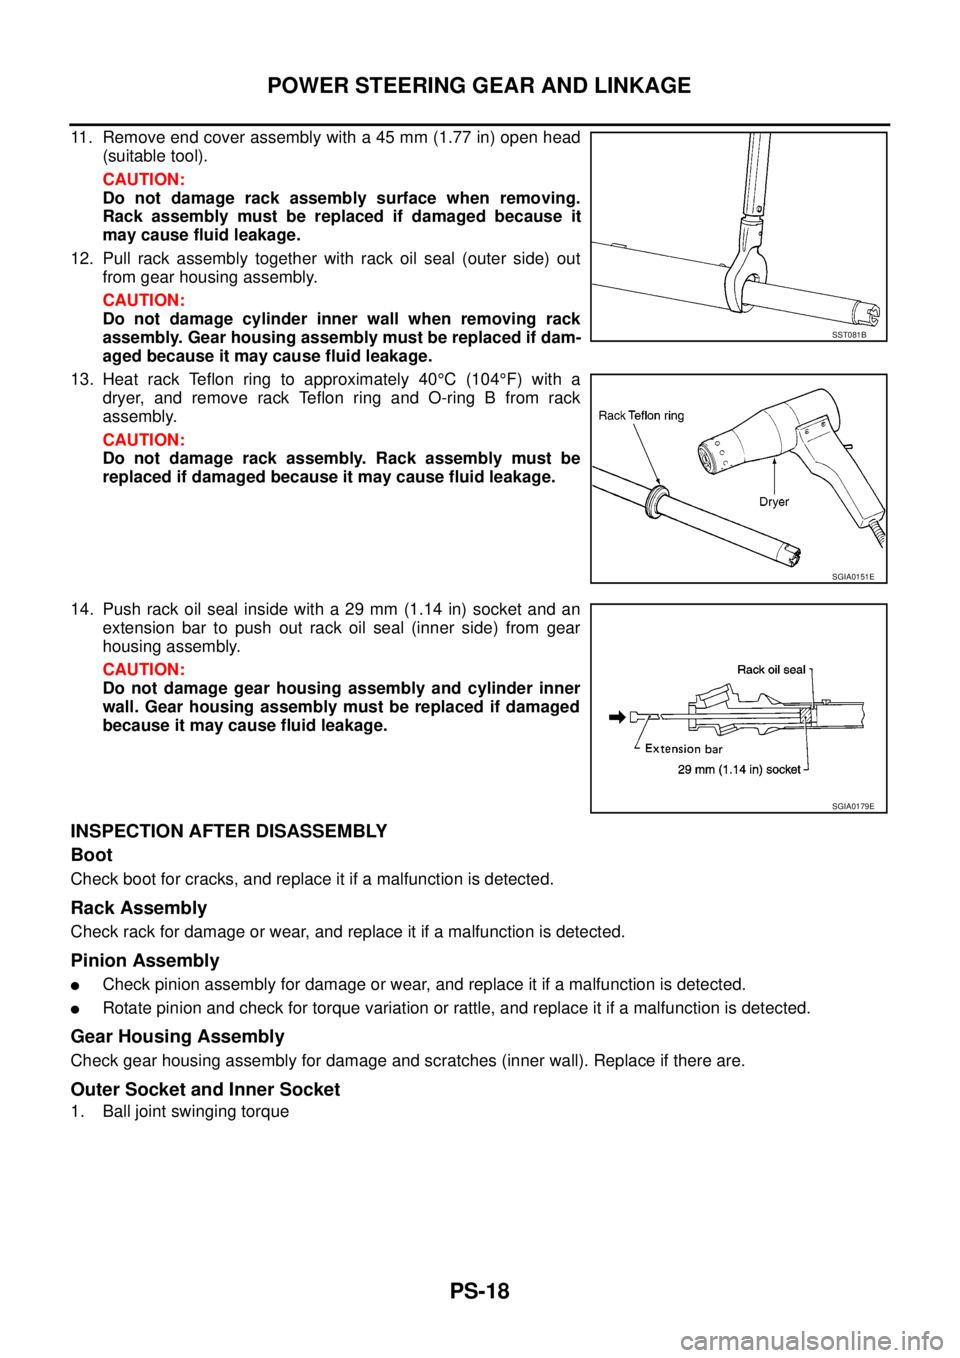
11. Remove end cover assembly with a 45 mm (1.77 in) open head
(suitable tool).
CAUTION:
Do not damage rack assembly surface when removing.
Rack assembly must be replaced if damaged because it
may cause fluid leakage.
12. Pull rack assembly together with rack oil seal (outer side) out
from gear housing assembly.
CAUTION:
Do not damage cylinder inner wall when removing rack
assembly. Gear housing assembly must be replaced if dam-
aged because it may cause fluid leakage.
13. Heat rack Teflon ring to approximately 40°C(104°F) with a
dryer, and remove rack Teflon ring and O-ring B from rack
assembly.
CAUTION:
Do not damage rack assembly. Rack assembly must be
replaced if damaged because it may cause fluid leakage.
14. Push rack oil seal inside with a 29 mm (1.14 in) socket and an
extension bar to push out rack oil seal (inner side) from gear
housing assembly.
CAUTION:
Do not damage gear housing assembly and cylinder inner
wall. Gear housing assembly must be replaced if damaged
because it may cause fluid leakage.
INSPECTION AFTER DISASSEMBLY
Boot
Check boot for cracks, and replace it if a malfunction is detected.
Rack Assembly
Check rack for damage or wear, and replace it if a malfunction is detected.
Pinion Assembly
lCheck pinion assembly for damage or wear, and replace it if a malfunction is detected.
lRotate pinion and check for torque variation or rattle, and replace it if a malfunction is detected.
Gear Housing Assembly
Check gear housing assembly for damage and scratches (inner wall). Replace if there are.
Outer Socket and Inner Socket
1. Ball joint swinging torque
SST081B
SGIA0151E
SGIA0179E
Page 2646 of 3171
POWER STEERING GEAR AND LINKAGE
PS-19
C
D
E
F
H
I
J
K
L
MA
B
PS
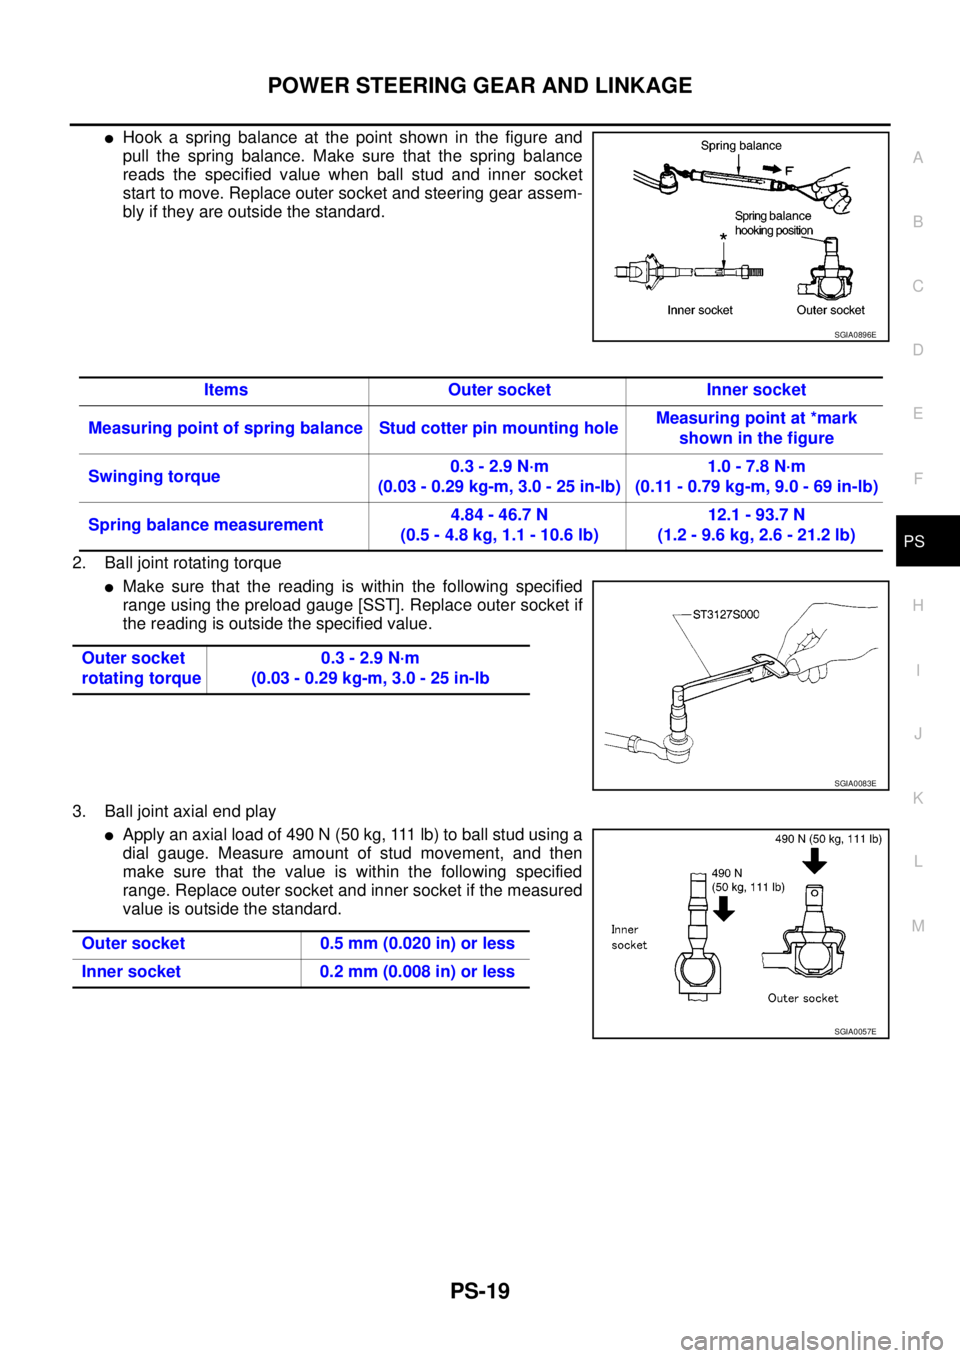
lHook a spring balance at the point shown in the figure and
pull the spring balance. Make sure that the spring balance
reads the specified value when ball stud and inner socket
start to move. Replace outer socket and steering gear assem-
bly if they are outside the standard.
2. Ball joint rotating torque
lMake sure that the reading is within the following specified
range using the preload gauge [SST]. Replace outer socket if
the reading is outside the specified value.
3. Ball joint axial end play
lApply an axial load of 490 N (50 kg, 111 lb) to ball stud using a
dial gauge. Measure amount of stud movement, and then
make sure that the value is within the following specified
range. Replace outer socket and inner socket if the measured
value is outside the standard.
SGIA0896E
Items Outer socket Inner socket
Measuring point of spring balance Stud cotter pin mounting holeMeasuring point at *mark
shown in the figure
Swinging torque0.3 - 2.9 N·m
(0.03 - 0.29 kg-m, 3.0 - 25 in-lb)1.0-7.8N·m
(0.11 - 0.79 kg-m, 9.0 - 69 in-lb)
Spring balance measurement4.84 - 46.7 N
(0.5 - 4.8 kg, 1.1 - 10.6 lb)12.1 - 93.7 N
(1.2 - 9.6 kg, 2.6 - 21.2 lb)
Outer socket
rotating torque0.3 - 2.9 N·m
(0.03 - 0.29 kg-m, 3.0 - 25 in-lb
SGIA0083E
Outer socket 0.5 mm (0.020 in) or less
Inner socket 0.2 mm (0.008 in) or less
SGIA0057E
Page 2648 of 3171
POWER STEERING GEAR AND LINKAGE
PS-21
C
D
E
F
H
I
J
K
L
MA
B
PS
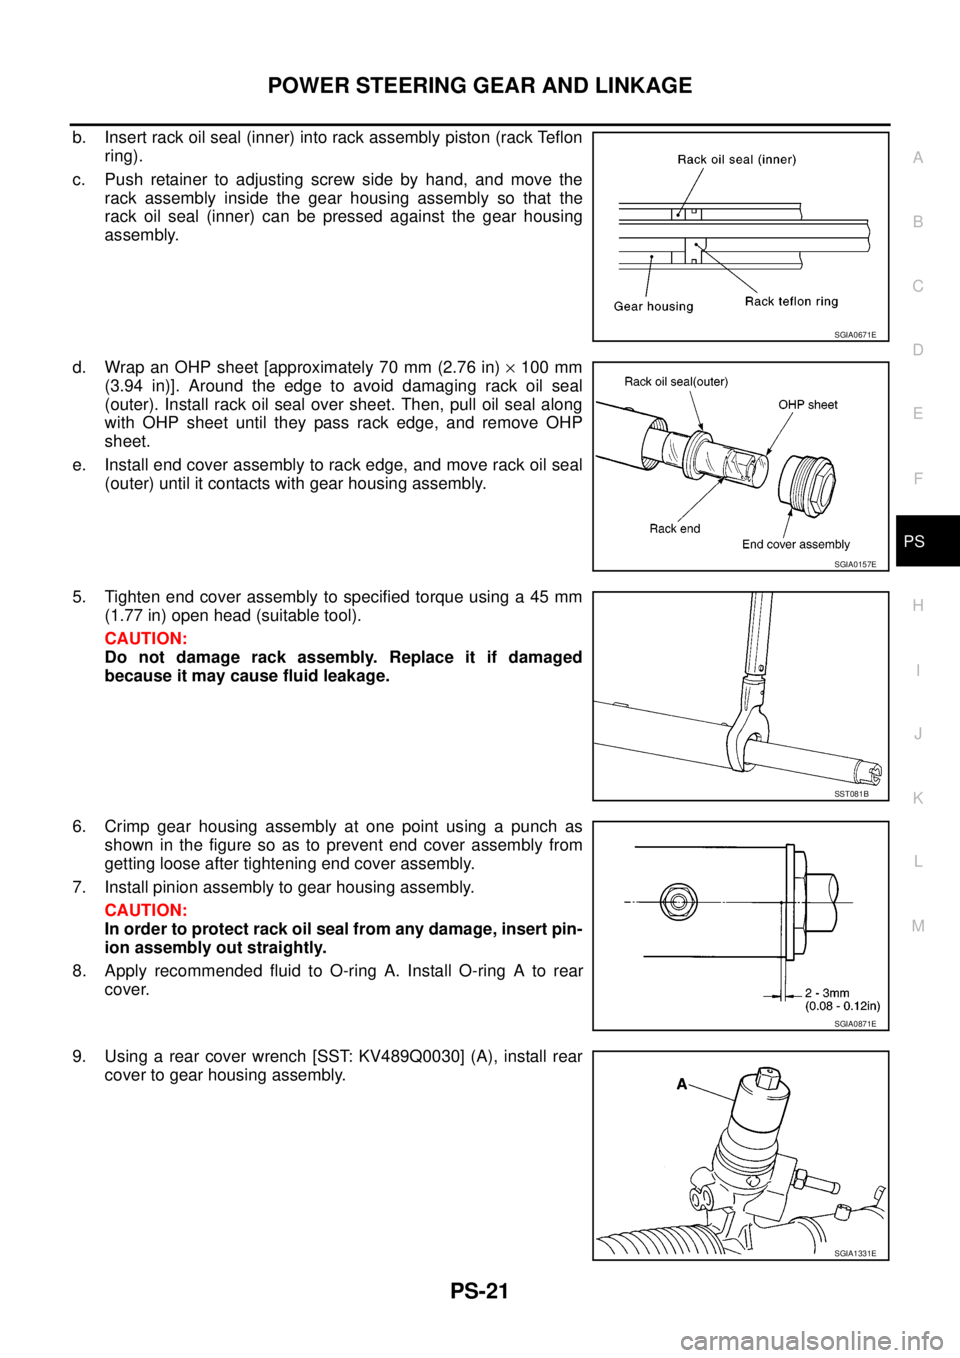
b. Insert rack oil seal (inner) into rack assembly piston (rack Teflon
ring).
c. Push retainer to adjusting screw side by hand, and move the
rack assembly inside the gear housing assembly so that the
rack oil seal (inner) can be pressed against the gear housing
assembly.
d. Wrap an OHP sheet [approximately 70 mm (2.76 in)´100 mm
(3.94 in)]. Around the edge to avoid damaging rack oil seal
(outer). Install rack oil seal over sheet. Then, pull oil seal along
with OHP sheet until they pass rack edge, and remove OHP
sheet.
e. Install end cover assembly to rack edge, and move rack oil seal
(outer) until it contacts with gear housing assembly.
5. Tighten end cover assembly to specified torque using a 45 mm
(1.77 in) open head (suitable tool).
CAUTION:
Do not damage rack assembly. Replace it if damaged
because it may cause fluid leakage.
6. Crimp gear housing assembly at one point using a punch as
shown in the figure so as to prevent end cover assembly from
getting loose after tightening end cover assembly.
7. Install pinion assembly to gear housing assembly.
CAUTION:
In order to protect rack oil seal from any damage, insert pin-
ion assembly out straightly.
8. Apply recommended fluid to O-ring A. Install O-ring A to rear
cover.
9. Using a rear cover wrench [SST: KV489Q0030] (A), install rear
cover to gear housing assembly.
SGIA0671E
SGIA0157E
SST081B
SGIA0871E
SGIA1331E