Page 672 of 969

16-23
2301 Author�: Da")
160QL-01
A87082
Dimension ºBº
Overhaul HandleStopper Bolt SSTPart ºAº
Claw
A86587Stopper Bolt
Core Plate
SST
Radiator Tank
A86588
Ta p
A86589
- COOLINGRADIATOR ASSY (3MZ-FE)
16-23
2301 Author�: Date�:
2005 LEXUS ES330 REPAIR MANUAL (RM1124U)
OVERHAUL
1. REMOVE RADIATOR DRAIN COCK PLUG
(a) Remove the drain cock plug.
(b) Remove the O-ring from the drain cock plug.
2. ASSEMBLE SST
SST 09230-01010 (09231-01010, 09231-01030)
(a) Install the claw to the overhaul handle by inserting it in the
hole in part ºAº as shown in the illustration.
(b) While gripping the handle, adjust the stopper bolt so that
dimension ºBº is as shown in the illustration.
Dimension ºBº: 0.2 to 0.3 mm (0.008 to 0.012 in)
NOTICE:
If the stopper bolt is not adjusted, the claw may be dam-
aged.
3. UNCAULK CORE PLATE
(a) Using SST to release the core plate, grip the handle until
stopped by the stopper bolt.
SST 09230-01010 (09231-01010, 09231-01030)
4. REMOVE RADIATOR TANK UPPER
(a) Lightly tap the bracket of the radiator tank (or radiator tank
pipe) with a soft-faced hammer, then remove the radiator
tank.
(b) Remove the O-ring.
5. REMOVE RADIATOR TANK LOWER
HINT:
Perform the same procedures as the radiator tank upper.
6. REMOVE INLET NO.1
(a) Remove the bolt.
(b) Remove the nut and inlet No. 1.
Page 674 of 969

A87088
� Normal
O-ringX Twisted
X Twisted
A86593
Ta pCORRECT
WRONG Radiator Tank
Core
Plate
A87090
Dimension ºBº
Stopper Bolt
Overhaul Handle Punch AssemblyPart ºAº
SST
- COOLINGRADIATOR ASSY (3MZ-FE)
16-25
2303 Author�: Date�:
2005 LEXUS ES330 REPAIR MANUAL (RM1124U)
13. INSTALL RADIATOR TANK UPPER
(a) After checking that there are no foreign objects in the core
plate groove, install a new O-ring without twisting it.
HINT:
When cleaning the core plate groove, lightly rub it with sandpa-
per without scratching it.
(b) Install the radiator tank without damaging the O-ring.
(c) Tap the core plate with a soft-faced hammer so that there
is no gap between the core plate and radiator tank.
14. INSTALL RADIATOR TANK LOWER
HINT:
Perform the same procedures as the radiator tank upper.
15. ASSEMBLE SST
SST 09230-01010 (09231-01010, 09231-01020)
(a) Install the punch assembly to the overhaul handle by in-
serting it in the hole in part ºAº as shown in the illustration.
(b) While gripping the handle, adjust the stopper bolt so that
dimension ºBº is as shown in the illustration.
Dimension ºBº: 8.4 mm (0.341 in.)
Page 675 of 969
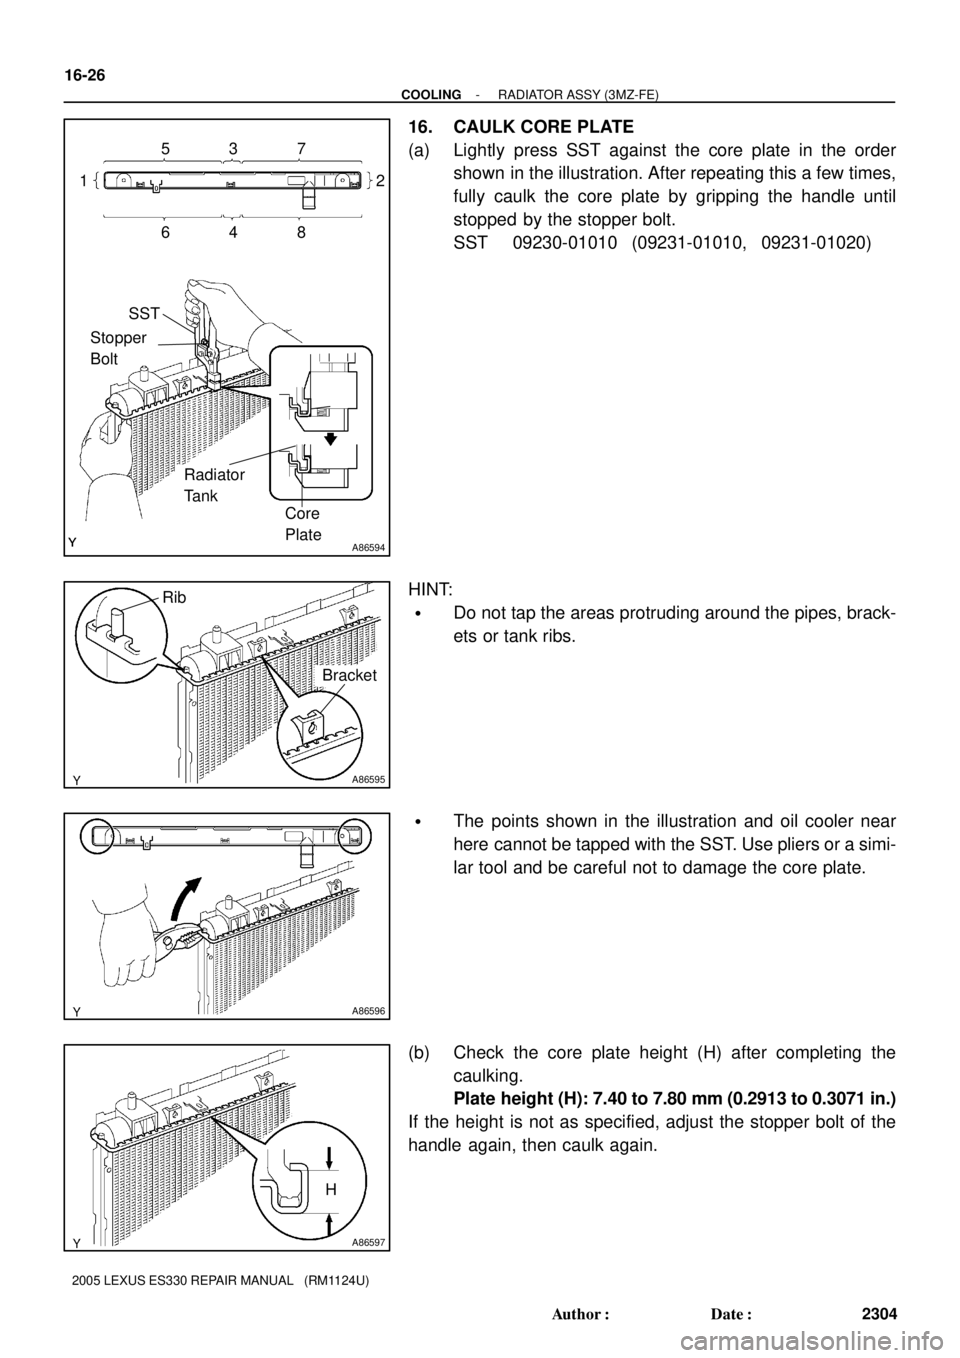
A86594
5
SST
Stopper
Bolt
Radiator
Tank
Core
Plate 1
6482 7 3
A86595
Rib
Bracket
A86596
A86597
H 16-26
- COOLINGRADIATOR ASSY (3MZ-FE)
2304 Author�: Date�:
2005 LEXUS ES330 REPAIR MANUAL (RM1124U)
16. CAULK CORE PLATE
(a) Lightly press SST against the core plate in the order
shown in the illustration. After repeating this a few times,
fully caulk the core plate by gripping the handle until
stopped by the stopper bolt.
SST 09230-01010 (09231-01010, 09231-01020)
HINT:
�Do not tap the areas protruding around the pipes, brack-
ets or tank ribs.
�The points shown in the illustration and oil cooler near
here cannot be tapped with the SST. Use pliers or a simi-
lar tool and be careful not to damage the core plate.
(b) Check the core plate height (H) after completing the
caulking.
Plate height (H): 7.40 to 7.80 mm (0.2913 to 0.3071 in.)
If the height is not as specified, adjust the stopper bolt of the
handle again, then caulk again.
Page 689 of 969
A36784
A78725
Seal Packing
Seal Width
2 to 3 mm
(0.08 to 0.12 in.) A
A
BB
C
C
A36785
- LUBRICATIONOIL PUMP ASSY (3MZ-FE)
17-13
2318 Author�: Date�:
41. INSTALL OIL PUMP ASSY
(a) Remove any old seal packing material from the contact
surface.
(b) Apply a light coat of engine oil to a new O-ring, then place
it on the cylinder block.
(c) Apply a continuous bead of seal packing (Diameter 2 to
3 mm (0.08 to 0.12 in.)) as shown in the illustration.
Seal packing: Part No. 08826-00080 or equivalent
NOTICE:
�Remove any oil from contact surface.
�Apply seal packing to the inner side of the bolt holes.
�Install the oil pump within 3 minutes after applying
seal packing.
�Do not expose the seal packing to engine oil within 2
hours after installing.
(d) Align the key of the oil pump drive gear with the keyway
located on the crankshaft, then slide the oil pump into
place.
Page 694 of 969

2323 Author�: Date�:
2005 LEXUS ES330 REPAIR MANUAL (RM1124U)
OVERHAUL
1. REMOVE OIL PUMP RELIEF VALVE
(a) Remove the p")
170F4-03
A33002
A33003
A33004
A33005
17-18
- LUBRICATIONOIL PUMP ASSY (3MZ-FE)
2323 Author�: Date�:
2005 LEXUS ES330 REPAIR MANUAL (RM1124U)
OVERHAUL
1. REMOVE OIL PUMP RELIEF VALVE
(a) Remove the plug, spring and relief valve.
2. INSPECT OIL PUMP RELIEF VALVE
(a) Apply a light coat of engine oil to the relief valve.
(b) Check that the relief valve falls smoothly into the valve
hole by its own weight.
3. INSPECT OIL PUMP ASSY
(a) Remove the oil pump cover.
(1) Remove the 10 screws and oil pump cover.
(b) Remove the oil pump rotor set.
NOTICE:
Do not change the combination or turn over the 2 removed
rotors.
(c) Inspect the oil pump rotor set.
(1) Apply a light coat of engine oil to the oil pump rotor
set, then place them into the oil pump body. Check
that the rotors revolve smoothly.
(d) Inspect the tip clearance.
(1) Using a feeler gauge, measure the clearance be-
tween the drive and driven rotor tips.
Standard tip clearance:
0.06 to 0.18 mm (0.0024 to 0.0071 in.)
Maximum tip clearance: 0.35 mm (0.0138 in.)
(e) Inspect the body clearance.
(1) Using a feeler gauge, measure the clearance be-
tween the driven rotor and body.
Standard body clearance:
0.250 to 0.325 mm (0.0098 to 0.0128 in.)
Maximum body clearance: 0.30 mm (0.0118 in.)
(f) Inspect the side clearance.
(1) Using a feeler gauge and precision straight edge,
measure the clearance between the rotors and pre-
cision straight edge.
Standard side clearance:
0.03 to 0.09 mm (0.0012 to 0.0035 in.)
Maximum side clearance: 0.15 mm (0.0059 in.)
Page 695 of 969
A78905
Marks
- LUBRICATIONOIL PUMP ASSY (3MZ-FE)
17-19
2324 Author�: Date�:
2005 LEXUS ES330 REPAIR MANUAL (RM1124U)
(g) Install the oil pump rotor set.
(1) Apply a light coat of engine oil to the oil pump gear
set, then place it into the pump body with the marks
facing the pump body cover side.
(h) Install the oil pump cover.
(1) Install the 10 screws and oil pump cover.
Torque: 10 NVm (105 kgfVcm, 8 ftVlbf)
4. INSTALL OIL PUMP RELIEF VALVE
(a) Apply a light coat of engine oil to the relief valve, then insert the relief valve and spring into the pump
body hole.
(b) Install the oil pump relief valve plug.
Torque: 49 NVm (500 kgfVcm,
36 ftVlbf)
Page 696 of 969

2325 Author�: Date�:
2005 LEXUS ES330 REPAIR MANUAL (RM1124U)
OIL FILTER SUB-ASSY (3MZ-FE)
REPLAC")
170F5-03
A78720
SST
P12582
Additional
3/4 TurnSST
17-20
- LUBRICATIONOIL FILTER SUB-ASSY (3MZ-FE)
2325 Author�: Date�:
2005 LEXUS ES330 REPAIR MANUAL (RM1124U)
OIL FILTER SUB-ASSY (3MZ-FE)
REPLACEMENT
CAUTION:
�Prolonged and repeated contact with engine oil will cause removal of natural oils from the skin,
leading to dryness, irritation and dermatitis. In addition, used engine oil contains potentially
harmful contaminants which may cause skin cancer.
�Precautions should be taken when replacing engine oil to minimize the risk of your skin making
contact with used engine oil. Wear protective clothing and gloves. Wash your skin thoroughly
with soap and water, or use water-less hand cleaner to remove any used engine oil. Do not use
gasoline, thinners, or solvents.
�For environmental protection used oil and used oil filter must be disposed of at designated dis-
posal sites.
1. REMOVE ENGINE UNDER COVER NO.1
2. DRAIN ENGINE OIL
(a) Remove the oil filler cap.
(b) Remove the oil drain plug, then drain the oil into a container.
(c) Clean and install the oil drain plug with a new gasket.
Torque: 45 NVm (459 kgfVcm,
33 ftVlbf)
3. REMOVE OIL FILTER SUB-ASSY
(a) Using SST, remove the oil filter.
SST 09228-07501
4. INSTALL OIL FILTER SUB-ASSY
(a) Check and clean the oil filter installation surface.
(b) Apply clean engine oil to the gasket of a new oil filter.
(c) Lightly screw the oil filter into place, then tighten it until the
gasket contacts the seat.
(d) Using SST, tighten it an additional 3/4 turn.
SST 09228-07501
5. ADD ENGINE OIL
(a) Fill with fresh engine oil.
Capacity:
Drain and refill with oil filter change4.7 liters (5.0 US qts, 4.1 lmp. qts)
Drain and refill without oil filter change4.5 liters (4.8 US qts, 4.0 lmp. qts)
Dry fill5.5 liters (5.8 US qts, 4.8 lmp. qts)
6. CHECK FOR ENGINE OIL LEAKS
Page 701 of 969

(b)
A78529
LH Bank:
(a)
(b)
- IGNITIONVVT SENSOR (3MZ-FE)
18-5
2330 Author�: Date�:
2005 LEXUS ES330 REPAIR MANUAL (RM1124U)
VVT SENSOR (3MZ-FE)
REPLACEMENT
1. DISCONNEC")
1809C-01
A79541
RH Bank:
(a)
(b)
A78529
LH Bank:
(a)
(b)
- IGNITIONVVT SENSOR (3MZ-FE)
18-5
2330 Author�: Date�:
2005 LEXUS ES330 REPAIR MANUAL (RM1124U)
VVT SENSOR (3MZ-FE)
REPLACEMENT
1. DISCONNECT ENGINE WIRE NO. 3 (BATTERY NEGATIVE TERMINAL)
2. REMOVE RADIATOR LOWER AIR DEFLECTOR (See page 19-5)
3. REMOVE AIR CLEANER INLET ASSY (See page 19-5)
4. REMOVE AIR CLEANER ASSY (See page 19-5)
5. REMOVE VVT SENSOR
(a) Remove the 2 VVT sensor connectors.
(b) Remove the 2 bolts, then remove the 2 VVT sensors.
HINT:
The VVT sensor is installed with the bolt.
6. INSTALL VVT SENSOR
(a) Apply a light coat of engine oil to the O-ring on each VVT sensor.
(b) Install the 2 VVT sensors with the 2 bolts.
Torque: 8.0 NVm (80 kgfVcm, 71 in.Vlbf)
NOTICE:
Be careful not to twist the O-ring.
(c) Connect the 2 VVT sensor connectors.
7. INSTALL AIR CLEANER ASSY (See page 19-5)
8. INSTALL AIR CLEANER INLET ASSY (See page 19-5)
9. INSTALL RADIATOR LOWER AIR DEFLECTOR
10. CHECK CONNECTION OF VACUUM HOSE (See page 14-29)
11. CONNECT ENGINE WIRE NO. 3 (BATTERY NEGATIVE TERMINAL)
Torque: 5.4 NVm (55 kgfVcm, 48 in.Vlbf)
12. CHECK FOR ENGINE OIL LEAKS
13. SYSTEM INITIALIZATION (See page 19-15)