Page 908 of 2870
ME(H4SO)-39
MECHANICAL
Engine Assembly
(1) Tighten the bolts which hold torque convert-
er clutch to drive plate.
(2) Tighten other bolts while rotating the engine
by using a socket wrench.
NOTE:
Be careful not to drop the bolts into torque convert-
er clutch housing.
Tightening torque:
25 N
⋅m (2.5 kgf-m, 18.1 ft-lb)
(3) Plug up the service hole and prevent foreign
matters from getting in.
10) Install the power steering pump on bracket.
(1) Install the reservoir tank on bracket.
(2) Install the power steering pump on bracket,
and then tighten the bolts.
Tightening torque:
20.1 N
⋅m (2.05 kgf-m, 14.8 ft-lb)(3) Tighten the bolts which install power steer-
ing pump bracket, and then install the spark plug
cords.
(4) Connect the power steering switch connec-
tor.
(5) Install the front side V-belt, and adjust it.
STALLATION, V-belt.>
(6) Install the resonator chamber.
Tightening torque:
33 N
⋅m (3.4 kgf-m, 24.6 ft-lb)
ME-00212
FU-00020
FU-00139
ME-00331
FU-00017
IN-00044
Page 909 of 2870

ME(H4SO)-40
MECHANICAL
Engine Assembly
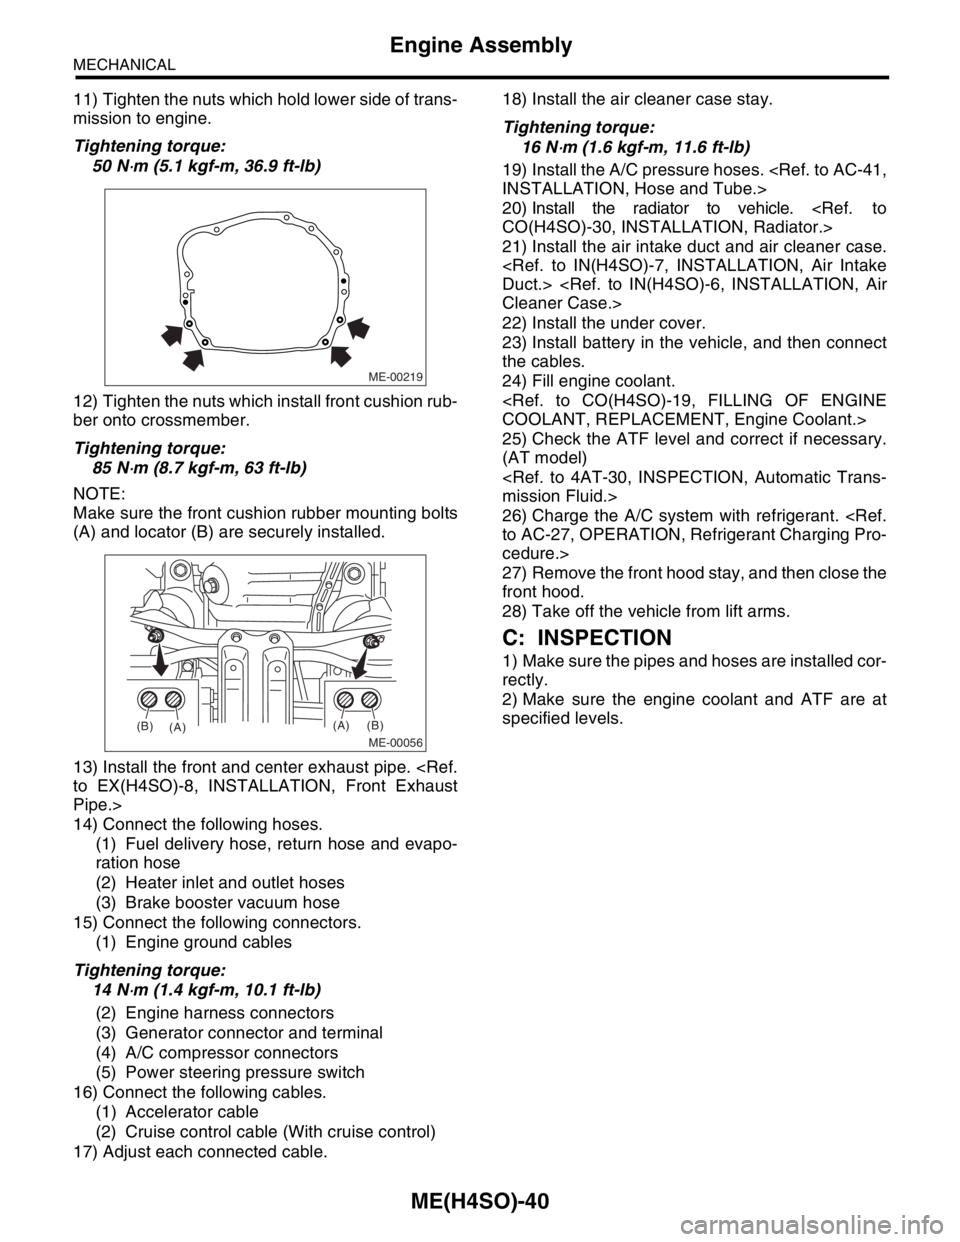
11) Tighten the nuts which hold lower side of trans-
mission to engine.
Tightening torque:
50 N
⋅m (5.1 kgf-m, 36.9 ft-lb)
12) Tighten the nuts which install front cushion rub-
ber onto crossmember.
Tightening torque:
85 N
⋅m (8.7 kgf-m, 63 ft-lb)
NOTE:
Make sure the front cushion rubber mounting bolts
(A) and locator (B) are securely installed.
13) Install the front and center exhaust pipe.
to EX(H4SO)-8, INSTALLATION, Front Exhaust
Pipe.>
14) Connect the following hoses.
(1) Fuel delivery hose, return hose and evapo-
ration hose
(2) Heater inlet and outlet hoses
(3) Brake booster vacuum hose
15) Connect the following connectors.
(1) Engine ground cables
Tightening torque:
14 N
⋅m (1.4 kgf-m, 10.1 ft-lb)
(2) Engine harness connectors
(3) Generator connector and terminal
(4) A/C compressor connectors
(5) Power steering pressure switch
16) Connect the following cables.
(1) Accelerator cable
(2) Cruise control cable (With cruise control)
17) Adjust each connected cable.18) Install the air cleaner case stay.
Tightening torque:
16 N
⋅m (1.6 kgf-m, 11.6 ft-lb)
19) Install the A/C pressure hoses.
INSTALLATION, Hose and Tube.>
20) Install the radiator to vehicle.
CO(H4SO)-30, INSTALLATION, Radiator.>
21) Install the air intake duct and air cleaner case.
Duct.>
Cleaner Case.>
22) Install the under cover.
23) Install battery in the vehicle, and then connect
the cables.
24) Fill engine coolant.
COOLANT, REPLACEMENT, Engine Coolant.>
25) Check the ATF level and correct if necessary.
(AT model)
mission Fluid.>
26) Charge the A/C system with refrigerant.
to AC-27, OPERATION, Refrigerant Charging Pro-
cedure.>
27) Remove the front hood stay, and then close the
front hood.
28) Take off the vehicle from lift arms.
C: INSPECTION
1) Make sure the pipes and hoses are installed cor-
rectly.
2) Make sure the engine coolant and ATF are at
specified levels.
ME-00219
ME-00056
(A)
(A)(B)
(B)
Page 913 of 2870
ME(H4SO)-44
MECHANICAL
V-belt
2) Tighten the lock nut (A).
Tightening torque:
Lock nut (A)
22.6 N
⋅m (2.3 kgf-m, 16.6 ft-lb)
C: INSPECTION
1) Replace the belts, if cracks, fraying or wear is
found.
2) Check the drive belt tension and adjust it if nec-
essary by changing the generator installing position
or idler pulley installing position.
Belt tension
(A)
replaced: 7 — 9 mm (0.276 — 0.354 in)
reused: 9 — 11 mm (0.354 — 0.433 in)
(B)
replaced: 7.5 — 8.5 mm (0.295 — 0.335 in)
reused: 9.0 — 10.0 mm (0.354 — 0.394 in)
C/P Crank pulley
GEN Generator
P/S Power steering oil pump pulley
A/C Air conditioning compressor pulley
I/P Idler pulley
ME-00224
(A) (B)
ME-00226
(A) (B)(C)GEN
C/P
I/P A/C
P/S
Page 1012 of 2870

CO(H4SO)-29
COOLING
Radiator
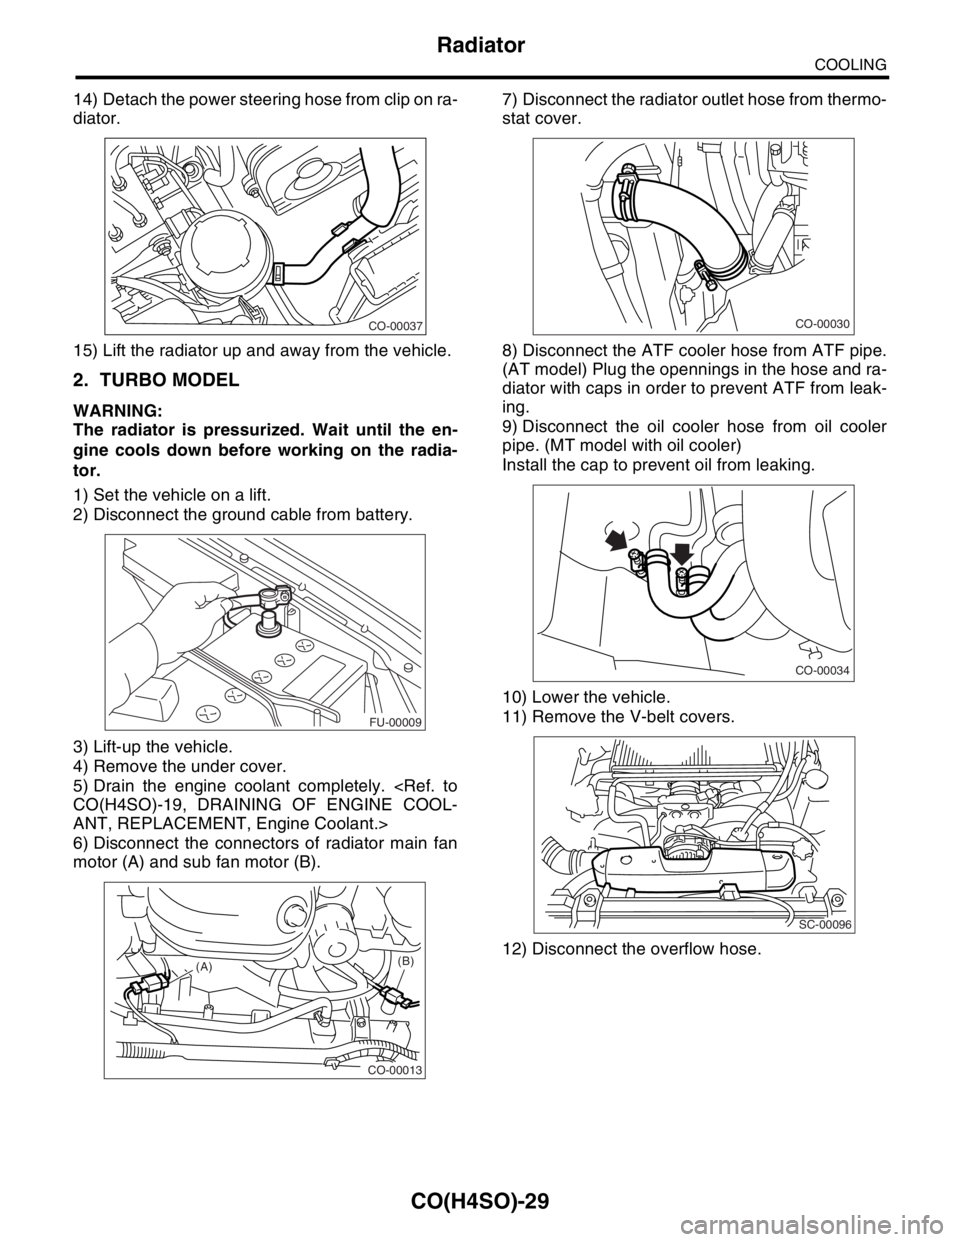
14) Detach the power steering hose from clip on ra-
diator.
15) Lift the radiator up and away from the vehicle.
2. TURBO MODEL
WARNING:
The radiator is pressurized. Wait until the en-
gine cools down before working on the radia-
tor.
1) Set the vehicle on a lift.
2) Disconnect the ground cable from battery.
3) Lift-up the vehicle.
4) Remove the under cover.
5) Drain the engine coolant completely.
CO(H4SO)-19, DRAINING OF ENGINE COOL-
ANT, REPLACEMENT, Engine Coolant.>
6) Disconnect the connectors of radiator main fan
motor (A) and sub fan motor (B).7) Disconnect the radiator outlet hose from thermo-
stat cover.
8) Disconnect the ATF cooler hose from ATF pipe.
(AT model) Plug the opennings in the hose and ra-
diator with caps in order to prevent ATF from leak-
ing.
9) Disconnect the oil cooler hose from oil cooler
pipe. (MT model with oil cooler)
Install the cap to prevent oil from leaking.
10) Lower the vehicle.
11) Remove the V-belt covers.
12) Disconnect the overflow hose.
CO-00037
FU-00009
CO-00013
(A)(B)
CO-00030
CO-00034
SC-00096
Page 1013 of 2870
CO(H4SO)-30
COOLING
Radiator
13) Remove the reservoir tank.
14) Disconnect the radiator inlet hose (A) and wa-
ter tank hose (B) from radiator.
15) Remove the radiator upper brackets.
16) Disconnect the power steering hose from clips
on radiator.
17) Lift the radiator up and away from the vehicle.18) Remove the radiator under cover (AT model).
B: INSTALLATION
1. NON-TURBO MODEL
1) Attach the radiator lower cushions to holes on
the vehicle.
2) Install the radiator to vehicle.
NOTE:
Fit pins on the lower side of radiator into cushions
on the body side.
3) Install the radiator upper brackets and tighten
bolts.
Tightening torque:
18 N
⋅m (1.8 kgf-m, 13.0 ft-lb)
CO-00015
CO-00039
(A) (B)
CO-00040
CO-00037
CO-00070
CO-00041
CO-00036
Page 1014 of 2870
CO(H4SO)-31
COOLING
Radiator
4) Attach the power steering hose to radiator.
5) Connect the radiator inlet hose.
6) Install the reservoir tank.
Tightening torque:
4.9 N
⋅m (0.50 kgf-m, 3.6 ft-lb)
7) Connect the overflow hose.
8) Lift-up the vehicle.
9) Connect the ATF cooler hoses. (AT model)10) Connect the radiator outlet hose.
11) Connect the connectors to radiator main fan
motor (A) and sub fan motor (B).
12) Install the under cover.
13) Lower the vehicle.
14) Connect the battery ground cable to battery.
15) Fill engine coolant.
FILLING OF ENGINE COOLANT, REPLACE-
MENT, Engine Coolant.>
16) Check the ATF level.
SPECTION, Automatic Transmission Fluid.>
CO-00037
CO-00035
CO-00015
CO-00034
CO-00076
CO-00013
(A)(B)
FU-00009
Page 1015 of 2870
CO(H4SO)-32
COOLING
Radiator
2. TURBO MODEL
1) Install the radiator under cover to radiator.
2) Attach the radiator lower cushions to holes on
the vehicle.
3) Install the radiator to vehicle.
NOTE:
Fit pins on the lower side of radiator into cushions
on body side.
4) Install the radiator upper brackets, and then
tighten the bolts.
Tightening torque:
18 N
⋅m (1.8 kgf-m, 13.0 ft-lb)5) Connect the power steering hose to radiator.
6) Connect the radiator inlet hose (A) and water
tank hose (B).
7) Install the reservoir tank.
Tightening torque:
4.9 N
⋅m (0.50 kgf-m, 3.6 ft-lb)
8) Connect the over flow hose.
9) Install the V-belt cover.
10) Lift-up the vehicle.
11) Connect the ATF cooler hoses. (AT model).
CO-00070
CO-00041
CO-00040
CO-00037
CO-00039
(A) (B)
CO-00015
SC-00096
Page 1018 of 2870
CO(H4SO)-35
COOLING
Radiator Main Fan and Fan Motor
8. Radiator Main Fan and Fan
Motor
A: REMOVAL
1. NON-TURBO MODEL
1) Set the vehicle on a lift.
2) Disconnect the ground cable from battery.
3) Lift-up the vehicle.
4) Remove the under cover.
5) Drain the coolant aprrox. 12 (1.06 US qt, 0.88
Imp qt).
ENGINE COOLANT, REPLACEMENT, Engine
Coolant.>
6) Disconnect the connector of main fan motor (A)
and sub fan motor (B).
7) Remove the ATF hose from two clips of radiator
fan motor assembly. (AT model)
8) Lower the vehicle.
9) Disconnect the over flow hose.
10) Remove the reservoir tank.11) Remove the radiator fan motor assembly
mounting bolts.
12) Disconnect the radiator inlet hose from engine.
13) Detach the power steering hose from clip on ra-
diator.
14) Rise up the radiator fan motor assembly to re-
move it from vehicle.
FU-00009
CO-00013
(A)(B)
CO-00015
CO-00064
CO-00035
CO-00037
CO-00065