Page 880 of 2870

ME(H4SO)-11
MECHANICAL
General Description
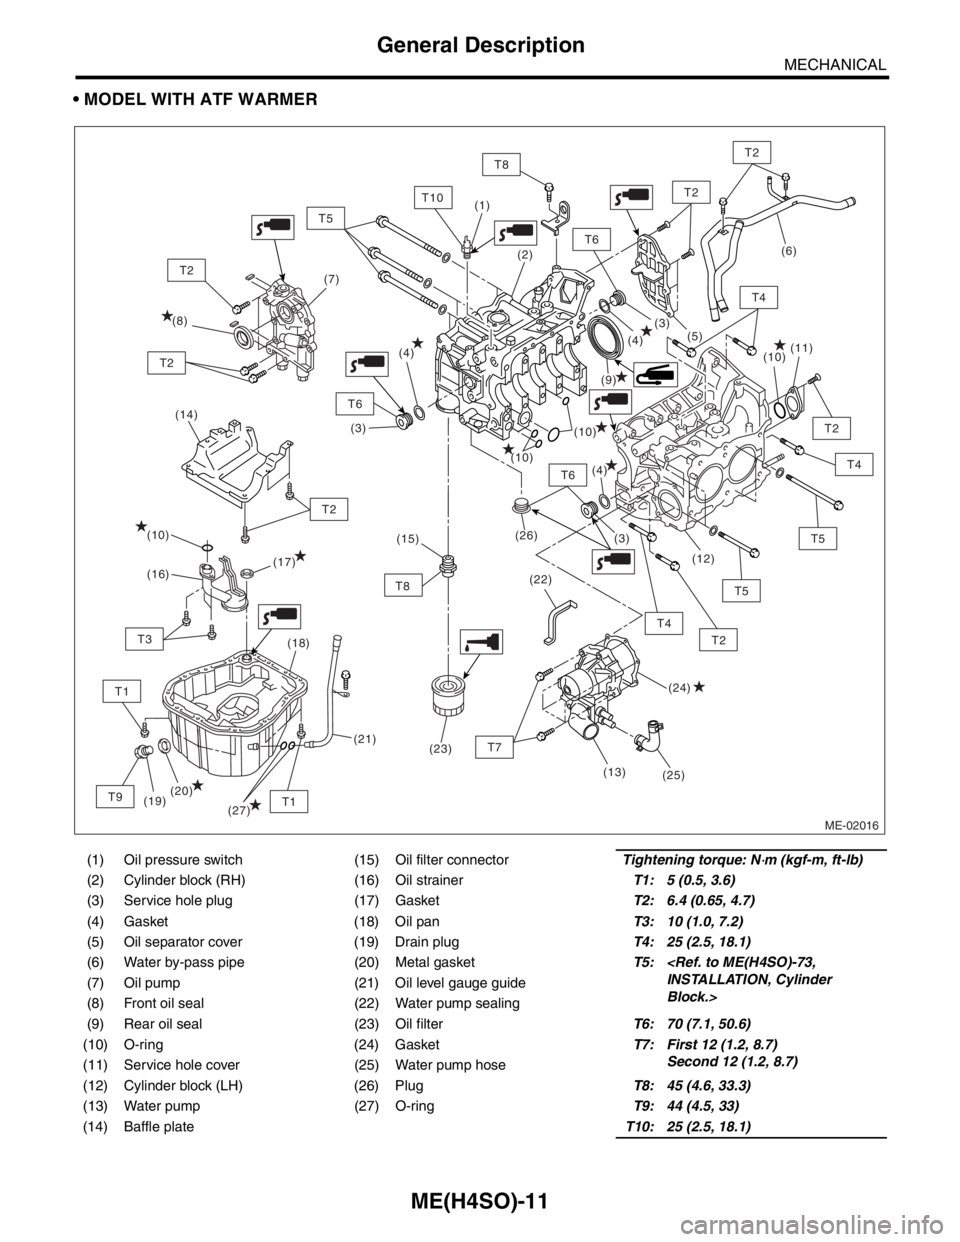
MODEL WITH ATF WARMER
(1) Oil pressure switch (15) Oil filter connectorTightening torque: N⋅m (kgf-m, ft-lb)
(2) Cylinder block (RH) (16) Oil strainerT1: 5 (0.5, 3.6)
(3) Service hole plug (17) GasketT2: 6.4 (0.65, 4.7)
(4) Gasket (18) Oil panT3: 10 (1.0, 7.2)
(5) Oil separator cover (19) Drain plugT4: 25 (2.5, 18.1)
(6) Water by-pass pipe (20) Metal gasketT5:
INSTALLATION, Cylinder
Block.> (7) Oil pump (21) Oil level gauge guide
(8) Front oil seal (22) Water pump sealing
(9) Rear oil seal (23) Oil filterT6: 70 (7.1, 50.6)
(10) O-ring (24) GasketT7: First 12 (1.2, 8.7)
Second 12 (1.2, 8.7)
(11) Service hole cover (25) Water pump hose
(12) Cylinder block (LH) (26) PlugT8: 45 (4.6, 33.3)
(13) Water pump (27) O-ringT9: 44 (4.5, 33)
(14) Baffle plateT10: 25 (2.5, 18.1)
ME-02016
(14)
T6
T2
T2
T4
T8
T5
T2
T6
T6
T10
T1
T2
T8
T1
T3
T9
T2
T2
(9) (8)(7)
(10)
(10)
(10)
(26)
(22)(11)
(12)
(19)(18)
(20)(17)
(16)
(24) (10)
(25)(5)
(4)
(4)
(4)(3)
(3)
(3) (2) (1)
(21)(15)
(23)
T5
T2
T5
T4
(27)
T7
(13)
(6)
T4
Page 884 of 2870

ME(H4SO)-15
MECHANICAL
General Description
C: CAUTION
Wear working clothing, including a cap, protec-
tive goggles and protective shoes during operation.
Remove contamination including dirt and corro-
sion before removal, installation or disassembly.
Keep the disassembled parts in order and pro-
tect them from dust or dirt.
Before removal, installation or disassembly, be
sure to clarify the failure. Avoid unnecessary re-
moval, installation, disassembly and replacement.
Be careful not to burn yourself, because each
part in the vehicle is hot after running.
Be sure to tighten bolts and nuts to the specified
torque.
Place shop jacks or rigid racks at the specified
points.
Before disconnecting electrical connectors of
sensors or units, be sure to disconnect the ground
cable from battery.
All parts should be thoroughly cleaned, paying
special attention to the engine oil passages, pis-
tons and bearings. Rotating parts and sliding parts such as piston,
bearing and gear should be coated with oil prior to
assembly.
Be careful not to let oil, grease or coolant contact
the timing belt, clutch disc and flywheel.
All removed parts, if to be reused, should be re-
installed in the original positions and directions.
Bolts, nuts and washers should be replaced with
new ones as required.
Even if necessary inspections have been made
in advance, proceed with assembly work while
making rechecks.
Remove or install engine in an area where chain
hoists, lifting devices, etc. are available for ready
use.
Be sure not to damage coated surfaces of body
panels with tools, or not to stain seats and windows
with coolant or oil. Place a cover over fenders, as
required, for protection.
Prior to starting work, prepare the following:
Service tools, clean cloth, containers to catch cool-
ant and oil, wire ropes, chain hoist, transmission
jacks, etc.
Lift-up or lower the vehicle when necessary.
Make sure to support the correct positions.
D: PREPARATION TOOL
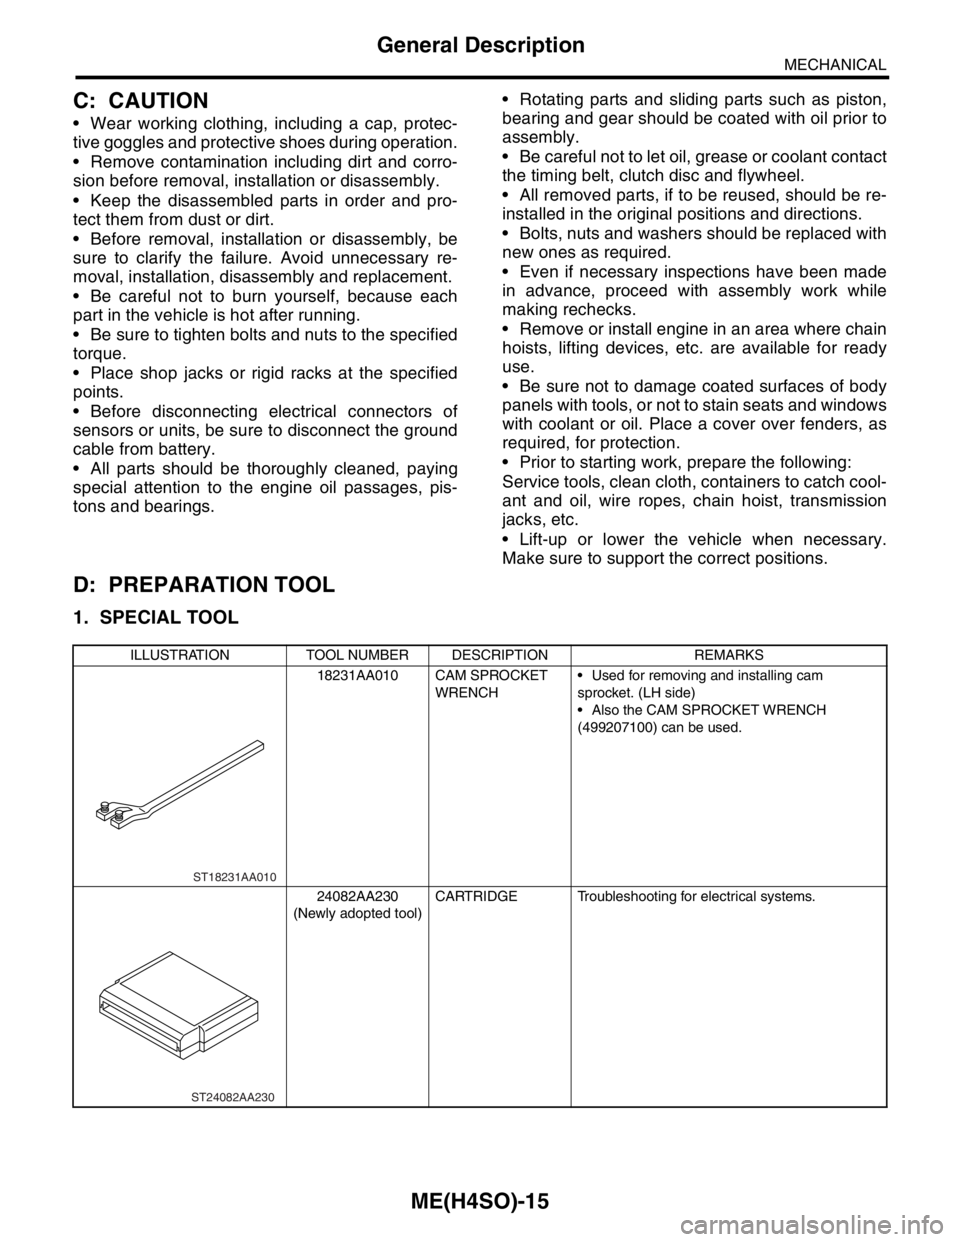
1. SPECIAL TOOL
ILLUSTRATION TOOL NUMBER DESCRIPTION REMARKS
18231AA010 CAM SPROCKET
WRENCH Used for removing and installing cam
sprocket. (LH side)
Also the CAM SPROCKET WRENCH
(499207100) can be used.
24082AA230
(Newly adopted tool)CARTRIDGE Troubleshooting for electrical systems.
ST18231AA010
ST24082AA230
Page 893 of 2870
ME(H4SO)-24
MECHANICAL
General Description
E: PROCEDURE
It is possible to conduct the following service proce-
dures with engine on the vehicle, however, the pro-
cedures described in this section are based on the
condition that the engine is removed from the vehi-
cle.
V-belt
Timing Belt
Valve Rocker Assembly
Camshaft
Cylinder Head
Page 905 of 2870
ME(H4SO)-36
MECHANICAL
Engine Assembly
(2) Loosen the lock bolt and slider bolt, and
then remove the front side V-belt.
ME(H4SO)-43, FRONT SIDE BELT, REMOV-
AL, V-belt.>
(3) Remove the pipe with bracket.
(4) Remove the bolts which install power steer-
ing pump bracket.
(5) Remove the reservoir tank from bracket by
pulling it upward.
(6) Place the power steering pump on right side
wheel apron.14) Remove the front and center exhaust pipe.
Pipe.>
15) Remove the nuts which hold lower side of
transmission to engine.
16) Remove the nuts which install front cushion
rubber onto front crossmember.
17) Separate the torque converter clutch from drive
plate. (AT model)
(1) Lower the vehicle.
(2) Remove the service hole plug.
(3) Remove the bolts which hold torque con-
verter clutch to drive plate.
(4) Remove other bolts while rotating the en-
gine using socket wrench.
ME-00331
FU-00139
FU-00020
FU-00140ME-00210
ME-00211
ME-00212
Page 908 of 2870
ME(H4SO)-39
MECHANICAL
Engine Assembly
(1) Tighten the bolts which hold torque convert-
er clutch to drive plate.
(2) Tighten other bolts while rotating the engine
by using a socket wrench.
NOTE:
Be careful not to drop the bolts into torque convert-
er clutch housing.
Tightening torque:
25 N
⋅m (2.5 kgf-m, 18.1 ft-lb)
(3) Plug up the service hole and prevent foreign
matters from getting in.
10) Install the power steering pump on bracket.
(1) Install the reservoir tank on bracket.
(2) Install the power steering pump on bracket,
and then tighten the bolts.
Tightening torque:
20.1 N
⋅m (2.05 kgf-m, 14.8 ft-lb)(3) Tighten the bolts which install power steer-
ing pump bracket, and then install the spark plug
cords.
(4) Connect the power steering switch connec-
tor.
(5) Install the front side V-belt, and adjust it.
STALLATION, V-belt.>
(6) Install the resonator chamber.
Tightening torque:
33 N
⋅m (3.4 kgf-m, 24.6 ft-lb)
ME-00212
FU-00020
FU-00139
ME-00331
FU-00017
IN-00044
Page 922 of 2870

FUJI HEAVY INDUSTRIES LTD. G8080GE2
2004 FORESTER SERVICE MANUAL QUICK REFERENCE INDEX
ENGINE SECTION 1
This service manual has been prepared
to provide SUBARU service personnel
with the necessary information and data
for the correct maintenance and repair
of SUBARU vehicles.
This manual includes the procedures
for maintenance, disassembling, reas-
sembling, inspection and adjustment of
components and diagnostics for guid-
ance of experienced mechanics.
Please peruse and utilize this manual
fully to ensure complete repair work for
satisfying our customers by keeping
their vehicle in optimum condition.
When replacement of parts during
repair work is needed, be sure to use
SUBARU genuine parts.
All information, illustration and specifi-
cations contained in this manual are
based on the latest product information
available at the time of publication
approval.FUEL INJECTION (FUEL SYSTEM) FU(H4SO)
EMISSION CONTROL
(AUX. EMISSION CONTROL DEVICE)EC(H4SO)
INTAKE (INDUCTION) IN(H4SO)
MECHANICAL ME(H4SO)
EXHAUST EX(H4SO)
COOLING CO(H4SO)
LUBRICATION LU(H4SO)
SPEED CONTROL SYSTEM SP(H4SO)
IGNITION IG(H4SO)
STARTING/CHARGING SYSTEM SC(H4SO)
ENGINE (DIAGNOSTIC) EN(H4SO)
Page 942 of 2870
ME(H4SO)-71
MECHANICAL
Cylinder Block
26) Remove the water pipe.
27) Remove the service hole cover and service
hole plugs using hexagon wrench [14 mm (0.55
in)].28) Rotate the crankshaft to bring #1 and #2 pis-
tons to bottom dead center position, and then re-
move the piston snap ring through service hole of
#1 and #2 cylinders using needle nose plier.
ME-00300
(1) Service hole plug (3) Snap ring (5) Service hole cover
(2) Gasket (4) Piston pin (6) O-ring
ME-00139
(3)
(4) (2)(1)
(3)
(4)
(5)
(6)
(2)(3)
(2)
(1)(3)(4)
(4)
(1)
ME-00140
ME-00141
Page 947 of 2870
ME(H4SO)-76
MECHANICAL
Cylinder Block
2.5 L model
CAUTION:
Ensure ring gaps do not face the same direc-
tion.
Ensure ring gaps are not within the piston
skirt area.
15) Install snap ring.
Install snap rings in the piston holes located oppo-
site service holes in cylinder block, when position-
ing all pistons in the corresponding cylinders.
NOTE:
Use new snap rings.
CAUTION:
Piston front mark faces towards the front of the
engine.
2.0 L model 2.5 L model
(A) Front side
ME-00415
5SH
(G)
ME-00306
#4 #3
#2 #1
(A)
ME-00387
B0SH
(A) Front mark
ME-00404
5SH
(A)