Page 2895 of 4264
FRAME AND BUMPER 2A-3
Important Operations - Removal
1. Radiator Grille
Refer to the Radiator Grille in this section.
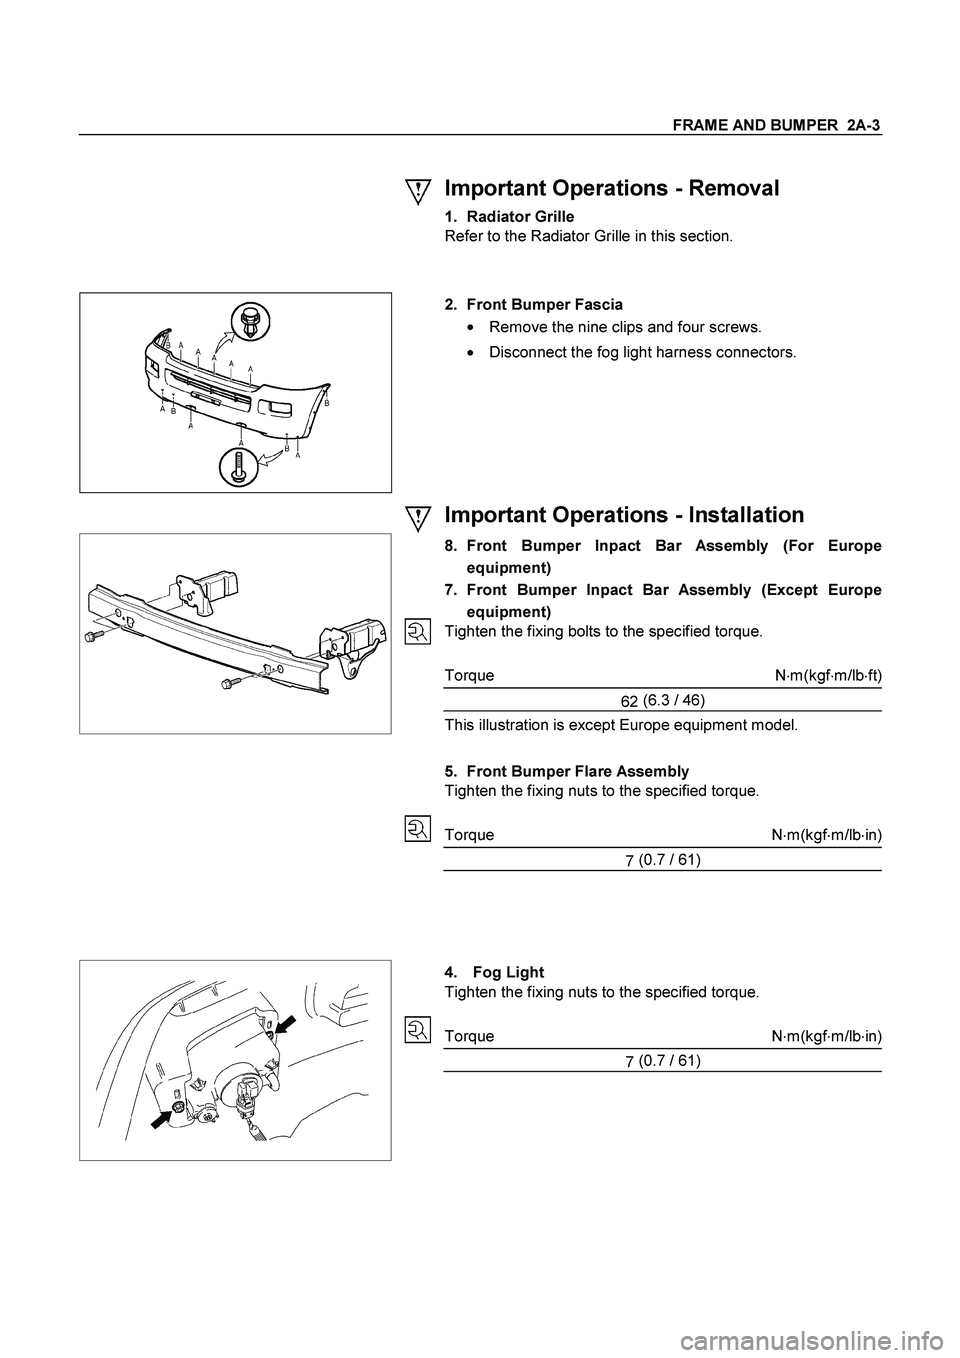
2. Front Bumper Fascia
�
Remove the nine clips and four screws.
�
Disconnect the fog light harness connectors.
Important Operations - Installation
8. Front Bumper Inpact Bar Assembly (For Europe
equipment)
7. Front Bumper Inpact Bar Assembly (Except Europe
equipment)
Tighten the fixing bolts to the specified torque.
Torque N�
m(kgf�
m/lb�
ft)
62 (6.3
/ 46)
This illustration is except Europe equipment model.
5. Front Bumper Flare Assembly
Tighten the fixing nuts to the specified torque.
Torque N�
m(kgf�
m/lb�
in)
7 (0.7
/ 61)
4. Fog Light
Tighten the fixing nuts to the specified torque.
Torque N�
m(kgf�
m/lb�
in)
7 (0.7
/ 61)
Page 2897 of 4264
FRAME AND BUMPER 2A-5
RTW32ASH000101
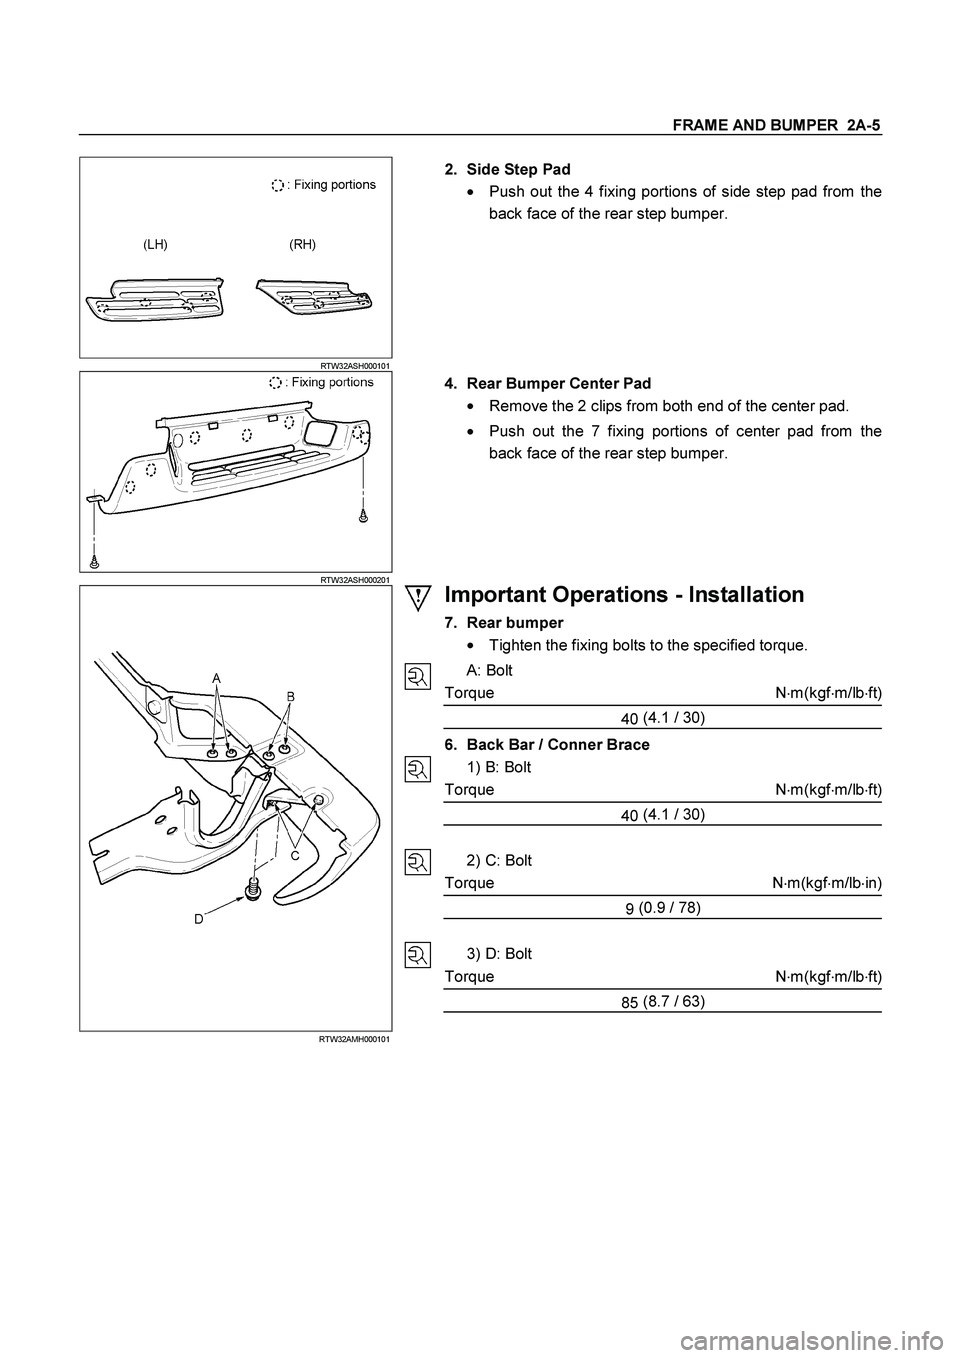
2. Side Step Pad
� Push out the 4 fixing portions of side step pad from the
back face of the rear step bumper.
RTW32ASH000201
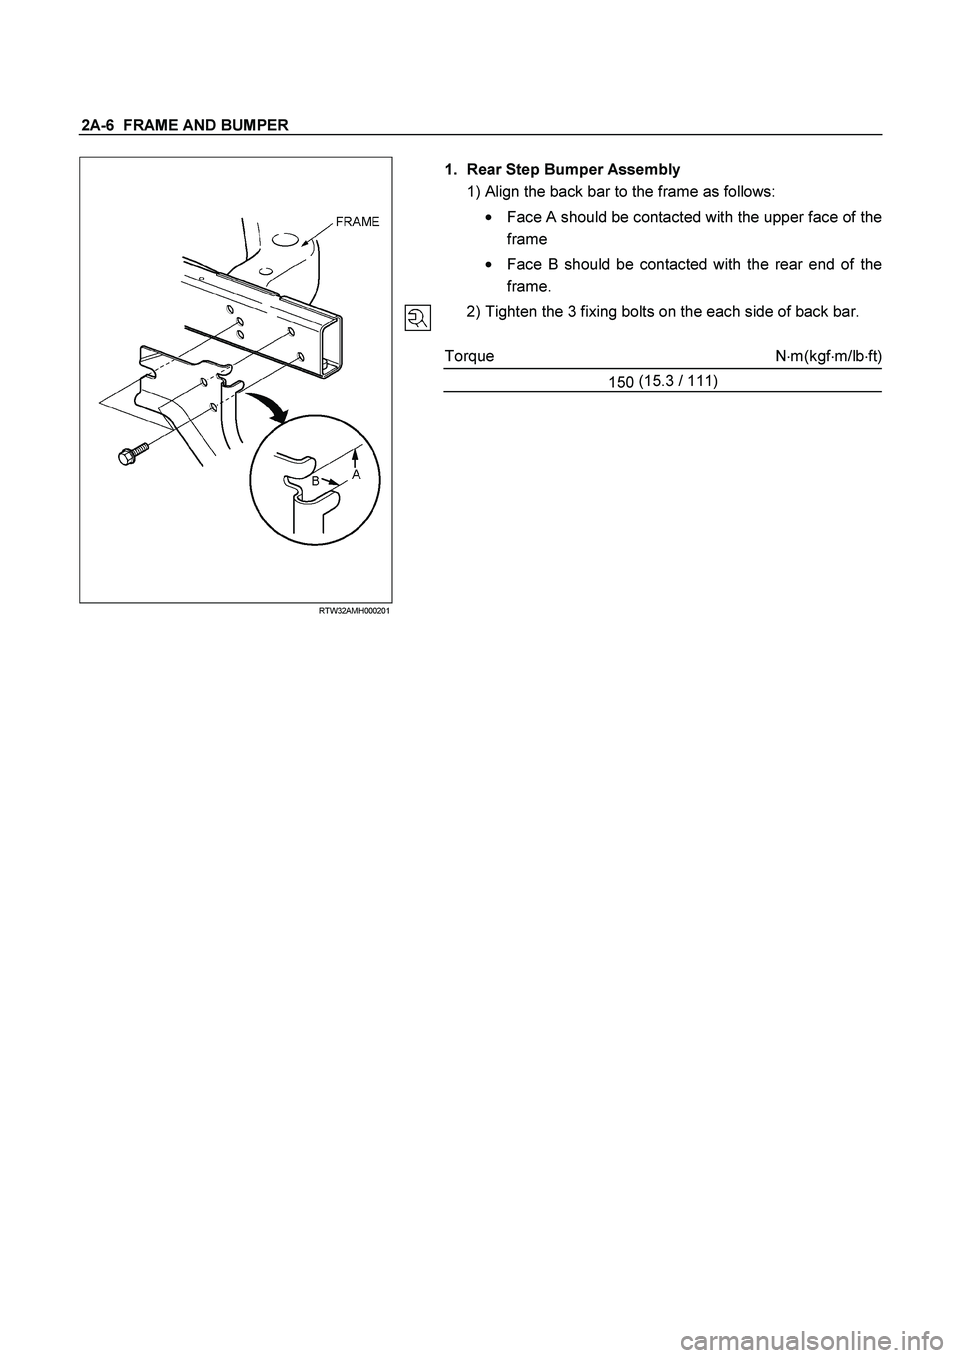
4. Rear Bumper Center Pad
�
Remove the 2 clips from both end of the center pad.
� Push out the 7 fixing portions of center pad from the
back face of the rear step bumper.
RTW32AM H000101
Important Operations - Installation
7. Rear bumper
�
Tighten the fixing bolts to the specified torque.
A: Bolt
Torque N�m(kgf�m/lb�ft)
40 (4.1
/ 30)
6. Back Bar / Conner Brace
1) B: Bolt
Torque N�
m(kgf�
m/lb�
ft)
40 (4.1
/ 30)
2) C: Bolt
Torque N�m(kgf�m/lb�in)
9 (0.9
/ 78)
3) D: Bolt
Torque N�
m(kgf�
m/lb�
ft)
85 (8.7
/ 63)
Page 2898 of 4264
2A-6 FRAME AND BUMPER
RTW32AMH000201
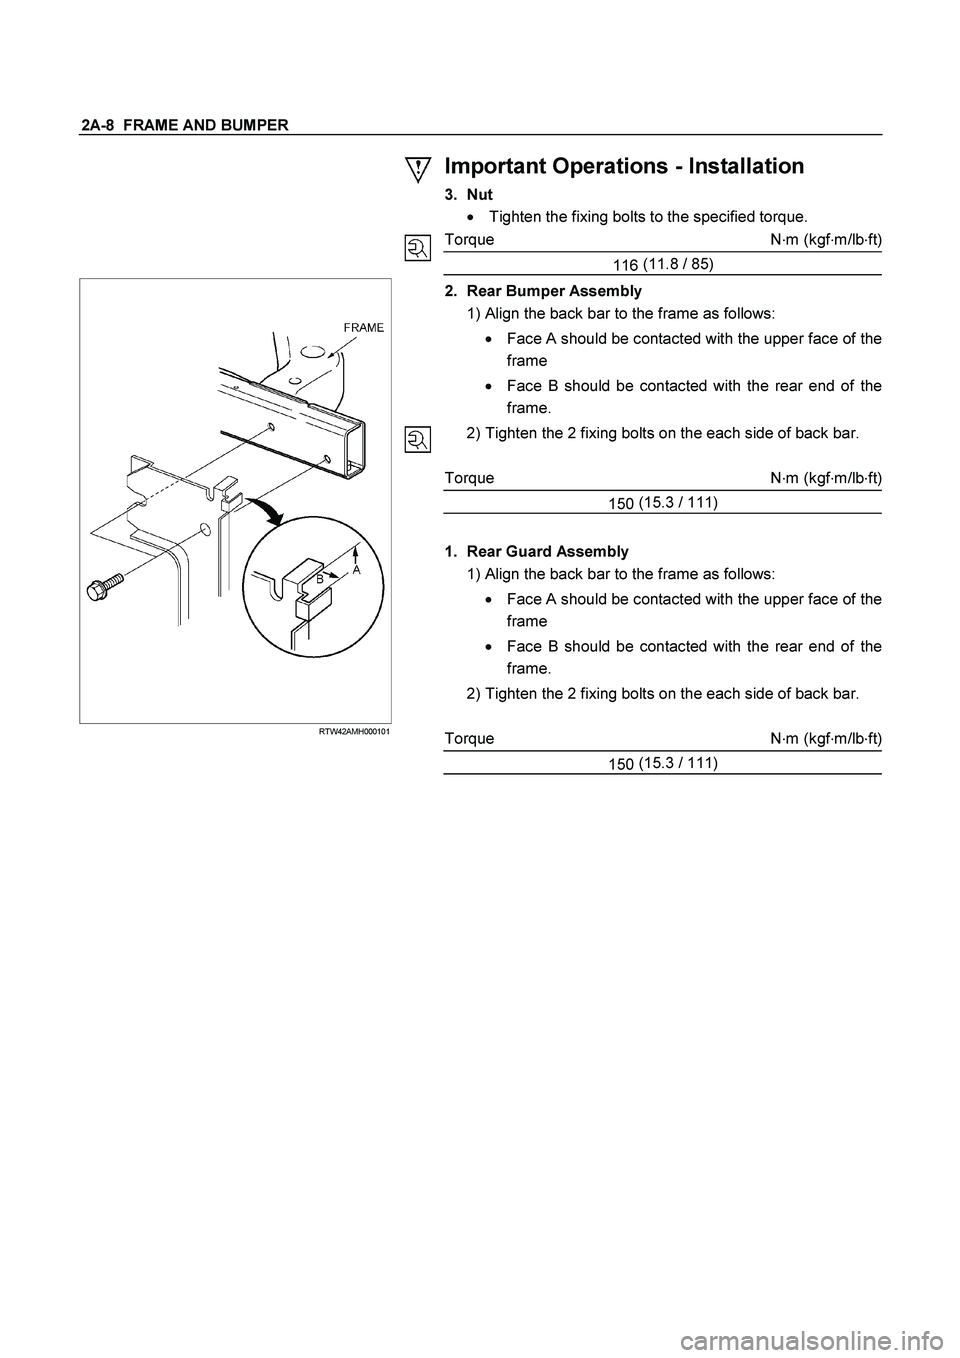
1. Rear Step Bumper Assembly
1) Align the back bar to the frame as follows:
�
Face A should be contacted with the upper face of the
frame
�
Face B should be contacted with the rear end of the
frame.
2) Tighten the 3 fixing bolts on the each side of back bar.
Torque N�
m(kgf�
m/lb�
ft)
150 (15.3
/ 111)
Page 2900 of 4264
2A-8 FRAME AND BUMPER
Important Operations - Installation
3. Nut
�
Tighten the fixing bolts to the specified torque.
Torque N�
m (kgf�
m/lb�
ft)
116 (11.8
/ 85)
RTW42AMH000101
2. Rear Bumper Assembly
1) Align the back bar to the frame as follows:
�
Face A should be contacted with the upper face of the
frame
�
Face B should be contacted with the rear end of the
frame.
2) Tighten the 2 fixing bolts on the each side of back bar.
Torque N�
m (kgf�
m/lb�
ft)
150 (15.3
/ 111)
1. Rear Guard Assembly
1) Align the back bar to the frame as follows:
�
Face A should be contacted with the upper face of the
frame
�
Face B should be contacted with the rear end of the
frame.
2) Tighten the 2 fixing bolts on the each side of back bar.
Torque N�
m (kgf�
m/lb�
ft)
150 (15.3
/ 111)
Page 2936 of 4264
2B-4 SHEET METAL
2. Hood Hinge Bolts
�
Tighten the engine hood hinge fixing bolts to the specified
torque.
Torque N�
m(kgf�
m/lb�
in)
10 (1.0
/ 87)
Page 2938 of 4264
2B-6 SHEET METAL
Important Operations - Installation
4. Control Cable
Reroute the control cable to its original position, and check and
see if the lock assembly and control lever work normally.
2. Engine Hood Lock Assembly
Adjustment
1) Install the engine hood lock assembly (4) and temporaril
y
tighten the bolts securing it.
2) Close the hood.
3) Position the hood so that the stepped portion between the
hood (1) and the fender (2) is precisely 1.5 mm (0.06 in)
high.
4) Final tighten the bolts securing the engine hood lock
assembly.
5) Turn the buffers (3) counterclockwise until the stepped
portion between the hood and the fender disappears.
6) Tighten the hood lock assembly fixing bolts to the specified
torque.
Torque N�
m(kgf�
m/lb�
in)
10 (1.0
/ 87)
Page 2940 of 4264
2B-8 SHEET METAL
Important Operations - Removal
1. Radiator Grille
Refer to the Radiator Grille in this section.
4. Inner liner
Remove the inner liner fixing screws.
5. Front bumper facia
Refer to the Front Bumper in this section.
7. Front fender panel
Remove the eight fixing bolts.
Important Operation - Installation
7. Front Fender Panel
1) Tighten the front fender panel fixing bolts to the
specified torque.
Torque N�m(kgf�m/lb�in)
10 (1.0
/ 87)
Page 2944 of 4264
2B-12 SHEET METAL
Important Operations - Removal
4. Fuel Filler Pipe and Evaporator Hose
7. Rear Body Assembly
Attach lifting wires to the rear body hooks and raise the rear
body.
Note:
In lifting up rear body, take care not to dash it against cab
body.
Important Operation – Installation
6. Bolt; Frame to Body
Torque N�m(kgf�m/lb�ft)
54 (5.5
/ 40)