Page 2526 of 3371
LIGHTING AND TURN SIGNAL SWITCH
LT-95
C
D
E
F
G
H
I
J
L
MA
B
LT
Revision: August 20072004 QX56
LIGHTING AND TURN SIGNAL SWITCHPFP:25540
Removal and InstallationEKS007BY
REMOVAL
1. Remove steering column cover.
2. While pressing tabs, pull lighting and turn signal switch toward
driver door and disconnect from the base.
INSTALLATION
Installation is in the reverse order of removal.
LKIA0013E
Page 2527 of 3371
LT-96
HAZARD SWITCH
Revision: August 20072004 QX56
HAZARD SWITCHPFP:25290
Removal and InstallationEKS007BZ
REMOVAL
1. Remove cluster lid C. Refer to IP-12, "Cluster Lid C" .
2. Remove screws and remove the hazard switch.
INSTALLATION
Installation is in the reverse order of removal.
WKIA1897E
Page 2536 of 3371
STOP LAMP
LT-105
C
D
E
F
G
H
I
J
L
MA
B
LT
Revision: August 20072004 QX56
High-Mounted Stop LampEKS007C8
BULB REPLACEMENT
The high-mounted stop lamp bulbs are not serviceable.
REMOVAL AND INSTALLATION
1. Remove back door upper finisher.
2. Remove 2 nuts and remove high-mounted stop lamp.
Installation is in the reverse order of removal.
Stop LampEKS007C9
BULB REPLACEMENT
The stop lamp bulbs are not serviceable separately. Replace rear combination lamp. Refer to LT-122,
"Removal and Installation" .
REMOVAL AND INSTALLATION
Refer to LT-122, "Removal and Installation" in REAR COMBINATION LAMP.
WKIA1397E
Page 2538 of 3371
BACK-UP LAMP
LT-107
C
D
E
F
G
H
I
J
L
MA
B
LT
Revision: August 20072004 QX56
Bulb ReplacementEKS007CB
1. Remove back door lower finisher. Refer to EI-41, "Removal and Installation" .
2. Turn bulb socket counterclockwise and remove it from the lamp housing.
3. Pull bulb from socket.
Installation is in the reverse order of removal.
Removal and InstallationEKS007CC
1. Remove license lamp finisher. Refer to EI-24, "Removal and Installation" .
2. Carefully release tabs to remove back up lamp housing from
license plate finisher.
Installation is in the reverse order of removal.
WKIA1898E
Page 2552 of 3371
PARKING, LICENSE PLATE AND TAIL LAMPS
LT-121
C
D
E
F
G
H
I
J
L
MA
B
LT
Revision: August 20072004 QX56
Front Parking LampEKS007CP
BULB REPLACEMENT
For bulb replacement, refer to LT- 3 2 , "FRONT PARKING LAMP (INNER OR OUTER)" or LT-32, "FRONT
SIDE MARKER LAMP" .
Tail LampEKS007CQ
BULB REPLACEMENT
The tail lamp bulbs are not serviceable separately. Replace rear combination lamp. Refer to LT-122, "Removal
and Installation" .
License Plate LampEKS007TR
BULB REPLACEMENT
1. Remove back door lower finisher. Refer to EI-41, "Removal and Installation" .
2. Turn bulb socket counterclockwise to remove it.
3. Pull bulb from socket.
Installation is in the reverse order of removal.
Page 2553 of 3371
LT-122
REAR COMBINATION LAMP
Revision: August 20072004 QX56
REAR COMBINATION LAMPPFP:26554
Bulb Replacement (Turn Signal)EKS007CR
NOTE:
The tail/stop lamp bulbs are LEDs and are not serviceable separately.
1. Remove rear combination lamp mounting bolts.
2. Pull rear combination lamp to remove from the vehicle.
3. Turn bulb socket counterclockwise and unlock it.
4. Remove bulb.
Installation is in the reverse order of removal.
Removal and InstallationEKS007CS
1. Remove rear combination lamp mounting bolts.
2. Pull rear combination lamp to remove from the vehicle.
3. Disconnect rear combination lamp connectors.
Installation is in the reverse order of removal.
WKIA1393E
Rear combination lamp
mounting bolts: 2.4 Nm (0.24 kg-m, 21 in-lb)
WKIA1393E
Page 2600 of 3371
ILLUMINATION
LT-169
C
D
E
F
G
H
I
J
L
MA
B
LT
Revision: August 20072004 QX56
Removal and InstallationEKS007DE
ILLUMINATION CONTROL SWITCH
1. Remove cluster lid A. Refer to DI-25, "Removal and Installation of Combination Meter" .
2. Carefully pry tabs and remove illumination control switch from
cluster lid A.
Installation is in the reverse order of removal.
WKIA1403E
Page 2613 of 3371
LU-12Revision: August 2007
OIL COOLER
2004 QX56
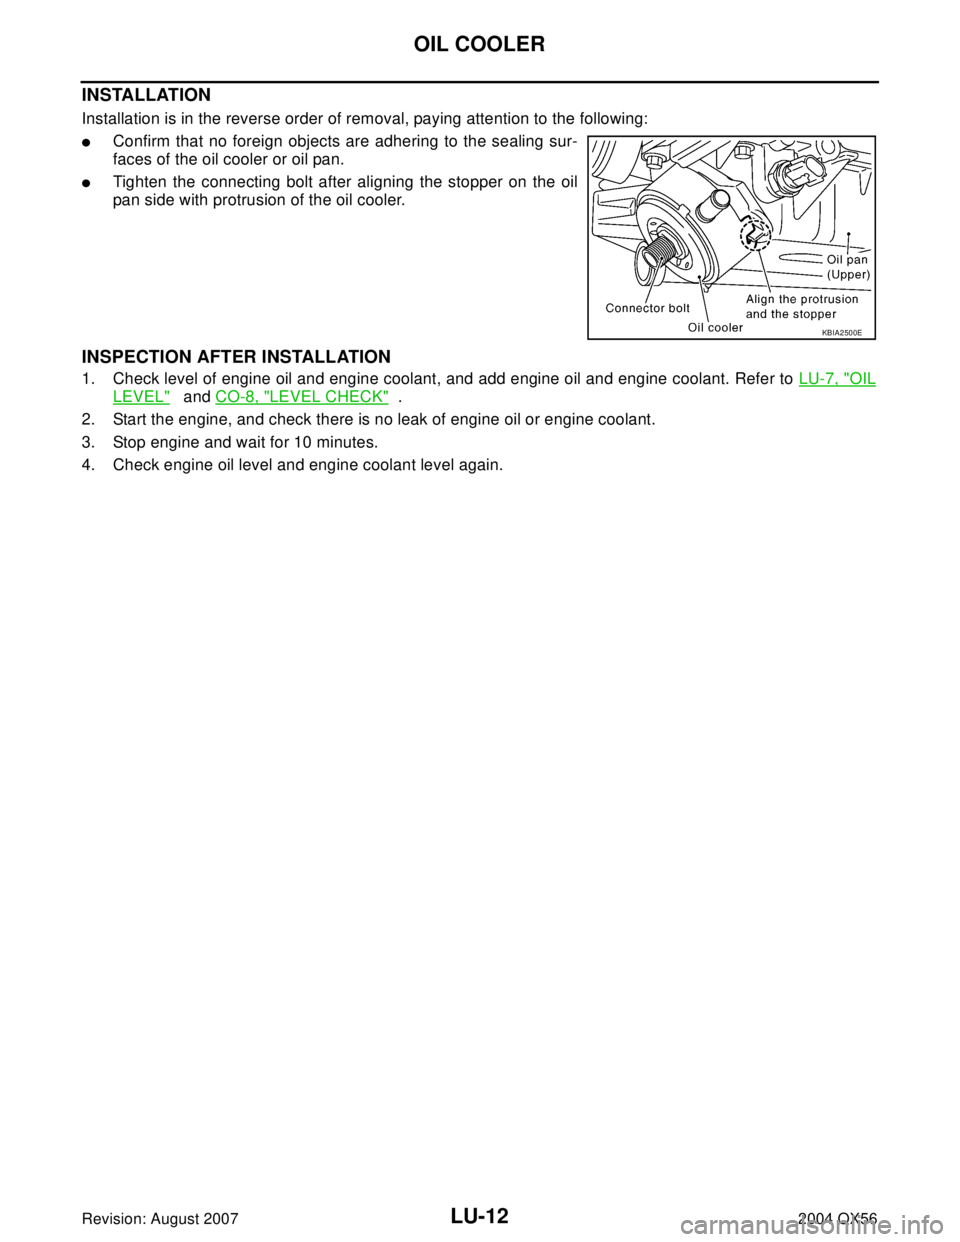
INSTALLATION
Installation is in the reverse order of removal, paying attention to the following:
�Confirm that no foreign objects are adhering to the sealing sur-
faces of the oil cooler or oil pan.
�Tighten the connecting bolt after aligning the stopper on the oil
pan side with protrusion of the oil cooler.
INSPECTION AFTER INSTALLATION
1. Check level of engine oil and engine coolant, and add engine oil and engine coolant. Refer to LU-7, "OIL
LEVEL" and CO-8, "LEVEL CHECK" .
2. Start the engine, and check there is no leak of engine oil or engine coolant.
3. Stop engine and wait for 10 minutes.
4. Check engine oil level and engine coolant level again.
KBIA2500E


EKS007CR
NOTE:
The tail/stop lamp bulbs are LEDs and are not serviceable separa")