Page 2033 of 4500

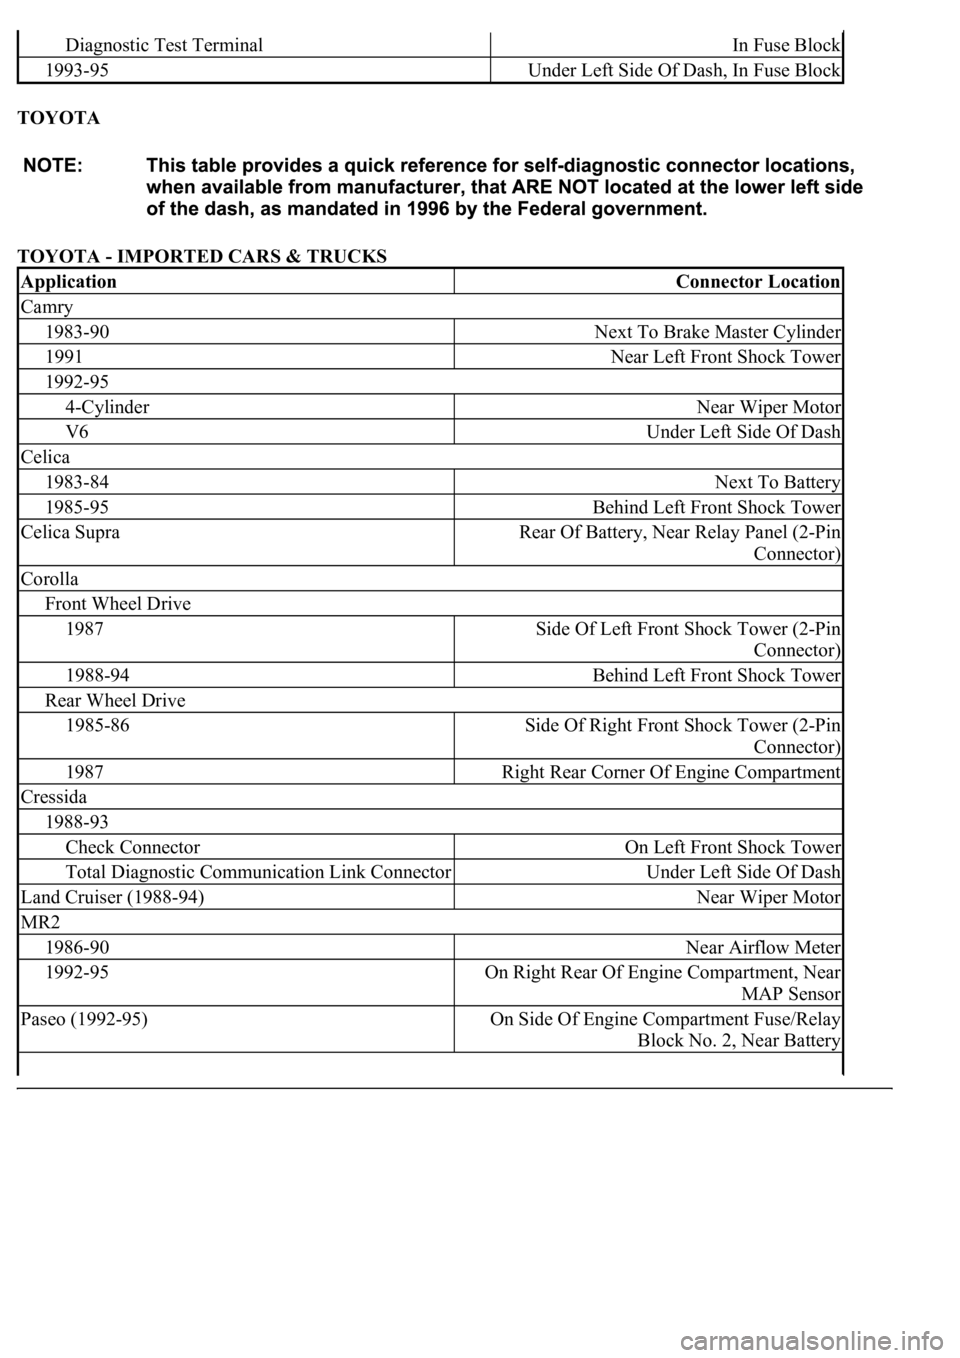
TOYOTA
TOYOTA - IMPORTED CARS & TRUCKS
Diagnostic Test TerminalIn Fuse Block
1993-95Under Left Side Of Dash, In Fuse Block
ApplicationConnector Location
Camry
1983-90Next To Brake Master Cylinder
1991Near Left Front Shock Tower
1992-95
4-CylinderNear Wiper Motor
V6Under Left Side Of Dash
Celica
1983-84Next To Battery
1985-95Behind Left Front Shock Tower
Celica SupraRear Of Battery, Near Relay Panel (2-Pin
Connector)
Corolla
Front Wheel Drive
1987Side Of Left Front Shock Tower (2-Pin
Connector)
1988-94Behind Left Front Shock Tower
Rear Wheel Drive
1985-86Side Of Right Front Shock Tower (2-Pin
Connector)
1987Right Rear Corner Of Engine Compartment
Cressida
1988-93
Check ConnectorOn Left Front Shock Tower
Total Diagnostic Communication Link ConnectorUnder Left Side Of Dash
Land Cruiser (1988-94)Near Wiper Motor
MR2
1986-90Near Airflow Meter
1992-95On Right Rear Of Engine Compartment, Near
MAP Sensor
Paseo (1992-95)On Side Of Engine Compartment Fuse/Relay
Block No. 2, Near Battery
Page 2034 of 4500

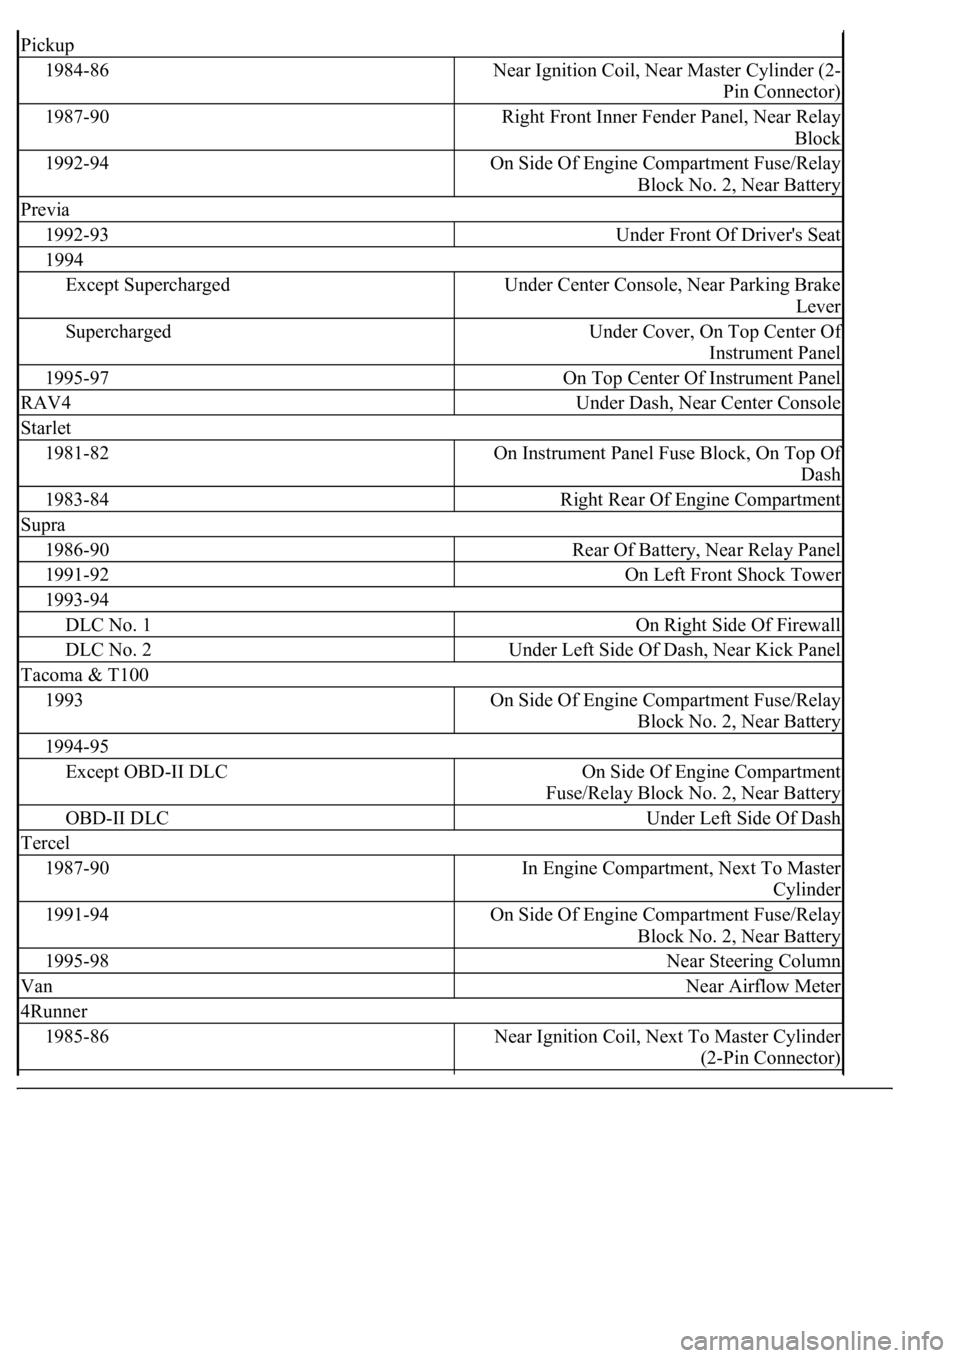
Pickup
1984-86Near Ignition Coil, Near Master Cylinder (2-
Pin Connector)
1987-90Right Front Inner Fender Panel, Near Relay
Block
1992-94On Side Of Engine Compartment Fuse/Relay
Block No. 2, Near Battery
Previa
1992-93Under Front Of Driver's Seat
1994
Except SuperchargedUnder Center Console, Near Parking Brake
Lever
SuperchargedUnder Cover, On Top Center Of
Instrument Panel
1995-97On Top Center Of Instrument Panel
RAV4Under Dash, Near Center Console
Starlet
1981-82On Instrument Panel Fuse Block, On Top Of
Dash
1983-84Right Rear Of Engine Compartment
Supra
1986-90Rear Of Battery, Near Relay Panel
1991-92On Left Front Shock Tower
1993-94
DLC No. 1On Right Side Of Firewall
DLC No. 2Under Left Side Of Dash, Near Kick Panel
Tacoma & T100
1993On Side Of Engine Compartment Fuse/Relay
Block No. 2, Near Battery
1994-95
Except OBD-II DLCOn Side Of Engine Compartment
Fuse/Relay Block No. 2, Near Battery
OBD-II DLCUnder Left Side Of Dash
Tercel
1987-90In Engine Compartment, Next To Master
Cylinder
1991-94On Side Of Engine Compartment Fuse/Relay
Block No. 2, Near Battery
1995-98Near Steering Column
VanNear Airflow Meter
4Runner
1985-86Near Ignition Coil, Next To Master Cylinder
(2-Pin Connector)
Page 2035 of 4500

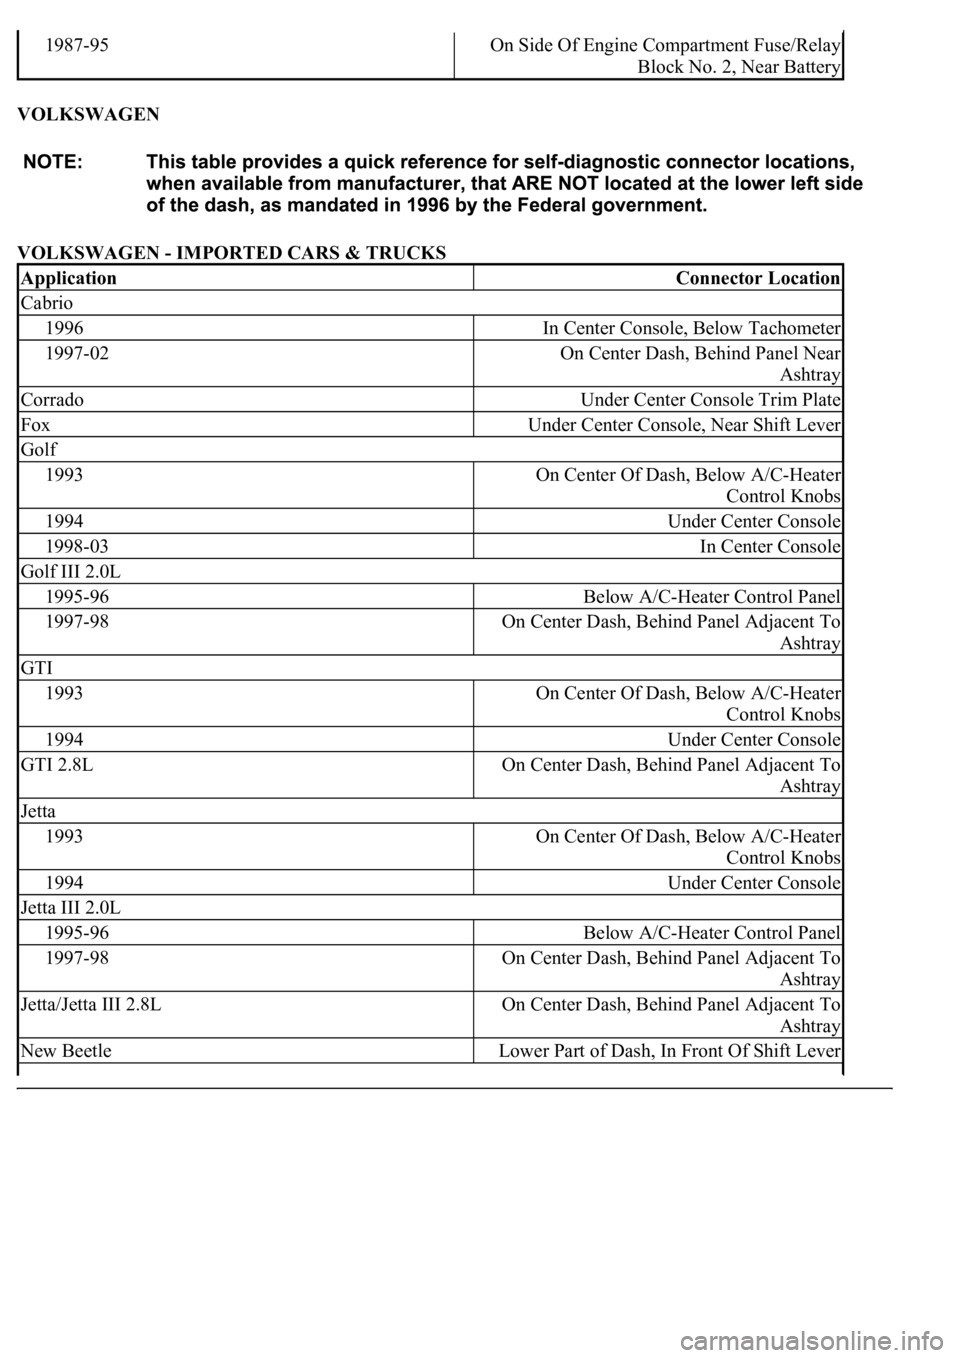
VOLKSWAGEN
VOLKSWAGEN - IMPORTED CARS & TRUCKS
1987-95On Side Of Engine Compartment Fuse/Relay
Block No. 2, Near Battery
ApplicationConnector Location
Cabrio
1996In Center Console, Below Tachometer
1997-02On Center Dash, Behind Panel Near
Ashtray
CorradoUnder Center Console Trim Plate
FoxUnder Center Console, Near Shift Lever
Golf
1993On Center Of Dash, Below A/C-Heater
Control Knobs
1994Under Center Console
1998-03In Center Console
Golf III 2.0L
1995-96Below A/C-Heater Control Panel
1997-98On Center Dash, Behind Panel Adjacent To
Ashtray
GTI
1993On Center Of Dash, Below A/C-Heater
Control Knobs
1994Under Center Console
GTI 2.8LOn Center Dash, Behind Panel Adjacent To
Ashtray
Jetta
1993On Center Of Dash, Below A/C-Heater
Control Knobs
1994Under Center Console
Jetta III 2.0L
1995-96Below A/C-Heater Control Panel
1997-98On Center Dash, Behind Panel Adjacent To
Ashtray
Jetta/Jetta III 2.8LOn Center Dash, Behind Panel Adjacent To
Ashtray
New BeetleLower Part of Dash, In Front Of Shift Lever
Page 2212 of 4500
Fig. 42: Driver Door ECU Power Source Circuit - Wiring Diagram
Courtesy of TOYOTA MOTOR SALES, U.S.A., INC.
INSPECTION PROCEDURE
1.INSPECT FUSE (MPX-IG, AM1, D DOOR, MPX-B1, D/C CUT)
a. Remove the MPX-IG and AM1 fuses from the driver side J/B.
b. Remove the D DOOR and MPX-B1 fuses from the passenger side J/B.
c. Remove the D/C CUT fuse from the FL block assy.
d. Measure the resistance.
Standard: Below 1 ohms
Page 2213 of 4500
NG: REPLACE FUSE
OK: Go to Next Step.
2.INSPECT RELAY (Marking: D-IG1)
a. Remove the D-IG1 relay from the driver side J/B.
b. Measure the resistance.
TERMINALS RESISTANCE REFERENCE
Fig. 43: Inspecting Relay (D
-IG1)
Courtesy of TOYOTA MOTOR SALES, U.S.A., INC.
NG: REPLACE RELAY
OK: Go to Next Step.
3.CHECK WIRE HARNESS (DRIVER DOOR ECU - BATTERY AND BODY GROUND)
a. Disconnect the D25 ECU connector.
Tester ConnectionSpecified Condition
3 - 510 kohms or higher
3 - 5Below 1 ohms (when battery voltage is applied to terminals 1 and 2)
Page 2216 of 4500
1.INSPECT FUSE (MPX-IG, AM1, P DOOR, MPX-B1, D/C CUT)
a. Remove the MPX-IG and AM1 fuses from the driver side J/B.
b. Remove the P DOOR and MPX-B1 fuses from the passenger side J/B.
c. Remove the D/C CUT fuse from the FL block assy.
d. Measure the resistance.
Standard: Below 1 ohms
NG: REPLACE FUSE
OK: Go to Next Step.
2.INSPECT RELAY (Marking: D-IG1)
a. Remove the D-IG1 relay from the driver side J/B.
b. Measure the resistance.
Fig. 46: Inspecting Relay (D
- IG1)
Courtesy of TOYOTA MOTOR SALES, U.S.A., INC.
TERMINALS RESISTANCE REFERENCE
Terminal No.Specified Condition
3 - 510 kohms or higher
Page 2219 of 4500
Fig. 48: Rear Door LH ECU Power Source Circuit - Wiring Diagram
Courtesy of TOYOTA MOTOR SALES, U.S.A., INC.
INSPECTION PROCEDURE
1.INSPECT FUSE (MPX-IG, AM1, RR DOOR LH, MPX-B1, D/C CUT)
a. Remove the MPX-IG and AM1 fuses from the driver side J/B.
Page 2220 of 4500
b. Remove the RR DOOR LH and MPX-B1 fuses from the passenger side J/B.
c. Remove the D/C CUT fuse from the FL block assy.
d. Measure the resistance.
Standard: Below 1 ohms
NG: REPLACE FUSE
OK: Go to Next Step.
2.INSPECT RELAY (Marking: D-IG1)
a. Remove the D-IG1 relay from the driver side J/B.
b. Measure the resistance.
TERMINALS RESISTANCE REFERENCE
Fig. 49: Inspecting Relay (D
-IG1)
Courtesy of TOYOTA MOTOR SALES, U.S.A., INC.
NG: REPLACE RELAY
Terminal No.Specified Condition
3 - 510 kohms or higher
3 - 5Below 1 ohms (when battery voltage is applied to terminals 1 and 2)