Page 1913 of 4500
Fig. 9: Checking RES (RESUME) Function
Courtesy of TOYOTA MOTOR SALES, U.S.A., INC.
If a normal system code is displayed during the DTC check but the problem still occurs, check the circuits for
each problem symptom in the order given in the table below and proceed to the relevant troubleshooting page.
HINT:
Inspect the "Fuse" and "Relay" before confirming the suspected areas as shown in the chart below.
Inspect each malfunction circuit in numerical order for the correspondin
g symptom.
Page 1923 of 4500
Fig. 18: DTC P0500 And P0503 Problem Symptom Diagnostic Chart
Courtesy of TOYOTA MOTOR SALES, U.S.A., INC.
WIRING DIAGRAM
See WIRING DIAGRAM
INSPECTION PROCEDURE
See INSPECTION PROCEDURE
.
CIRCUIT DESCRIPTION
When the brake pedal is depressed, the stop lamp switch assy sends a signal to the ECM. When the ECM
receives this signal, it cancels the cruise control.
Fail-safe function operates to enable normal driving even if there is a malfunction in the stop lamp signal
circuit.
The cancel condition occurs when positive battery voltage is applied to terminal STP.
When the brake is applied, battery positive voltage is normally applied to terminal STP of the ECM through the
STOP fuse and the stop lamp switch assy, and the ECM turns the cruise control off.
Fig. 19: DTC P0571 Problem Symptom Diagnostic Chart
Courtesy of TOYOTA MOTOR SALES, U.S.A., INC.
WIRING DIAGRAM
Page 1999 of 4500
Fig. 8: Rear Window Defogger System - Wiring Diagram
Courtesy of TOYOTA MOTOR SALES, U.S.A., INC.
INSPECTION PROCEDURE
1.INSPECT FUSE
a. Select the ACTIVE TEST, use the han
d-held tester to generate a control command, and then check
Page 2000 of 4500
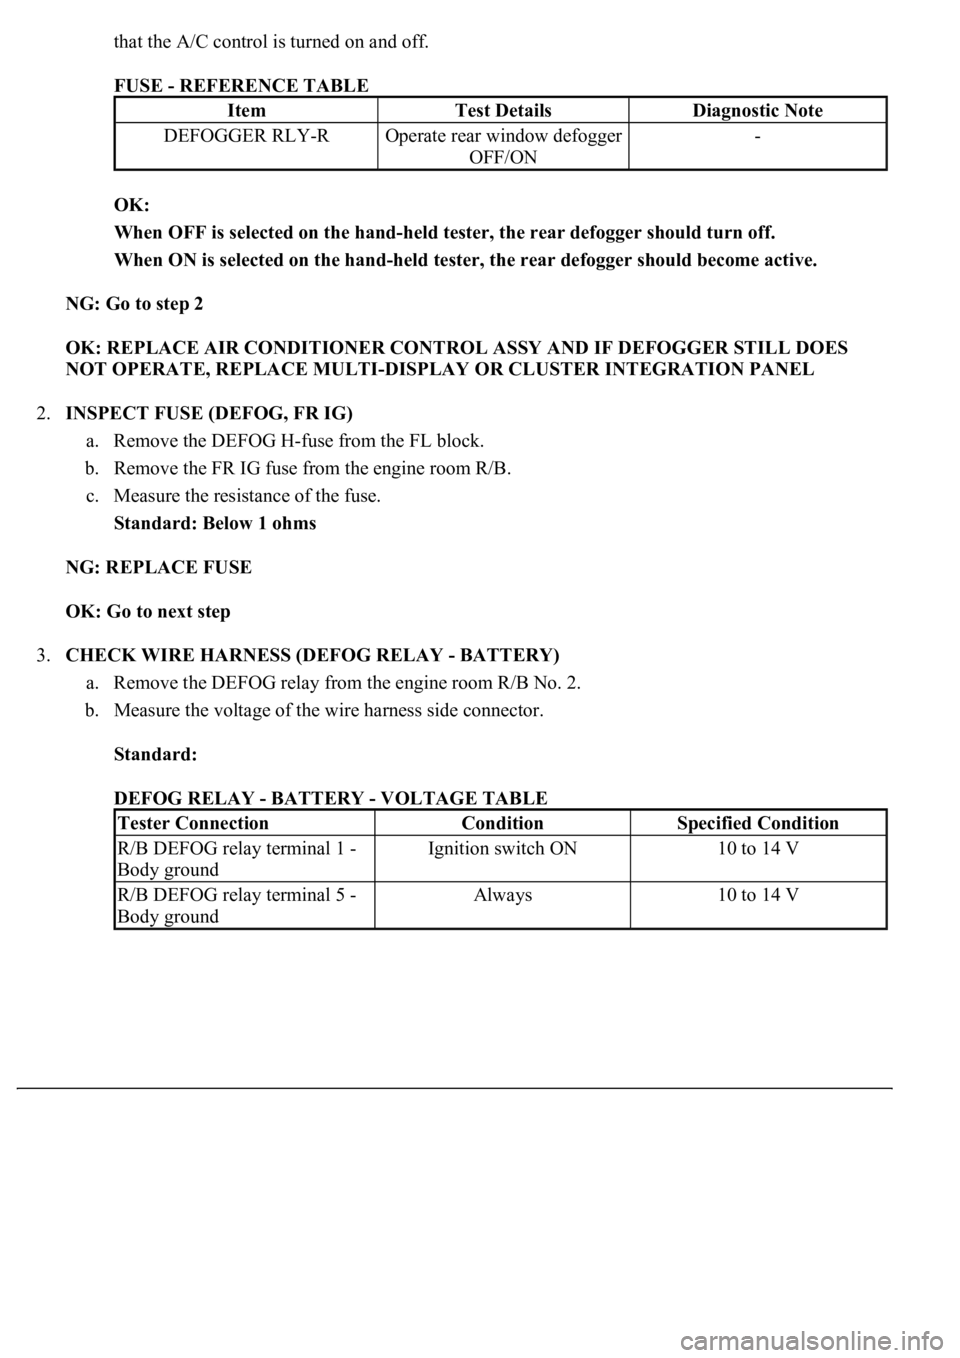
that the A/C control is turned on and off.
FUSE - REFERENCE TABLE
OK:
When OFF is selected on the hand-held tester, the rear defogger should turn off.
When ON is selected on the hand-held tester, the rear defogger should become active.
NG: Go to step 2
OK: REPLACE AIR CONDITIONER CONTROL ASSY AND IF DEFOGGER STILL DOES
NOT OPERATE, REPLACE MULTI-DISPLAY OR CLUSTER INTEGRATION PANEL
2.INSPECT FUSE (DEFOG, FR IG)
a. Remove the DEFOG H-fuse from the FL block.
b. Remove the FR IG fuse from the engine room R/B.
c. Measure the resistance of the fuse.
Standard: Below 1 ohms
NG: REPLACE FUSE
OK: Go to next step
3.CHECK WIRE HARNESS (DEFOG RELAY - BATTERY)
a. Remove the DEFOG relay from the engine room R/B No. 2.
b. Measure the voltage of the wire harness side connector.
Standard:
DEFOG RELAY - BATTERY - VOLTAGE TABLE
ItemTest DetailsDiagnostic Note
DEFOGGER RLY-ROperate rear window defogger
OFF/ON-
Tester ConnectionConditionSpecified Condition
R/B DEFOG relay terminal 1 -
Body groundIgnition switch ON10 to 14 V
R/B DEFOG relay terminal 5 -
Body groundAlways10 to 14 V
Page 2007 of 4500
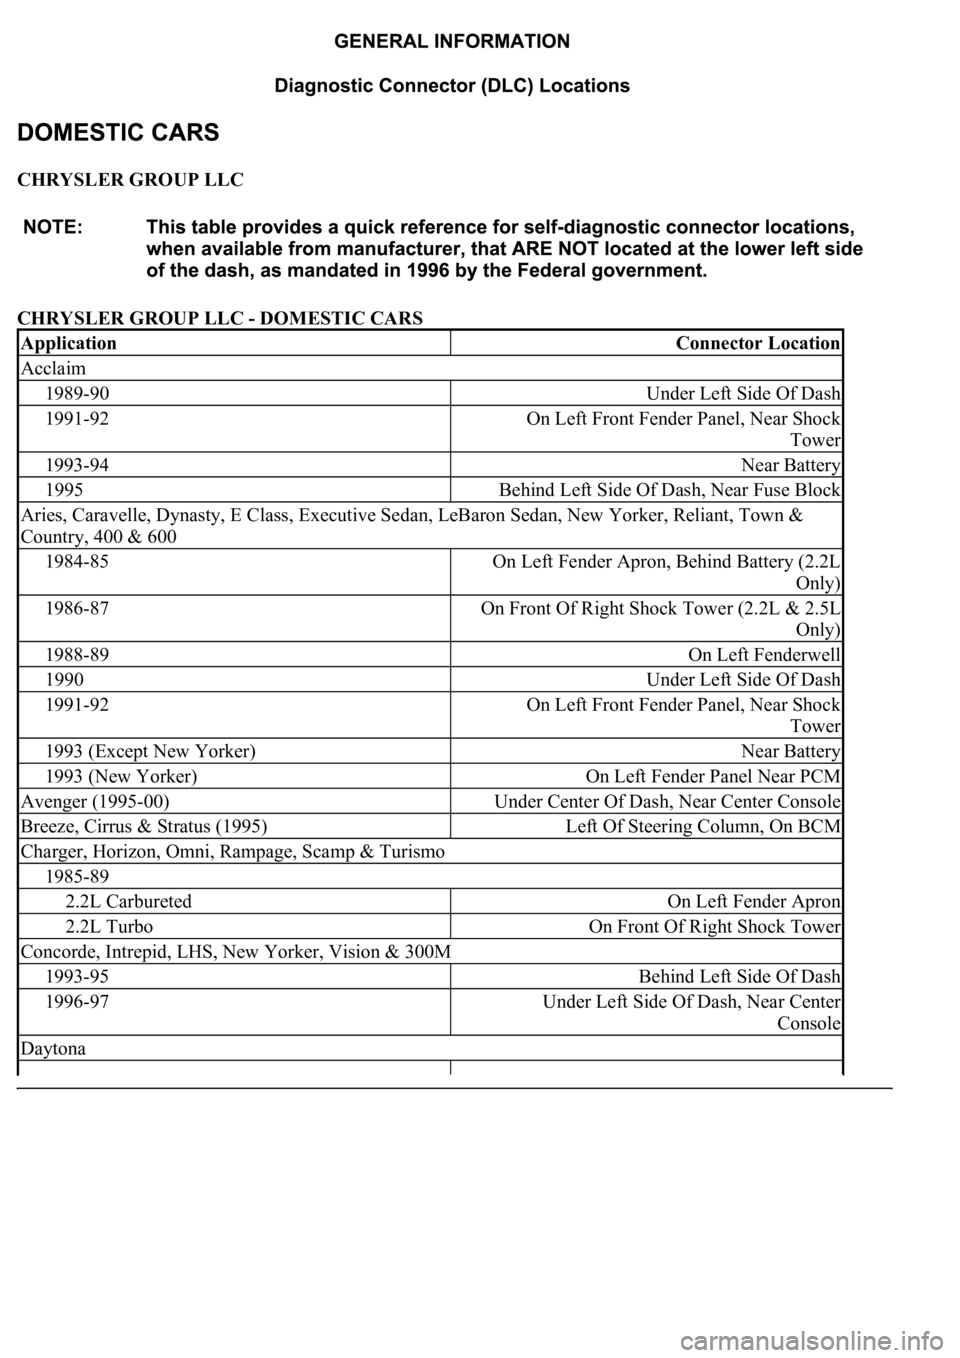
CHRYSLER GROUP LLC
CHRYSLER GROUP LLC - DOMESTIC CARS
ApplicationConnector Location
Acclaim
1989-90Under Left Side Of Dash
1991-92On Left Front Fender Panel, Near Shock
Tower
1993-94Near Battery
1995Behind Left Side Of Dash, Near Fuse Block
Aries, Caravelle, Dynasty, E Class, Executive Sedan, LeBaron Sedan, New Yorker, Reliant, Town &
Country, 400 & 600
1984-85On Left Fender Apron, Behind Battery (2.2L
Only)
1986-87On Front Of Right Shock Tower (2.2L & 2.5L
Only)
1988-89On Left Fenderwell
1990Under Left Side Of Dash
1991-92On Left Front Fender Panel, Near Shock
Tower
1993 (Except New Yorker)Near Battery
1993 (New Yorker)On Left Fender Panel Near PCM
Avenger (1995-00)Under Center Of Dash, Near Center Console
Breeze, Cirrus & Stratus (1995)Left Of Steering Column, On BCM
Charger, Horizon, Omni, Rampage, Scamp & Turismo
1985-89
2.2L CarburetedOn Left Fender Apron
2.2L TurboOn Front Of Right Shock Tower
Concorde, Intrepid, LHS, New Yorker, Vision & 300M
1993-95Behind Left Side Of Dash
1996-97Under Left Side Of Dash, Near Center
Console
Daytona
Page 2008 of 4500
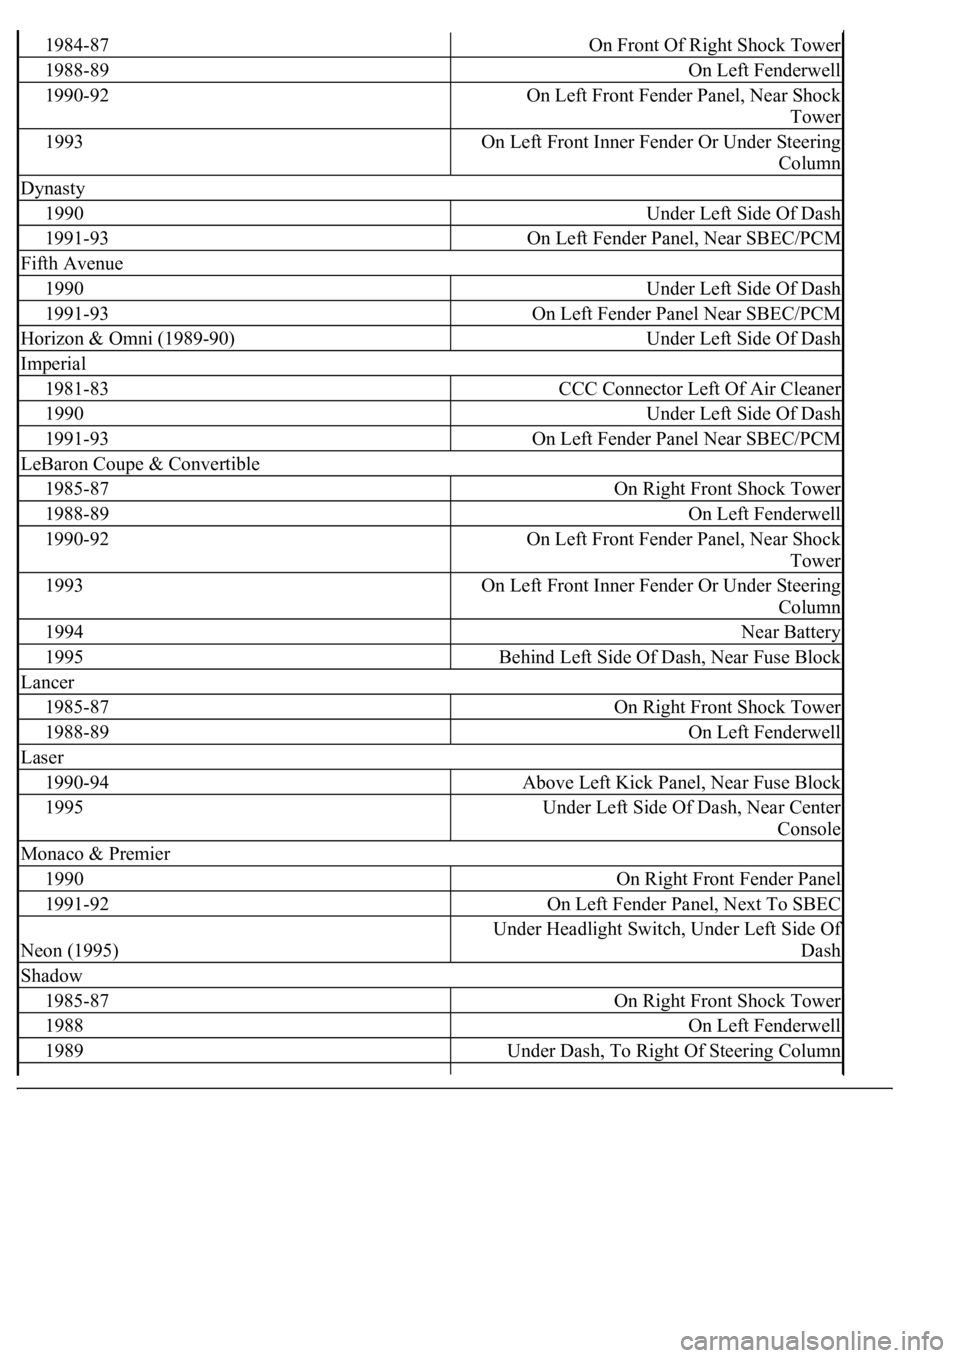
1984-87On Front Of Right Shock Tower
1988-89On Left Fenderwell
1990-92On Left Front Fender Panel, Near Shock
Tower
1993On Left Front Inner Fender Or Under Steering
Column
Dynasty
1990Under Left Side Of Dash
1991-93On Left Fender Panel, Near SBEC/PCM
Fifth Avenue
1990Under Left Side Of Dash
1991-93On Left Fender Panel Near SBEC/PCM
Horizon & Omni (1989-90)Under Left Side Of Dash
Imperial
1981-83CCC Connector Left Of Air Cleaner
1990Under Left Side Of Dash
1991-93On Left Fender Panel Near SBEC/PCM
LeBaron Coupe & Convertible
1985-87On Right Front Shock Tower
1988-89On Left Fenderwell
1990-92On Left Front Fender Panel, Near Shock
Tower
1993On Left Front Inner Fender Or Under Steering
Column
1994Near Battery
1995Behind Left Side Of Dash, Near Fuse Block
Lancer
1985-87On Right Front Shock Tower
1988-89On Left Fenderwell
Laser
1990-94Above Left Kick Panel, Near Fuse Block
1995Under Left Side Of Dash, Near Center
Console
Monaco & Premier
1990On Right Front Fender Panel
1991-92On Left Fender Panel, Next To SBEC
Neon (1995)
Under Headlight Switch, Under Left Side Of
Dash
Shadow
1985-87On Right Front Shock Tower
1988On Left Fenderwell
1989Under Dash, To Right Of Steering Column
Page 2009 of 4500
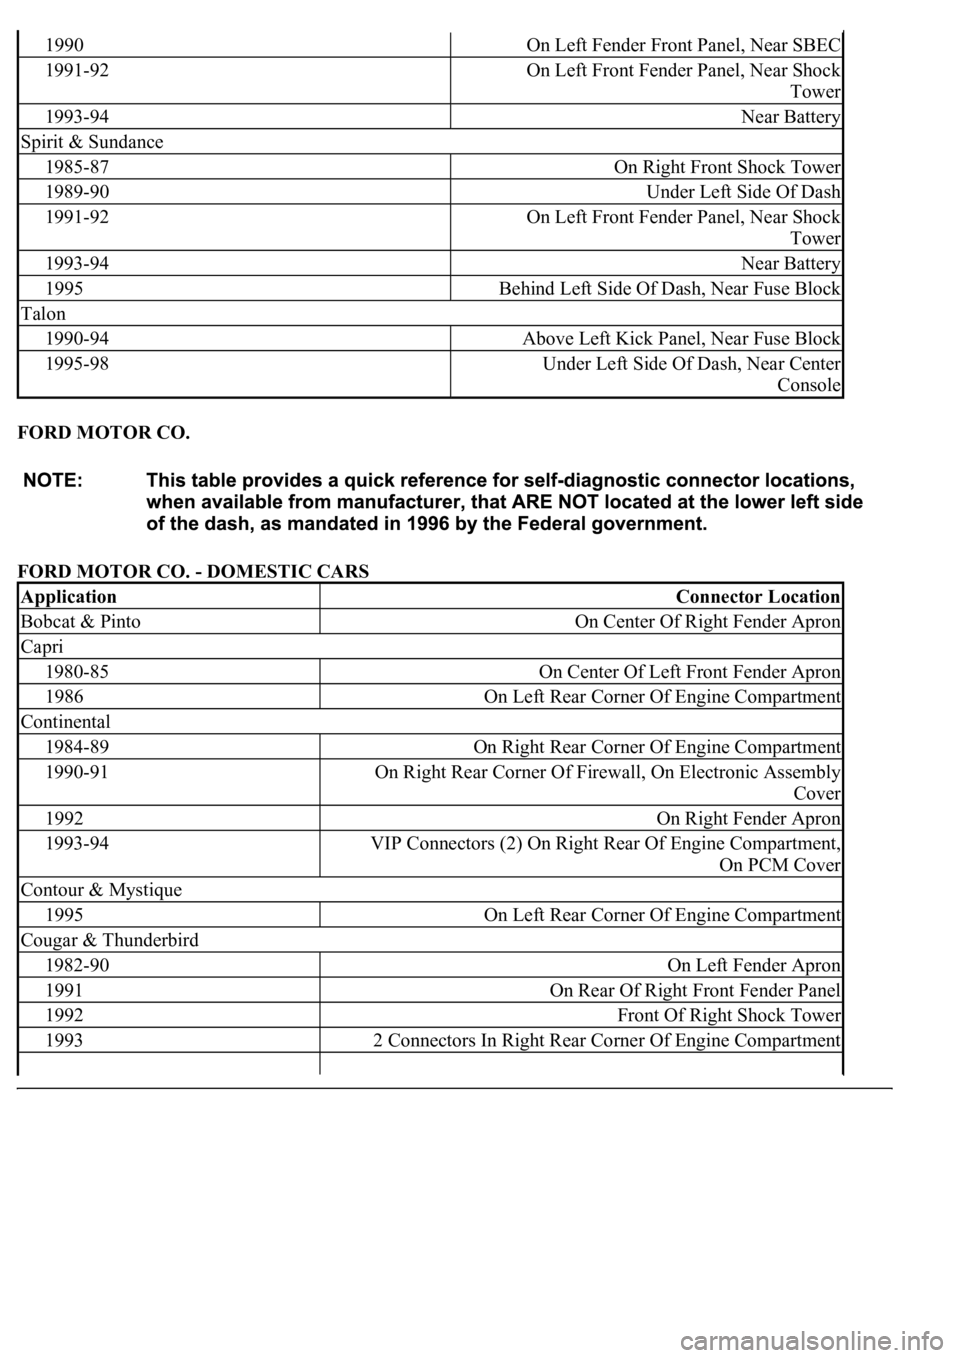
FORD MOTOR CO.
FORD MOTOR CO. - DOMESTIC CARS
1990On Left Fender Front Panel, Near SBEC
1991-92On Left Front Fender Panel, Near Shock
Tower
1993-94Near Battery
Spirit & Sundance
1985-87On Right Front Shock Tower
1989-90Under Left Side Of Dash
1991-92On Left Front Fender Panel, Near Shock
Tower
1993-94Near Battery
1995Behind Left Side Of Dash, Near Fuse Block
Talon
1990-94Above Left Kick Panel, Near Fuse Block
1995-98Under Left Side Of Dash, Near Center
Console
ApplicationConnector Location
Bobcat & PintoOn Center Of Right Fender Apron
Capri
1980-85On Center Of Left Front Fender Apron
1986On Left Rear Corner Of Engine Compartment
Continental
1984-89On Right Rear Corner Of Engine Compartment
1990-91On Right Rear Corner Of Firewall, On Electronic Assembly
Cover
1992On Right Fender Apron
1993-94VIP Connectors (2) On Right Rear Of Engine Compartment,
On PCM Cover
Contour & Mystique
1995On Left Rear Corner Of Engine Compartment
Cougar & Thunderbird
1982-90On Left Fender Apron
1991On Rear Of Right Front Fender Panel
1992Front Of Right Shock Tower
19932 Connectors In Right Rear Corner Of Engine Compartment
Page 2011 of 4500
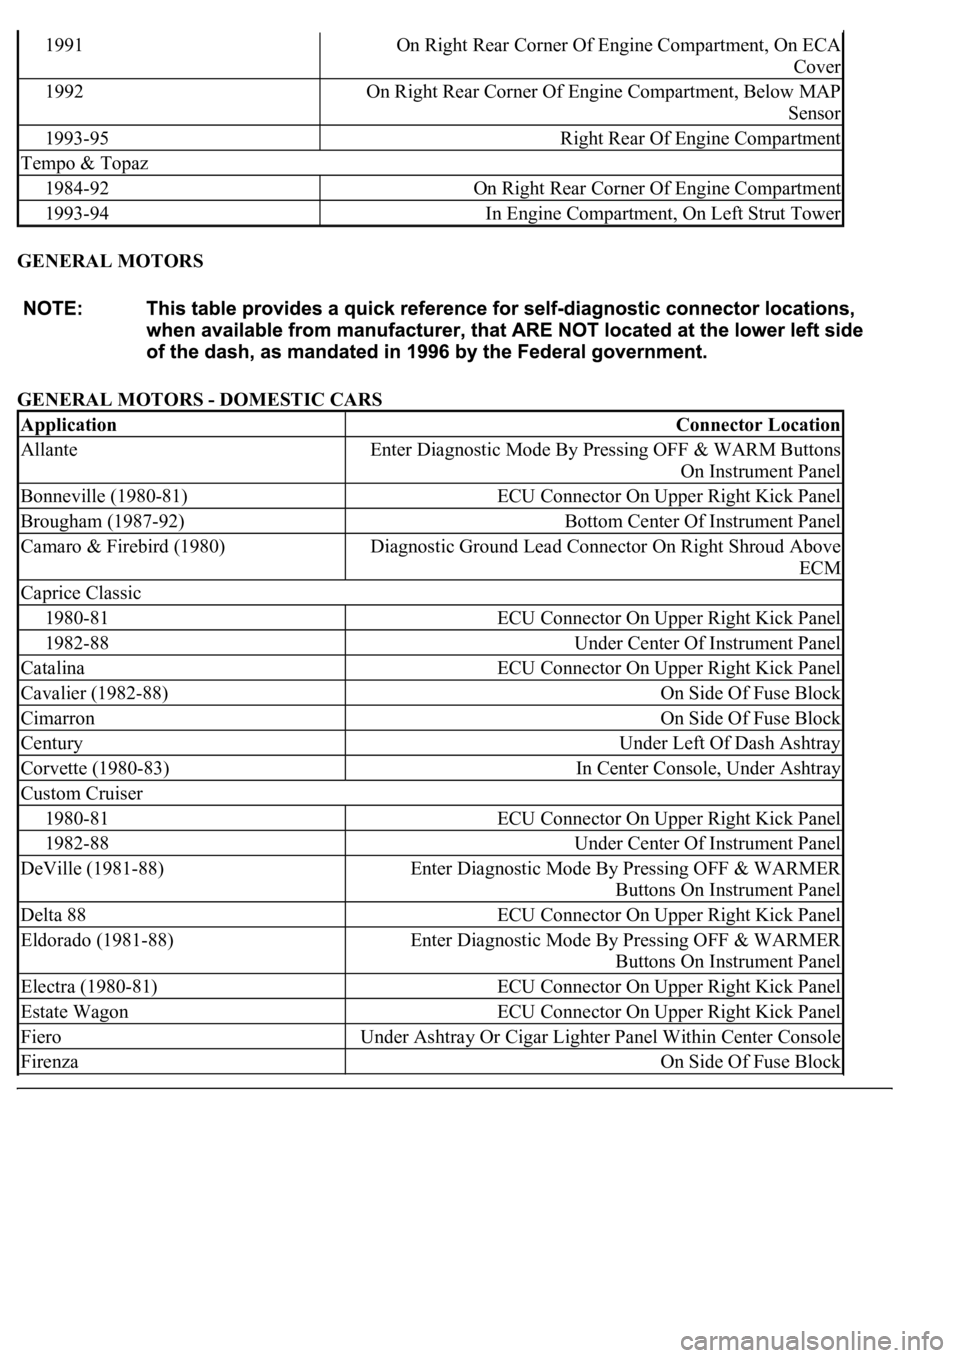
GENERAL MOTORS
GENERAL MOTORS - DOMESTIC CARS
1991On Right Rear Corner Of Engine Compartment, On ECA
Cover
1992On Right Rear Corner Of Engine Compartment, Below MAP
Sensor
1993-95Right Rear Of Engine Compartment
Tempo & Topaz
1984-92On Right Rear Corner Of Engine Compartment
1993-94In Engine Compartment, On Left Strut Tower
ApplicationConnector Location
AllanteEnter Diagnostic Mode By Pressing OFF & WARM Buttons
On Instrument Panel
Bonneville (1980-81)ECU Connector On Upper Right Kick Panel
Brougham (1987-92)Bottom Center Of Instrument Panel
Camaro & Firebird (1980)Diagnostic Ground Lead Connector On Right Shroud Above
ECM
Caprice Classic
1980-81ECU Connector On Upper Right Kick Panel
1982-88Under Center Of Instrument Panel
CatalinaECU Connector On Upper Right Kick Panel
Cavalier (1982-88)On Side Of Fuse Block
CimarronOn Side Of Fuse Block
CenturyUnder Left Of Dash Ashtray
Corvette (1980-83)In Center Console, Under Ashtray
Custom Cruiser
1980-81ECU Connector On Upper Right Kick Panel
1982-88Under Center Of Instrument Panel
DeVille (1981-88)Enter Diagnostic Mode By Pressing OFF & WARMER
Buttons On Instrument Panel
Delta 88ECU Connector On Upper Right Kick Panel
Eldorado (1981-88)Enter Diagnostic Mode By Pressing OFF & WARMER
Buttons On Instrument Panel
Electra (1980-81)ECU Connector On Upper Right Kick Panel
Estate WagonECU Connector On Upper Right Kick Panel
FieroUnder Ashtray Or Cigar Lighter Panel Within Center Console
FirenzaOn Side Of Fuse Block