Page 2725 of 4500
Fig. 46: Test Item Reference Chart
Courtesy of TOYOTA MOTOR SALES, U.S.A., INC.
HINT:
The pressure values in ACTIVE TEST and HYDRAULIC TEST are different from each other.
DIAGNOSTIC TROUBLE CODE CHART
If a DTC is displayed during the DTC check, check the parts listed in the table below.
DTC LIST
DTCDescription
DTC P0705, P0850TRANSMISSION RANGE SENSOR CIRCUIT
MALFUNCTION (PRNDL INPUT),
PARK/NEUTRAL SWITCH INPUT CIRCUIT
DTC P0710, P0712, P0713TRANSMISSION FLUID TEMPERATURE
SENSOR "A" CIRCUIT LOW/HIGH INPUT
DTC P0711TRANSMISSION FLUID TEMPERATURE
SENSOR "A" PERFORMANCE
DTC P0717TURBINE SPEED SENSOR CIRCUIT NO SIGNAL
DTC P0724BRAKE SWITCH "B" CIRCUIT HIGH
DTC P0729GEAR 6 INCORRECT RATIO
DTC P0748PRESSURE CONTROL SOLENOID "A"
ELECTRICAL (SHIFT SOLENOID VALVE SL1)
Page 2760 of 4500

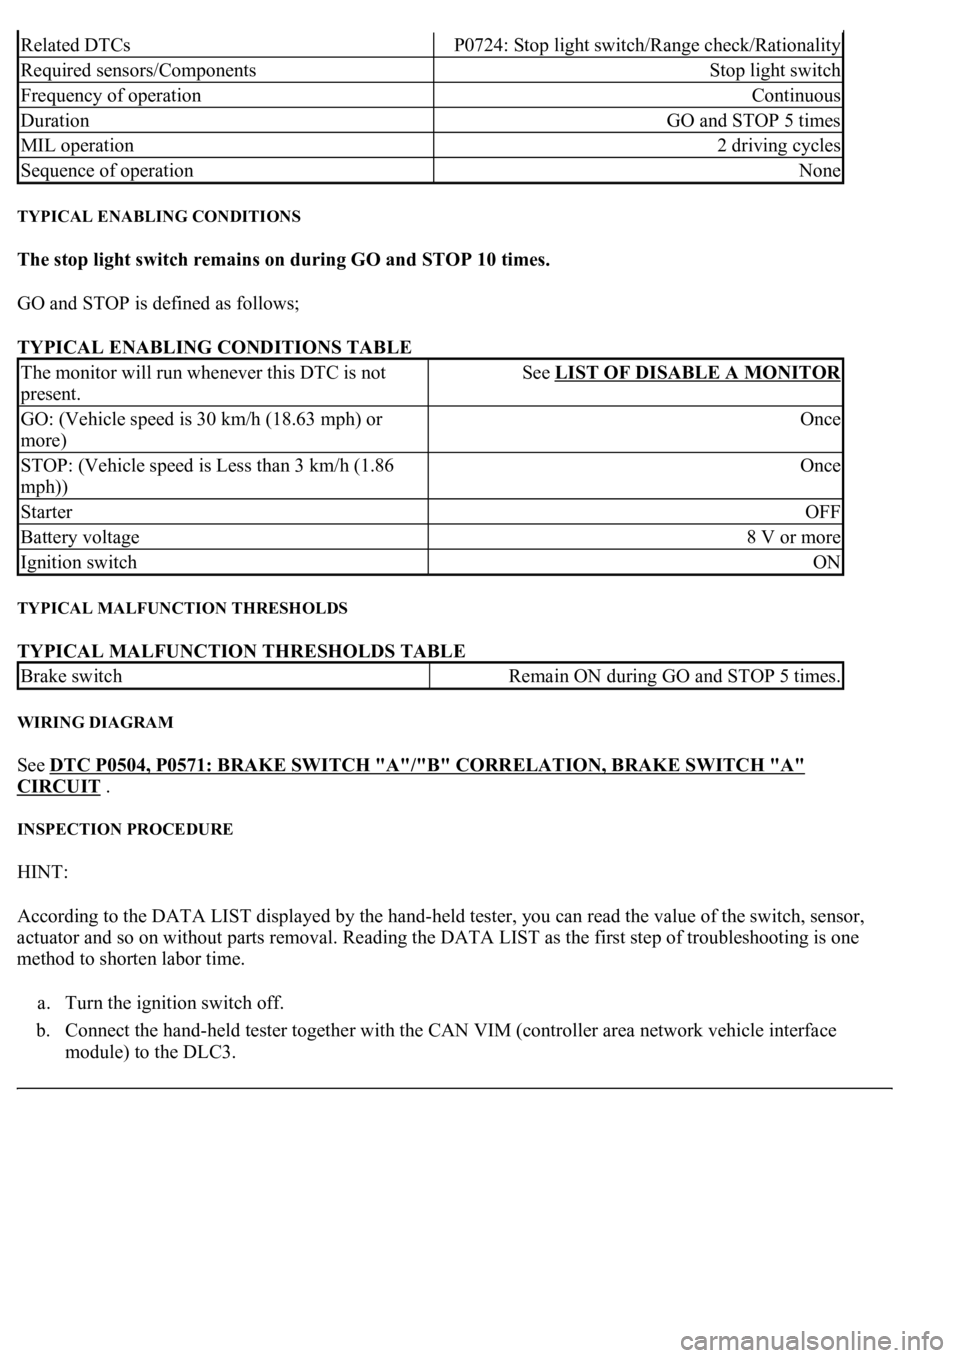
TYPICAL ENABLING CONDITIONS
The stop light switch remains on during GO and STOP 10 times.
GO and STOP is defined as follows;
TYPICAL ENABLING CONDITIONS TABLE
TYPICAL MALFUNCTION THRESHOLDS
TYPICAL MALFUNCTION THRESHOLDS TABLE
WIRING DIAGRAM
See DTC P0504, P0571: BRAKE SWITCH "A"/"B" CORRELATION, BRAKE SWITCH "A"
CIRCUIT .
INSPECTION PROCEDURE
HINT:
According to the DATA LIST displayed by the hand-held tester, you can read the value of the switch, sensor,
actuator and so on without parts removal. Reading the DATA LIST as the first step of troubleshooting is one
method to shorten labor time.
a. Turn the ignition switch off.
b. Connect the hand-held tester together with the CAN VIM (controller area network vehicle interface
module) to the DLC3.
Related DTCsP0724: Stop light switch/Range check/Rationality
Required sensors/ComponentsStop light switch
Frequency of operationContinuous
DurationGO and STOP 5 times
MIL operation2 driving cycles
Sequence of operationNone
The monitor will run whenever this DTC is not
present.See LIST OF DISABLE A MONITOR
GO: (Vehicle speed is 30 km/h (18.63 mph) or
more)Once
STOP: (Vehicle speed is Less than 3 km/h (1.86
mph))Once
StarterOFF
Battery voltage8 V or more
Ignition switchON
Brake switchRemain ON during GO and STOP 5 times.
Page 2764 of 4500
OK: REPLACE ECM (See REPLACEMENT)
DTC P0729: GEAR 6 INCORRECT RATIO
SYSTEM DESCRIPTION
The ECM uses signals from the output speed sensor SP2 and input speed sensor NT to detect the actual gear
position (1st, 2nd, 3rd, 4th, 5th or 6th gear). Then the ECM compares the actual gear with the shift schedule in
the ECM memory to detect mechanical problems of the shift solenoid valves, valve body or automatic
transmission (clutch, brake or gear, etc.).
Fig. 83: Identifying Valve Body
Courtesy of TOYOTA MOTOR SALES, U.S.A., INC.
Page 2802 of 4500

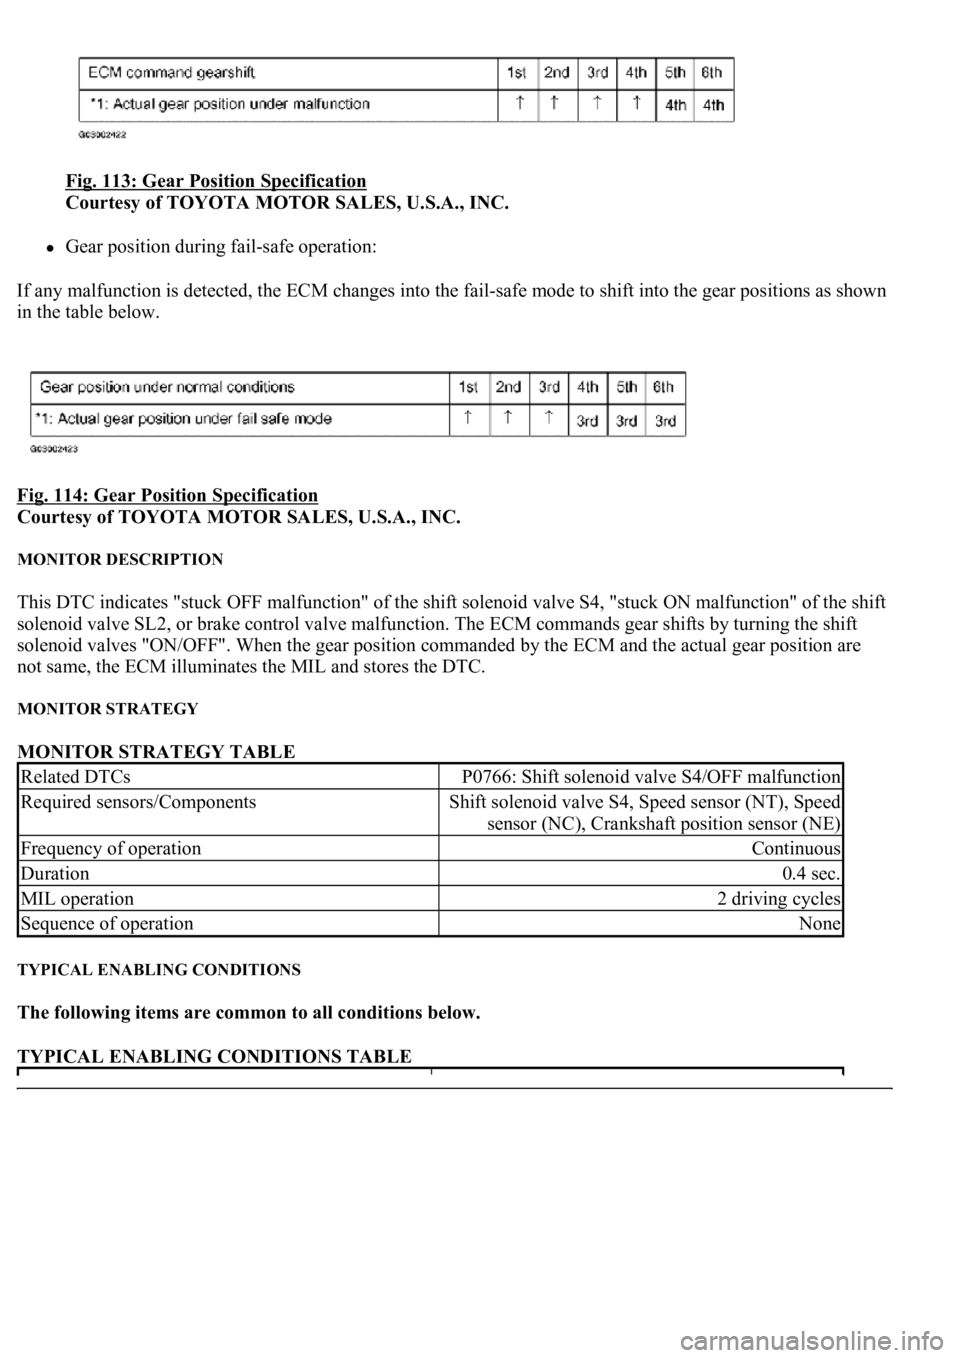
Fig. 113: Gear Position Specification
Courtesy of TOYOTA MOTOR SALES, U.S.A., INC.
Gear position during fail-safe operation:
If any malfunction is detected, the ECM changes into the fail-safe mode to shift into the gear positions as shown
in the table below.
Fig. 114: Gear Position Specification
Courtesy of TOYOTA MOTOR SALES, U.S.A., INC.
MONITOR DESCRIPTION
This DTC indicates "stuck OFF malfunction" of the shift solenoid valve S4, "stuck ON malfunction" of the shift
solenoid valve SL2, or brake control valve malfunction. The ECM commands gear shifts by turning the shift
solenoid valves "ON/OFF". When the gear position commanded by the ECM and the actual gear position are
not same, the ECM illuminates the MIL and stores the DTC.
MONITOR STRATEGY
MONITOR STRATEGY TABLE
TYPICAL ENABLING CONDITIONS
The following items are common to all conditions below.
TYPICAL ENABLING CONDITIONS TABLE
Related DTCsP0766: Shift solenoid valve S4/OFF malfunction
Required sensors/ComponentsShift solenoid valve S4, Speed sensor (NT), Speed
sensor (NC), Crankshaft position sensor (NE)
Frequency of operationContinuous
Duration0.4 sec.
MIL operation2 driving cycles
Sequence of operationNone
Page 2820 of 4500

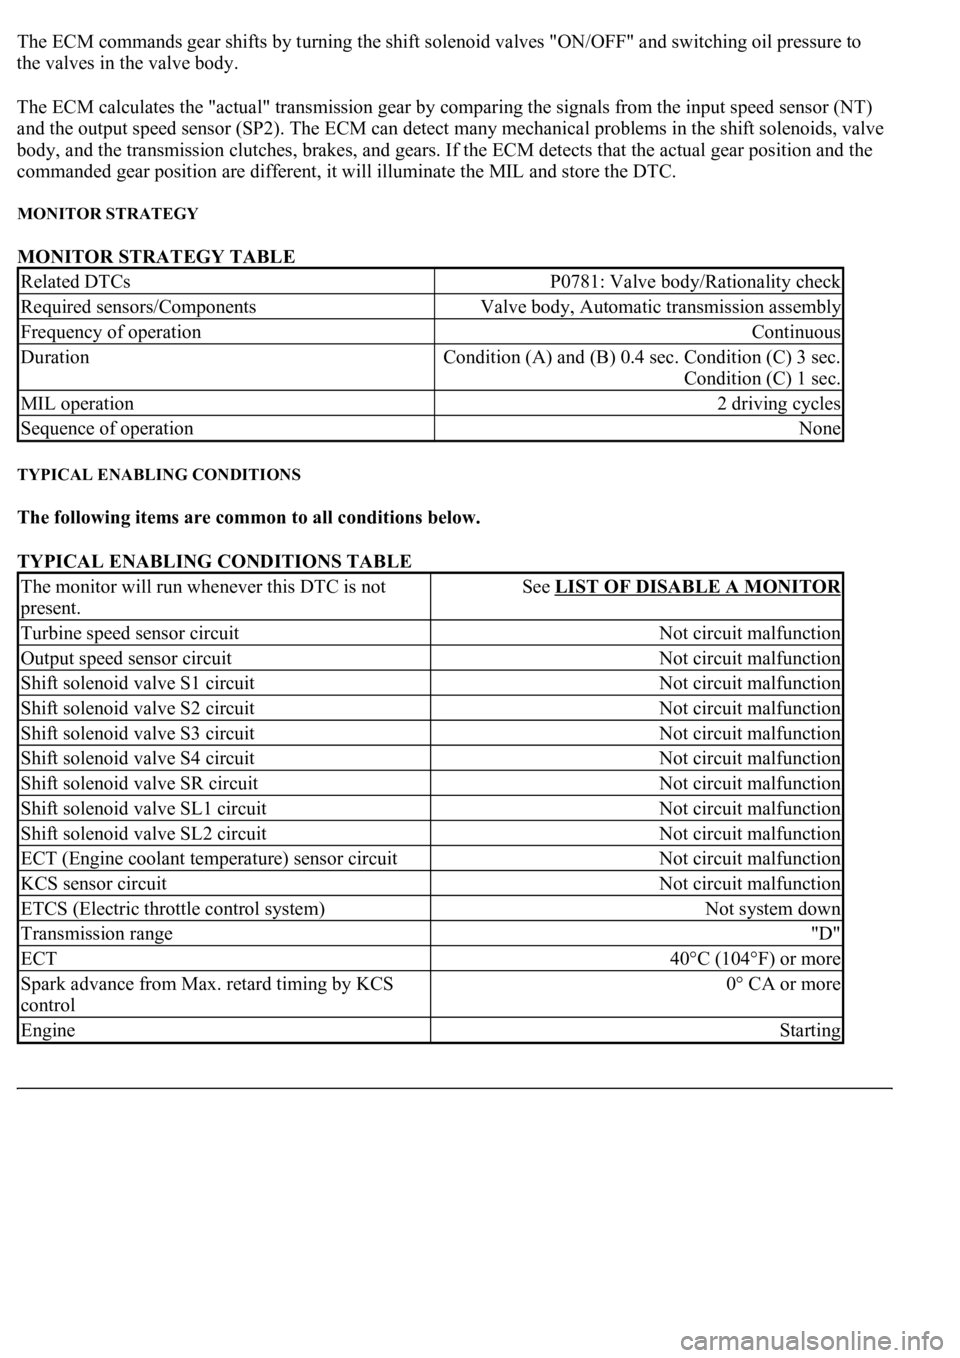
The ECM commands gear shifts by turning the shift solenoid valves "ON/OFF" and switching oil pressure to
the valves in the valve body.
The ECM calculates the "actual" transmission gear by comparing the signals from the input speed sensor (NT)
and the output speed sensor (SP2). The ECM can detect many mechanical problems in the shift solenoids, valve
body, and the transmission clutches, brakes, and gears. If the ECM detects that the actual gear position and the
commanded gear position are different, it will illuminate the MIL and store the DTC.
MONITOR STRATEGY
MONITOR STRATEGY TABLE
TYPICAL ENABLING CONDITIONS
The following items are common to all conditions below.
TYPICAL ENABLING CONDITIONS TABLE
Related DTCsP0781: Valve body/Rationality check
Required sensors/ComponentsValve body, Automatic transmission assembly
Frequency of operationContinuous
Duration<0026005200510047004c0057004c005200510003000b0024000c00030044005100470003000b0025000c00030013001100170003005600480046001100030026005200510047004c0057004c005200510003000b0026000c00030016000300560048004600
110003[
Condition (C) 1 sec.
MIL operation2 driving cycles
Sequence of operationNone
The monitor will run whenever this DTC is not
present.See LIST OF DISABLE A MONITOR
Turbine speed sensor circuitNot circuit malfunction
Output speed sensor circuitNot circuit malfunction
Shift solenoid valve S1 circuitNot circuit malfunction
Shift solenoid valve S2 circuitNot circuit malfunction
Shift solenoid valve S3 circuitNot circuit malfunction
Shift solenoid valve S4 circuitNot circuit malfunction
Shift solenoid valve SR circuitNot circuit malfunction
Shift solenoid valve SL1 circuitNot circuit malfunction
Shift solenoid valve SL2 circuitNot circuit malfunction
ECT (Engine coolant temperature) sensor circuitNot circuit malfunction
KCS sensor circuitNot circuit malfunction
ETCS (Electric throttle control system)Not system down
Transmission range"D"
ECT40°C (104°F) or more
Spark advance from Max. retard timing by KCS
control0° CA or more
EngineStarting
Page 3314 of 4500
a. Check the steering wheel at the straight-ahead position.
b. Remove the 2 bolts and sliding yoke from the steering intermediate shaft.
Fig. 34: Removing Bolts And Sliding Yoke
Courtesy of TOYOTA MOTOR SALES, U.S.A., INC.
33.REMOVE FRONT DISC BRAKE CYLINDER ASSY RH (See OVERHAUL
)
34.REMOVE DISC BRAKE CYLINDER ASSY LH (See OVERHAUL
)
35.REMOVE FRONT SUSPENSION UPPER ARM ASSY RH (See REPLACEMENT
)
36.REMOVE FRONT SUSPENSION UPPER ARM ASSY LH (See REPLACEMENT
)
37.REMOVE PNEUMATIC FRONT RH W/ SHOCK ABSORBER CYLINDER ASSY (See
REPLACEMENT
)
38.REMOVE PNEUMATIC FRONT LH W/ SHOCK ABSORBER CYLINDER ASSY (See
REPLACEMENT
)
39.REMOVE HEIGHT CONTROL SENSOR LINK SUB-ASSY FRONT (See REPLACEMENT
)
40.REMOVE STABILIZER BRACKET FRONT (See REPLACEMENT
)
41.DISCONNECT POWER STEERING GEAR HOUSING ASSY
a. Remove the bolt, and disconnect the 2 PS oil tubes from the front frame.
b. Remove the 4 bolts, and disconnect the PS gear housing from the front frame.
Page 3357 of 4500
Fig. 77: Installing Power Steering Gear Housing Assy
Courtesy of TOYOTA MOTOR SALES, U.S.A., INC.
114.INSTALL HEIGHT CONTROL SENSOR LINK SUB-ASSY FRONT (See REPLACEMENT
)
115.INSTALL PNEUMATIC FRONT RH W/SHOCK ABSORBER CYLINDER ASSY (See
REPLACEMENT
)
116.INSTALL PNEUMATIC FRONT LH W/SHOCK ABSORBER CYLINDER ASSY (See
REPLACEMENT
)
117.INSTALL FRONT SUSPENSION UPPER ARM ASSY RH (See REPLACEMENT
)
118.INSTALL FRONT SUSPENSION UPPER ARM ASSY LH (See REPLACEMENT
)
119.INSTALL FRONT DISC BRAKE CYLINDER ASSY RH (See OVERHAUL
)
120.INSTALL DISC BRAKE CYLINDER ASSY LH (See OVERHAUL
)
121.INSTALL STEERING SLIDING W/ SHAFT YOKE SUB-ASSY
a. Tighten the 2 bolts for sliding yoke.
Torque: 35 N.m (357 kgf.cm, 26 ft.lbf)
Page 4060 of 4500
3.SEPARATE SKID CONTROL SENSOR WIRE (See REPLACEMENT )
4.REMOVE DISC BRAKE CYLINDER ASSY LH (See step 8 in OVERHAUL
)
5.REMOVE FRONT DISC (See step 14 in OVERHAUL
)
6.REMOVE FRONT AXLE HUB SUB-ASSY LH (See step 5 in REPLACEMENT
)
7.REMOVE STEERING KNUCKLE LH
a. Remove the clip and castle nut.
b. Using SST, separate the upper ball joint from the steering knuckle LH.
SST 09628-62011
Fig. 68: Removing Steering Knuckle LH
Courtesy of TOYOTA MOTOR SALES, U.S.A., INC.
8.SEPARATE TIE ROD ASSY LH
a. Remove the clip and castle nut.
b. Using SST, separate the tie rod end.
SST 09628-62011