Page 4182 of 4500

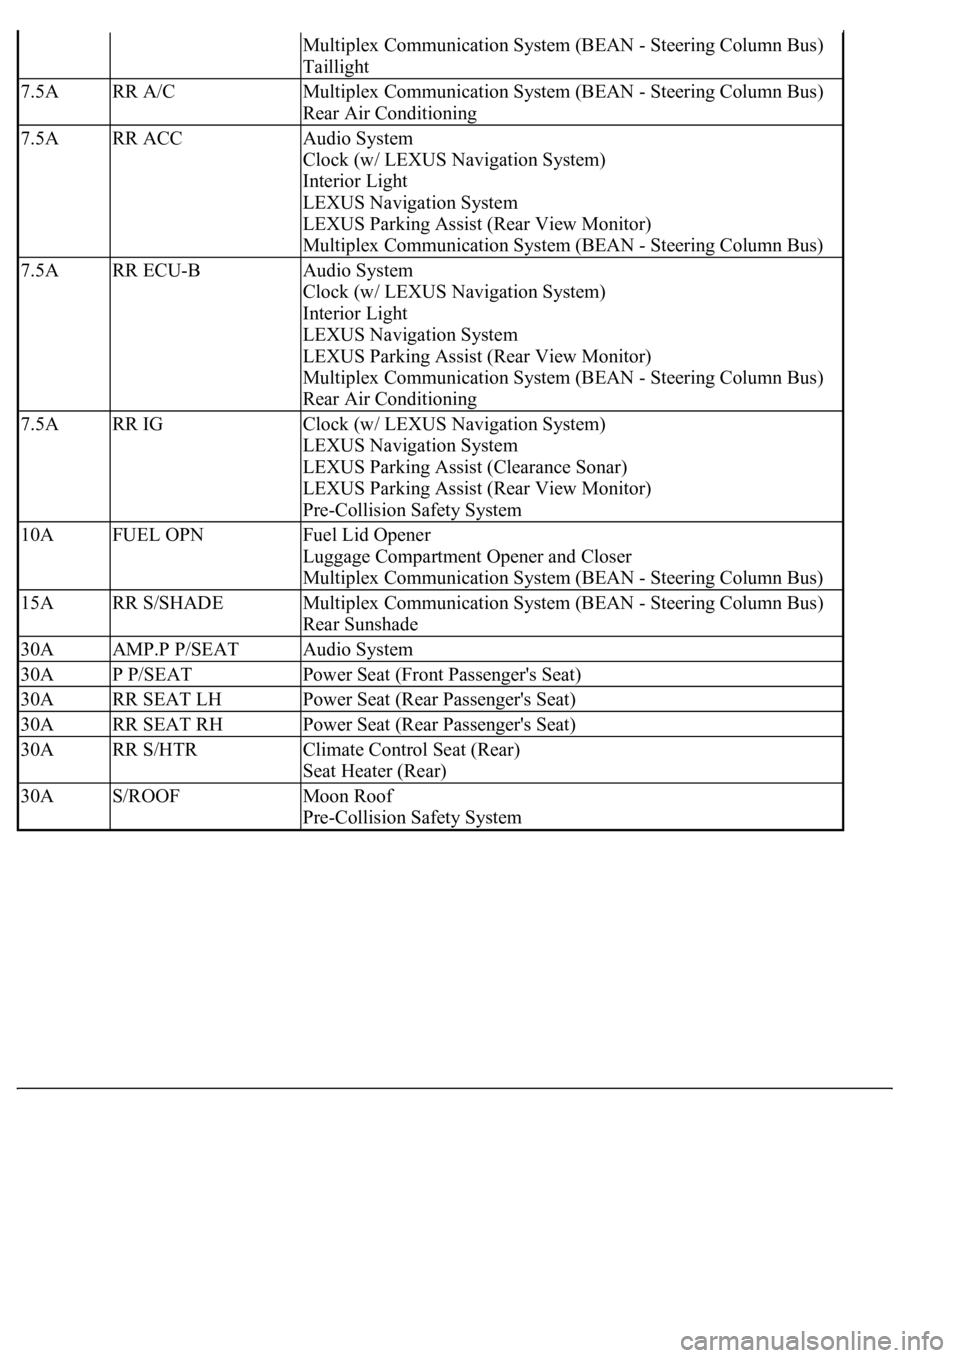
Multiplex Communication System (BEAN - Steering Column Bus)
Taillight
7.5ARR A/CMultiplex Communication System (BEAN - Steering Column Bus)
Rear Air Conditioning
7.5ARR ACCAudio System
Clock (w/ LEXUS Navigation System)
Interior Light
LEXUS Navigation System
LEXUS Parking Assist (Rear View Monitor)
Multiplex Communication System (BEAN - Steering Column Bus)
7.5ARR ECU-BAudio System
Clock (w/ LEXUS Navigation System)
Interior Light
LEXUS Navigation System
LEXUS Parking Assist (Rear View Monitor)
Multiplex Communication System (BEAN - Steering Column Bus)
Rear Air Conditioning
7.5ARR IGClock (w/ LEXUS Navigation System)
LEXUS Navigation System
LEXUS Parking Assist (Clearance Sonar)
LEXUS Parking Assist (Rear View Monitor)
Pre-Collision Safety System
10AFUEL OPNFuel Lid Opener
Luggage Compartment Opener and Closer
Multiplex Communication System (BEAN - Steering Column Bus)
15ARR S/SHADEMultiplex Communication System (BEAN - Steering Column Bus)
Rear Sunshade
30AAMP.P P/SEATAudio System
30AP P/SEATPower Seat (Front Passenger's Seat)
30ARR SEAT LHPower Seat (Rear Passenger's Seat)
30ARR SEAT RHPower Seat (Rear Passenger's Seat)
30ARR S/HTRClimate Control Seat (Rear)
Seat Heater (Rear)
30AS/ROOFMoon Roof
Pre-Collision Safety System
Page 4197 of 4500
Fig. 4: Identifying Air Conditioning System Components And Replacements Location (1 Of 2)
Courtesy of TOYOTA MOTOR SALES, U.S.A., INC.
Page 4198 of 4500
Fig. 5: Identifying Air Conditioning System Components And Replacements Location (2 Of 2)
Courtesy of TOYOTA MOTOR SALES, U.S.A., INC.
Page 4216 of 4500
Fig. 31: Identifying Air Conditioning Panel Sub-Assy Components And Replacements
Courtesy of TOYOTA MOTOR SALES, U.S.A., INC.
REPLACEMENT
HINT:
Installation is in the reverse order of removal.
See COMPONENTS .
1.RESTORE SHIP MODE SETTING (W/ CD CHANGER) (See PRECAUTION
)
2.REMOVE INSTRUMENT PANEL FINISH PANEL LOWER CENTER (See step 26 in
REPLACEMENT
)
3.REMOVE PANEL INSTRUMENT CLUSTER FINISH LOWER (See step 27 in
REPLACEMENT
)
4.REMOVE RADIO RECEIVER ASSEMBLY W/BRACKET (See step 4 in REPLACEMENT
)
5.CONFIRM SHIP MODE (W/ CD CHANGER) (See PRECAUTION
)
6.REMOVE TEMPERATURE CONTROL SWITCH ASSY
a. Using a screwdriver, release the 2 claws and remove the temperature control switch.
HINT:
Tape the screwdriver tip before use.
b. Employ the same manner described above to the other side.
c. Disconnect the connectors.
Page 4225 of 4500
Fig. 40: Identifying Air Conditioning Radiator Assy Components And Replacements (1 Of 2)
Courtesy of TOYOTA MOTOR SALES, U.S.A., INC.
Page 4226 of 4500
Fig. 41: Identifying Air Conditioning Radiator Assy Components And Replacements (2 Of 2)
Courtesy of TOYOTA MOTOR SALES, U.S.A., INC.
Page 4231 of 4500
Fig. 45: Separating Console Box Duct No. 1
Courtesy of TOYOTA MOTOR SALES, U.S.A., INC.
16.REMOVE AIR CONDITIONING RADIATOR ASSY
a. Disconnect the connectors and wire harness clamps.
b. Remove the 2 nuts, bolt and air conditioning radiator assy.
Page 4232 of 4500
Fig. 46: Removing Air Conditioning Radiator Assy
Courtesy of TOYOTA MOTOR SALES, U.S.A., INC.
17.REMOVE HEATER CASE SUB-ASSY
a. Remove the 5 screws, release the 2 claws and remove the air vent duct.