Page 1941 of 4500
OK: When cruise control main switch operation is performed the standard values will be above.
NG: REPLACE ECM (SEE REPLACEMENT
)
OK: PROCEED TO NEXT CIRCUIT INSPECTION SHOWN ON PROBLEM SYMPTOMS
TABLE
CIRCUIT DESCRIPTION
Making a short circuit between terminals TC and CG of the DLC3 will output DTCs from the DLC3.
WIRING DIAGRAM
Fig. 32: [Wiring Diagram
- Diagnosis Circuit]
Courtesy of TOYOTA MOTOR SALES, U.S.A., INC.
HINT:
When a particular warning light stays blinking, a ground short in the wiring of terminal TC of the DLC3 or an
internal ground short in the relevant ECU is suspected.
INSPECTION PROCEDURE
CCS
INDICATORSCruise indicator signal (Sub
CPU) /ON or OFFON: "CCS READY" ON OFF:
"CCS READY" OFF-
Page 1949 of 4500
Fig. 2: Removing Laser Sensor
Courtesy of TOYOTA MOTOR SALES, U.S.A., INC.
10.INSTALL LASER SENSOR
11.INSTALL FRONT BUMPER REINFORCEMENT SUB-ASSY (See step 25 in REPLACEMENT
)
12.ADJUST FOG LIGHT AIM (See ADJUSTMENT
)
13.CHECK FOG LIGHT AIM
14.ADJUST LASER SENSOR (See ADJUSTMENT
)
ADJUSTMENT
Page 1950 of 4500
HINT:
There is a limitation on laser optical axis adjustment.
Since the laser sensor is installed in the bumper reinforcement, it is important that the laser sensor,
bumper reinforcement, and other related parts are installed properly.
When the sensor is removed from the vehicle for trouble diagnosis or repair, it is necessary to adjust the
laser optical axis after the operation.
1.ADJUST LASER SENSOR
a. Preparation for adjusting the laser optical axis
1. Adjust the tire pressure properly (see INSPECTION
).
2. Luggage in the vehicle, such as in the trunk, should be unloaded.
3. Clean the light-luminous and light-receiving portions of the laser sensor.
HINT:
Prepare a 10 m (32.81 ft) string, with a sharp-pointed weight (plumb bob), and a 5 m (16.41 ft) tape
measure.
Page 1979 of 4500
Fig. 33: Pressing "ENTER" Key
Courtesy of TOYOTA MOTOR SALES, U.S.A., INC.
11. After the CRUISE main indicator light comes on. press the "ENTER" key.
12. Press the "ENTER" ke
y.
Page 1988 of 4500
Fig. 44: Removing Cruise Control Main Switch Assy
Courtesy of TOYOTA MOTOR SALES, U.S.A., INC.
7.INSPECT STEERING WHEEL CENTER POINT
8.INSTALL STEERING WHEEL ASSY (See step 96 in OVERHAUL
)
9.INSTALL HORN BUTTON ASSY (See step 6 in REPLACEMENT
)
10.CONNECT BATTERY NEGATIVE TERMINAL
11.INSPECT HORN BUTTON ASSY
12.INSPECT SRS WARNING LIGHT
Page 2008 of 4500

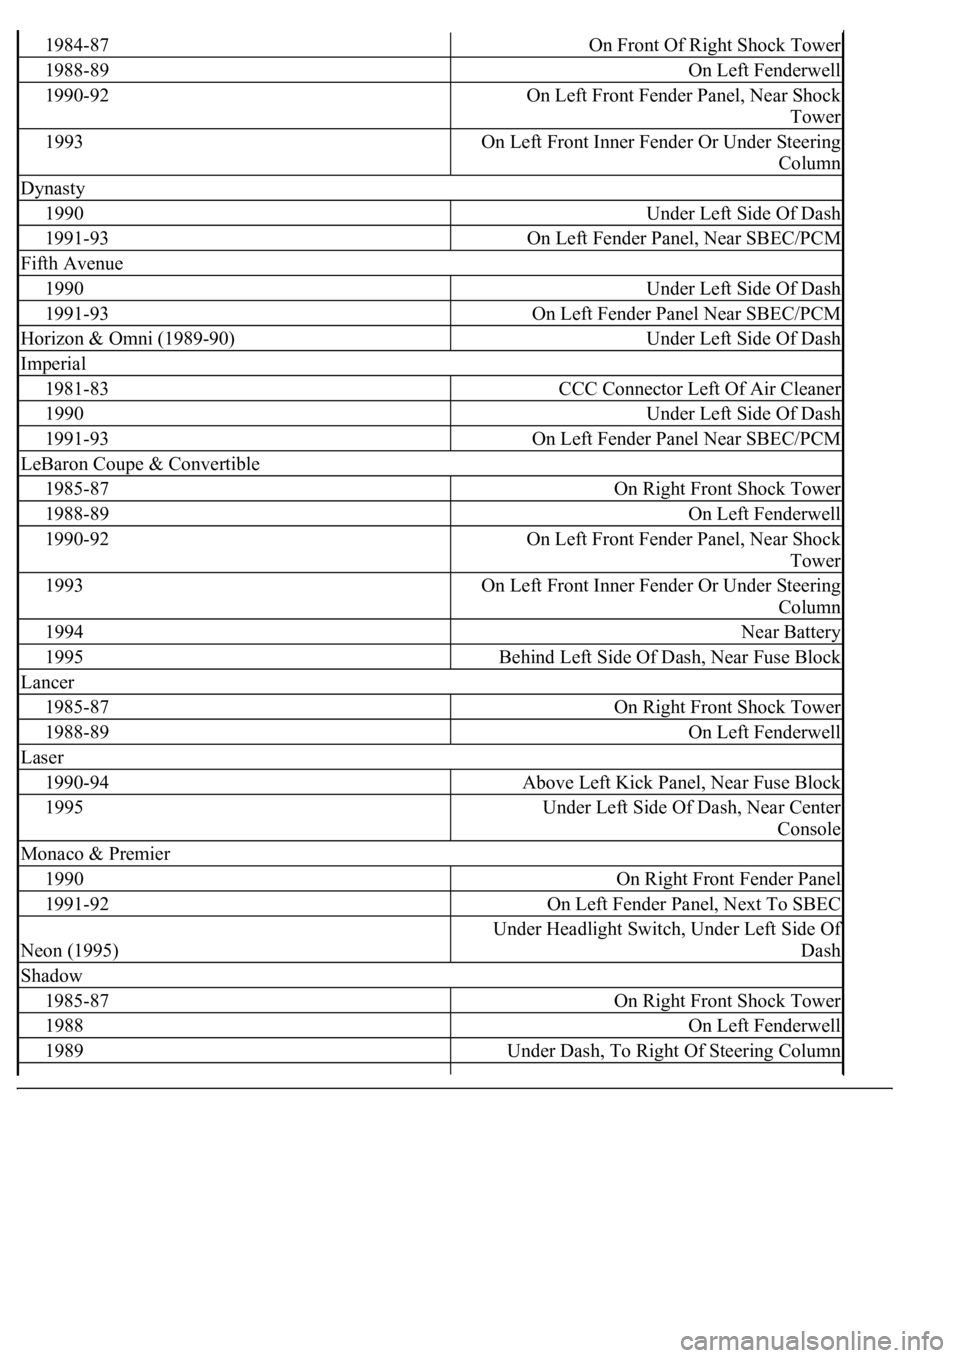
1984-87On Front Of Right Shock Tower
1988-89On Left Fenderwell
1990-92On Left Front Fender Panel, Near Shock
Tower
1993On Left Front Inner Fender Or Under Steering
Column
Dynasty
1990Under Left Side Of Dash
1991-93On Left Fender Panel, Near SBEC/PCM
Fifth Avenue
1990Under Left Side Of Dash
1991-93On Left Fender Panel Near SBEC/PCM
Horizon & Omni (1989-90)Under Left Side Of Dash
Imperial
1981-83CCC Connector Left Of Air Cleaner
1990Under Left Side Of Dash
1991-93On Left Fender Panel Near SBEC/PCM
LeBaron Coupe & Convertible
1985-87On Right Front Shock Tower
1988-89On Left Fenderwell
1990-92On Left Front Fender Panel, Near Shock
Tower
1993On Left Front Inner Fender Or Under Steering
Column
1994Near Battery
1995Behind Left Side Of Dash, Near Fuse Block
Lancer
1985-87On Right Front Shock Tower
1988-89On Left Fenderwell
Laser
1990-94Above Left Kick Panel, Near Fuse Block
1995Under Left Side Of Dash, Near Center
Console
Monaco & Premier
1990On Right Front Fender Panel
1991-92On Left Fender Panel, Next To SBEC
Neon (1995)
Under Headlight Switch, Under Left Side Of
Dash
Shadow
1985-87On Right Front Shock Tower
1988On Left Fenderwell
1989Under Dash, To Right Of Steering Column
Page 2011 of 4500

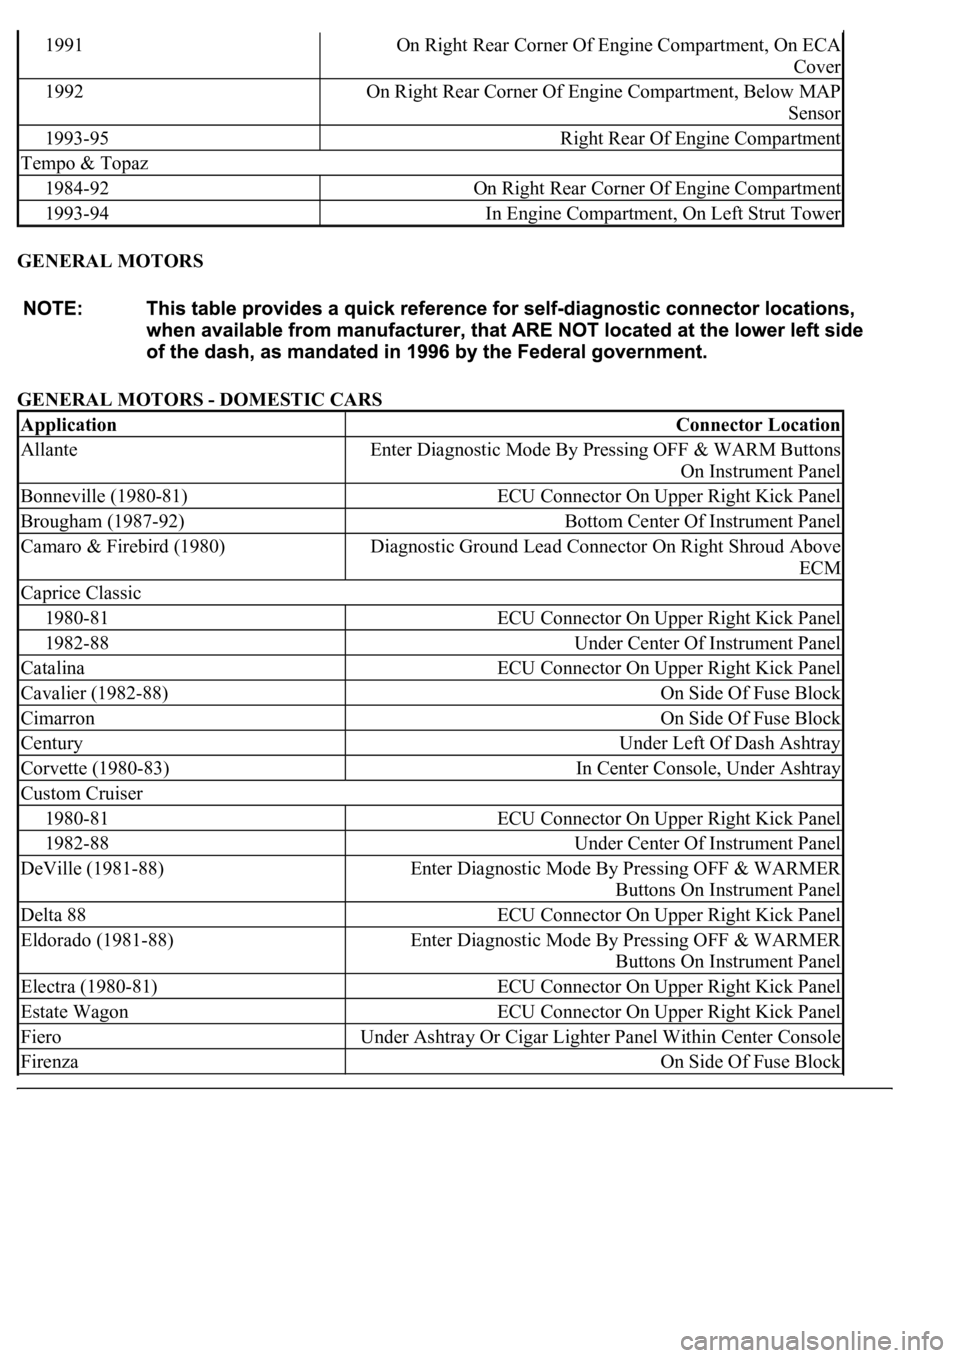
GENERAL MOTORS
GENERAL MOTORS - DOMESTIC CARS
1991On Right Rear Corner Of Engine Compartment, On ECA
Cover
1992On Right Rear Corner Of Engine Compartment, Below MAP
Sensor
1993-95Right Rear Of Engine Compartment
Tempo & Topaz
1984-92On Right Rear Corner Of Engine Compartment
1993-94In Engine Compartment, On Left Strut Tower
ApplicationConnector Location
AllanteEnter Diagnostic Mode By Pressing OFF & WARM Buttons
On Instrument Panel
Bonneville (1980-81)ECU Connector On Upper Right Kick Panel
Brougham (1987-92)Bottom Center Of Instrument Panel
Camaro & Firebird (1980)Diagnostic Ground Lead Connector On Right Shroud Above
ECM
Caprice Classic
1980-81ECU Connector On Upper Right Kick Panel
1982-88Under Center Of Instrument Panel
CatalinaECU Connector On Upper Right Kick Panel
Cavalier (1982-88)On Side Of Fuse Block
CimarronOn Side Of Fuse Block
CenturyUnder Left Of Dash Ashtray
Corvette (1980-83)In Center Console, Under Ashtray
Custom Cruiser
1980-81ECU Connector On Upper Right Kick Panel
1982-88Under Center Of Instrument Panel
DeVille (1981-88)Enter Diagnostic Mode By Pressing OFF & WARMER
Buttons On Instrument Panel
Delta 88ECU Connector On Upper Right Kick Panel
Eldorado (1981-88)Enter Diagnostic Mode By Pressing OFF & WARMER
Buttons On Instrument Panel
Electra (1980-81)ECU Connector On Upper Right Kick Panel
Estate WagonECU Connector On Upper Right Kick Panel
FieroUnder Ashtray Or Cigar Lighter Panel Within Center Console
FirenzaOn Side Of Fuse Block
Page 2013 of 4500

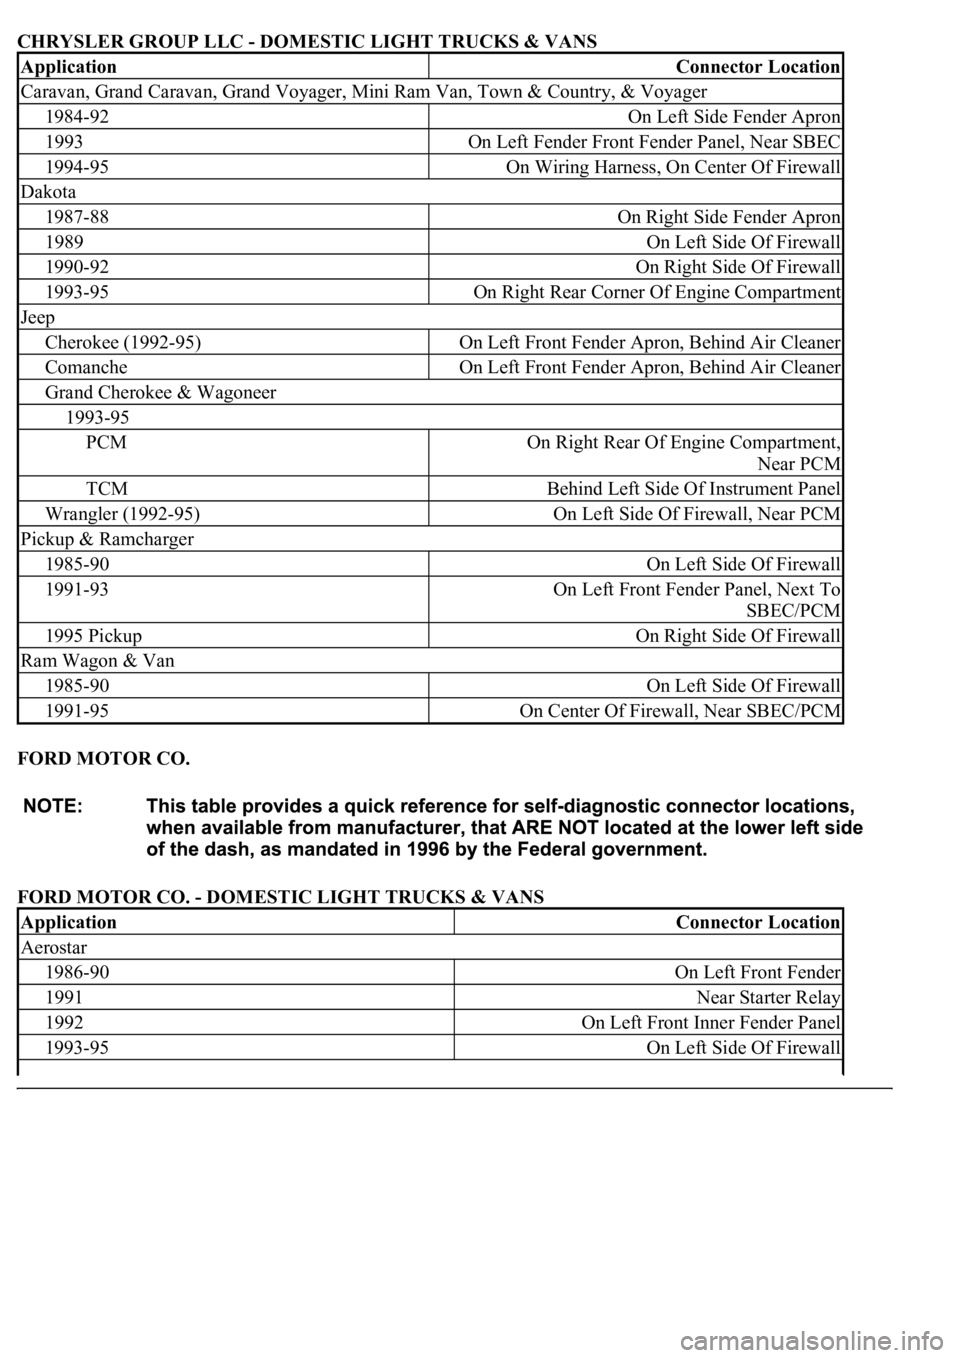
CHRYSLER GROUP LLC - DOMESTIC LIGHT TRUCKS & VANS
FORD MOTOR CO.
FORD MOTOR CO. - DOMESTIC LIGHT TRUCKS & VANS
ApplicationConnector Location
Caravan, Grand Caravan, Grand Voyager, Mini Ram Van, Town & Country, & Voyager
1984-92On Left Side Fender Apron
1993On Left Fender Front Fender Panel, Near SBEC
1994-95On Wiring Harness, On Center Of Firewall
Dakota
1987-88On Right Side Fender Apron
1989On Left Side Of Firewall
1990-92On Right Side Of Firewall
1993-95On Right Rear Corner Of Engine Compartment
Jeep
Cherokee (1992-95)On Left Front Fender Apron, Behind Air Cleaner
ComancheOn Left Front Fender Apron, Behind Air Cleaner
Grand Cherokee & Wagoneer
1993-95
PCMOn Right Rear Of Engine Compartment,
Near PCM
TCMBehind Left Side Of Instrument Panel
Wrangler (1992-95)On Left Side Of Firewall, Near PCM
Pickup & Ramcharger
1985-90On Left Side Of Firewall
1991-93On Left Front Fender Panel, Next To
SBEC/PCM
1995 PickupOn Right Side Of Firewall
Ram Wagon & Van
1985-90On Left Side Of Firewall
1991-95On Center Of Firewall, Near SBEC/PCM
ApplicationConnector Location
Aerostar
1986-90On Left Front Fender
1991Near Starter Relay
1992On Left Front Inner Fender Panel
1993-95On Left Side Of Firewall