Page 2750 of 4500
HINT:
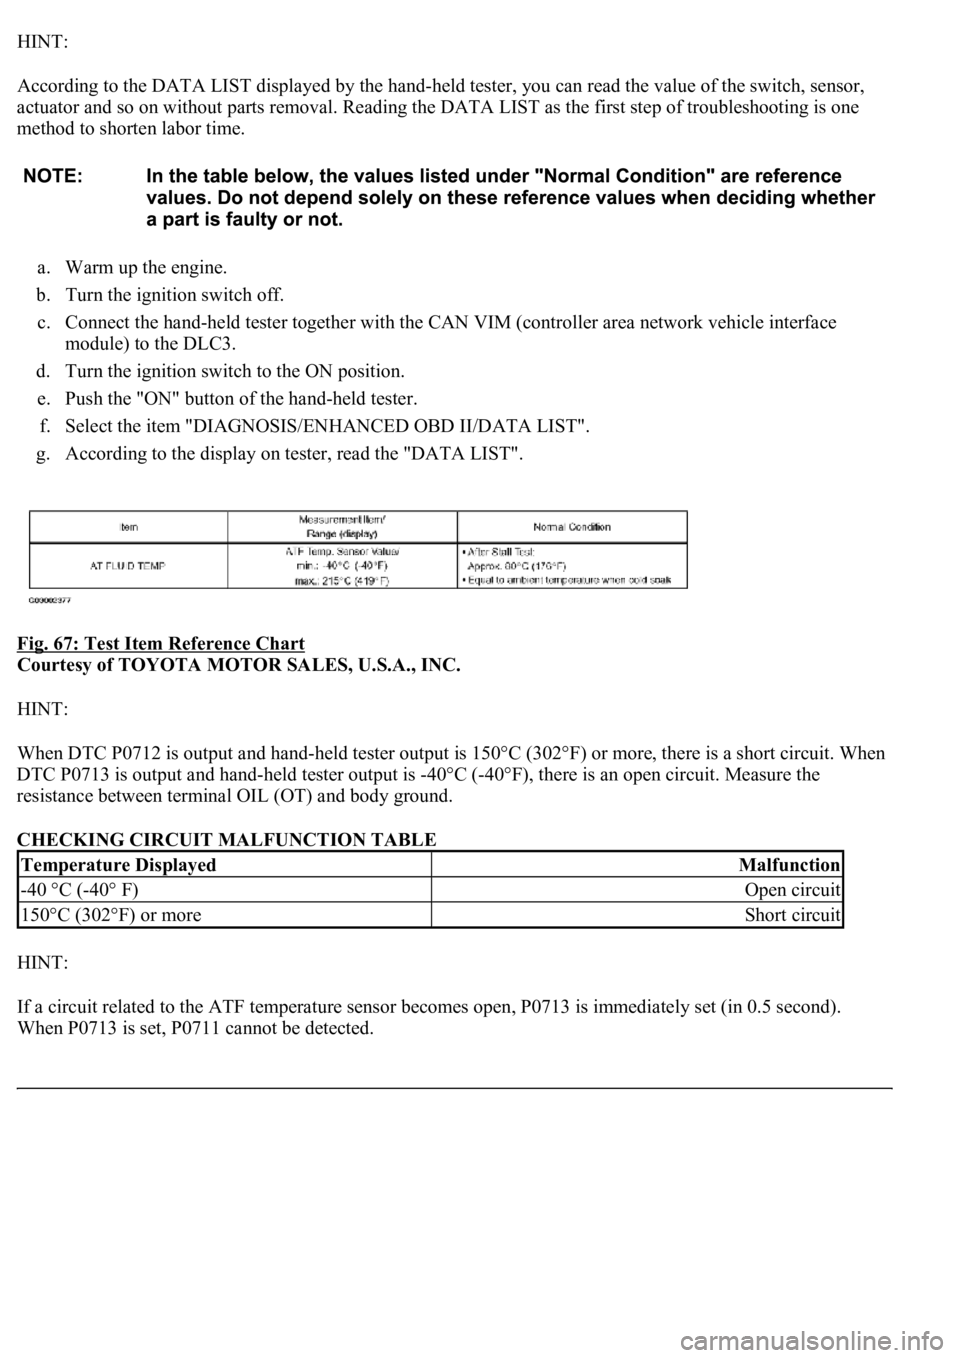
According to the DATA LIST displayed by the hand-held tester, you can read the value of the switch, sensor,
actuator and so on without parts removal. Reading the DATA LIST as the first step of troubleshooting is one
method to shorten labor time.
a. Warm up the engine.
b. Turn the ignition switch off.
c. Connect the hand-held tester together with the CAN VIM (controller area network vehicle interface
module) to the DLC3.
d. Turn the ignition switch to the ON position.
e. Push the "ON" button of the hand-held tester.
f. Select the item "DIAGNOSIS/ENHANCED OBD II/DATA LIST".
g. According to the display on tester, read the "DATA LIST".
Fig. 67: Test Item Reference Chart
Courtesy of TOYOTA MOTOR SALES, U.S.A., INC.
HINT:
<003a004b004800510003002700370026000300330013001a001400150003004c0056000300520058005700530058005700030044005100470003004b0044005100470010004b0048004f004700030057004800560057004800550003005200580057005300
5800570003004c00560003001400180013008300260003000b[302°F) or more, there is a short circuit. When
DTC P0713 is output and hand-held tester output is -40°C (-40°F), there is an open circuit. Measure the
resistance between terminal OIL (OT) and body ground.
CHECKING CIRCUIT MALFUNCTION TABLE
HINT:
If a circuit related to the ATF temperature sensor becomes open, P0713 is immediately set (in 0.5 second).
When P0713 is set, P0711 cannot be detected.
Temperature DisplayedMalfunction
-40 °C (-40° F)Open circuit
150°C (302°F) or moreShort circuit
Page 2751 of 4500
It is not necessary to inspect the circuit when P0711 is set.
1.CHECK OTHER DTCS OUTPUT (IN ADDITION TO DTC P0711)
a. Connect the hand-held tester to the DLC3.
b. Turn the ignition switch to the ON position and push the hand-held tester main switch ON.
c. Select the item "DIAGNOSIS/ENHANCED OBD II/DTC INFO/CURRENT CODES".
d. Read the DTCs using the hand-held tester.
Result:
DTC OUTPUT RESULT TABLE
HINT:
If any other codes besides "P0711" are output, perform troubleshooting for those DTCs first.
B: GO TO RELEVANT DTC CHART (See DIAGNOSTIC TROUBLE CODE CHART
)
A: Go to next step
2.CHECK TRANSMISSION FLUID LEVEL (See ADJUSTMENT
- AUTOMATIC
TRANSMISSION FLUID )
OK:
Automatic transmission fluid level is correct.
NG: ADD FLUID
OK: REPLACE TRANSMISSION WIRE (See step 5 on REPLACEMENT
)
DTC P0717: TURBINE SPEED SENSOR CIRCUIT NO SIGNAL
CIRCUIT DESCRIPTION
This sensor detects the rotation speed of the turbine which shows the input revolution of transmission. By
comparing the input turbine speed signal (NT) with the counter gear speed sensor signal (SP2), the ECM detects
the shift timing of the gears and appropriately controls the engine torque and hydraulic pressure according to
various conditions. Thus, providin
g smooth gear shift.
Display (DTC output)Proceed to
Only "P0711" is outputA
"P0711" and other DTCsB
Page 2759 of 4500
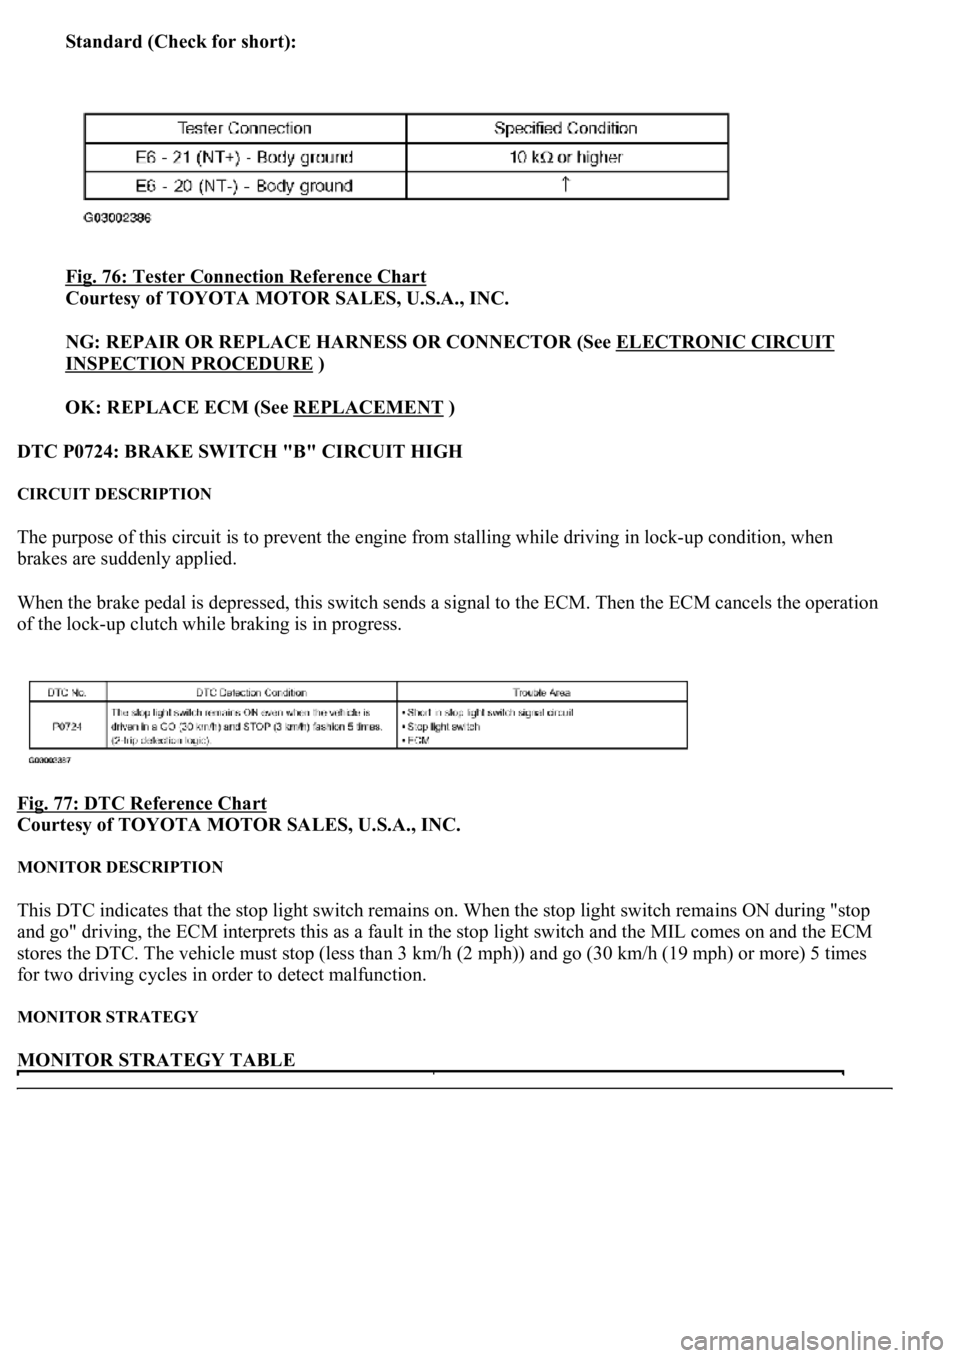
Standard (Check for short):
Fig. 76: Tester Connection Reference Chart
Courtesy of TOYOTA MOTOR SALES, U.S.A., INC.
NG: REPAIR OR REPLACE HARNESS OR CONNECTOR (See ELECTRONIC CIRCUIT
INSPECTION PROCEDURE )
OK: REPLACE ECM (See REPLACEMENT
)
DTC P0724: BRAKE SWITCH "B" CIRCUIT HIGH
CIRCUIT DESCRIPTION
The purpose of this circuit is to prevent the engine from stalling while driving in lock-up condition, when
brakes are suddenly applied.
When the brake pedal is depressed, this switch sends a signal to the ECM. Then the ECM cancels the operation
of the lock-up clutch while braking is in progress.
Fig. 77: DTC Reference Chart
Courtesy of TOYOTA MOTOR SALES, U.S.A., INC.
MONITOR DESCRIPTION
This DTC indicates that the stop light switch remains on. When the stop light switch remains ON during "stop
and go" driving, the ECM interprets this as a fault in the stop light switch and the MIL comes on and the ECM
stores the DTC. The vehicle must stop (less than 3 km/h (2 mph)) and go (30 km/h (19 mph) or more) 5 times
for two driving cycles in order to detect malfunction.
MONITOR STRATEGY
MONITOR STRATEGY TABLE
Page 2799 of 4500
c. Start the engine and warm it up.
d. Measure the line pressure with SST.
e. Turn the hand - held tester ON.
f. Enter the following menus: DIAGNOSIS / ENHANCED OBD II / ACTIVE TEST.
g. Follow the instructions on the tester and perform the ACTIVE TEST.
h. Measure the line pressure with SST.
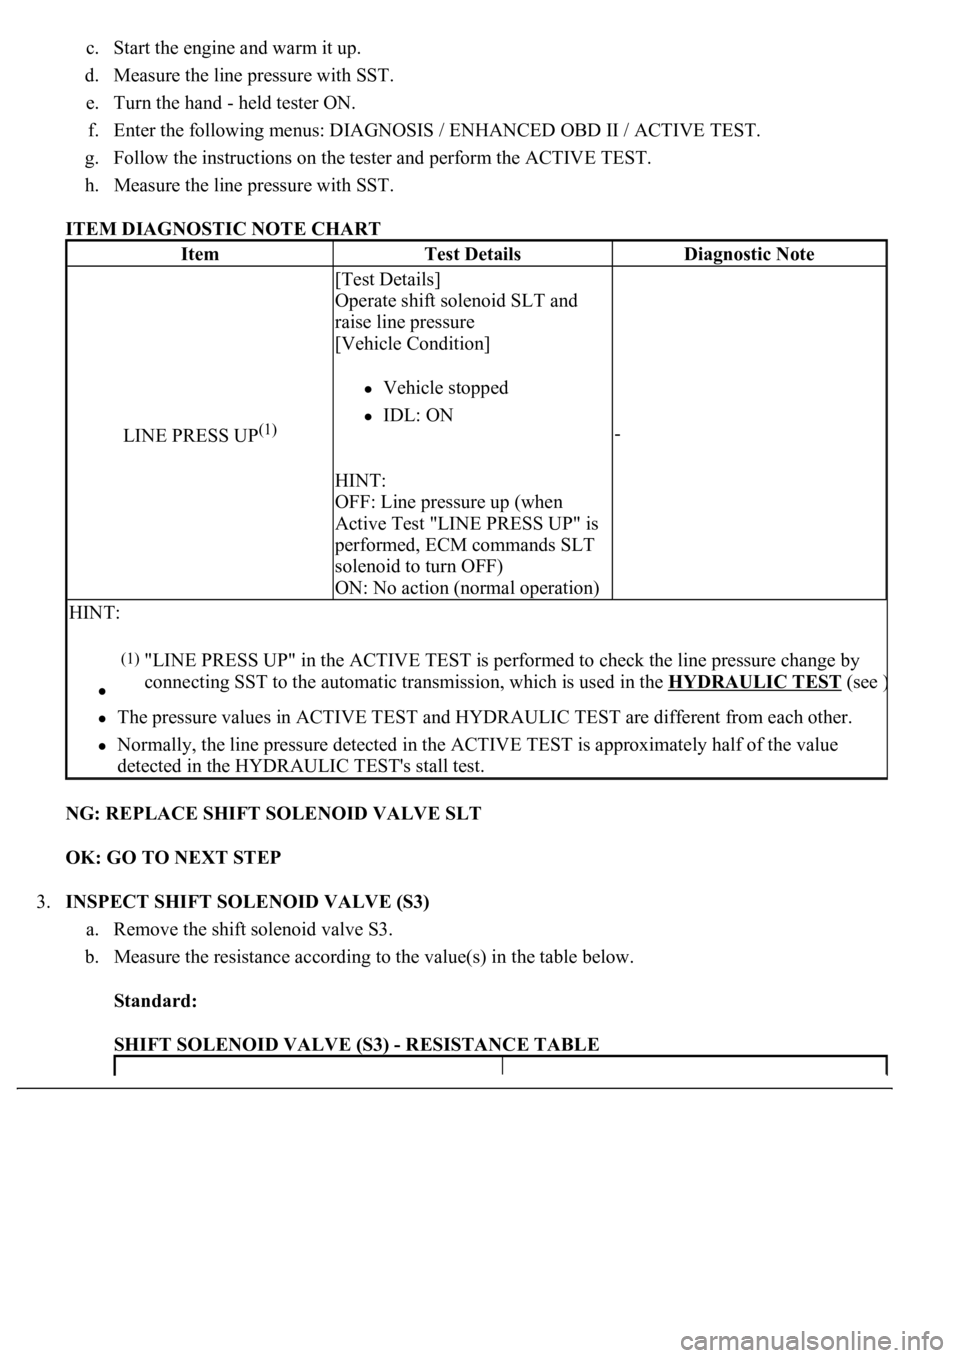
ITEM DIAGNOSTIC NOTE CHART
NG: REPLACE SHIFT SOLENOID VALVE SLT
OK: GO TO NEXT STEP
3.INSPECT SHIFT SOLENOID VALVE (S3)
a. Remove the shift solenoid valve S3.
b. Measure the resistance according to the value(s) in the table below.
Standard:
SHIFT SOLENOID VALVE (S3) - RESISTANCE TABLE
ItemTest DetailsDiagnostic Note
LINE PRESS UP(1)
[Test Details]
Operate shift solenoid SLT and
raise line pressure
[Vehicle Condition]
Vehicle stopped
IDL: ON
HINT:
OFF: Line pressure up (when
Active Test "LINE PRESS UP" is
performed, ECM commands SLT
solenoid to turn OFF)
ON: No action (normal operation)
-
HINT:
The pressure values in ACTIVE TEST and HYDRAULIC TEST are different from each other.
Normally, the line pressure detected in the ACTIVE TEST is approximately half of the value
detected in the HYDRAULIC TEST's stall test.
(1)"LINE PRESS UP" in the ACTIVE TEST is performed to check the line pressure change by
connecting SST to the automatic transmission, which is used in the HYDRAULIC TEST
(see )
Page 2820 of 4500
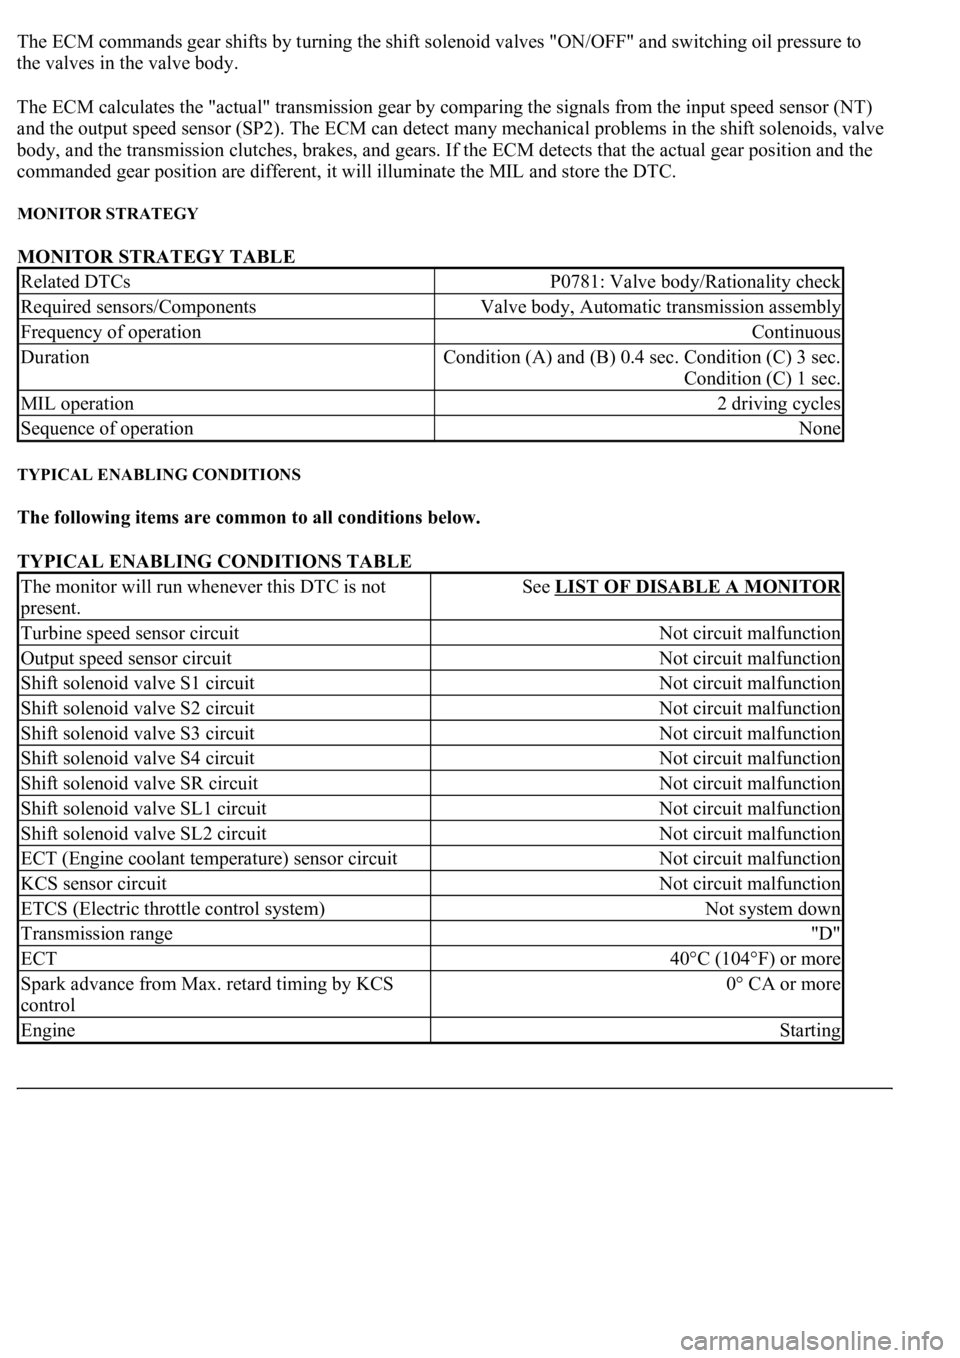
The ECM commands gear shifts by turning the shift solenoid valves "ON/OFF" and switching oil pressure to
the valves in the valve body.
The ECM calculates the "actual" transmission gear by comparing the signals from the input speed sensor (NT)
and the output speed sensor (SP2). The ECM can detect many mechanical problems in the shift solenoids, valve
body, and the transmission clutches, brakes, and gears. If the ECM detects that the actual gear position and the
commanded gear position are different, it will illuminate the MIL and store the DTC.
MONITOR STRATEGY
MONITOR STRATEGY TABLE
TYPICAL ENABLING CONDITIONS
The following items are common to all conditions below.
TYPICAL ENABLING CONDITIONS TABLE
Related DTCsP0781: Valve body/Rationality check
Required sensors/ComponentsValve body, Automatic transmission assembly
Frequency of operationContinuous
Duration<0026005200510047004c0057004c005200510003000b0024000c00030044005100470003000b0025000c00030013001100170003005600480046001100030026005200510047004c0057004c005200510003000b0026000c00030016000300560048004600
110003[
Condition (C) 1 sec.
MIL operation2 driving cycles
Sequence of operationNone
The monitor will run whenever this DTC is not
present.See LIST OF DISABLE A MONITOR
Turbine speed sensor circuitNot circuit malfunction
Output speed sensor circuitNot circuit malfunction
Shift solenoid valve S1 circuitNot circuit malfunction
Shift solenoid valve S2 circuitNot circuit malfunction
Shift solenoid valve S3 circuitNot circuit malfunction
Shift solenoid valve S4 circuitNot circuit malfunction
Shift solenoid valve SR circuitNot circuit malfunction
Shift solenoid valve SL1 circuitNot circuit malfunction
Shift solenoid valve SL2 circuitNot circuit malfunction
ECT (Engine coolant temperature) sensor circuitNot circuit malfunction
KCS sensor circuitNot circuit malfunction
ETCS (Electric throttle control system)Not system down
Transmission range"D"
ECT40°C (104°F) or more
Spark advance from Max. retard timing by KCS
control0° CA or more
EngineStarting
Page 2859 of 4500
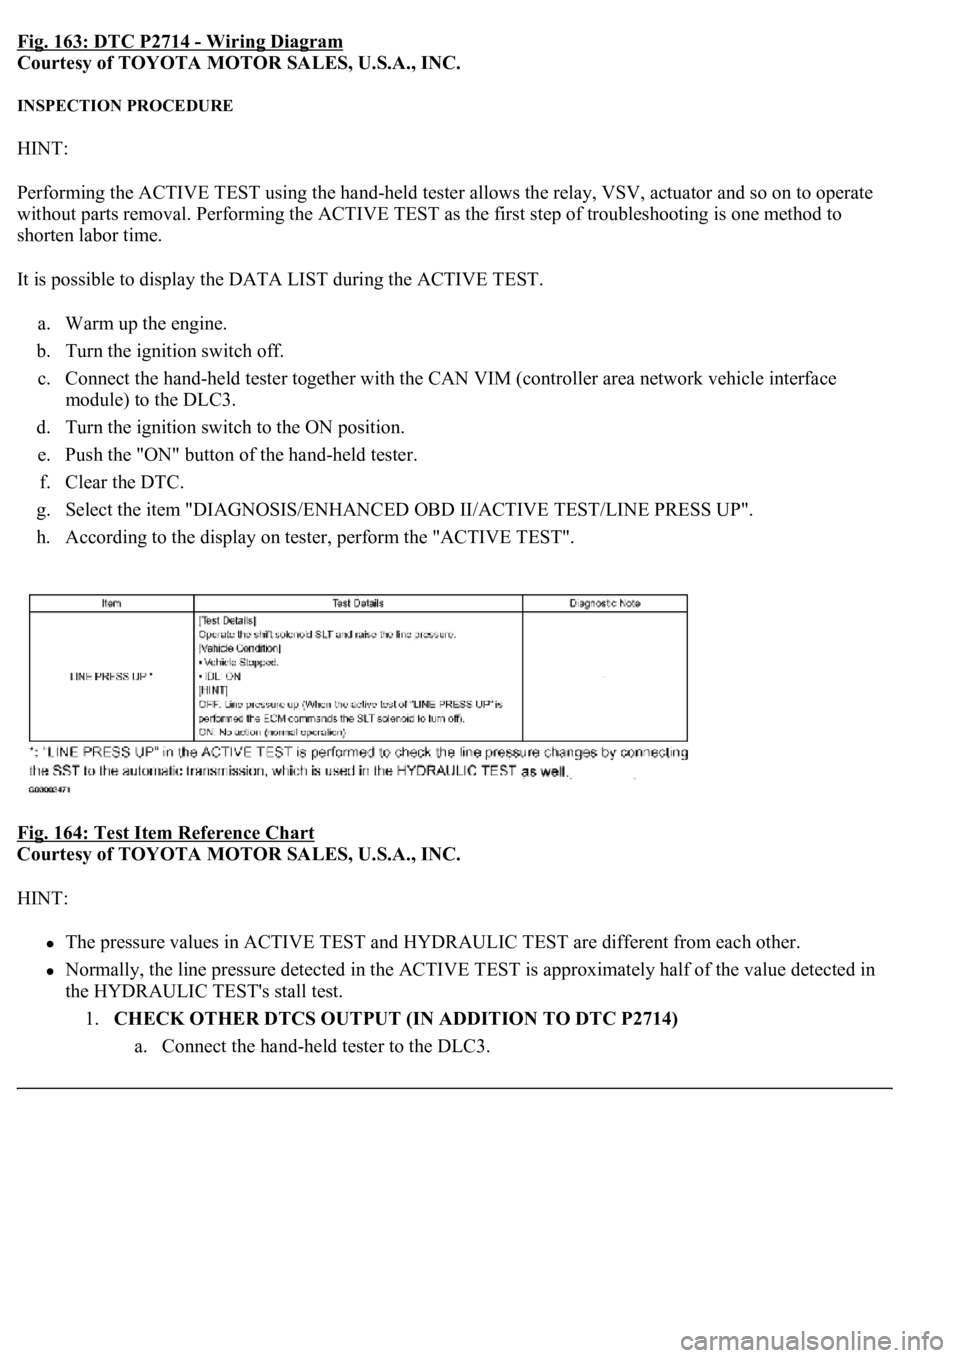
Fig. 163: DTC P2714 - Wiring Diagram
Courtesy of TOYOTA MOTOR SALES, U.S.A., INC.
INSPECTION PROCEDURE
HINT:
Performing the ACTIVE TEST using the hand-held tester allows the relay, VSV, actuator and so on to operate
without parts removal. Performing the ACTIVE TEST as the first step of troubleshooting is one method to
shorten labor time.
It is possible to display the DATA LIST during the ACTIVE TEST.
a. Warm up the engine.
b. Turn the ignition switch off.
c. Connect the hand-held tester together with the CAN VIM (controller area network vehicle interface
module) to the DLC3.
d. Turn the ignition switch to the ON position.
e. Push the "ON" button of the hand-held tester.
f. Clear the DTC.
g. Select the item "DIAGNOSIS/ENHANCED OBD II/ACTIVE TEST/LINE PRESS UP".
h. According to the display on tester, perform the "ACTIVE TEST".
Fig. 164: Test Item Reference Chart
Courtesy of TOYOTA MOTOR SALES, U.S.A., INC.
HINT:
The pressure values in ACTIVE TEST and HYDRAULIC TEST are different from each other.
Normally, the line pressure detected in the ACTIVE TEST is approximately half of the value detected in
the HYDRAULIC TEST's stall test.
1.CHECK OTHER DTCS OUTPUT (IN ADDITION TO DTC P2714)
a. Connect the han
d-held tester to the DLC3.
Page 2874 of 4500
a. Warm up the engine.
b. Turn the ignition switch off.
c. Connect the hand-held tester together with the CAN VIM (controller area network vehicle interface
module) to the DLC3.
d. Turn the ignition switch to the ON position.
e. Push the "ON" button of the hand-held tester.
f. Clear the DTC.
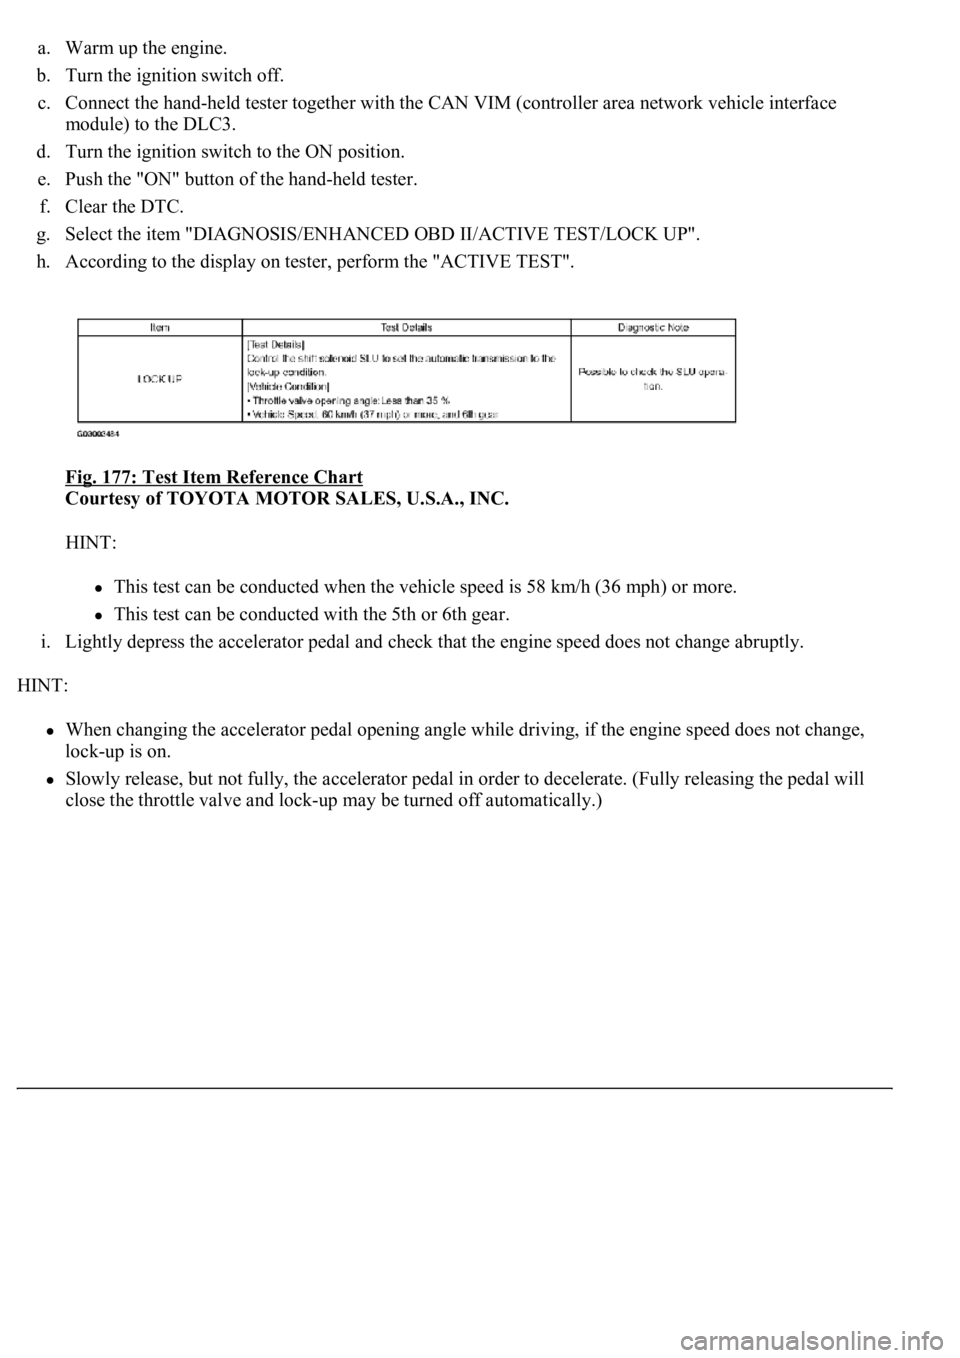
g. Select the item "DIAGNOSIS/ENHANCED OBD II/ACTIVE TEST/LOCK UP".
h. According to the display on tester, perform the "ACTIVE TEST".
Fig. 177: Test Item Reference Chart
Courtesy of TOYOTA MOTOR SALES, U.S.A., INC.
HINT:
This test can be conducted when the vehicle speed is 58 km/h (36 mph) or more.
This test can be conducted with the 5th or 6th gear.
i. Lightly depress the accelerator pedal and check that the engine speed does not change abruptly.
HINT:
When changing the accelerator pedal opening angle while driving, if the engine speed does not change,
lock-up is on.
Slowly release, but not fully, the accelerator pedal in order to decelerate. (Fully releasing the pedal will
close the throttle valve and loc
k-up may be turned off automatically.)
Page 2900 of 4500
Fig. 205: Pattern Select Switch Circuit (SNOW) - Wiring Diagram
Courtesy of TOYOTA MOTOR SALES, U.S.A., INC.
INSPECTION PROCEDURE
1.DRIVING TEST
a. Start the engine.
b. Turn the ECT SNOW switch "OFF" (Normal drive mode).
c. Confirm vehicle response by driving from a parked position to fully depressing the accelerator
pedal.
d. Turn the ECT SNOW switch "ON" and perform the same check as (c).
Confirm that there is a difference between ECT SNOW switch "ON" and "OFF".
Driving test should be done on a paved road (a nonskid road).
Make sure not to use the TRAC system when testing a vehicle equipped with one.
OK:
There is a difference in acceleration between "ON" and "OFF".
NG: Go to step 2
OK: PROCEED TO NEXT CIRCUIT INSPECTION SHOWN IN PROBLEM SYMPTOMS
TABLE
2.CHECK HARNESS AND CONNECTOR (PATTERN SELECT SWITCH ASSY NO. 1 - BODY
GROUND)