Page 3575 of 4323
H16654
H16655
BO±14
± BODYFRONT DOOR
3567 Author�: Date�:
2005 SEQUOIA (RM1146U)
�Install the door lock as shown in the illustration.
(g) Remove the 2 screws and door lock outer cover from the
door lock.
HINT:
At the time of reassembly, please refer to the following item.
Apply MP grease to the sliding and rotating parts of the door
lock.
19. REMOVE OUTSIDE HANDLE WITH LOCK CYLINDER
(a) Remove the service hole plug.
(b) Remove the 2 bolts and outside handle with lock cylinder.
Torque: 5.5 N´m (56 kgf´cm, 49 in.´lbf)
(c) Remove the bolt and lock cylinder from the outside han-
dle.
Torque: 5.5 N´m (56 kgf´cm, 49 in.´lbf)
20. REMOVE FRONT DOOR WEATHERSTRIP
Using a clip remover, remove the front door weatherstrip.
21. REMOVE NO. 2 FRONT DOOR WEATHERSTRIP
Page 3578 of 4323
BO45P±01
H16670
Rear Door
Quarter Window GlassUpper Window Frame Moulding
Door Glass Run
Division Bar
Rear Door Weatherstrip
Door Glass Quarter Window
Weatherstrip
Door Lock Striker
Outside Handle
Door Lock Outer Cover
Window Regulator Motor
No. 2 Rear Door
Weatherstrip
Door Hinge
Child Protection Cover
Door Lock
Cable Protection
Door Belt Moulding
Inner Weatherstrip
Door Trim
Courtesy Light Inside Handle BezelSpeaker Upper Armrest Base PanelPower Window SwitchService Hole Cover
Inside Handle
Ash Tray Window Regulator
Sub±assemblyDoor HingeDoor Check
� Precoated part: Specified torque
N´m (kgf´cm, ft´lbf)
�
23 (230, 17)
23 (230, 17)
23 (230, 17)
23 (230, 17)
23 (230, 17)
30 (306, 22)
5.5 (56, 49 in.´lbf)
5.5 (56, 49 in.´lbf)
8.0 (82, 71 in.´lbf)
5.0 (51, 44 in.´lbf)
5.5 (56, 49 in.´lbf)
± BODYREAR DOOR
BO±17
3570 Author�: Date�:
2005 SEQUOIA (RM1146U)
REAR DOOR
COMPONENTS
Page 3580 of 4323

6. REMOVE INSIDE HANDLE
(a) Slide the inside handle backward to remove it.
(b) Disconnect the 2 cables from i")
H16644
H16643
H05546
± BODYREAR DOOR
BO±19
3572 Author�: Date�:
2005 SEQUOIA (RM1146U)
6. REMOVE INSIDE HANDLE
(a) Slide the inside handle backward to remove it.
(b) Disconnect the 2 cables from inside handle as shown in
the illustration.
7. REMOVE SERVICE HOLE COVER
(a) Using a clip remover, remove the clamp and grommets.
(b) Remove the service hole cover.
NOTICE:
Do not tear the cover.
HINT:
At the time of reassembly, please refer to the following item.
Bring out the 2 control cables and wire harness through the ser-
vice hole cover.
8. REMOVE DIVISION BAR
HINT:
Insert a shop rag inside the door panel to prevent scratching the
glass.
(a) Open the door glass until the bolts appear in the service
hole.
(b) Remove the 2 door glass set nuts.
(c) Remove the door glass from the glass bracket and lower
the door glass into the door panel.
NOTICE:
Do not damage the door glass.
HINT:
Position the door glass toward the front as much as possible.
(d) Remove the door glass run.
(e) Remove the 2 bolts and screw.
(f) Pull the division bar forward.
Page 3581 of 4323

(g) Rotate the division bar 90° and pull it upward as shown
in the illustration.
9. REMOVE REAR DOOR")
H05544
H16661
H16662
H16663
BO±20
± BODYREAR DOOR
3573 Author�: Date�:
2005 SEQUOIA (RM1146U)
(g) Rotate the division bar 90° and pull it upward as shown
in the illustration.
9. REMOVE REAR DOOR QUARTER WINDOW GLASS
(a) Remove the rear door quarter window glass.
NOTICE:
Do not damage the glass.
(b) Remove the quarter window weatherstrip from the glass.
10. REMOVE DOOR GLASS
Pull the glass up out of the panel carefully.
HINT:
Insert a shop rag inside the panel to prevent scratching the
glass.
11. REMOVE UPPER WINDOW FRAME MOULDING
(a) Remove the 5 screws.
(b) Using a screwdriver or clip remover, remove the upper
window frame moulding.
HINT:
Tape the screwdriver tip before use.
12. REMOVE DOOR BELT MOULDING
(a) Apply protective tape to the outer surface as shown in the
illustration, to keep the surface from being scratched.
(b) Using a moulding remover, remove the door belt mould-
ing.
13. REMOVE WINDOW REGULATOR ASSEMBLY
(a) Disconnect the connector.
(b) Remove the 3 bolts.
Torque: 8.0 N´m (82 kgf´cm, 71 in.´lbf)
(c) Loosen the bolt, then remove the window regulator as-
sembly.
Torque: 8.0 N´m (82 kgf´cm, 71 in.´lbf)
HINT:
Remove the window regulator assembly through the service
hole.
Page 3582 of 4323
H16663
1
3
2 4
4
H16664
H16665
H16666
± BODYREAR DOOR
BO±21
3574 Author�: Date�:
2005 SEQUOIA (RM1146U)
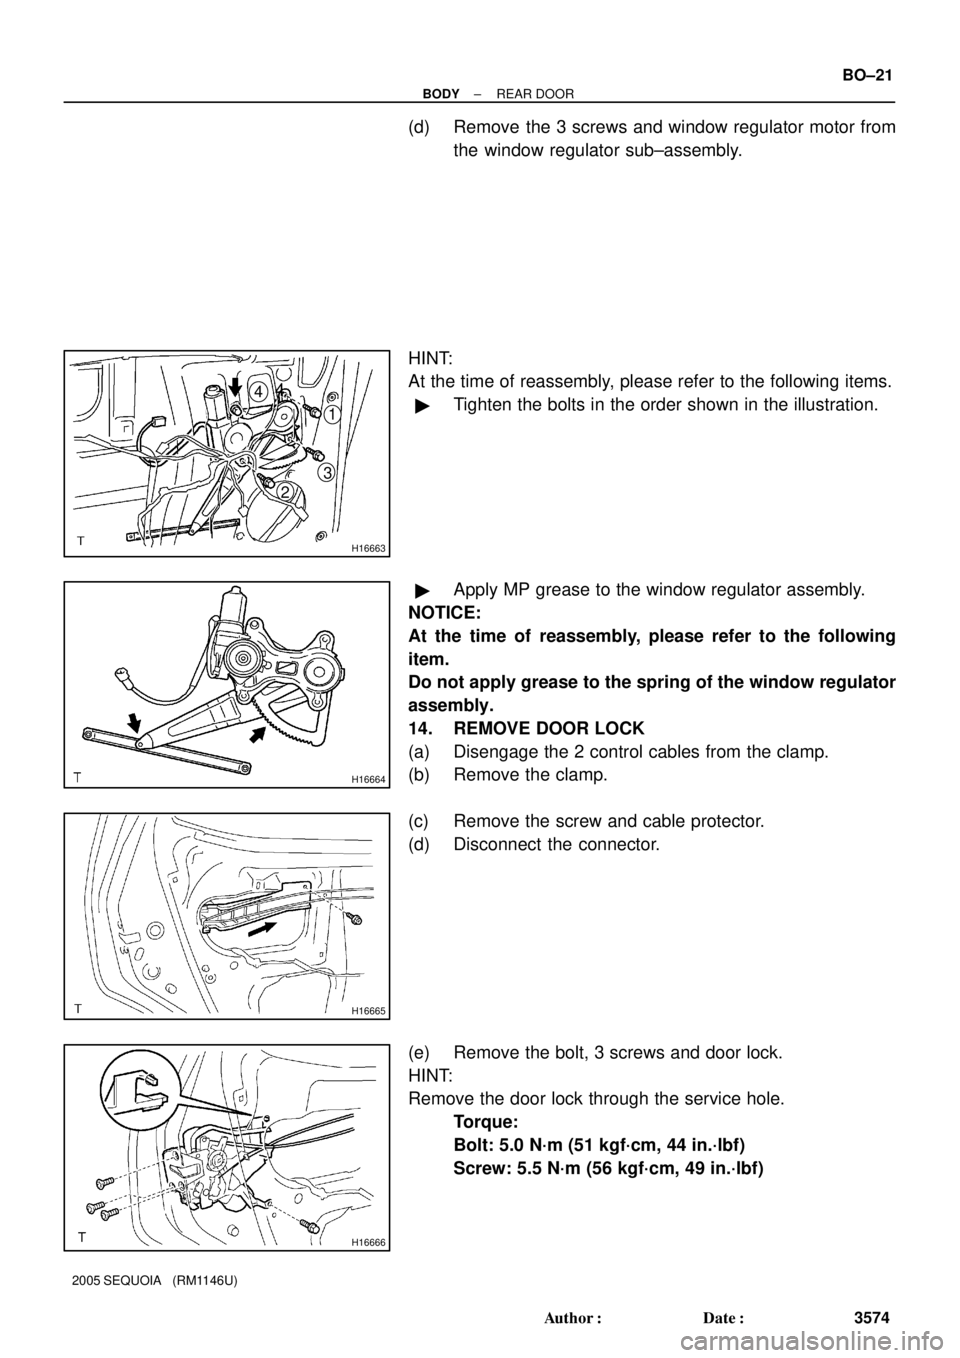
(d) Remove the 3 screws and window regulator motor from
the window regulator sub±assembly.
HINT:
At the time of reassembly, please refer to the following items.
�Tighten the bolts in the order shown in the illustration.
�Apply MP grease to the window regulator assembly.
NOTICE:
At the time of reassembly, please refer to the following
item.
Do not apply grease to the spring of the window regulator
assembly.
14. REMOVE DOOR LOCK
(a) Disengage the 2 control cables from the clamp.
(b) Remove the clamp.
(c) Remove the screw and cable protector.
(d) Disconnect the connector.
(e) Remove the bolt, 3 screws and door lock.
HINT:
Remove the door lock through the service hole.
Torque:
Bolt: 5.0 N´m (51 kgf´cm, 44 in.´lbf)
Screw: 5.5 N´m (56 kgf´cm, 49 in.´lbf)
Page 3586 of 4323

BO45T±01
H16689
Back Door Side Garnish
Back Door Center Garnishw/o Rear spoiler:
High Mount Stop Light
Outside MouldingBack Door Hingew/ Rear spoiler:
Rear Spoiler
Back Door Hinge
Rear Wiper Arm
Wiper
Motor
Grommet
Rear Wiper
Motor
Service Hole Plug
Outside MouldingStep Liner Back Door Glass Back Door Side
Garnish
Back Door Glass Run
Outer Weatherstrip
Back Door
Glass Guide Rail
Outer Cover
Power Window Regulator
Back Door
Glass Guide RailOutside Handle
Key Cylinder
Rear Light
Lower Stopper Rear Light Opening Hole Cover
Stopper Cushion
Back Door Lock ProtectorControl
Cable
Stopper Cushion
: Specified torque Strap Cover
Back Door Pull StrapBack Door Trim Board Inner WeatherstripNo. 1 Service
Hole Cover
Opening Hole Cover
19.5 (199, 14.4)
8.0 (82, 71 in.´lbf)
5.5 (56, 49 in.´lbf)
5.5 (56, 49 in.´lbf)
8.0 (82, 71 in.´lbf)
N´m (kgf´cm, ft´lbf)No. 2 Service
Hole Cover
Back Door
Handle
Protector
Licence Plate
Light
Assembly
Outside
Garnish
Washer Nozzle
Lower Stopper
Power Window
Regulator Motor
Back Door Lock
19.5 (199, 14.4)
8.0 (82, 71 in.´lbf)
± BODYBACK DOOR
BO±25
3578 Author�: Date�:
2005 SEQUOIA (RM1146U)
BACK DOOR
COMPONENTS
Page 3588 of 4323

7. REMOVE BACK DOOR TRIM BOARD
(a) Insert a screwdriver between the back door and back
door trim board to p")
H16676
10 Clips
H02440
± BODYBACK DOOR
BO±27
3580 Author�: Date�:
2005 SEQUOIA (RM1146U)
7. REMOVE BACK DOOR TRIM BOARD
(a) Insert a screwdriver between the back door and back
door trim board to pry the back door trim board out.
NOTICE:
Be careful not to damage the back door and back door trim
board.
HINT:
Tape the screwdriver tip before use.
(b) Pull the back door trim board to remove it as shown in the
illustration.
8. REMOVE INNER WEATHERSTRIP
Using a screwdriver, remove the inner weatherstrip from the
back door trim board.
HINT:
Tape the screwdriver tip before use.
9. REMOVE NO. 1 SERVICE HOLE COVER
10. REMOVE NO. 2 SERVICE HOLE COVER
11. REMOVE BACK DOOR ECU
(a) Using a drill of less than ù3.2 mm (0.126 in.), drill out the
2 rivet heads.
HINT:
Gentry and vertically put the drill to the rivets, and cut the rivet
flanges.
CAUTION:
Take care as the cut rivets are hot.
NOTICE:
Prizing the hole with a drill can lead to damage to the rivet
hole or the drill itself.
(b) Remove the back door ECU.
HINT:
At the time of reassembly, please refer to the following item.
Using an air riveter with nose piece No. 1 or a hand riveter with
nose piece No. 1 to install new 3 rivets to the front door outside
lower moulding.
NOTICE:
�At the time of reassembly, please refer to the follow-
ing items.
�Do not prize a riveter, as riveter is damaged, it is not
tightened and the mandrel is bent.
Page 3590 of 4323

(c) Employ the same manner described above to the other
side.
16. REMOVE POWER WINDOW REGULATOR
(a) Disconnec")
H16680
H16681
H16682
± BODYBACK DOOR
BO±29
3582 Author�: Date�:
2005 SEQUOIA (RM1146U)
(c) Employ the same manner described above to the other
side.
16. REMOVE POWER WINDOW REGULATOR
(a) Disconnect the connector.
(b) Disengage the connector and clamp.
(c) Remove the 4 nuts and power window regulator.
Torque: 5.5 N´m (56 kgf´cm, 49 in.´lbf)
HINT:
Remove the power window regulator through the service hole.
(d) Remove the 3 screws and power window regulator motor
from the power window regulator.
(e) Remove the nut and limit switch from the power window
regulator.
HINT:
At the time of reassembly, please refer to following item.
Remove the window regulator gear, then apply MP grease to
the power window regulator.
NOTICE:
At the time of reassembly, please refer to following item.
Do not apply grease to the spring of the power window reg-
ulator.
17. REMOVE REAR WIPER MOTOR
(a) Disconnect the connector.
(b) Disengage the connector and clamp.
(c) Remove the service hole plug.
(d) Unfasten the 3 bolts, then remove the rear wiper motor.
Torque: 5.5 N´m (56 kgf´cm, 49 in.´lbf)
18. REMOVE BACK DOOR LOCK
(a) Remove the back door handle protector.
(b) Disconnect the control cable from the back door outside
handle.