Page 825 of 4323
 (±) Shift Solenoid Valve SR:
± DIAGNOSTICSAUTOMATIC TRANSMISSION
DI±623
817 Author�: Date�:
2005 SEQUOIA (RM1146U)
1 Check other DTCs output (in addition to DTC P0771).
PREPARATION:
(a")
D11993
(+) (±) Shift Solenoid Valve SR:
± DIAGNOSTICSAUTOMATIC TRANSMISSION
DI±623
817 Author�: Date�:
2005 SEQUOIA (RM1146U)
1 Check other DTCs output (in addition to DTC P0771).
PREPARATION:
(a) Turn the ignition switch off.
(b) Connect the OBD II scan tool or hand±held tester to the DLC3.
(c) Turn the ignition switch to the ON position.
(d) Turn on the tester.
(e) Select the item ºDIAGNOSIS / ENHANCED OBD II / DTC INFO / CURRENT CODESº.
CHECK:
Read the DTCs using the OBD II scan tool or the hand±held tester.
RESULT:
Display (DTC output)Proceed to
Only ºP0771º is outputA
ºP0771º and other DTCsB
HINT:
If any other codes besides ºP0771º are output, perform troubleshooting for those DTCs first.
B Go to DTC chart (See page DI±573).
A
2 Inspect shift solenoid valve SR operation.
PREPARATION:
Remove the shift solenoid valve SR (See page AT±10).
CHECK:
Measure the resistance according to the value(s) in the table
below.
OK:
Tester ConnectionSpecified Condition
20�C (68�F)
Solenoid Connector (SR) ± Solenoid
Body (SR)11 to 15 W
CHECK:
Connect the positive (+) lead to the terminal of the solenoid con-
nector, and the negative (±) lead to the solenoid body.
OK:
The solenoid makes an operating sound.
NG Replace shift solenoid valve SR
(See page AT±10).
OK
Page 826 of 4323
D12795
12
(±)(+)
12
Shift Solenoid Valve SL1:
DI±624
± DIAGNOSTICSAUTOMATIC TRANSMISSION
818 Author�: Date�:
2005 SEQUOIA (RM1146U)
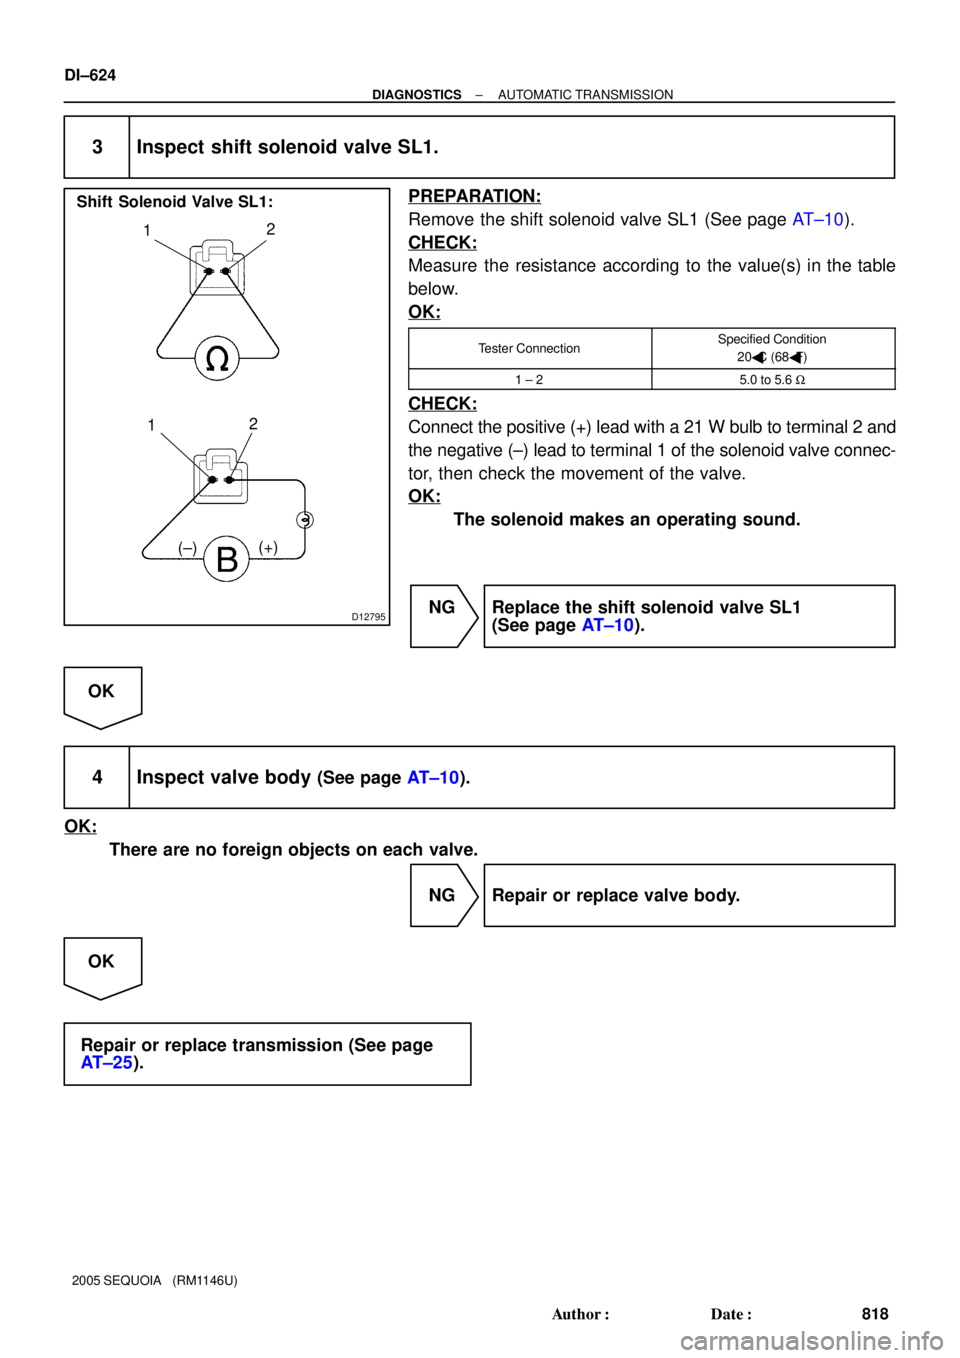
3 Inspect shift solenoid valve SL1.
PREPARATION:
Remove the shift solenoid valve SL1 (See page AT±10).
CHECK:
Measure the resistance according to the value(s) in the table
below.
OK:
Tester ConnectionSpecified Condition
20�C (68�F)
1 ± 25.0 to 5.6 W
CHECK:
Connect the positive (+) lead with a 21 W bulb to terminal 2 and
the negative (±) lead to terminal 1 of the solenoid valve connec-
tor, then check the movement of the valve.
OK:
The solenoid makes an operating sound.
NG Replace the shift solenoid valve SL1
(See page AT±10).
OK
4 Inspect valve body (See page AT±10).
OK:
There are no foreign objects on each valve.
NG Repair or replace valve body.
OK
Repair or replace transmission (See page
AT±25).
Page 832 of 4323
D12795
12
(±)(+)
12
Shift Solenoid Valve SL2:
DI±630
± DIAGNOSTICSAUTOMATIC TRANSMISSION
824 Author�: Date�:
2005 SEQUOIA (RM1146U)
2 Inspect shift solenoid valve SL2.
PREPARATION:
Remove the shift solenoid valve SL2 (See page AT±10).
CHECK:
Measure the resistance according to the value(s) in the table
below.
OK:
Tester ConnectionSpecified Condition
20�C (68�F)
1 ± 25.0 to 5.6 W
CHECK:
Connect the positive (+) lead with a 21 W bulb to terminal 2 and
the negative (±) lead to terminal 1 of the solenoid valve connec-
tor, then check the movement of the valve.
OK:
The solenoid makes an operating sound.
NG Replace the shift solenoid valve SL2
(See page AT±10).
OK
3 Inspect valve body (See page AT±10).
OK:
There are no foreign objects on each valve.
NG Repair or replace valve body.
OK
Repair or replace transmission (See page
AT±25).
Page 837 of 4323
D12795
12
(±)(+)
12
Shift Solenoid Valve SL2:
± DIAGNOSTICSAUTOMATIC TRANSMISSION
DI±635
829 Author�: Date�:
2005 SEQUOIA (RM1146U)
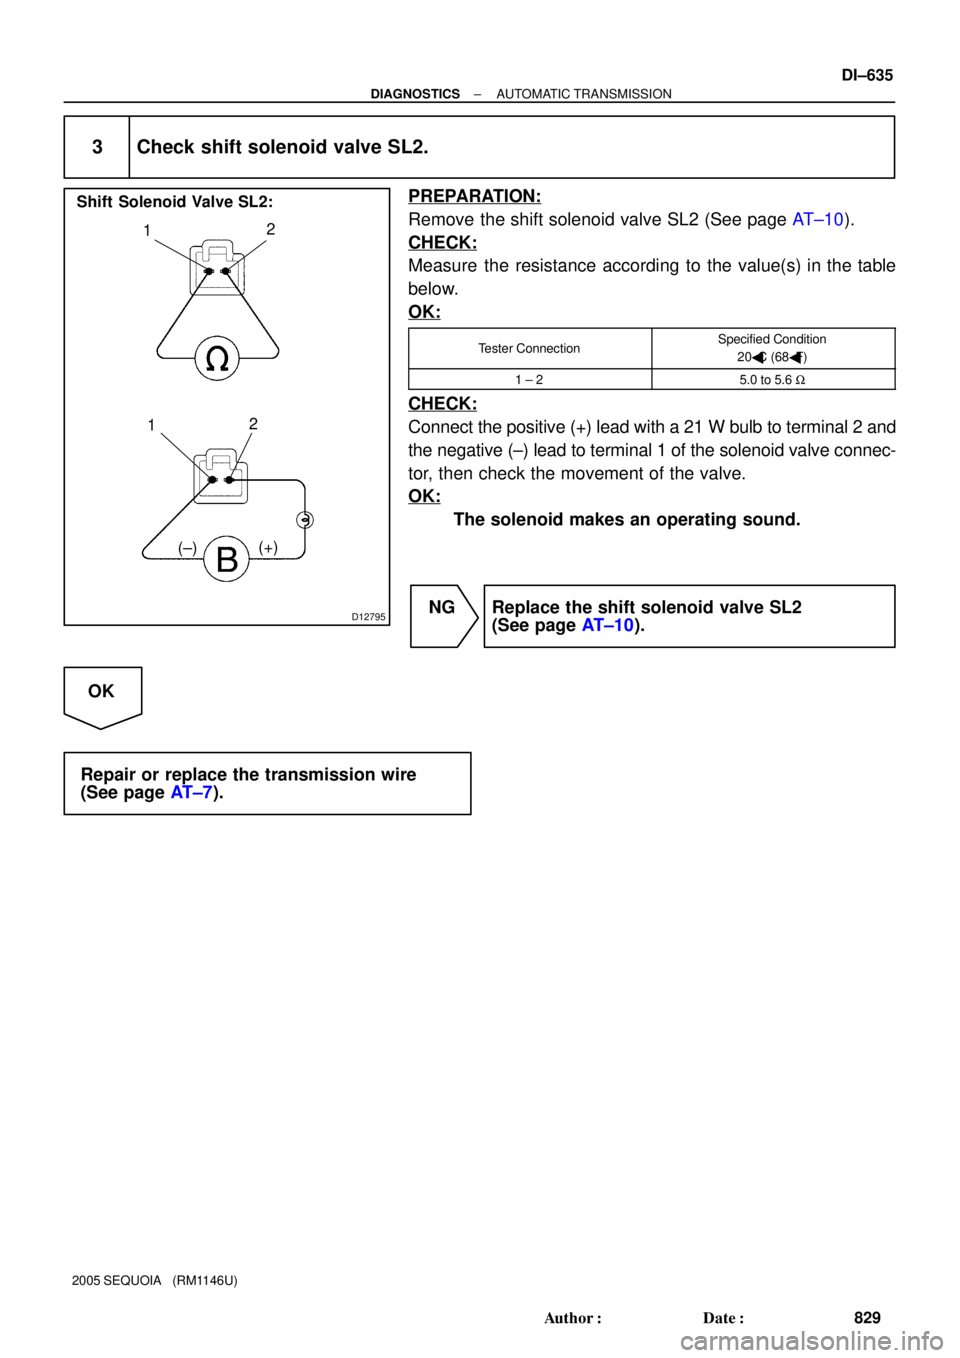
3 Check shift solenoid valve SL2.
PREPARATION:
Remove the shift solenoid valve SL2 (See page AT±10).
CHECK:
Measure the resistance according to the value(s) in the table
below.
OK:
Tester ConnectionSpecified Condition
20�C (68�F)
1 ± 25.0 to 5.6 W
CHECK:
Connect the positive (+) lead with a 21 W bulb to terminal 2 and
the negative (±) lead to terminal 1 of the solenoid valve connec-
tor, then check the movement of the valve.
OK:
The solenoid makes an operating sound.
NG Replace the shift solenoid valve SL2
(See page AT±10).
OK
Repair or replace the transmission wire
(See page AT±7).
Page 847 of 4323
D11991(+) (±)
Shift Solenoid Valve S1:
± DIAGNOSTICSAUTOMATIC TRANSMISSION
DI±645
839 Author�: Date�:
2005 SEQUOIA (RM1146U)
3 Check shift solenoid valve S1.
PREPARATION:
Remove the shift solenoid valve S1 (See page AT±10).
CHECK:
Measure the resistance according to the value(s) in the table
below.
OK:
Tester ConnectionSpecified Condition
20�C (68�F)
Solenoid Connector (S1) ± Solenoid
Body (S1)11 to 15 W
CHECK:
Connect the positive (+) lead to the terminal of the solenoid con-
nector, and the negative (±) lead to the solenoid body.
OK:
The solenoid makes an operating sound.
NG Replace the shift solenoid valve S1
(See page AT±10).
OK
Repair or replace the transmission wire
(See page AT±7).
Page 852 of 4323
D11992
(+) (±)
Shift Solenoid Valve S2:
DI±650
± DIAGNOSTICSAUTOMATIC TRANSMISSION
844 Author�: Date�:
2005 SEQUOIA (RM1146U)
3 Check shift solenoid valve S2.
PREPARATION:
Remove the shift solenoid valve S2 (See page AT±10).
CHECK:
Measure the resistance according to the value(s) in the table
below.
OK:
Tester ConnectionSpecified Condition
20�C (68�F)
Solenoid Connector (S2) ± Solenoid
Body (S2)11 to 15 W
CHECK:
Connect the positive (+) lead to the terminal of the solenoid con-
nector, and the negative (±) lead to the solenoid body.
OK:
The solenoid makes an operating sound.
NG Replace the shift solenoid valve S2
(See page AT±10).
OK
Repair or replace the transmission wire
(See page AT±7).
Page 863 of 4323
D11987
2
1
(+)
(±) Shift Solenoid Valve SLT:
± DIAGNOSTICSAUTOMATIC TRANSMISSION
DI±661
855 Author�: Date�:
2005 SEQUOIA (RM1146U)
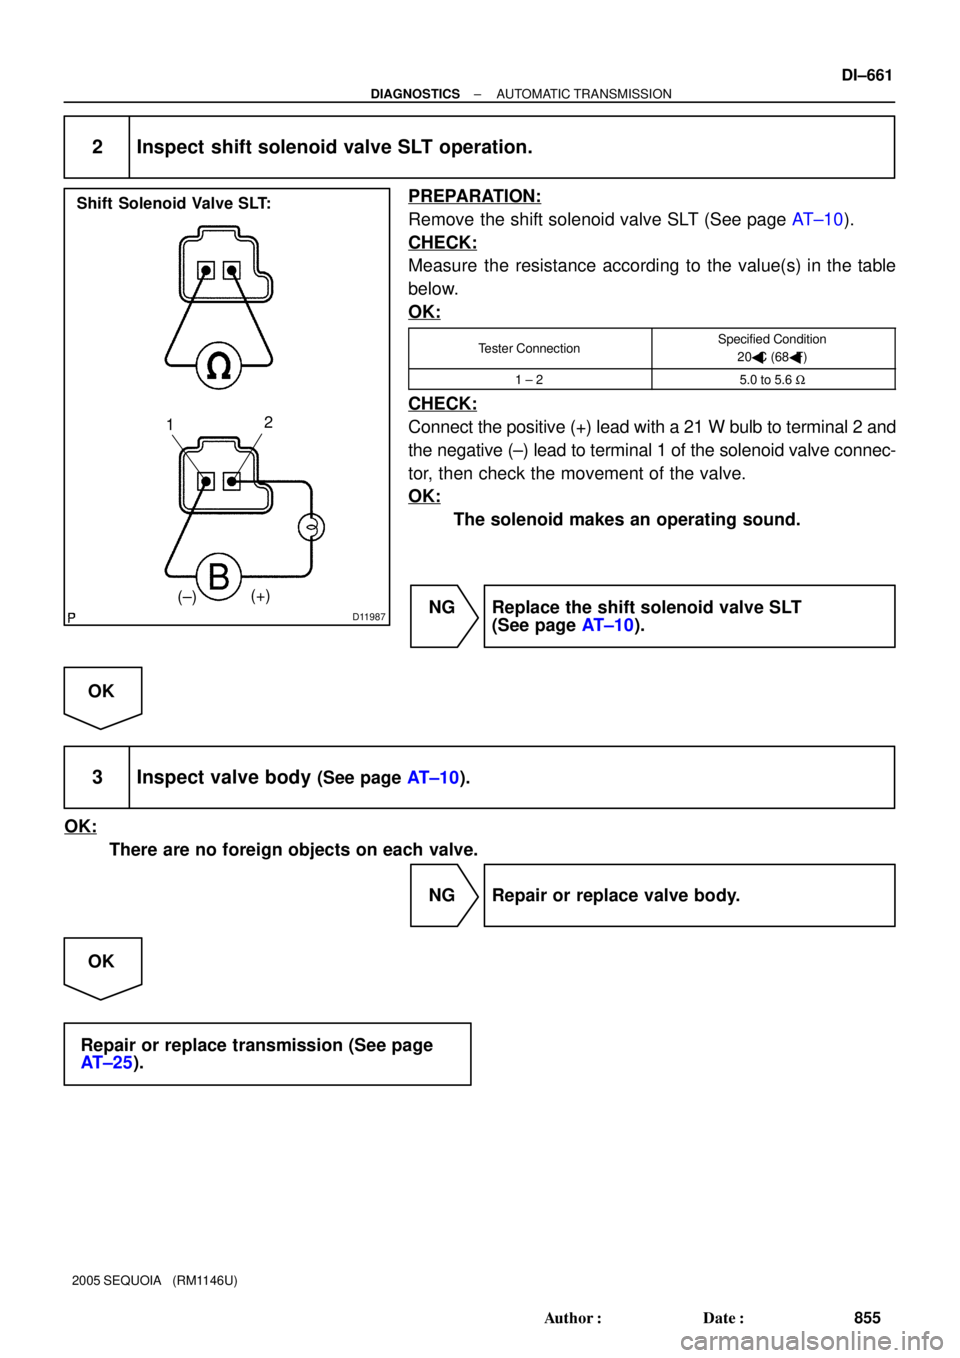
2 Inspect shift solenoid valve SLT operation.
PREPARATION:
Remove the shift solenoid valve SLT (See page AT±10).
CHECK:
Measure the resistance according to the value(s) in the table
below.
OK:
Tester ConnectionSpecified Condition
20�C (68�F)
1 ± 25.0 to 5.6 W
CHECK:
Connect the positive (+) lead with a 21 W bulb to terminal 2 and
the negative (±) lead to terminal 1 of the solenoid valve connec-
tor, then check the movement of the valve.
OK:
The solenoid makes an operating sound.
NG Replace the shift solenoid valve SLT
(See page AT±10).
OK
3 Inspect valve body (See page AT±10).
OK:
There are no foreign objects on each valve.
NG Repair or replace valve body.
OK
Repair or replace transmission (See page
AT±25).
Page 867 of 4323
D11987
2
1
(+)
(±) Shift Solenoid Valve SLT:
± DIAGNOSTICSAUTOMATIC TRANSMISSION
DI±665
859 Author�: Date�:
2005 SEQUOIA (RM1146U)
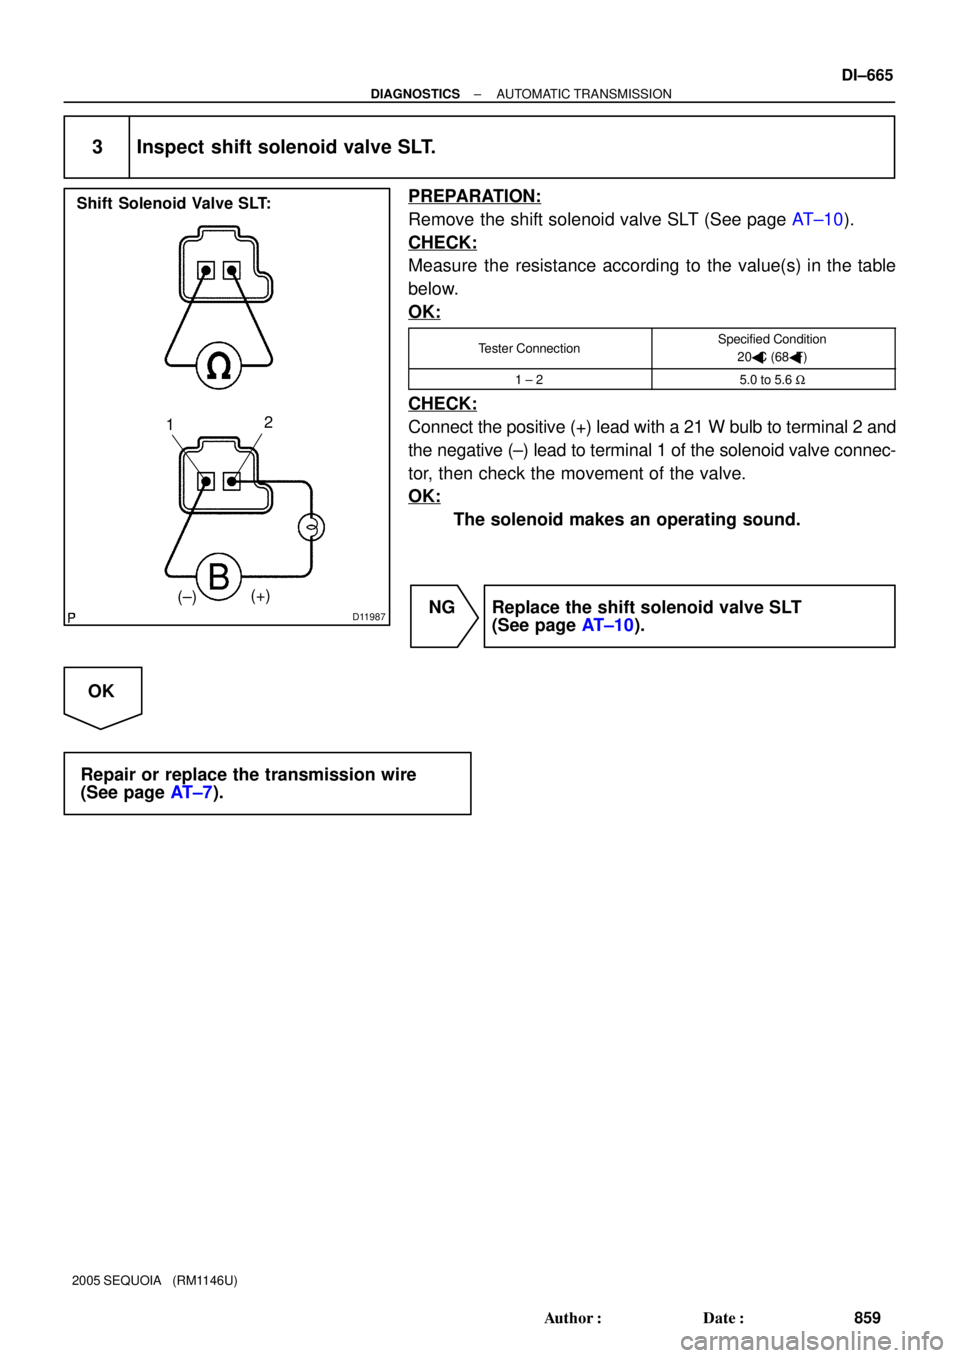
3 Inspect shift solenoid valve SLT.
PREPARATION:
Remove the shift solenoid valve SLT (See page AT±10).
CHECK:
Measure the resistance according to the value(s) in the table
below.
OK:
Tester ConnectionSpecified Condition
20�C (68�F)
1 ± 25.0 to 5.6 W
CHECK:
Connect the positive (+) lead with a 21 W bulb to terminal 2 and
the negative (±) lead to terminal 1 of the solenoid valve connec-
tor, then check the movement of the valve.
OK:
The solenoid makes an operating sound.
NG Replace the shift solenoid valve SLT
(See page AT±10).
OK
Repair or replace the transmission wire
(See page AT±7).