Page 3772 of 4323
AC3H7±01
± AIR CONDITIONINGHEATER UNIT
AC±37
3764 Author�: Date�:
2005 SEQUOIA (RM1146U)
INSTALLATION
Installation is in the reverse order of removal (See page AC±33).
Page 3780 of 4323
AC3HB±02
I22634
FACE 1
FACE 2
B/L 1
B/L 2
FOOT
1
2 3 4 5
7
8
± AIR CONDITIONINGREAR A/C UNIT
AC±45
3772 Author�: Date�:
2005 SEQUOIA (RM1146U)
INSPECTION
1. INSPECT EVAPORATOR
(a) Check evaporator fins for blockage.
If the fins are clogged, clean them with compressed air.
NOTICE:
Never use water to clean the evaporator.
(b) Check fitting for cracks or scratches.
If necessary, repair or replace.
2. INSPECT HEATER RADIATOR
Inspect fins for blockage.
If the fins are clogged, clean them with compressed air.
3. INSPECT WATER VALVE SERVOMOTOR CIRCUIT
(See page DI±2361)
4. INSPECT AIR OUTLET SERVOMOTOR OPERATION
(a) Connect the positive (+) lead from the battery to terminal
7 and the negative (±) lead to terminal 8.
(b) Connect the negative (±) lead from the battery to each ter-
minal and check that the shaft rotates at each position, as
shown in the illustration.
Connected terminalPosition
1FOOT
2B/L 2
3B/L 1
4FACE 2
5FACE 1
Page 3782 of 4323
AC3HD±01
± AIR CONDITIONINGREAR A/C UNIT
AC±47
3774 Author�: Date�:
2005 SEQUOIA (RM1146U)
INSTALLATION
Installation is in the reverse order of removal (See page AC±40).
Page 3784 of 4323
AC1KU±06
I21448
± AIR CONDITIONINGBLOWER UNIT
AC±49
3776 Author�: Date�:
2005 SEQUOIA (RM1146U)
REMOVAL
1. REMOVE CONSOLE UPPER PANEL
2. REMOVE REAR CONSOLE BOX
3. REMOVE FRONT CONSOLE BOX
4. REMOVE LOWER LH FINISH PANEL
5. REMOVE GLOVE COMPARTMENT DOOR
6. REMOVE LOWER NO. 2 FINISH PANEL
7. REMOVE LOWER COVER
8. REMOVE COOLING UNIT (See page AC±26)
9. REMOVE BLOWER UNIT
(a) Disconnect the connector from the blower motor.
(b) Disconnect the connector from the air inlet servomotor.
(c) Remove the nut, bolt and blower unit.
Page 3786 of 4323
AC1KW±04
± AIR CONDITIONINGBLOWER UNIT
AC±51
3778 Author�: Date�:
2005 SEQUOIA (RM1146U)
INSPECTION
INSPECT AIR INLET SERVOMOTOR OPERATION (See page DI±2358)
Page 3787 of 4323
AC1KX±01
AC±52
± AIR CONDITIONINGBLOWER UNIT
3779 Author�: Date�:
2005 SEQUOIA (RM1146U)
REASSEMBLY
Reassembly is in the reverse order of disassembly (See page AC±50).
Page 3788 of 4323
AC1KY±01
± AIR CONDITIONINGBLOWER UNIT
AC±53
3780 Author�: Date�:
2005 SEQUOIA (RM1146U)
INSTALLATION
Installation is in the reverse order of removal (See page AC±49).
Page 3789 of 4323

AC1KZ±05
I21361
3
3
I21362
12
AC±54
± AIR CONDITIONINGCOMPRESSOR AND MAGNETIC CLUTCH
3781 Author�: Date�:
2005 SEQUOIA (RM1146U)
COMPRESSOR AND MAGNETIC
CLUTCH
ON±VEHICLE INSPECTION
1. SET MANIFOLD GAUGE SET (See page AC±18)
2. START ENGINE
3. INSPECT COMPRESSOR FOR METALLIC SOUND
Check if a metallic sound can be heard from the compressor
when the A/C switch is on.
If a metallic sound cannot be heard, replace the compressor as-
sembly.
4. INSPECT REFRIGERANT PRESSURE
(See page AC±3)
5. STOP ENGINE
6. INSPECT VISUALLY FOR LEAKAGE OF REFRIGER-
ANT FROM SAFETY SEAL
Using a gas leak detector, check for leakage of refrigerant.
If there is any leakage, replace the compressor assembly.
7. REMOVE MANIFOLD GAUGE SET
(See page AC±19)
8. CHECK FOR LEAKAGE OF GREASE FROM CLUTCH
BEARING
9. CHECK FOR SIGNS OF OIL ON PRESSURE PLATE
If necessary, repair or replace.
10. INSPECT MAGNETIC CLUTCH BEARING FOR NOISE
(a) Start the engine.
(b) Check if abnormal noise is heard from near the compres-
sor when the A/C switch is OFF.
If abnormal noise is being emitted, replace the magnetic clutch.
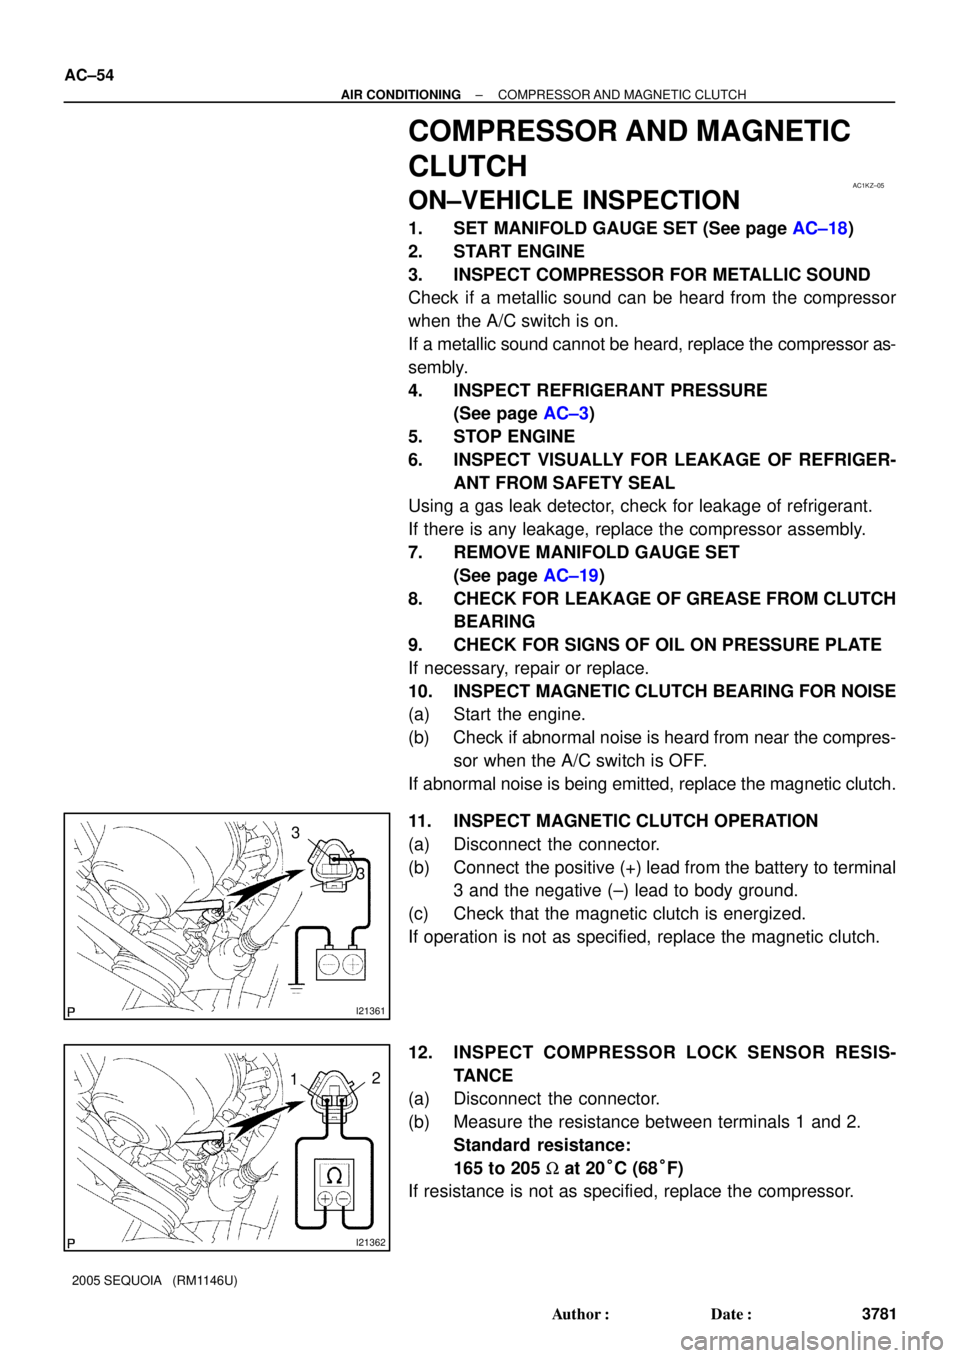
11. INSPECT MAGNETIC CLUTCH OPERATION
(a) Disconnect the connector.
(b) Connect the positive (+) lead from the battery to terminal
3 and the negative (±) lead to body ground.
(c) Check that the magnetic clutch is energized.
If operation is not as specified, replace the magnetic clutch.
12. INSPECT COMPRESSOR LOCK SENSOR RESIS-
TANCE
(a) Disconnect the connector.
(b) Measure the resistance between terminals 1 and 2.
Standard resistance:
165 to 205 W at 20°C (68°F)
If resistance is not as specified, replace the compressor.