Page 3775 of 4323

REMOVAL
1. DISCHARGE REFRIGERANT FROM REFRIGERATION
SYSTEM
HINT:
At the time of installat")
AC3H9±02
I21380
I21381
AC±40
± AIR CONDITIONINGREAR A/C UNIT
3767 Author�: Date�:
2005 SEQUOIA (RM1146U)
REMOVAL
1. DISCHARGE REFRIGERANT FROM REFRIGERATION
SYSTEM
HINT:
At the time of installation, refer to the following item:
�Evacuate air from the refrigeration system.
�Charge the system with refrigerant and inspect for leak-
age of refrigerant.
Specified amount:
Dual A/C: 1050 ± 50 g (37.03 ± 1.76 oz.)
2. DRAIN ENGINE COOLANT FROM RADIATOR
HINT:
It is not necessary to drain out all coolant.
3. REMOVE REAR SEAT OUTER BELT FLOOR AN-
CHORS
4. REMOVE BACK DOOR SCUFF PLATE
5. REMOVE REAR DOOR SCUFF PLATE RH
6. REMOVE UPPER BACK DOOR GARNISH
7. REMOVE REAR WINDOW SIDE GARNISH RH
8. REMOVE REAR QUARTER TRIM PANEL RH
9. REMOVE QUARTER PILLAR GARNISH RH
10. DISCONNECT LIQUID AND SUCTION TUBES
Remove the 2 bolts and disconnect both tubes.
Torque: 5.4 N´m (55 kgf´cm, 48 in.´lbf)
NOTICE:
Cap the openings immediately to keep moisture or dirt out
of the system.
HINT:
At the time of installation, refer to the following:
Lubricate 2 new O±rings with compressor oil and install them
to the tubes.
11. DISCONNECT WATER HOSES FROM HEATER PIPES
(a) Grip the claws of the hose clip and slide the hose clip
along the hose.
(b) Disconnect the water hoses.
Page 3806 of 4323

REMOVAL
1. DISCHARGE REFRIGERANT FROM REFRIGERATION
SYSTEM
HINT:
At the time of ins")
AC3I9±02
I21380
I21383
± AIR CONDITIONINGREAR A/C EVAPORATOR
AC±71
3798 Author�: Date�:
2005 SEQUOIA (RM1146U)
REMOVAL
1. DISCHARGE REFRIGERANT FROM REFRIGERATION
SYSTEM
HINT:
At the time of installation, refer to the following:
�Evacuate air from the refrigeration system.
�Charge the system with refrigerant and inspect for leak-
age of refrigerant.
Specified amount:
Dual A/C: 1050 ± 50 g (37.03 ± 1.76 oz.)
2. DRAIN ENGINE COOLANT FROM RADIATOR
HINT:
It is not necessary to drain out all coolant.
3. REMOVE REAR SEAT OUTER BELT FLOOR AN-
CHORS
4. REMOVE BACKDOOR SCUFF PLATE
5. REMOVE REAR DOOR SCUFF PLATE RH
6. REMOVE UPPER BACK DOOR GARNISH
7. REMOVE REAR WINDOW SIDE GARNISH RH
8. REMOVE REAR QUARTER TRIM PANEL RH
9. REMOVE QUARTER PILLAR GARNISH RH
10. DISCONNECT LIQUID AND SUCTION TUBES
Remove the 2 bolts and disconnect both tubes.
Torque: 5.4 N´m (55 kgf´cm, 48 in.´lbf)
NOTICE:
Cap the openings immediately to keep moisture or dirt out
of the system.
HINT:
At the time of installation, refer to the following:
Lubricate 2 new O±rings with compressor oil and install them
to the tubes.
11. REMOVE AIR DUCT
(a) Remove the 3 clips and cover.
(b) Remove the 2 air ducts.
(c) Disconnect the connectors and wire harness clamps.
Page 3809 of 4323

REAR A/C EXPANSION VALVE
REMOVAL
1. DISCHARGE REFRIGERANT FROM REFRIGERATION")
AC3IB±02
I21380
I21383
AC±74
± AIR CONDITIONINGREAR A/C EXPANSION VALVE
3801 Author�: Date�:
2005 SEQUOIA (RM1146U)
REAR A/C EXPANSION VALVE
REMOVAL
1. DISCHARGE REFRIGERANT FROM REFRIGERATION
SYSTEM
HINT:
At the time of installation, refer to the following:
�Evacuate air from the refrigeration system.
�Charge the system with refrigerant and inspect for leak-
age of refrigerant.
Specified amount:
Dual A/C: 1050 ± 50 g (37.03 ± 1.76 oz.)
2. DRAIN ENGINE COOLANT FROM RADIATOR
HINT:
It is not necessary to drain out all coolant.
3. REMOVE REAR SEAT OUTER BELT FLOOR AN-
CHORS
4. REMOVE BACKDOOR SCUFF PLATE
5. REMOVE REAR DOOR SCUFF PLATE RH
6. REMOVE UPPER BACK DOOR GARNISH
7. REMOVE REAR WINDOW SIDE GARNISH RH
8. REMOVE REAR QUARTER TRIM PANEL RH
9. REMOVE QUARTER PILLAR GARNISH RH
10. DISCONNECT LIQUID AND SUCTION TUBES
Remove the 2 bolts and disconnect both tubes.
Torque: 5.4 N´m (55 kgf´cm, 48 in.´lbf)
NOTICE:
Cap the openings immediately to keep moisture or dirt out
of the system.
HINT:
At the time of installation, refer to the following:
Lubricate 2 new O±rings with compressor oil and install them
to the tubes.
11. REMOVE AIR DUCT
(a) Remove the 3 clips and cover.
(b) Remove the 2 air ducts.
(c) Disconnect the connectors and wire harness clamps.
Page 3814 of 4323
AC3HL±02
I21369
I21370
I21371
± AIR CONDITIONINGWATER VALVE
AC±79
3806 Author�: Date�:
2005 SEQUOIA (RM1146U)
REMOVAL
1. DRAIN ENGINE COOLANT FROM RADIATOR
HINT:
It is not necessary to drain out all the coolant.
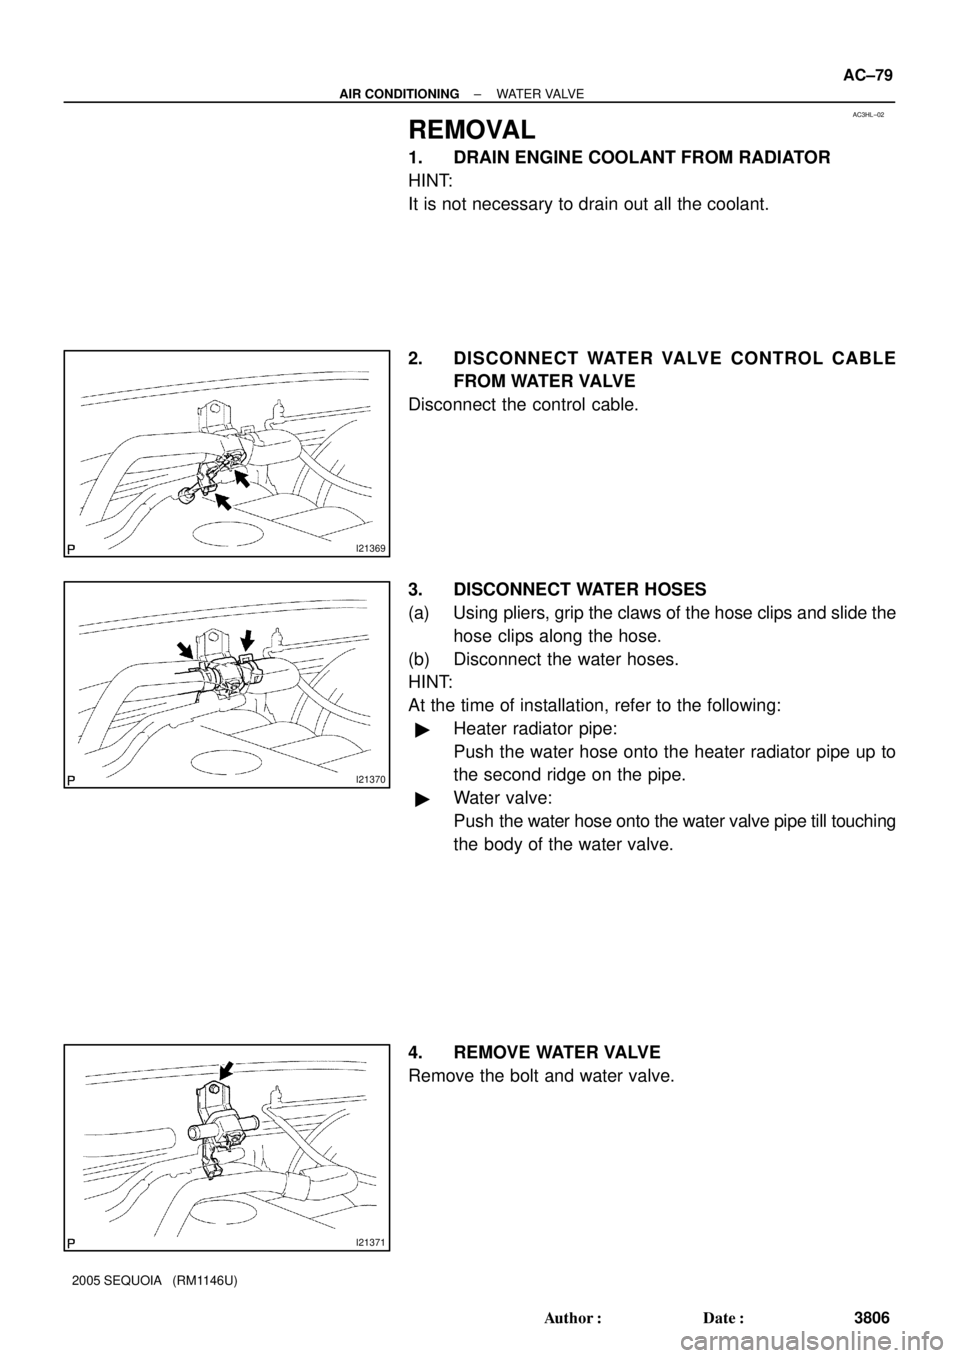
2. DISCONNECT WATER VALVE CONTROL CABLE
FROM WATER VALVE
Disconnect the control cable.
3. DISCONNECT WATER HOSES
(a) Using pliers, grip the claws of the hose clips and slide the
hose clips along the hose.
(b) Disconnect the water hoses.
HINT:
At the time of installation, refer to the following:
�Heater radiator pipe:
Push the water hose onto the heater radiator pipe up to
the second ridge on the pipe.
�Water valve:
Push the water hose onto the water valve pipe till touching
the body of the water valve.
4. REMOVE WATER VALVE
Remove the bolt and water valve.
Page 3867 of 4323
05_SEQUOIA_U (L/O 0408)
8
2005 SEQUOIA from Aug. '04 Prod. (OM34424U)
1. Service reminder indicators and
indicator lights
2. Oil pressure gauge
3. Tachometer4. Speedometer
5. Fuel gauge
6. Engine coolant temperature gauge7. Trip meter reset knob
8. Odometer and two trip meters
9. Height control indicator lights
10. Volt meter
Instrument cluster overview
�Ty p e A
Page 3868 of 4323
05_SEQUOIA_U (L/O 0408)
9
2005 SEQUOIA from Aug. '04 Prod. (OM34424U)
1. Service reminder indicators and
indicator lights
2. Oil pressure gauge
3. Tachometer4. Speedometer
5. Fuel gauge
6. Engine coolant temperature gauge7. Trip meter reset knob
8. Odometer and two trip meters
9. Height control indicator lights
10. Volt meter �Ty p e B
Page 4016 of 4323
05_SEQUOIA_U (L/O 0408)
157
2005 SEQUOIA from Aug. '04 Prod. (OM34424U)
OPERATION OF INSTRUMENTS AND
CONTROLS
Gauges, Meters and Service reminder indicators
Fuel gauge158 . . . . . . . . . . . . . . . . . . . . . . . . . . . . . . . . . . . . . . . . . . . . . . . .
Engine coolant temperature gauge158 . . . . . . . . . . . . . . . . . . . . . . . . . . .
Oil pressure gauge159 . . . . . . . . . . . . . . . . . . . . . . . . . . . . . . . . . . . . . . . . .
Vo ltme te r160 . . . . . . . . . . . . . . . . . . . . . . . . . . . . . . . . . . . . . . . . . . . . . . . . . .
Tachometer160 . . . . . . . . . . . . . . . . . . . . . . . . . . . . . . . . . . . . . . . . . . . . . . . .
Odometer and two trip meters160 . . . . . . . . . . . . . . . . . . . . . . . . . . . . . . . .
Service reminder indicators and warning buzzers162 . . . . . . . . . . . . . .
SECTION 1± 6
Page 4017 of 4323

158
2005 SEQUOIA from Aug. 04 Prod. (OM34424U)
The gauge indicates the approximate
quantity of fuel remaining in the tank
when the ignition switch is on.
Nearly fullÐNeedle a")
05_SEQUOIA_U (L/O 0408)
158
2005 SEQUOIA from Aug. '04 Prod. (OM34424U)
The gauge indicates the approximate
quantity of fuel remaining in the tank
when the ignition switch is on.
Nearly fullÐNeedle at ªFº
Nearly emptyÐNeedle at ªEº
It is a good idea to keep the tank over
1/4 full.
If the fuel level approaches ªEº or the low
fuel level warning light comes on, fill the
fuel tank as soon as possible.
On inclines or curves, due to the move-
ment of fuel in the tank, the fuel gauge
needle may fluctuate or the low fuel level
warning light may come on earlier than
usual.If the fuel tank is completely empty, the
malfunction indicator lamp comes on. Fill
the fuel tank immediately.
The indicator lamp goes off after driving
several times. If the indicator lamp does
not go off, contact your Toyota dealer as
soon as possible.The gauge indicates the engine coolant
temperature when the ignition switch is
on. The engine operating temperature
will vary with changes in weather and
engine load.
If the needle moves into the red zone,
your engine is too hot. If your vehicle
overheats, stop your vehicle and allow the
engine to cool.
Your vehicle may overheat during severe
operating conditions, such as:
�Driving up a long hill on a hot day.
�Reducing speed or stopping after high
speed driving.
Fuel gaugeEngine coolant temperature
gauge

8
2005 SEQUOIA from Aug. 04 Prod. (OM34424U)
1. Service reminder indicators and
indicator lights
2. Oil pressure gauge
3. Tachometer4. Speedometer
5. Fuel gauge
6. Engine cool")

9
2005 SEQUOIA from Aug. 04 Prod. (OM34424U)
1. Service reminder indicators and
indicator lights
2. Oil pressure gauge
3. Tachometer4. Speedometer
5. Fuel gauge
6. Engine cool")

157
2005 SEQUOIA from Aug. 04 Prod. (OM34424U)
OPERATION OF INSTRUMENTS AND
CONTROLS
Gauges, Meters and Service reminder indicators
Fuel gauge158 . . . . . . . . . . . . . . .")