Page 2949 of 4323
TR04I±06
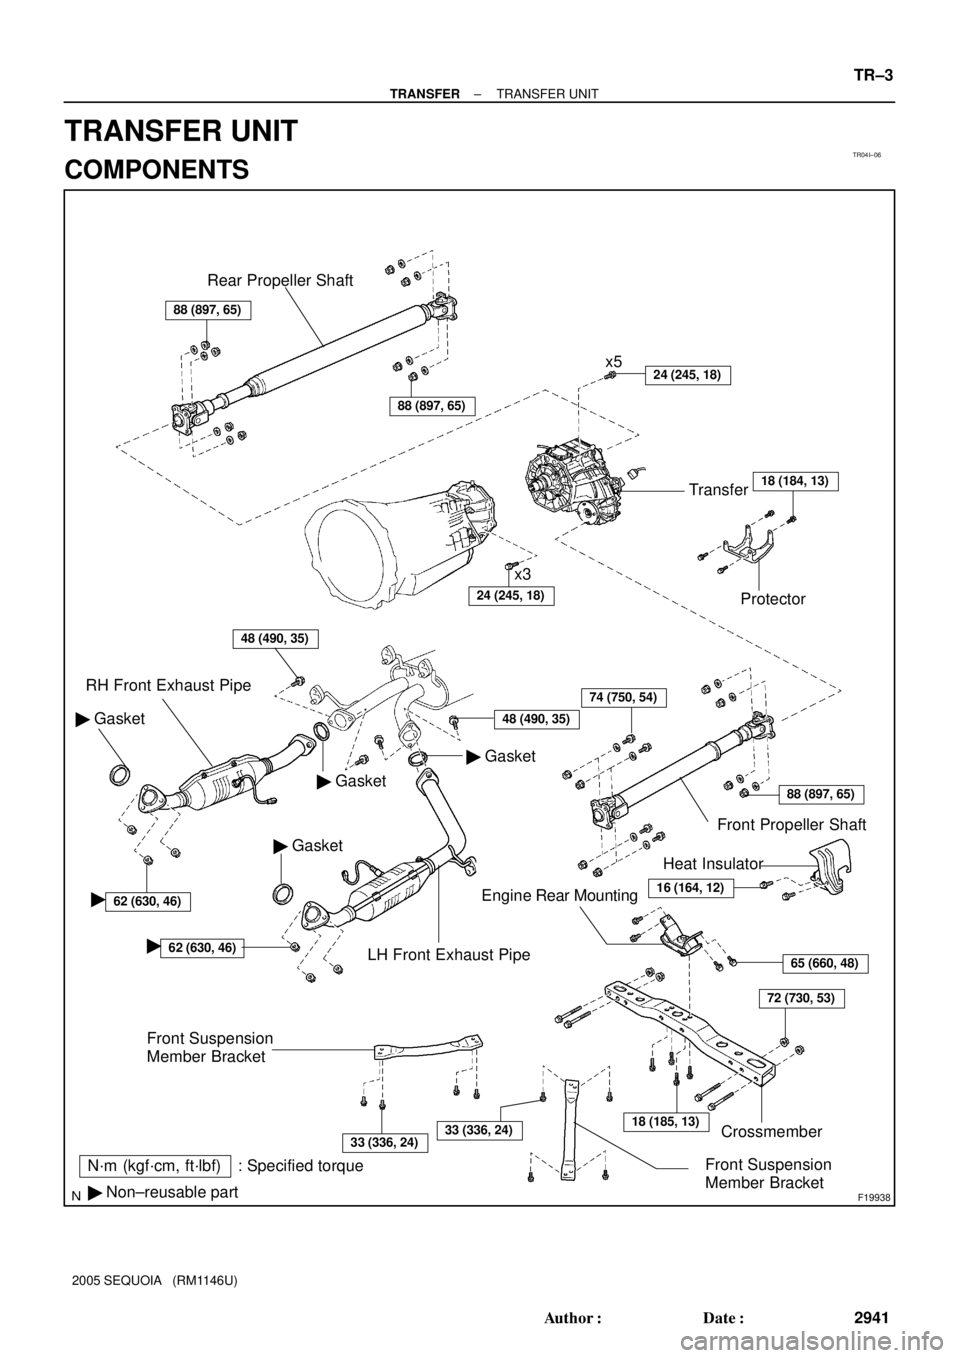
F19938
Rear Propeller Shaft
24 (245, 18)
24 (245, 18)
48 (490, 35)
48 (490, 35)
62 (630, 46)
88 (897, 65)
65 (660, 48)
Protector Transfer
� Gasket
� Gasket
� Gasket� Gasket RH Front Exhaust Pipe
LH Front Exhaust PipeFront Propeller Shaft
Engine Rear Mounting
Crossmember �
62 (630, 46)�
x5
x3
74 (750, 54)
72 (730, 53)
18 (185, 13)
N´m (kgf´cm, ft´lbf) : Specified torque
� Non±reusable part
Heat Insulator
16 (164, 12)
Front Suspension
Member Bracket
Front Suspension
Member Bracket
33 (336, 24)33 (336, 24)
88 (897, 65)
88 (897, 65)
18 (184, 13)
± TRANSFERTRANSFER UNIT
TR±3
2941 Author�: Date�:
2005 SEQUOIA (RM1146U)
TRANSFER UNIT
COMPONENTS
Page 2950 of 4323

REMOVAL
1. SWITCH TRANSFER TO 2WD
2. REMOVE PROTECTOR
Remove the 4 bolts and protector.
3. DRAIN TR")
TR0DD±01
F19315
F19237
TR±4
± TRANSFERTRANSFER UNIT
2942 Author�: Date�:
2005 SEQUOIA (RM1146U)
REMOVAL
1. SWITCH TRANSFER TO 2WD
2. REMOVE PROTECTOR
Remove the 4 bolts and protector.
3. DRAIN TRANSFER OIL
4. REMOVE FRONT SUSPENSION MEMBER BRACKET
Remove the 8 bolts and 2 front suspension member brackets.
5. REMOVE LH AND RH FRONT EXHAUST PIPES
(See page EM±126)
6. REMOVE FRONT AND REAR PROPELLER SHAFT
(See page PR±7)
7. REMOVE CROSS MEMBER
(a) Remove the 2 bolts and heat insulator.
(b) Support the rear side of the transmission with a transmis-
sion jack.
(c) Remove the 4 set bolts of the engine rear mounting.
(d) Remove the 4 bolts, nuts and cross member.
8. REMOVE ENGINE REAR MOUNTING
Remove the 4 bolts and engine rear mounting from the transfer.
9. DISCONNECT VEHICLE SPEED SENSOR AND
TRANSFER ACTUATOR CONNECTORS
10. REMOVE TRANSFER
(a) Support the transfer with another transmission jack.
(b) Remove the 8 transfer mounting bolts.
(c) Pull the transfer out from the transmission down and to-
ward the rear.
Page 2951 of 4323

± TRANSFERTRANSFER UNIT
TR±5
2943 Author�: Date�:
2005 SEQUOIA (RM1146U)
INSTALLATION
1. INSTALL TRANSFER
Raise the transfer and install it to t")
TR0DE±01
F19237
F19338
0 to 5 mm
(0 to 0.1968 in.)
± TRANSFERTRANSFER UNIT
TR±5
2943 Author�: Date�:
2005 SEQUOIA (RM1146U)
INSTALLATION
1. INSTALL TRANSFER
Raise the transfer and install it to the transmission with the 8
transfer mounting bolts.
Torque: 24 N´m (245 kgf´cm, 18 ft´lbf)
NOTICE:
Take care not to damage the lip of the transfer rear oil seal
with the transfer input shaft.
2. CONNECT VEHICLE SPEED SENSOR AND TRANS-
FER ACTUATOR CONNECTORS
3. INSTALL ENGINE REAR MOUNTING
Install the engine rear mounting to the transfer with the 4 bolts.
Torque: 65 N´m (660 kgf´cm, 48 ft´lbf)
4. INSTALL CROSS MEMBER
(a) Install the cross member with the 4 bolts and nuts.
Torque: 72 N´m (730 kgf´cm, 53 ft´lbf)
(b) Install the 4 set bolts of the engine rear mounting.
Torque: 18 N´m (185 kgf´cm, 13 ft´lbf)
(c) Remove the transmission jacks.
(d) Install the heat insulator with the 2 bolts.
Torque: 16 N´m (164 kgf´cm, 12 ft´lbf)
5. INSTALL FRONT AND REAR PROPELLER SHAFTS
(See page PR±9)
6. INSTALL LH AND RH FRONT EXHAUST PIPES
(See page EM±128)
7. INSTALL FRONT SUSPENSION MEMBER BRACKET
Install the 2 front suspension member brackets with the 8 bolts.
Torque: 33 N´m (336 kgf´cm, 24 ft´lbf)
8. FILL WITH TRANSFER OIL
(a) Remove the filler plug and gasket.
(b) Fill with transfer oil.
Oil grade: API GL±4 or GL±5
Viscosity: SAE 75W±90
Capacity: 1.4 liters (1.5 US qts, 1.2 lmp.qts)
NOTICE:
�When supplying oil, pour it slowly.
�Supply oil several times at several minute intervals.
HINT:
The oil level must be within 0 to 5 mm (0 to 0.1968 in.) down from
the lowest end of the hole for the filler plug.
(c) After leaving it for 5 minutes, check the oil level again.
(d) Install the filler plug with a new gasket.
Torque: 37 N´m (377 kgf´cm, 27 ft´lbf)
Page 2985 of 4323

INSPECTION
NOTICE:
�4HI e 4LO: Stop the v")
TR09T±04
F19317
2WD/4HI Switch
F19318
Differential Lock Switch
± TRANSFERONE TOUCH 2±4 SELECTOR SYSTEM
TR±39
2977 Author�: Date�:
2005 SEQUOIA (RM1146U)
INSPECTION
NOTICE:
�4HI e 4LO: Stop the vehicle and apply the brake, then
first shift the transmission shift lever into the ºNº
position.
�Do not operate the four wheel drive control switch
and the differential lock switch at the same time.
�Do not change from 2WD to 4WD when vehicle speed
is 62 mph (100 km/h) or more.
1. INSPECT 2WD e 4HI (4WD and differential lock
ºFREEº) SHIFT
(a) Start the engine.
(b) Push the 2WD/4HI switch once.
(c) Check that the 4WD indicator light stays lit after blinking.
(The center differential lock indicator light blinks while be-
ing shifted.)
(d) Push the 2WD/4HI switch once again.
(e) Check that the 4WD indicator light goes off after blinking.
(The center differential lock indicator light blinks while be-
ing shifted.)
2. INSPECT 4HI (4WD and differential lock ºFREEº) e
4HI (4WD and differential lock ºLOCKº) SHIFT
(a) Start the engine.
(b) Push the 2WD/4HI switch once.
(c) Check that the 4WD indicator light stays lit after blinking.
(d) Push the differential lock switch once.
(e) Check that the center differential lock indicator light stays
lit after blinking.
(f) Push the differential lock switch once again.
(g) Check that the center differential lock indicator light goes
off after blinking.
3. INSPECT 4HI (4WD and differential lock ºLOCKº) e
2WD
(a) Start the engine.
(b) Push the 2WD/4HI once.
(c) Check that the 4WD indicator light stays lit after blinking.
(d) Push the differential lock switch once.
(e) Check that the center differential lock indicator light stays
lit after blinking.
Page 2986 of 4323

(f) Push the 2WD/4HI switch once")
F19319
2WD/4HI Switch
F19320
4LO Switch
F19321
Differential Lock Switch
TR±40
± TRANSFERONE TOUCH 2±4 SELECTOR SYSTEM
2978 Author�: Date�:
2005 SEQUOIA (RM1146U)
(f) Push the 2WD/4HI switch once again.
(g) Check that the 4WD and center differential lock indicator
lights go off after blinking.
4. INSPECT 2WD e 4LO (4WD and differential lock
ºFREEº)
(a) Start the engine.
(b) Push the 4LO switch once.
(c) Check that the 4LO indicator light stays lit after blinking.
(The 4WD and center differential lock indicator lights blink
while shifting.)
(d) Push the 2WD/4HI switch once.
Check that the 4LO indicator light goes off after blinking.
(The 4WD and center differential lock indicator lights blink
while shifting.)
5. INSPECT 4LO (4WD and differential lock ºFREEº) e
4LO (4WD and differential lock ºLOCKº)
(a) Start the engine.
(b) Push the 4LO switch once.
(c) Check that the 4LO indicator light stays lit after blinking.
(d) Push the differential lock switch once.
(e) Check that the center differential lock indicator light stays
lit after blinking.
(f) Push the differential lock switch once again.
(g) Check that the center differential lock indicator light goes
off after blinking.
Page 2987 of 4323

6. INSPECT 4HI (4WD and differential lock ºFREEº) e
4LO (4WD and di")
F19322
4LO Switch
F19323
4LO Switch
± TRANSFERONE TOUCH 2±4 SELECTOR SYSTEM
TR±41
2979 Author�: Date�:
2005 SEQUOIA (RM1146U)
6. INSPECT 4HI (4WD and differential lock ºFREEº) e
4LO (4WD and differential lock ºFREEº)
(a) Start the engine.
(b) Push the 2WD/4HI switch once.
(c) Check that the 4WD indicator light stays lit after blinking.
(d) Push the 4LO switch once.
(e) Check that the 4WD indicator light goes off and the 4LO
indicator light stays lit after blinking.
(f) Push the 4LO switch once again.
(g) Check that the 4LO indicator light goes off after blinking
and the 4WD indicator light comes on.
7. INSPECT 4HI (4WD and differential lock ºLOCKº) e
4LO (4WD and differential lock ºLOCKº)
(a) Start the engine.
(b) Push the 2WD/4HI switch once.
(c) Check that the 4WD indicator light stays lit after blinking.
(d) Push the differential lock switch once.
(e) Check that the center differential lock indicator light stays
lit after blinking.
(f) Push the 4LO switch once.
(g) Check that the 4WD indicator light goes off and the 4LO
indicator light stays lit after blinking.
(h) Push the 4LO switch once again.
(i) Check that the 4LO indicator light goes off after blinking
and the 4WD indicator light comes on.
Page 2988 of 4323

8. INSPECT 4LO (4WD and differential lock ºLOCKº) \"
2W")
F19324
2WD/4HI Switch
F19325
A GND
4LO
CPU 4WD
B TR±42
± TRANSFERONE TOUCH 2±4 SELECTOR SYSTEM
2980 Author�: Date�:
2005 SEQUOIA (RM1146U)
8. INSPECT 4LO (4WD and differential lock ºLOCKº) "
2WD
(a) Start the engine.
(b) Push the 4LO switch once.
(c) Check that the 4LO indicator light stays lit after blinking.
(d) Push the differential lock switch once.
(e) Check that the center differential lock indicator light stays
lit after blinking.
(f) Push the 2WD/4HI switch once.
(g) Check that the 4LO and center differential lock indicator
lights go off after the 4LO and 4WD indicators are blink-
ing.
9. INSPECT 2WD/4HI, 4LO AND DIFFERENTIAL LOCK
SWITCH CONTINUITY
(a) Remove the instrument panel finish lower panel.
(b) Inspect the continuity between each terminal.
Switch positionTester connectionSpecified condition
Diff. Lock OFFB±8 ± A±10No continuity
Diff. Lock Hold ONB±8 ± A±10Continuity
4LO OFFB±9 ± A±10No continuity
4LO Hold ONB±9 ± A±10Continuity
2WD/4HI OFFB±10 ± A±10No continuity
2WD/4HI Hold ONB±10 ± A±10Continuity
If continuity is not as specified, replace the instrument panel fin-
ish lower panel.
Page 3035 of 4323
SA24L±03
F06624
R12863
SST
R13233
± SUSPENSION AND AXLEFRONT DRIVE SHAFT
SA±31
3027 Author�: Date�:
2005 SEQUOIA (RM1146U)
REMOVAL
1. REMOVE FRONT WHEEL
2. REMOVE ENGINE UNDER COVER
3. DRAIN DIFFERENTIAL OIL
4. REMOVE DRIVE SHAFT LOCK NUT
(a) Using a screwdriver and hammer, remove the grease cap.
(b) Remove the cotter pin and lock cap.
(c) While applying the brakes, remove the lock nut.
5. DISCONNECT LOWER SUSPENSION ARM FROM
LOWER BALL JOINT
(a) Remove the cotter pin and nut.
(b) Using SST, disconnect the lower suspension arm from the
lower ball joint.
SST 09628±62011
6. DISCONNECT DRIVE SHAFT FROM STEERING
KNUCKLE
(a) Using a plastic hammer, disengage the drive shaft from
the axle hub.
(b) Push the steering knuckle outward and disconnect the
drive shaft from the steering knuckle.
NOTICE:
Be careful not to damage the oil seal, boots and dust seal.
7. LH drive shaft:
REMOVE LH SHOCK ABSORBER (See page SA±64)