Page 1232 of 1943
I15489
Body ECU
B B9
B8
1 5
8 11
159
8
8
2
13 5 3 1
6
24
1 1BDR F
FJ27
J/C
W±B
W±B
B±GB±Y
W±G W±GWR±G
2C
2D
2K 2B2H
2D10A GAUGE IG1 Relay30A DOOR7.5A ECU±B
5A AM1
J11
J/C
ID Battery F13 F11100A DC/DC FL Block No. 1I15 Ignition Switch
AM1 IG1
F18
FL Block No. 2
120A MAINB9 E Instrument Panel J/B
B
IG
A 7.5A OBDII
9
2DR±G
D
D
J26
J/CW±L W±L
W DI±692
± DIAGNOSTICSBODY CONTROL SYSTEM
2001 PRIUS (RM778U)
Ignition Switch Power Source Circuit
CIRCUIT DESCRIPTION
When the ignition switch is turned to the ACC position, battery voltage is applied to the terminal ACC of the
ECU and when the ignition switch is turned to the ON position, battery voltage is applied to the terminal IG
of the ECU.
WIRING DIAGRAM
DI7NO±01
Page 1236 of 1943

I15485
BatteryB9
BODY ECU
11
F112 5
6 3
2 15
1
11
1 WID2 2F
2K 2HTAIL
RELAY7.5A
TAIL Instrument Panel J/Bto Taillight
F18
FL BLock No. 2 FL Block No. 1LG LG
F13B±GTRLY
100A DC/DC 120A MAIN DI±696
± DIAGNOSTICSBODY CONTROL SYSTEM
2001 PRIUS (RM778U)
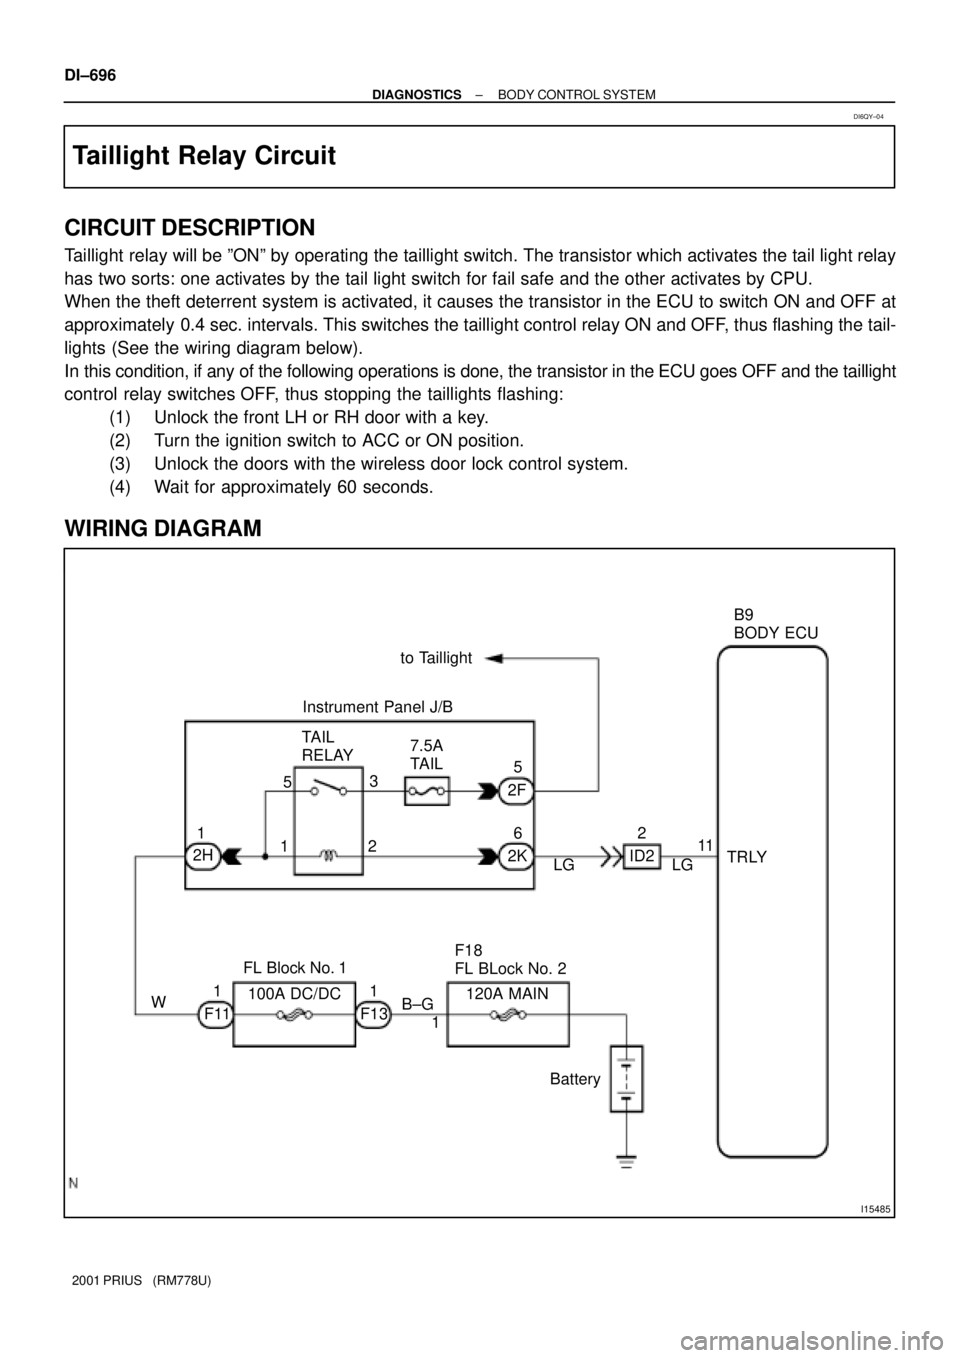
Taillight Relay Circuit
CIRCUIT DESCRIPTION
Taillight relay will be ºONº by operating the taillight switch. The transistor which activates the tail light relay
has two sorts: one activates by the tail light switch for fail safe and the other activates by CPU.
When the theft deterrent system is activated, it causes the transistor in the ECU to switch ON and OFF at
approximately 0.4 sec. intervals. This switches the taillight control relay ON and OFF, thus flashing the tail-
lights (See the wiring diagram below).
In this condition, if any of the following operations is done, the transistor in the ECU goes OFF and the taillight
control relay switches OFF, thus stopping the taillights flashing:
(1) Unlock the front LH or RH door with a key.
(2) Turn the ignition switch to ACC or ON position.
(3) Unlock the doors with the wireless door lock control system.
(4) Wait for approximately 60 seconds.
WIRING DIAGRAM
DI6QY±04
Page 1237 of 1943
± DIAGNOSTICSBODY CONTROL SYSTEM
DI±697
2001 PRIUS (RM778U)
INSPECTION PROCEDURE
1 Check taillight relay (See page DI±691).
NG Replace the taillight relay.
OK
2 Check wireharness and connector between taillight relay and body ECU, battery
and taillight relay (See page IN±41).
NG Repair or replace wireharness or connector.
OK
Proceed to next circuit inspection shown on
problem symptoms table (See page
DI±683).
Page 1238 of 1943

I15484
2 3 66
8 7
1 4 2
1
4
3 2 1 1
11
1
710
883
A L D
FE
E
E
LE
ER±L
R±G
R±W
R±G R±W R±W R±W
R±G
R±G B±G
R±G B
F13 F12
2I
2A 1B1F
1F
1F3
ID2 IA2J20
J/C
IA1
J4J5
ID 2K 2A
15
17
BatteryC10 High Beam
Indicator Light
(Comb. meter) F18
FL Block No. 2
J11
J/CJ4 H2
Headlight RH
10A HEAD (LH) 10A HEAD (RH)
Short Pin HEAD RelayEngine Room J/BB9
Body ECU
Short Pin
120A MAIN
Instrument
Panel J/BJ12 J13
W±B
H1
Headlight
LH
1
FL Block No. 13
1
HRLY
Instrument
Panel J/B DI±698
± DIAGNOSTICSBODY CONTROL SYSTEM
2001 PRIUS (RM778U)
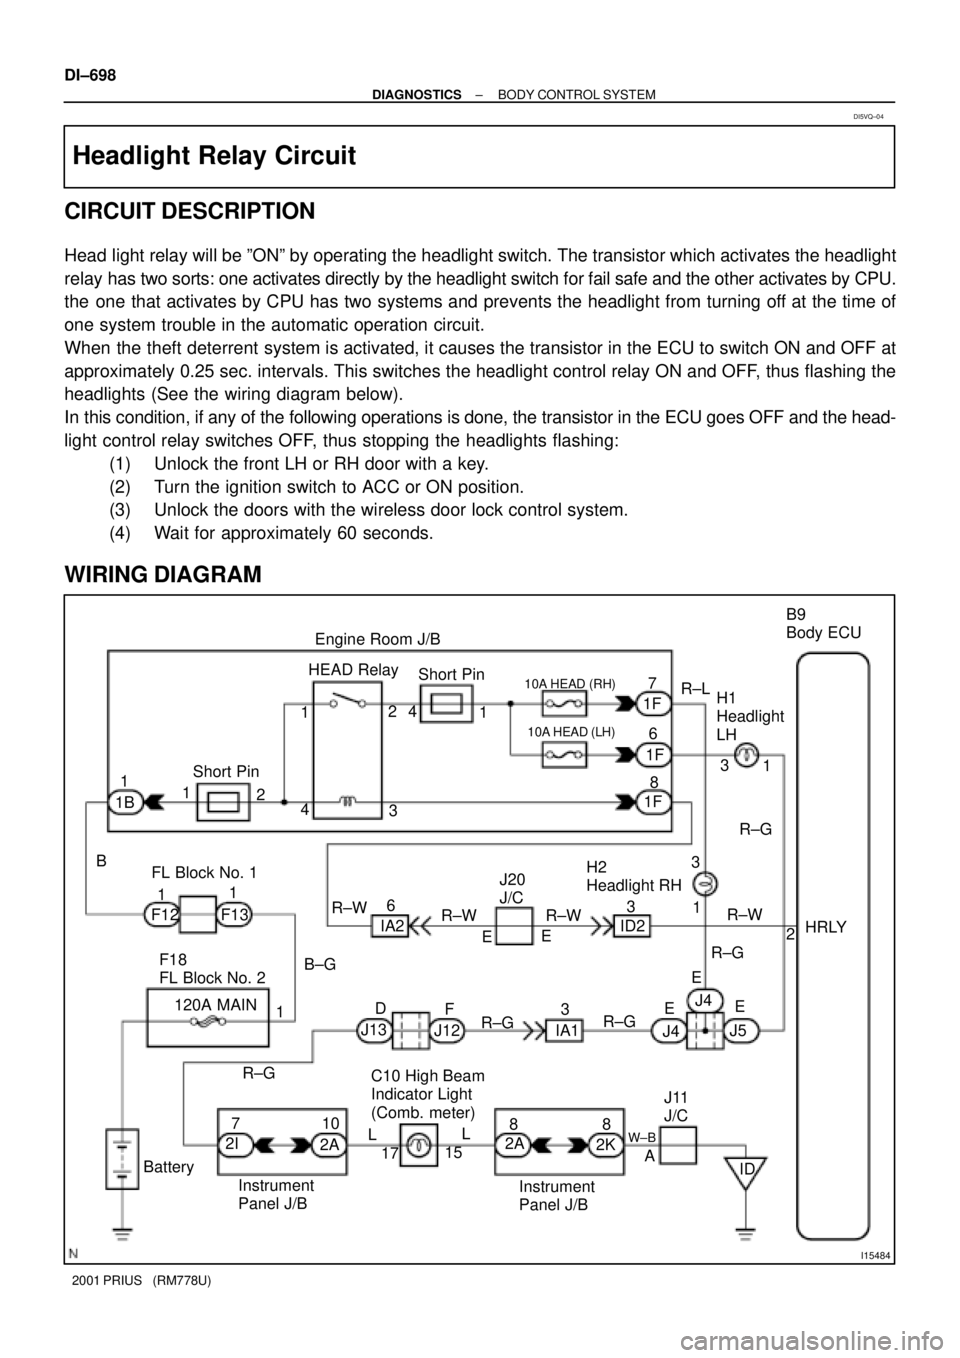
Headlight Relay Circuit
CIRCUIT DESCRIPTION
Head light relay will be ºONº by operating the headlight switch. The transistor which activates the headlight
relay has two sorts: one activates directly by the headlight switch for fail safe and the other activates by CPU.
the one that activates by CPU has two systems and prevents the headlight from turning off at the time of
one system trouble in the automatic operation circuit.
When the theft deterrent system is activated, it causes the transistor in the ECU to switch ON and OFF at
approximately 0.25 sec. intervals. This switches the headlight control relay ON and OFF, thus flashing the
headlights (See the wiring diagram below).
In this condition, if any of the following operations is done, the transistor in the ECU goes OFF and the head-
light control relay switches OFF, thus stopping the headlights flashing:
(1) Unlock the front LH or RH door with a key.
(2) Turn the ignition switch to ACC or ON position.
(3) Unlock the doors with the wireless door lock control system.
(4) Wait for approximately 60 seconds.
WIRING DIAGRAM
DI5VQ±04
Page 1239 of 1943
± DIAGNOSTICSBODY CONTROL SYSTEM
DI±699
2001 PRIUS (RM778U)
INSPECTION PROCEDURE
1 Check headlight relay (See page DI±693).
NG Replace the headlight relay.
OK
2 Check wireharness and connector between headlight relay and body ECU, bat-
tery and headlight relay (See page IN±41).
NG Repair or replace wireharness or connector.
OK
Proceed to next circuit inspection shown on
problem symptoms table (See page
DI±683).
Page 1242 of 1943
I15492
B8BODY ECU
HR 10
Battery10A
HORNHorn Relay
2 13 5 Engine Room J/B
C14
Horn SW
(Comb. SW)
6 1
1
1 B229
D DB±R B±R
B±R
B±W
B±R
H4
Horn F18
FL Block No. 2
120A MAINB±G
F13 F121J 1F
1BID24
J20
J/C FL Block No. 1
1IA28
B±R DI±702
± DIAGNOSTICSBODY CONTROL SYSTEM
2001 PRIUS (RM778U)
Horn Circuit
CIRCUIT DESCRIPTION
The horn is connected to the body ECU and activated by the body ECU.
WIRING DIAGRAM
DI2A3±06
Page 1243 of 1943
± DIAGNOSTICSBODY CONTROL SYSTEM
DI±703
2001 PRIUS (RM778U)
INSPECTION PROCEDURE
1 Check horn (See page DI±697).
NG Replace the horn.
OK
2 Check wireharness and connector between horn relay and body ECU, battery
and horn relay (See page IN±41).
NG Repair or replace wireharness or connector.
OK
Proceed to next circuit inspection shown on
problem symptoms table (See page
DI±683).
Page 1244 of 1943
I15493
1920
B8 B±W
SH B±W
IE1
T1
Theft
Deterrent
HornBody ECU DI±704
± DIAGNOSTICSBODY CONTROL SYSTEM
2001 PRIUS (RM778U)
Theft Deterrent Horn Circuit
CIRCUIT DESCRIPTION
When the theft deterrent system is activated, the relay in the ECU turns ON and OFF cycles of approximately
0.2 sec., causing the theft deterrent horn to blow (See the wiring diagram below).
In this condition, if any of the following operations is done, the relay in the ECU turns OFF, thus stopping
the theft deterrent horn from blowing:
(1) Unlock the front LH or RH door with key.
(2) Turn the ignition switch to ACC or ON position.
(3) Unlock the doors with the wireless door lock control system.
(4) Wait for approximately 60 seconds.
(5) Push the panic switch of the wireless door lock control system.
Except for the anti±theft purpose, the theft deferrent horn is used as a high±pitched horn.
WIRING DIAGRAM
DI7NQ±01