Page 56 of 2898

SAT964I
Malfunction Indicator (MI)=NJAT02551. The malfunction indicator will light up when the ignition switch
is turned ON without the engine running. This is for checking
the lamp.
+If the malfunction indicator does not light up, refer to EL-185,
ªWarning Lampsº.
(Or see MI & CONSULT-II in EC section. Refer to EC-74,
ªDescriptionº, ªMalfunction Indicator (MI)º and EC-83, ªCON-
SULT-IIº.)
2. When the engine is started, the malfunction indicator should go
off.
If the lamp remains on, the on board diagnostic system has
detected an emission-related (EURO-OBD) malfunction. For
detail, refer to EC-59, ªON BOARD DIAGNOSTIC SYSTEM
DESCRIPTIONº.
CONSULT-IINJAT0256After performing ªSELF-DIAGNOSTIC PROCEDURE (WITH CON-
SULT-II)º (AT-55), place check marks for results on the ªDIAGNOS-
TIC WORKSHEETº, AT-76. Reference pages are provided follow-
ing the items.
NOTICE:
1) The CONSULT-II electrically displays shift timing and lock-up
timing (that is, operation timing of each solenoid).
Check for time difference between actual shift timing and the
CONSULT-II display. If the difference is noticeable, mechani-
cal parts (except solenoids, sensors, etc.) may be malfunction-
ing. Check mechanical parts using applicable diagnostic pro-
cedures.
2) Shift schedule (which implies gear position) displayed on
CONSULT-II and that indicated in Service Manual may differ
slightly. This occurs because of the following reasons:
+Actual shift schedule has more or less tolerance or allowance,
+Shift schedule indicated in Service Manual refers to the point
where shifts start, and
+Gear position displayed on CONSULT-II indicates the point
where shifts are completed.
3) Shift solenoid valve ªAº or ªBº is displayed on CONSULT-II at
the start of shifting. Gear position is displayed upon completion
of shifting (which is computed by TCM).
4) Additional CONSULT-II information can be found in the Opera-
tion Manual supplied with the CONSULT-II unit.
ON BOARD DIAGNOSTIC SYSTEM
DESCRIPTION
EURO-OBD
Malfunction Indicator (MI)
AT-54
Page 61 of 2898
![NISSAN ALMERA 2001 Service Manual Item DisplayMonitor item
Description Remarks
ECU input
signalsMain sig-
nals
Throttle position THROTTLE
POSI
[/8]ÐX+Throttle position data,
used for computation by
TCM, is displayed.+A specific value NISSAN ALMERA 2001 Service Manual Item DisplayMonitor item
Description Remarks
ECU input
signalsMain sig-
nals
Throttle position THROTTLE
POSI
[/8]ÐX+Throttle position data,
used for computation by
TCM, is displayed.+A specific value](/manual-img/5/57348/w960_57348-60.png)
Item DisplayMonitor item
Description Remarks
ECU input
signalsMain sig-
nals
Throttle position THROTTLE
POSI
[/8]ÐX+Throttle position data,
used for computation by
TCM, is displayed.+A specific value used for
control is displayed if
fail-safe is activated due
to error.
Line pressure duty LINE PRES DTY
[%]
ÐX+Control value of line
pressure solenoid valve,
computed by TCM from
each input signal, is dis-
played.
Torque converter clutch
solenoid valve dutyTCC S/V DUTY
[%]
ÐX+Control value of torque
converter clutch sole-
noid valve, computed by
TCM from each input
signal, is displayed.
Shift solenoid valve A SHIFT S/V A
[ON/OFF]
ÐX+Control value of shift
solenoid valve A, com-
puted by TCM from
each input signal, is dis-
played.Control value of solenoid is
displayed even if solenoid
circuit is disconnected.
The ªOFFº signal is dis-
played if solenoid circuit is
shorted.
Shift solenoid valve B SHIFT S/V B
[ON/OFF]
ÐX+Control value of shift
solenoid valve B, com-
puted by TCM from
each input signal, is dis-
played.
Overrun clutch solenoid
valveOVERRUN/C S/V
[ON/OFF]
ÐX+Control value of overrun
clutch solenoid valve
computed by TCM from
each input signal is dis-
played.
Self-diagnosis display lamp
(O/D OFF indicator lamp)SELF-D DP LMP
[ON/OFF] Ð X+Control status of O/D
OFF indicator lamp is
displayed.
X: Applicable
Ð: Not applicable
SAT998J
DTC WORK SUPPORT MODE WITH CONSULT-IINJAT0256S04CONSULT-II Setting ProcedureNJAT0256S04011. Turn ignition switch ªOFFº.
2. Connect CONSULT-II to data link connector which is located
in left side lower dash panel.
ON BOARD DIAGNOSTIC SYSTEM
DESCRIPTION
EURO-OBD
CONSULT-II (Cont'd)
AT-59
Page 62 of 2898
SAT586J
3. Turn ignition switch ªONº.
4. Touch ªSTARTº.
SAT014K
5. Touch ªA/Tº.
SAT587J
6. Touch ªDTC WORK SUPPORTº.
SAT018K
7. Touch select item menu (1ST, 2ND, etc.).
SAT589J
8. Touch ªSTARTº.
ON BOARD DIAGNOSTIC SYSTEM
DESCRIPTION
EURO-OBD
CONSULT-II (Cont'd)
AT-60
Page 65 of 2898

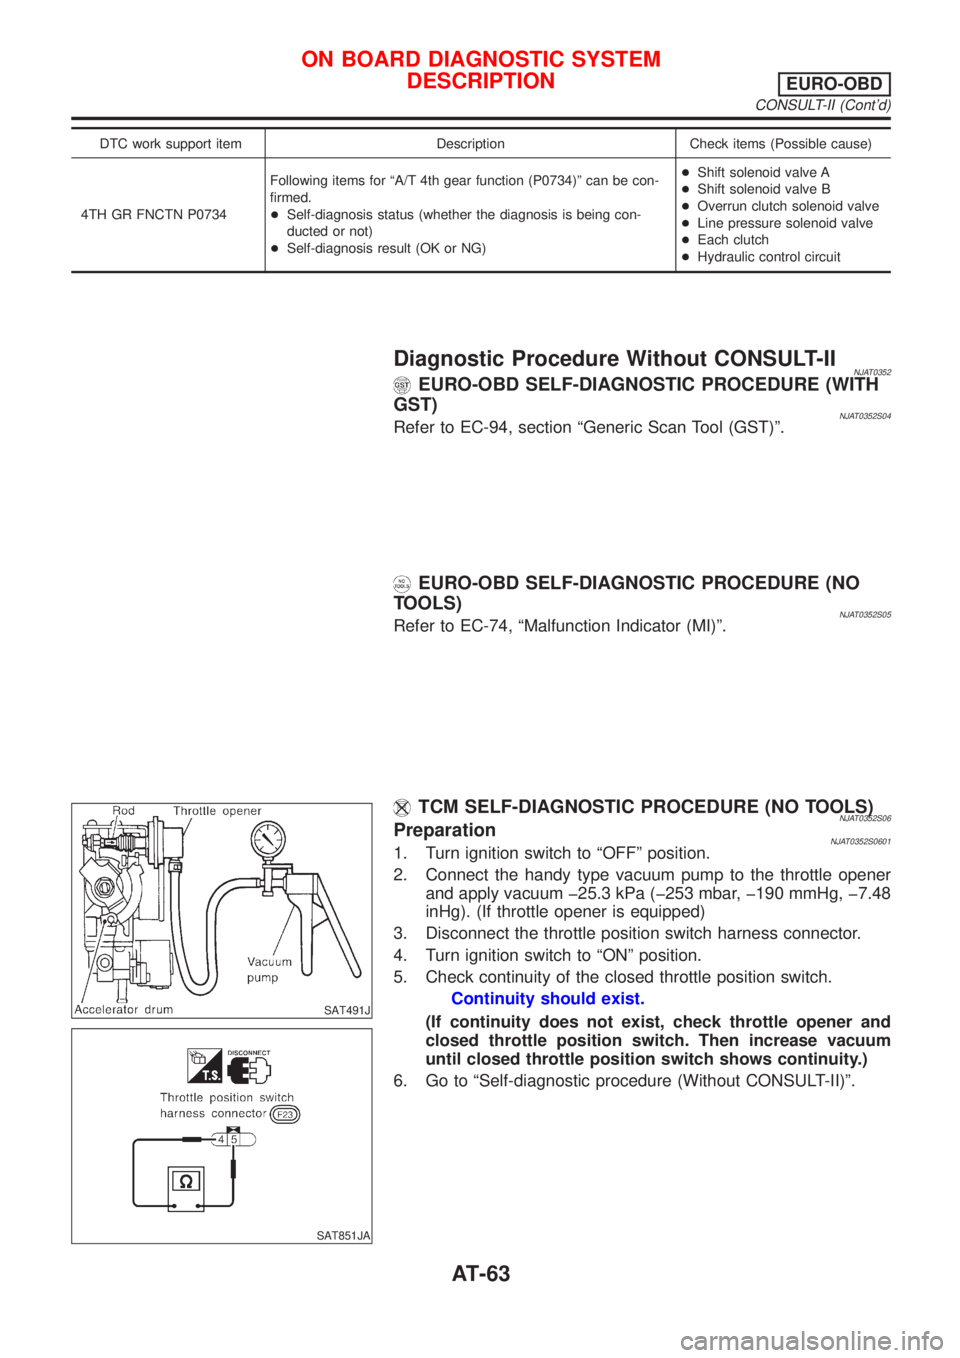
DTC work support item Description Check items (Possible cause)
4TH GR FNCTN P0734Following items for ªA/T 4th gear function (P0734)º can be con-
firmed.
+Self-diagnosis status (whether the diagnosis is being con-
ducted or not)
+Self-diagnosis result (OK or NG)+Shift solenoid valve A
+Shift solenoid valve B
+Overrun clutch solenoid valve
+Line pressure solenoid valve
+Each clutch
+Hydraulic control circuit
Diagnostic Procedure Without CONSULT-IINJAT0352EURO-OBD SELF-DIAGNOSTIC PROCEDURE (WITH
GST)
NJAT0352S04Refer to EC-94, section ªGeneric Scan Tool (GST)º.
EURO-OBD SELF-DIAGNOSTIC PROCEDURE (NO
TOOLS)
NJAT0352S05Refer to EC-74, ªMalfunction Indicator (MI)º.
SAT491J
SAT851JA
TCM SELF-DIAGNOSTIC PROCEDURE (NO TOOLS)NJAT0352S06PreparationNJAT0352S06011. Turn ignition switch to ªOFFº position.
2. Connect the handy type vacuum pump to the throttle opener
and apply vacuum þ25.3 kPa (þ253 mbar, þ190 mmHg, þ7.48
inHg). (If throttle opener is equipped)
3. Disconnect the throttle position switch harness connector.
4. Turn ignition switch to ªONº position.
5. Check continuity of the closed throttle position switch.
Continuity should exist.
(If continuity does not exist, check throttle opener and
closed throttle position switch. Then increase vacuum
until closed throttle position switch shows continuity.)
6. Go to ªSelf-diagnostic procedure (Without CONSULT-II)º.
ON BOARD DIAGNOSTIC SYSTEM
DESCRIPTION
EURO-OBD
CONSULT-II (Cont'd)
AT-63
Page 66 of 2898
1 CHECK O/D OFF INDICATOR LAMP
1. Start engine and warm it up to normal operating temperature.
2. Turn ignition switch to ªOFFº position.
Wait 5 seconds.
3. Turn ignition switch to ªACCº position.
SAT774B
4. Set overdrive control switch to ªONº position.
5. Move selector lever to ªPº position.
6. Turn ignition switch to ªONº position. (Do not start engine.)
7. Does O/D OFF indicator lamp come on for about 2 seconds?
SAT138K
YesorNo
Ye s©GO TO 2.
No©Go to ª1. O/D OFF Indicator Lamp Does Not Come Onº, AT-296.
2 JUDGEMENT PROCEDURE STEP 1
1. Turn ignition switch to ªOFFº position.
2. Turn ignition switch to ªACCº position.
3. Move selector lever to ªDº position.
4. Set overdrive control switch to ªOFFº position.
5. Turn ignition switch to ªONº position. (Do not start engine.)
+Wait more than 2 seconds after turning ignition switch ªONº.
SAT653E
©GO TO 3.
ON BOARD DIAGNOSTIC SYSTEM
DESCRIPTION
EURO-OBD
Diagnostic Procedure Without CONSULT-II (Cont'd)
AT-64
Page 107 of 2898

Symptom ChartNJAT0029Numbers are arranged in order of inspection.
Perform inspections starting with number one and work up.
Symptom Condition Diagnostic ItemReference Page
General and
except for
Euro-OBDEURO-OBD
Engine cannot start in ªPº and ªNº
positions.
AT-299ON vehicle1. Ignition switch and starterEL-10, ªPOWER SUPPLY
ROUTINGº and SC-13,
ªSTARTING SYSTEMº
2. Control cable adjustment AT-352¬
3. PNP switch adjustment AT-352¬
Engine starts in position other than
ªNº and ªPº positions.
AT-299ON vehicle1. Control cable adjustment AT-352¬
2. PNP switch adjustment AT-352¬
Transaxle noise in ªPº and ªNº
positions.ON vehicle1. Fluid level AT-80¬
2. Line pressure test AT-84¬
3. Throttle position sensor (Adjustment)EC-207,
ªDTC P0120
THROTTLE
POSITION
SENSORºEC-207,
ªDTC P0120
THROTTLE
POSITION
SENSORº
4. Vehicle speed sensor´A/T (Revolution
sensor) and vehicle speed sensor´MTRAT-126,
AT-131AT-195,
AT-281
5. Engine speed signal AT-172 AT-200
OFF vehicle6. Oil pump AT-384¬
7. Torque converter AT-366¬
Vehicle moves when changing into
ªPº position, or parking gear does
not disengage when shifted out of
ªPº position.
AT-300ON vehicle 1. Control cable adjustment AT-352¬
OFF vehicle 2. Parking componentsAT-361,
AT-362AT-362
Vehicle runs in ªNº position.
AT-301ON vehicle 1. Control cable adjustment AT-352¬
OFF vehicle2. Forward clutch AT-412¬
3. Reverse clutch AT-403¬
4. Overrun clutch AT-412¬
Vehicle will not run in ªRº position
(but runs in ªDº, ª2º and ª1º posi-
tions). Clutch slips.
Very poor acceleration.
AT-305ON vehicle1. Control cable adjustment AT-352¬
2. Line pressure test AT-84¬
3. Line pressure solenoid valve AT-176 AT-239
4. Control valve assembly AT-351¬
OFF vehicle5. Reverse clutch AT-403¬
6. High clutch AT-407¬
7. Forward clutch AT-412¬
8. Overrun clutch AT-412¬
9. Low & reverse brake AT-419¬
TROUBLE DIAGNOSIS Ð GENERAL DESCRIPTION
Symptom Chart
AT-105
Page 347 of 2898

Diagnostic ProcedureNJAT0105SYMPTOM 1:
+Selector lever cannot be moved from ªPº position with key
in ON position and brake pedal applied.
+Selector lever can be moved from ªPº position with key in
ON position and brake pedal released.
+Selector lever can be moved from ªPº position when key
is removed from key cylinder.
SYMPTOM 2:
Ignition key cannot be removed when selector lever is set to
ªPº position. It can be removed when selector lever is set to
any position except ªPº.
1 CHECK KEY INTERLOCK CABLE
Check key interlock cable for damage.
OK or NG
OK©GO TO 2.
NG©Repair key interlock cable. Refer to AT-349.
2 CHECK SELECTOR LEVER POSITION
Check selector lever position for damage.
OK or NG
OK©GO TO 3.
NG©Check selector lever. Refer to ªON-VEHICLE SERVICE Ð PNP Switch and Control
Cable Adjustmentº, AT-352.
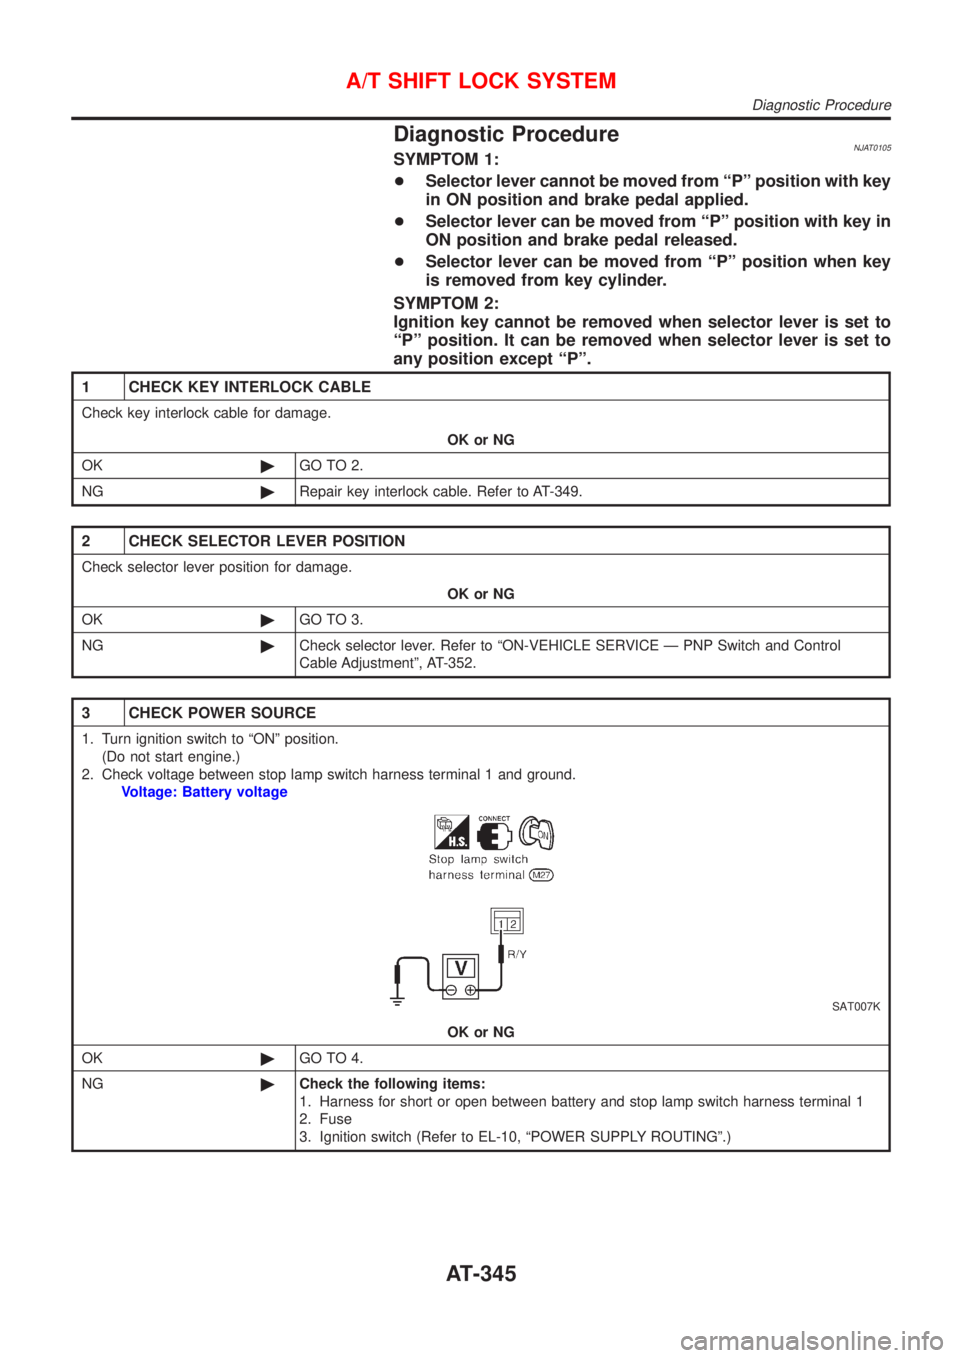
3 CHECK POWER SOURCE
1. Turn ignition switch to ªONº position.
(Do not start engine.)
2. Check voltage between stop lamp switch harness terminal 1 and ground.
Voltage: Battery voltage
SAT007K
OK or NG
OK©GO TO 4.
NG©Check the following items:
1. Harness for short or open between battery and stop lamp switch harness terminal 1
2. Fuse
3. Ignition switch (Refer to EL-10, ªPOWER SUPPLY ROUTINGº.)
A/T SHIFT LOCK SYSTEM
Diagnostic Procedure
AT-345
Page 348 of 2898

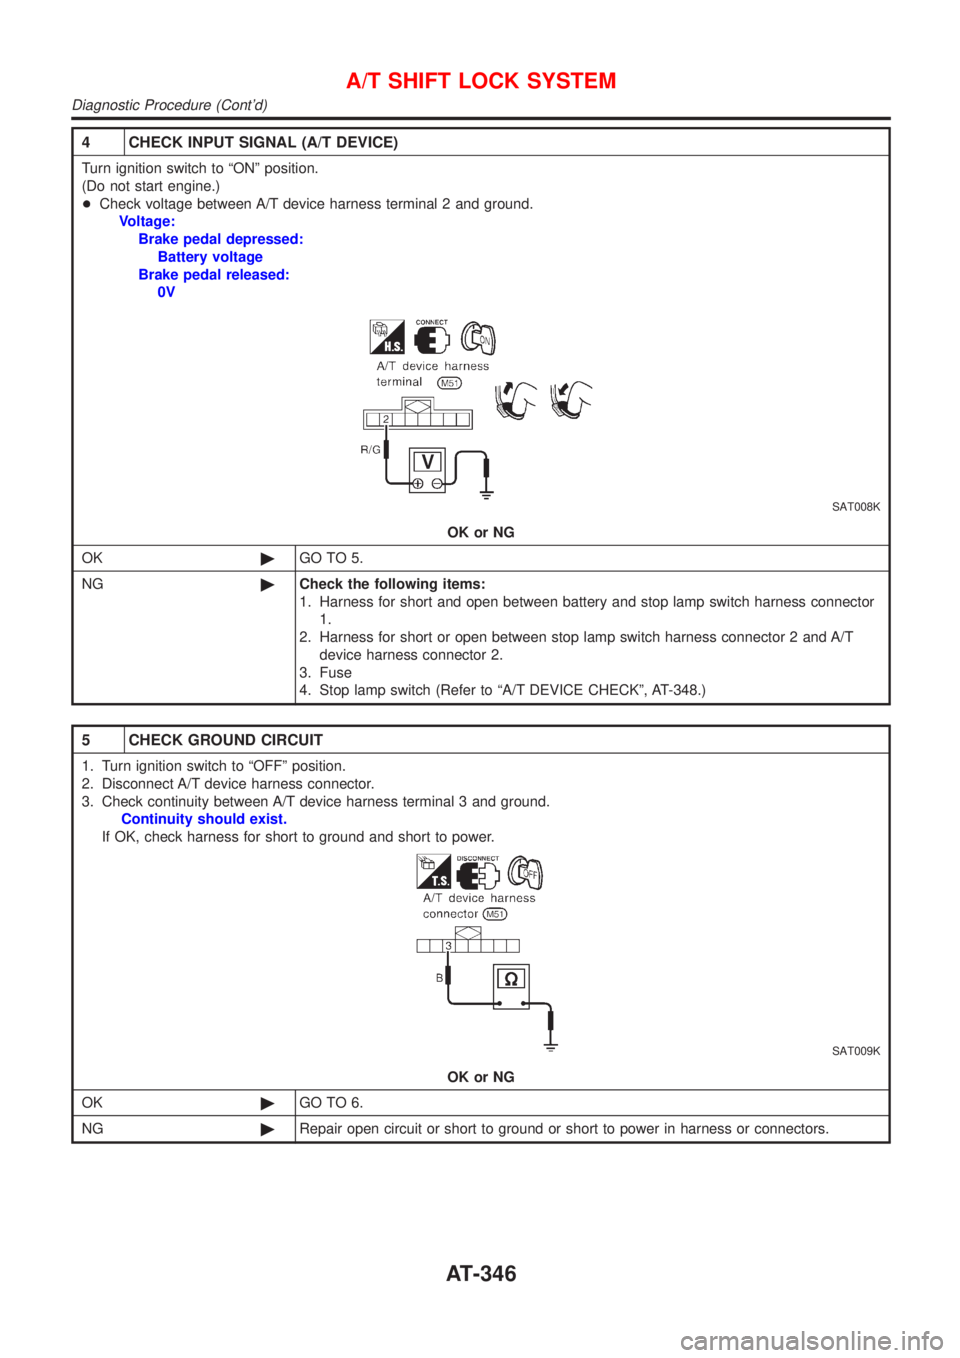
4 CHECK INPUT SIGNAL (A/T DEVICE)
Turn ignition switch to ªONº position.
(Do not start engine.)
+Check voltage between A/T device harness terminal 2 and ground.
Voltage:
Brake pedal depressed:
Battery voltage
Brake pedal released:
0V
SAT008K
OK or NG
OK©GO TO 5.
NG©Check the following items:
1. Harness for short and open between battery and stop lamp switch harness connector
1.
2. Harness for short or open between stop lamp switch harness connector 2 and A/T
device harness connector 2.
3. Fuse
4. Stop lamp switch (Refer to ªA/T DEVICE CHECKº, AT-348.)
5 CHECK GROUND CIRCUIT
1. Turn ignition switch to ªOFFº position.
2. Disconnect A/T device harness connector.
3. Check continuity between A/T device harness terminal 3 and ground.
Continuity should exist.
If OK, check harness for short to ground and short to power.
SAT009K
OK or NG
OK©GO TO 6.
NG©Repair open circuit or short to ground or short to power in harness or connectors.
A/T SHIFT LOCK SYSTEM
Diagnostic Procedure (Cont'd)
AT-346