2001 NISSAN ALMERA o2 sensor
[x] Cancel search: o2 sensorPage 520 of 2898

Supplemental Restraint System (SRS) ªAIR
BAGº and ªSEAT BELT PRE-TENSIONERº
NJBR0139The Supplemental Restraint System such as ªAIR BAGº and ªSEAT BELT PRE-TENSIONERº used along with
a seat belt, helps to reduce the risk or severity of injury to the driver and front passenger for certain types of
collision. The SRS system composition which is available to NISSAN MODEL N16 is as follows (The compo-
sition varies according to the destination and optional equipment.):
+For a frontal collision
The Supplemental Restraint System consists of driver air bag module (located in the center of the steer-
ing wheel), front passenger air bag module (located on the instrument panel on passenger side), front seat
belt pre-tensioners, a diagnosis sensor unit, warning lamp, wiring harness and spiral cable.
+For a side collision
The Supplemental Restraint System consists of front side air bag module (located in the outer side of front
seat), side air bag (satellite) sensor, diagnosis sensor unit (one of components of air bags for a frontal
collision), wiring harness, warning lamp (one of components of air bags for a frontal collision).
Information necessary to service the system safely is included in theRS sectionof this Service Manual.
WARNING:
+To avoid rendering the SRS inoperative, which could increase the risk of personal injury or death
in the event of a collision which would result in air bag inflation, all maintenance should be per-
formed by an authorized NISSAN dealer.
+Improper maintenance, including incorrect removal and installation of the SRS, can lead to per-
sonal injury caused by unintentional activation of the system. For removal of Spiral Cable and Air
Bag Module, see the RS section.
+Do not use electrical test equipment on any circuit related to the SRS unless instructed to in this
Service Manual. SRS wiring harnesses can be identified by yellow harness connector.
SBR686C
Precautions for Brake SystemNJBR0002+Recommended fluid is brake fluid ªDOT 4º.
+Never reuse drained brake fluid.
+Be careful not to splash brake fluid on painted areas.
+To clean or wash all parts of master cylinder, disc brake
caliper and wheel cylinder, use clean brake fluid.
+Never use mineral oils such as gasoline or kerosene. They
will ruin rubber parts of the hydraulic system.
+Use flare nut wrench when removing and installing brake
tube.
+Always torque brake lines when installing.
+Burnish the brake contact surfaces after refinishing or
replacing drums or rotors, after replacing pads or linings,
or if a soft pedal occurs at very low mileage.
Refer to ªBrake Burnishing Procedureº, ªON-VEHICLE
SERVICEº, BR-8.
WARNING:
+Clean brake pads and shoes with a waste cloth, then wipe
with a dust collector.
PRECAUTIONS
Supplemental Restraint System (SRS) ªAIR BAGº and ªSEAT BELT PRE-TENSIONERº
BR-4
Page 566 of 2898
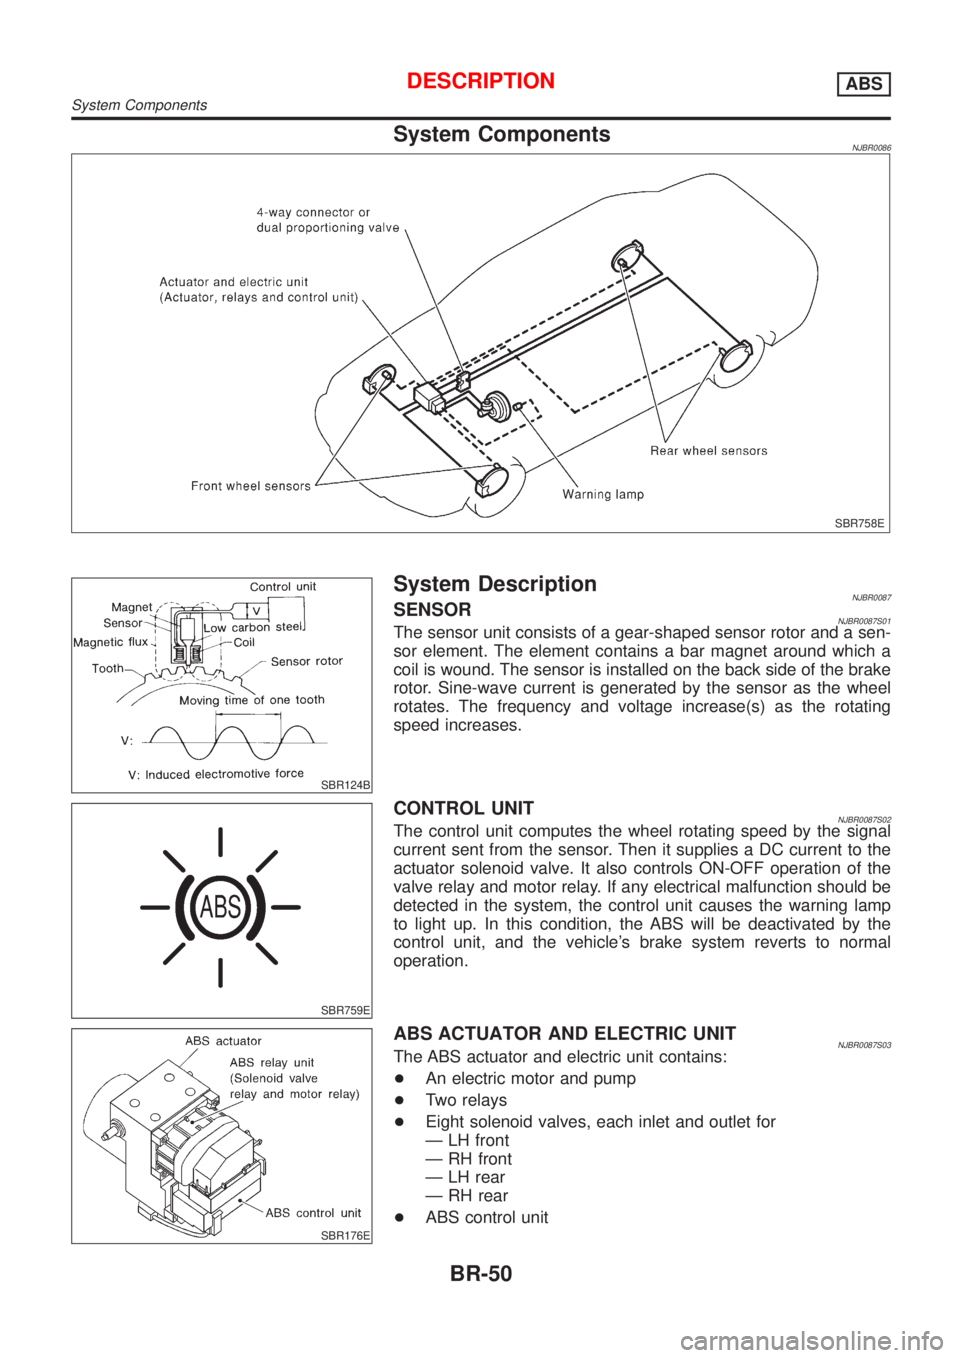
System ComponentsNJBR0086
SBR758E
SBR124B
System DescriptionNJBR0087SENSORNJBR0087S01The sensor unit consists of a gear-shaped sensor rotor and a sen-
sor element. The element contains a bar magnet around which a
coil is wound. The sensor is installed on the back side of the brake
rotor. Sine-wave current is generated by the sensor as the wheel
rotates. The frequency and voltage increase(s) as the rotating
speed increases.
SBR759E
CONTROL UNITNJBR0087S02The control unit computes the wheel rotating speed by the signal
current sent from the sensor. Then it supplies a DC current to the
actuator solenoid valve. It also controls ON-OFF operation of the
valve relay and motor relay. If any electrical malfunction should be
detected in the system, the control unit causes the warning lamp
to light up. In this condition, the ABS will be deactivated by the
control unit, and the vehicle's brake system reverts to normal
operation.
SBR176E
ABS ACTUATOR AND ELECTRIC UNITNJBR0087S03The ABS actuator and electric unit contains:
+An electric motor and pump
+Two relays
+Eight solenoid valves, each inlet and outlet for
Ð LH front
Ð RH front
Ð LH rear
Ð RH rear
+ABS control unit
DESCRIPTIONABS
System Components
BR-50
Page 581 of 2898
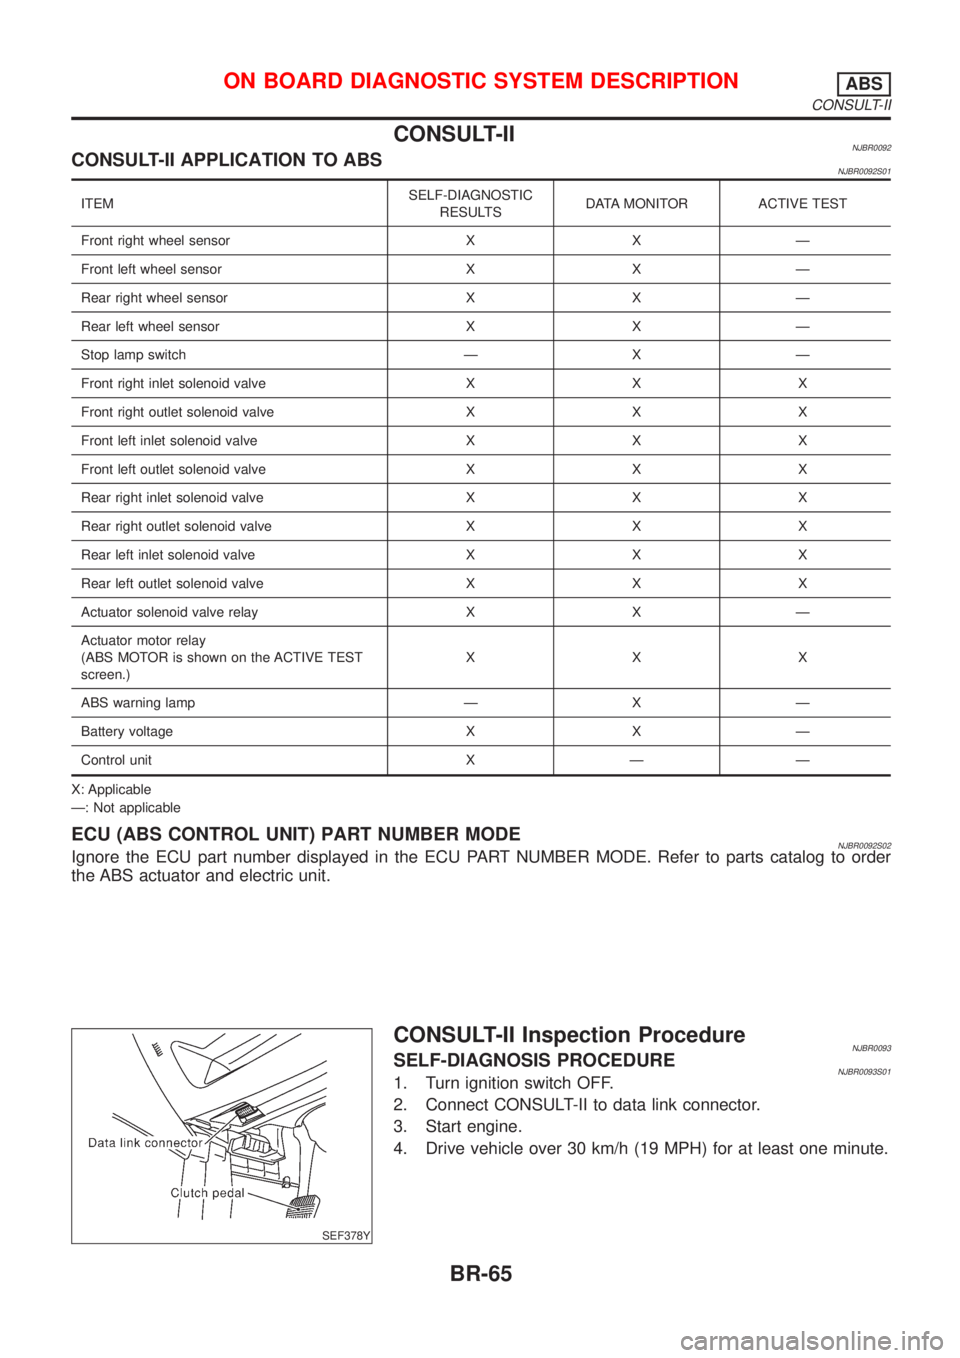
CONSULT-IINJBR0092CONSULT-II APPLICATION TO ABSNJBR0092S01
ITEMSELF-DIAGNOSTIC
RESULTSDATA MONITOR ACTIVE TEST
Front right wheel sensor X X Ð
Front left wheel sensor X X Ð
Rear right wheel sensor X X Ð
Rear left wheel sensor X X Ð
Stop lamp switch Ð X Ð
Front right inlet solenoid valve X X X
Front right outlet solenoid valve X X X
Front left inlet solenoid valve X X X
Front left outlet solenoid valve X X X
Rear right inlet solenoid valve X X X
Rear right outlet solenoid valve X X X
Rear left inlet solenoid valve X X X
Rear left outlet solenoid valve X X X
Actuator solenoid valve relay X X Ð
Actuator motor relay
(ABS MOTOR is shown on the ACTIVE TEST
screen.)XXX
ABS warning lamp Ð X Ð
Battery voltage X X Ð
Control unit X Ð Ð
X: Applicable
Ð: Not applicable
ECU (ABS CONTROL UNIT) PART NUMBER MODENJBR0092S02Ignore the ECU part number displayed in the ECU PART NUMBER MODE. Refer to parts catalog to order
the ABS actuator and electric unit.
SEF378Y
CONSULT-II Inspection ProcedureNJBR0093SELF-DIAGNOSIS PROCEDURENJBR0093S011. Turn ignition switch OFF.
2. Connect CONSULT-II to data link connector.
3. Start engine.
4. Drive vehicle over 30 km/h (19 MPH) for at least one minute.
ON BOARD DIAGNOSTIC SYSTEM DESCRIPTIONABS
CONSULT-II
BR-65
Page 583 of 2898
![NISSAN ALMERA 2001 Service Manual SELF-DIAGNOSTIC RESULTS MODE=NJBR0093S02
Diagnostic item Diagnostic item is detected when ...Reference
Page
FR RH SENSOR
[OPEN]*1+Circuit for front right wheel sensor is open.
(An abnormally high inpu NISSAN ALMERA 2001 Service Manual SELF-DIAGNOSTIC RESULTS MODE=NJBR0093S02
Diagnostic item Diagnostic item is detected when ...Reference
Page
FR RH SENSOR
[OPEN]*1+Circuit for front right wheel sensor is open.
(An abnormally high inpu](/manual-img/5/57348/w960_57348-582.png)
SELF-DIAGNOSTIC RESULTS MODE=NJBR0093S02
Diagnostic item Diagnostic item is detected when ...Reference
Page
FR RH SENSOR
[OPEN]*1+Circuit for front right wheel sensor is open.
(An abnormally high input voltage is entered.)BR-78
FR LH SENSOR
[OPEN]*1+Circuit for front left wheel sensor is open.
(An abnormally high input voltage is entered.)BR-78
RR RH SENSOR
[OPEN]*1+Circuit for rear right sensor is open.
(An abnormally high input voltage is entered.)BR-78
RR LH SENSOR
[OPEN]*1+Circuit for rear left sensor is open.
(An abnormally high input voltage is entered.)BR-78
FR RH SENSOR
[SHORT]*1+Circuit for front right wheel sensor is shorted.
(An abnormally low input voltage is entered.)BR-78
FR LH SENSOR
[SHORT]*1+Circuit for front left wheel sensor is shorted.
(An abnormally low input voltage is entered.)BR-78
RR RH SENSOR
[SHORT]*1+Circuit for rear right sensor is shorted.
(An abnormally low input voltage is entered.)BR-78
RR LH SENSOR
[SHORT]*1+Circuit for rear left sensor is shorted.
(An abnormally low input voltage is entered.)BR-78
ABS SENSOR
[ABNORMAL SIGNAL]+Teeth damage on sensor rotor or improper installation of wheel sensor.
(Abnormal wheel sensor signal is entered.)BR-78
FR RH IN ABS SOL
[OPEN]+Circuit for front right inlet solenoid valve is open.
(An abnormally low output voltage is entered.)BR-81
FR LH IN ABS SOL
[OPEN]+Circuit for front left inlet solenoid valve is open.
(An abnormally low output voltage is entered.)BR-81
RR RH IN ABS SOL
[OPEN]+Circuit for rear right inlet solenoid valve is open.
(An abnormally low output voltage is entered.)BR-81
RR LH IN ABS SOL
[OPEN]+Circuit for rear left inlet solenoid valve is open.
(An abnormally low output voltage is entered.)BR-81
FR RH IN ABS SOL
[SHORT]+Circuit for front right inlet solenoid valve is shorted.
(An abnormally high output voltage is entered.)BR-81
FR LH IN ABS SOL
[SHORT]+Circuit for front left inlet solenoid valve is shorted.
(An abnormally high output voltage is entered.)BR-81
RR RH IN ABS SOL
[SHORT]+Circuit for rear right inlet solenoid valve is shorted.
(An abnormally high output voltage is entered.)BR-81
RR LH IN ABS SOL
[SHORT]+Circuit for rear left inlet solenoid valve is shorted.
(An abnormally high output voltage is entered.)BR-81
FR RH OUT ABS SOL
[OPEN]+Circuit for front right outlet solenoid valve is open.
(An abnormally low output voltage is entered.)BR-81
FR LH OUT ABS SOL
[OPEN]+Circuit for front left outlet solenoid valve is open.
(An abnormally low output voltage is entered.)BR-81
RR RH OUT ABS SOL
[OPEN]+Circuit for rear right outlet solenoid valve is open.
(An abnormally low output voltage is entered.)BR-81
RR LH OUT ABS SOL
[OPEN]+Circuit for rear left outlet solenoid valve is open.
(An abnormally low output voltage is entered.)BR-81
FR RH OUT ABS SOL
[SHORT]+Circuit for front right outlet solenoid valve is shorted.
(An abnormally high output voltage is entered.)BR-81
FR LH OUT ABS SOL
[SHORT]+Circuit for front left outlet solenoid valve is shorted.
(An abnormally high output voltage is entered.)BR-81
ON BOARD DIAGNOSTIC SYSTEM DESCRIPTIONABS
CONSULT-II Inspection Procedure (Cont'd)
BR-67
Page 584 of 2898
![NISSAN ALMERA 2001 Service Manual Diagnostic item Diagnostic item is detected when ...Reference
Page
RR RH OUT ABS SOL
[SHORT]+Circuit for rear right outlet solenoid valve is shorted.
(An abnormally high output voltage is entered.)BR- NISSAN ALMERA 2001 Service Manual Diagnostic item Diagnostic item is detected when ...Reference
Page
RR RH OUT ABS SOL
[SHORT]+Circuit for rear right outlet solenoid valve is shorted.
(An abnormally high output voltage is entered.)BR-](/manual-img/5/57348/w960_57348-583.png)
Diagnostic item Diagnostic item is detected when ...Reference
Page
RR RH OUT ABS SOL
[SHORT]+Circuit for rear right outlet solenoid valve is shorted.
(An abnormally high output voltage is entered.)BR-81
RR LH OUT ABS SOL
[SHORT]+Circuit for rear left outlet solenoid valve is shorted.
(An abnormally high output voltage is entered.)BR-81
ABS ACTUATOR RELAY
[ABNORMAL]+Actuator solenoid valve relay is ON, even control unit sends off signal.
+Actuator solenoid valve relay is OFF, even control unit sends on signal.BR-81
ABS MOTOR RELAY
[ABNORMAL]+Circuit for actuator motor is open or shorted.
+Actuator motor relay is stuck.BR-84
BATTERY VOLT
[ABNORMAL]+Power source voltage supplied to ABS control unit is abnormally low. BR-86
CONTROL UNIT+Function of calculation in ABS control unit has failed. BR-88
*1: Be sure to confirm the ABS warning lamp illuminates when the ignition switch is turned ON after repairing the shorted sensor circuit,
but the lamp goes out when driving the vehicle over 30 km/h (19 MPH) for one minute in accordance with SELF-DIAGNOSIS
PROCEDURE.
PBR455D
DATA MONITOR PROCEDURENJBR0093S031. Turn ignition switch OFF.
2. Connect CONSULT-II to data link connector.
3. Turn ignition switch ON.
4. Touch ªSTARTº on CONSULT-II screen.
PBR385C
5. Touch ªABSº.
PST412B
6. Touch ªDATA MONITORº.
7. Touch ªSETTINGº on ªSELECT MONITOR ITEMº screen.
8. Touch ªLONG TIMEº on ªSET RECORDING CONDº screen.
9. Touch ªSTARTº on ªSELECT MONITOR ITEMº.
ON BOARD DIAGNOSTIC SYSTEM DESCRIPTIONABS
CONSULT-II Inspection Procedure (Cont'd)
BR-68
Page 586 of 2898
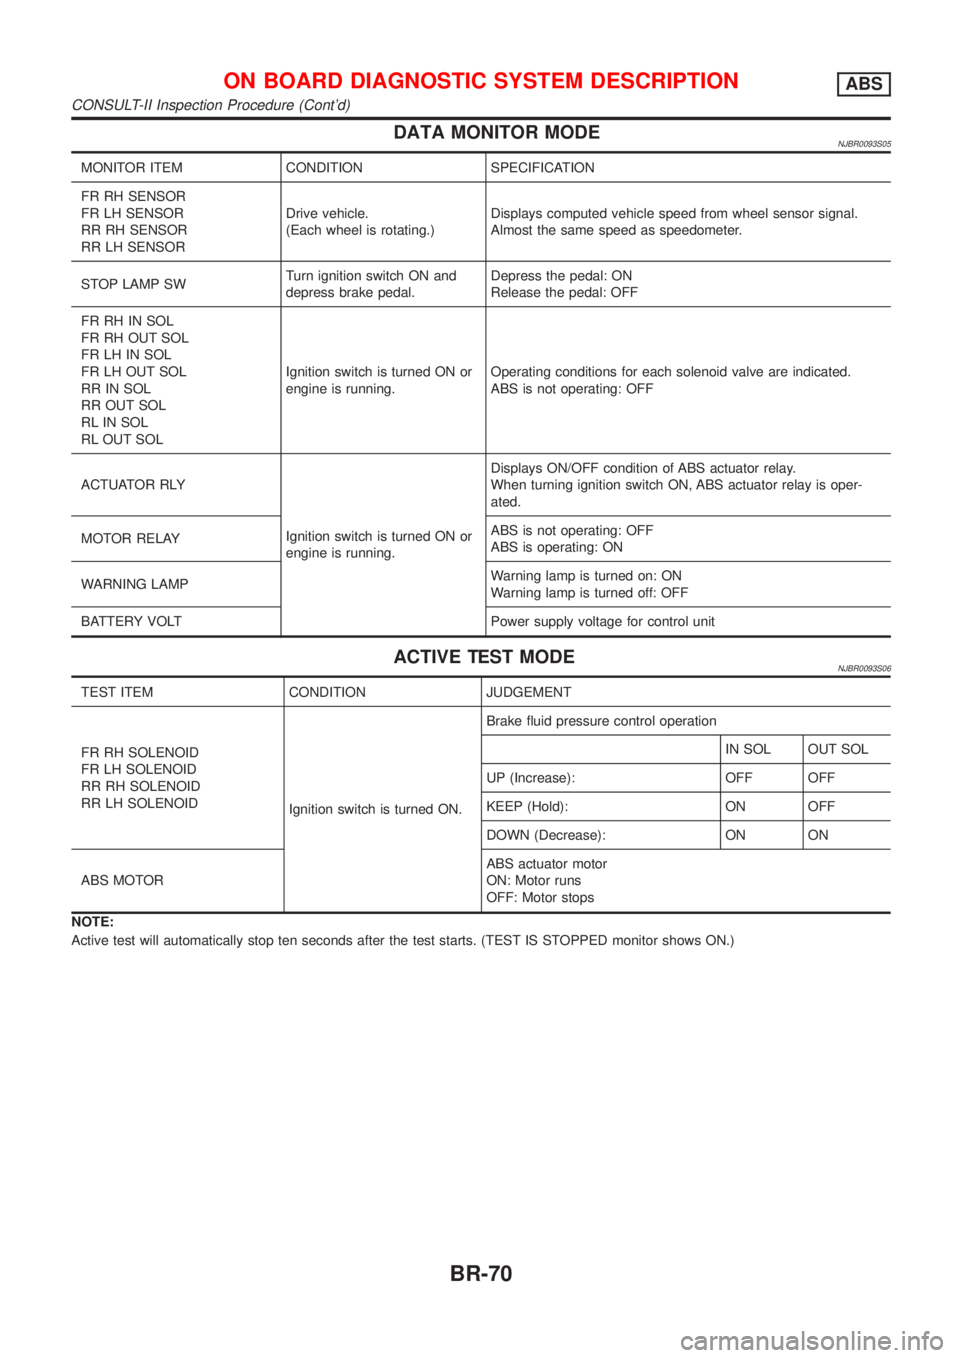
DATA MONITOR MODENJBR0093S05
MONITOR ITEM CONDITION SPECIFICATION
FR RH SENSOR
FR LH SENSOR
RR RH SENSOR
RR LH SENSORDrive vehicle.
(Each wheel is rotating.)Displays computed vehicle speed from wheel sensor signal.
Almost the same speed as speedometer.
STOP LAMP SWTurn ignition switch ON and
depress brake pedal.Depress the pedal: ON
Release the pedal: OFF
FR RH IN SOL
FR RH OUT SOL
FR LH IN SOL
FR LH OUT SOL
RR IN SOL
RR OUT SOL
RL IN SOL
RL OUT SOLIgnition switch is turned ON or
engine is running.Operating conditions for each solenoid valve are indicated.
ABS is not operating: OFF
ACTUATOR RLY
Ignition switch is turned ON or
engine is running.Displays ON/OFF condition of ABS actuator relay.
When turning ignition switch ON, ABS actuator relay is oper-
ated.
MOTOR RELAYABS is not operating: OFF
ABS is operating: ON
WARNING LAMPWarning lamp is turned on: ON
Warning lamp is turned off: OFF
BATTERY VOLT Power supply voltage for control unit
ACTIVE TEST MODENJBR0093S06
TEST ITEM CONDITION JUDGEMENT
FR RH SOLENOID
FR LH SOLENOID
RR RH SOLENOID
RR LH SOLENOID
Ignition switch is turned ON.Brake fluid pressure control operation
IN SOL OUT SOL
UP (Increase): OFF OFF
KEEP (Hold): ON OFF
DOWN (Decrease): ON ON
ABS MOTORABS actuator motor
ON: Motor runs
OFF: Motor stops
NOTE:
Active test will automatically stop ten seconds after the test starts. (TEST IS STOPPED monitor shows ON.)
ON BOARD DIAGNOSTIC SYSTEM DESCRIPTIONABS
CONSULT-II Inspection Procedure (Cont'd)
BR-70
Page 587 of 2898
SEF233G
SEF234G
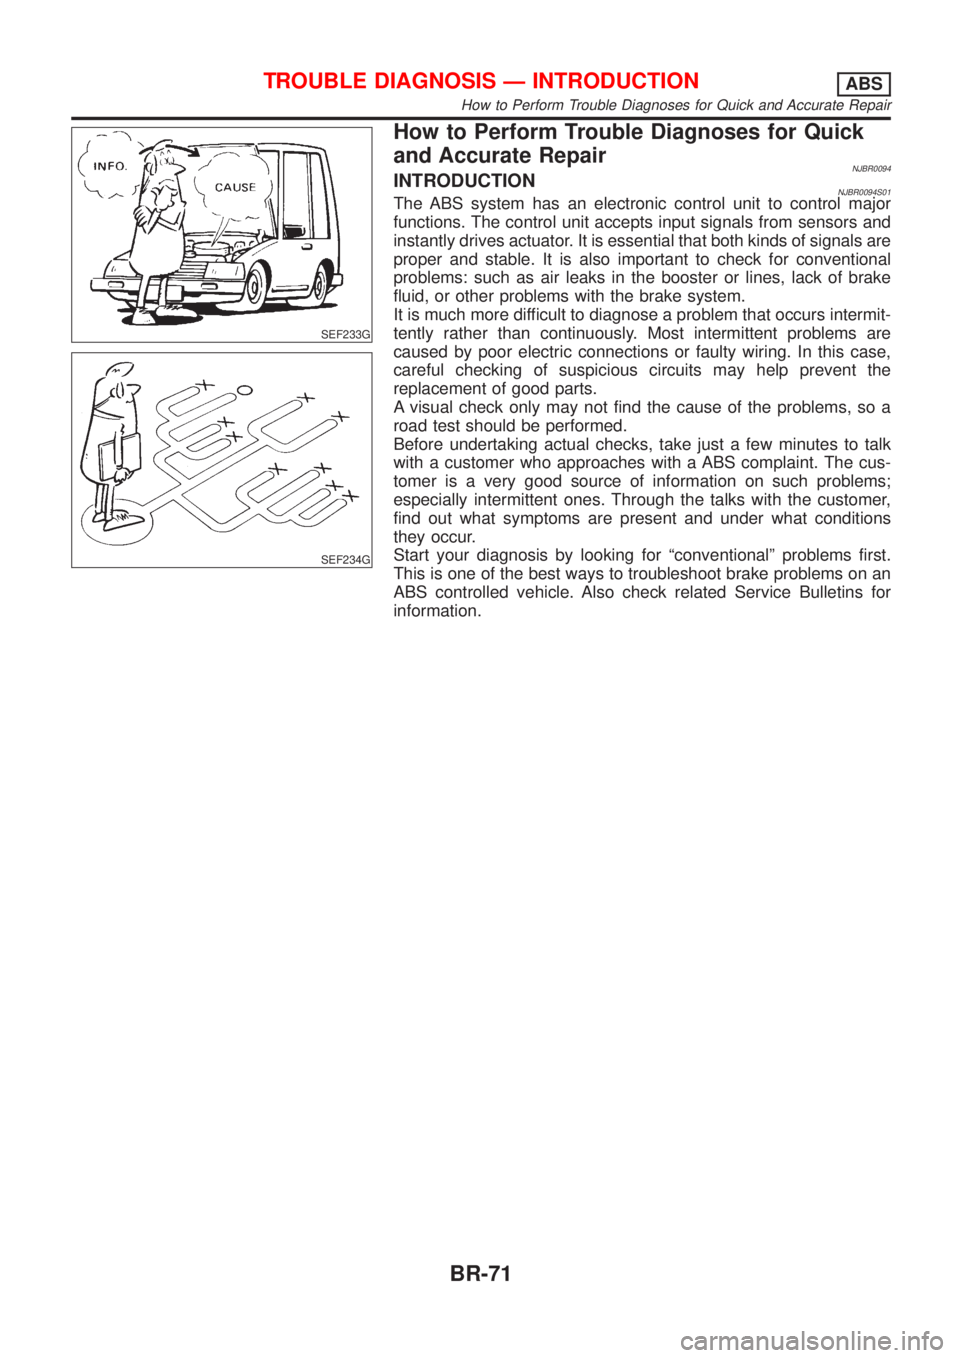
How to Perform Trouble Diagnoses for Quick
and Accurate Repair
NJBR0094INTRODUCTIONNJBR0094S01The ABS system has an electronic control unit to control major
functions. The control unit accepts input signals from sensors and
instantly drives actuator. It is essential that both kinds of signals are
proper and stable. It is also important to check for conventional
problems: such as air leaks in the booster or lines, lack of brake
fluid, or other problems with the brake system.
It is much more difficult to diagnose a problem that occurs intermit-
tently rather than continuously. Most intermittent problems are
caused by poor electric connections or faulty wiring. In this case,
careful checking of suspicious circuits may help prevent the
replacement of good parts.
A visual check only may not find the cause of the problems, so a
road test should be performed.
Before undertaking actual checks, take just a few minutes to talk
with a customer who approaches with a ABS complaint. The cus-
tomer is a very good source of information on such problems;
especially intermittent ones. Through the talks with the customer,
find out what symptoms are present and under what conditions
they occur.
Start your diagnosis by looking for ªconventionalº problems first.
This is one of the best ways to troubleshoot brake problems on an
ABS controlled vehicle. Also check related Service Bulletins for
information.
TROUBLE DIAGNOSIS Ð INTRODUCTIONABS
How to Perform Trouble Diagnoses for Quick and Accurate Repair
BR-71
Page 592 of 2898
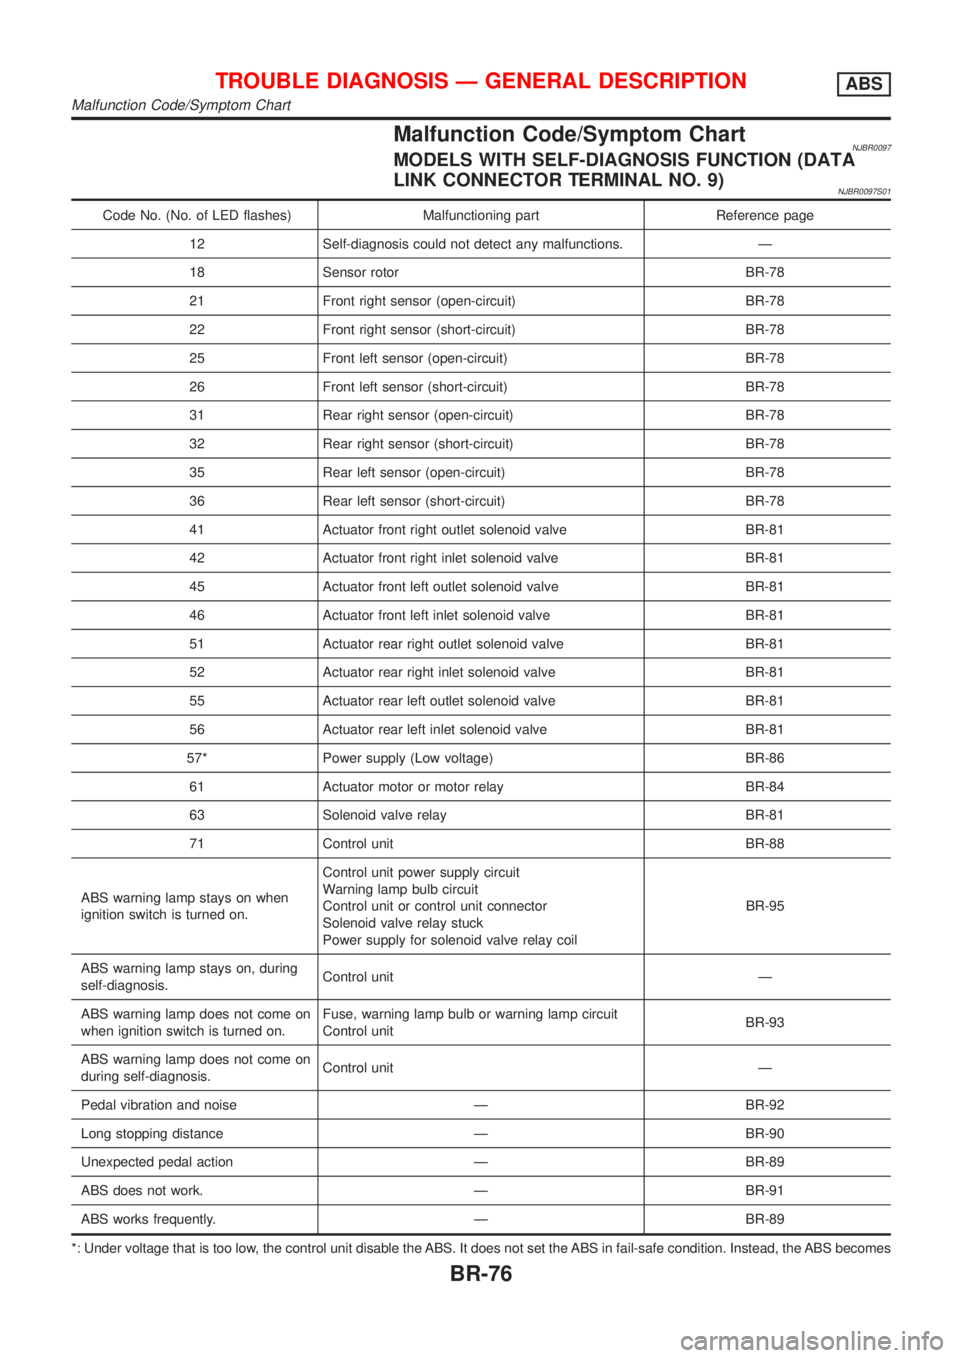
Malfunction Code/Symptom ChartNJBR0097MODELS WITH SELF-DIAGNOSIS FUNCTION (DATA
LINK CONNECTOR TERMINAL NO. 9)
NJBR0097S01
Code No. (No. of LED flashes) Malfunctioning part Reference page
12 Self-diagnosis could not detect any malfunctions. Ð
18 Sensor rotor BR-78
21 Front right sensor (open-circuit) BR-78
22 Front right sensor (short-circuit) BR-78
25 Front left sensor (open-circuit) BR-78
26 Front left sensor (short-circuit) BR-78
31 Rear right sensor (open-circuit) BR-78
32 Rear right sensor (short-circuit) BR-78
35 Rear left sensor (open-circuit) BR-78
36 Rear left sensor (short-circuit) BR-78
41 Actuator front right outlet solenoid valve BR-81
42 Actuator front right inlet solenoid valve BR-81
45 Actuator front left outlet solenoid valve BR-81
46 Actuator front left inlet solenoid valve BR-81
51 Actuator rear right outlet solenoid valve BR-81
52 Actuator rear right inlet solenoid valve BR-81
55 Actuator rear left outlet solenoid valve BR-81
56 Actuator rear left inlet solenoid valve BR-81
57* Power supply (Low voltage) BR-86
61 Actuator motor or motor relay BR-84
63 Solenoid valve relay BR-81
71 Control unit BR-88
ABS warning lamp stays on when
ignition switch is turned on.Control unit power supply circuit
Warning lamp bulb circuit
Control unit or control unit connector
Solenoid valve relay stuck
Power supply for solenoid valve relay coilBR-95
ABS warning lamp stays on, during
self-diagnosis.Control unit Ð
ABS warning lamp does not come on
when ignition switch is turned on.Fuse, warning lamp bulb or warning lamp circuit
Control unitBR-93
ABS warning lamp does not come on
during self-diagnosis.Control unit Ð
Pedal vibration and noise Ð BR-92
Long stopping distance Ð BR-90
Unexpected pedal action Ð BR-89
ABS does not work. Ð BR-91
ABS works frequently. Ð BR-89
*: Under voltage that is too low, the control unit disable the ABS. It does not set the ABS in fail-safe condition. Instead, the ABS becomes
TROUBLE DIAGNOSIS Ð GENERAL DESCRIPTIONABS
Malfunction Code/Symptom Chart
BR-76