2001 NISSAN ALMERA brake
[x] Cancel search: brakePage 5 of 2898

Component Inspection .............................................251
DTC P0755 SHIFT SOLENOID VALVE B..................252
Description ...............................................................252
Wiring Diagram - AT - SSV/B ..................................254
Diagnostic Procedure ..............................................255
Component Inspection .............................................257
DTC P1705 THROTTLE POSITION SENSOR...........258
Description ...............................................................258
Wiring Diagram - AT - TPS ......................................261
Diagnostic Procedure ..............................................263
Component Inspection .............................................267
DTC P1760 OVERRUN CLUTCH SOLENOID
VALVE..........................................................................268
Description ...............................................................268
Wiring Diagram - AT - OVRCSV..............................270
Diagnostic Procedure ..............................................271
Component Inspection .............................................273
DTC BATT/FLUID TEMP SEN (A/T FLUID TEMP
SENSOR CIRCUIT AND TCM POWER SOURCE)....274
Description ...............................................................274
Wiring Diagram - AT - BA/FTS ................................276
Diagnostic Procedure ..............................................277
Component Inspection .............................................280
DTC VHCL SPEED SEN.MTR VEHICLE SPEED
SENSOR.MTR..............................................................281
Description ...............................................................281
Wiring Diagram - AT - VSSMTR ..............................283
Diagnostic Procedure ..............................................285
DTC CONTROL UNIT (RAM), CONTROL UNIT
(ROM)...........................................................................286
Description ...............................................................286
Diagnostic Procedure ..............................................286
DTC CONTROL UNIT (EEP ROM).............................288
Description ...............................................................288
Diagnostic Procedure ..............................................289
TROUBLE DIAGNOSES FOR SYMPTOMS...............290
Wiring Diagram - AT - NONDTC/General and
Except for Euro-OBD ...............................................290
Wiring Diagram - AT - NONDTC/EURO-OBD .........292
1. O/D OFF Indicator Lamp Does Not Come On....296
2. Engine Cannot Be Started In²P²and²N²
Position ....................................................................299
3. In²P²Position, Vehicle Moves Forward Or
Backward When Pushed .........................................300
4. In²N²Position, Vehicle Moves ...........................301
5. Large Shock.²N²->²R²Position .......................303
6. Vehicle Does Not Creep Backward In²R²
Position ....................................................................305
7. Vehicle Does Not Creep Forward In²D²,²2²
Or²1²Position .........................................................3088. Vehicle Cannot Be Started From D
1................... 311
9. A/T Does Not Shift: D
1-> D2Or Does Not
Kickdown: D
4-> D2..................................................314
10. A/T Does Not Shift: D
2-> D3.............................317
11. A/T Does Not Shift: D
3-> D4.............................320
12. A/T Does Not Perform Lock-up .........................323
13. A/T Does Not Hold Lock-up Condition ..............325
14. Lock-up Is Not Released ...................................327
15. Engine Speed Does Not Return To Idle (Light
Braking D
4-> D3).....................................................328
16. Vehicle Does Not Start From D
1.......................330
17. A/T Does Not Shift: D
4-> D3, When
Overdrive Control Switch²ON²->²OFF²...............331
18. A/T Does Not Shift: D
3-> 22, When Selector
Lever²D²->²2²Position.........................................332
19. A/T Does Not Shift: 2
2-> 11, When Selector
Lever²2²->²1²Position .........................................333
20. Vehicle Does Not Decelerate By Engine
Brake........................................................................334
21. TCM Self-diagnosis Does Not Activate (PNP,
Overdrive Control and Throttle Position Switches
Circuit Checks) ........................................................334
A/T SHIFT LOCK SYSTEM.........................................343
Description ...............................................................343
Shift Lock System Electrical Parts Location............343
Wiring Diagram - SHIFT -........................................344
Diagnostic Procedure ..............................................345
KEY INTERLOCK CABLE..........................................349
Components.............................................................349
Removal ...................................................................349
Installation ................................................................350
ON-VEHICLE SERVICE..............................................351
Control Valve Assembly and Accumulators .............351
Control Cable Adjustment ........................................352
Park/Neutral Position (PNP) Switch Adjustment .....352
Differential Side Oil Seal Replacement ...................353
Revolution Sensor Replacement .............................353
REMOVAL AND INSTALLATION...............................354
Removal ...................................................................354
Installation ................................................................355
OVERHAUL.................................................................357
Components-1 3AX00, 3AX01, 3AX19, 3AX63
and 3AX64 models ..................................................357
Components-1 3AX10 and 3AX18 models .............358
Components-2 3AX00, 3AX01, 3AX19, 3AX63
and 3AX64 models ..................................................359
Components-2 3AX10 and 3AX18 models .............360
Components-3 3AX00, 3AX01, 3AX19, 3AX63
and 3AX64 models ..................................................361
Components-3 3AX10 and 3AX18 models .............362
Oil Channel ..............................................................363
CONTENTS(Cont'd)
AT-3
Page 6 of 2898

Locations of Adjusting Shims, Needle Bearings,
Thrust Washers and Snap Rings - 3AX00, 01,
19, 63 and 64 models..............................................364
Locations of Adjusting Shims, Needle Bearings,
Thrust Washers and Snap Rings - 3AX10 and
3AX18 models .........................................................365
DISASSEMBLY............................................................366
REPAIR FOR COMPONENT PARTS.........................381
Manual Shaft............................................................381
Oil Pump ..................................................................384
Control Valve Assembly ...........................................388
Control Valve Upper Body .......................................397
Control Valve Lower Body .......................................401
Reverse Clutch ........................................................403
High Clutch ..............................................................407
Forward Clutch and Overrun Clutch........................412
Low & Reverse Brake..............................................419
Rear Internal Gear, Forward Clutch Hub and
Overrun Clutch Hub .................................................423
O/Shaft, O/Gear, I/Gear, R/Pinion Gear and B/
Retainer - 3AX00, 01, 19, 63 and 64 models .........427
Output Shaft, Idler Gear, Reduction Pinion Gear
and Bearing Retainer - 3AX10 and 3AX18
models .....................................................................432
Band Servo Piston Assembly ..................................437
Final Drive................................................................442
ASSEMBLY..................................................................446
Assembly (1) ............................................................446
Adjustment (1) .........................................................447
Assembly (2) ............................................................455Adjustment (2) .........................................................459
Assembly (3) ............................................................462
Assembly (4) ............................................................465
SERVICE DATA AND SPECIFICATIONS (SDS).......470
General Specifications .............................................470
Shift Schedule..........................................................470
Stall Revolution ........................................................473
Line Pressure...........................................................473
Control Valves..........................................................474
Clutch and Brakes ...................................................474
Clutch and Brake Return Springs............................477
Oil Pump ..................................................................477
Input Shaft ...............................................................478
Planetary Carrier......................................................478
Final Drive................................................................478
Reduction Pinion Gear ............................................480
Output Shaft - 3AX00, 3AX01, 3AX19, 3AX63
and 3AX64 models ..................................................481
Output Shaft - 3AX10 and 3AX18 models ..............483
Bearing Retainer ......................................................484
Total End Play..........................................................484
Reverse Clutch End Play ........................................484
Accumulator .............................................................484
Band Servo ..............................................................485
Removal and Installation .........................................485
Shift Solenoid Valves ...............................................485
Resistance ...............................................................485
ATF Temp. Sensor ...................................................485
Revolution Sensor ...................................................485
Dropping Resistor ....................................................485
CONTENTS(Cont'd)
AT-4
Page 17 of 2898

SMA827CA
Checking A/T FluidNJAT02281. Warm up engine.
2. Check for fluid leakage.
3. Before driving, fluid level can be checked at fluid temperatures
of 30 to 50ÉC (86 to 122ÉF) using ªCOLDº range on dipstick.
a. Park vehicle on level surface and set parking brake.
b. Start engine and move selector lever through each gear posi-
tion. Leave selector lever in ªPº position.
c. Check fluid level with engine idling.
d. Remove dipstick and note reading. If level is at low side of
either range, and fluid to the charging pipe.
e. Re-insert dipstick into charging pipe as far as it will go.
f. Remove dipstick and note reading. If reading is at low side of
range, add fluid to the charging pipe.
Do not overfill.
4. Drive vehicle for approximately 5 minutes in urban areas.
5. Re-check fluid level at fluid temperatures of 50 to 80ÉC (122
to 176ÉF) using ªHOTº range on dipstick.
SMA853B
6. Check fluid condition.
+If fluid is very dark or smells burned, refer to AT section for
checking operation of A/T. Flush cooling system after repair of
A/T.
+If A/T fluid contains frictional material (clutches, bands, etc.),
replace radiator and flush cooler line using cleaning solvent
and compressed air after repair of A/T. Refer to LC-16, ªRadia-
torº.
SMA027D
Changing A/T FluidNJAT02291. Warm up A/T fluid.
2. Stop engine.
3. Drain A/T fluid from drain plug and refill with new A/T fluid.
Always refill same volume with drained fluid.
Fluid grade:
Nissan Matic ªDº or Genuine Nissan Automatic
Transmission Fluid. Refer to ªRECOMMENDED FLU-
IDS AND LUBRICANTSº, MA-16.
Fluid capacity (With torque converter):
7.0!(6-1/8 Imp qt)
Drain plug:
: 29 - 39 N´m (3.0 - 4.0 kg-m, 22 - 29 ft-lb)
4. Run engine at idle speed for five minutes.
5. Check fluid level and condition. Refer to ªChecking A/T Fluidº.
If fluid is still dirty, repeat steps 2 through 5.
A/T FLUID
Checking A/T Fluid
AT-15
Page 24 of 2898

Shift MechanismNJAT0013CONSTRUCTIONNJAT0013S01
SAT998I
1. Torque converter
2. Oil pump
3. Input shaft
4. Brake band
5. Reverse clutch
6. High clutch
7. Front sun gear
8. Front pinion gear9. Front internal gear
10. Front planetary carrier
11. Rear sun gear
12. Rear pinion gear
13. Rear internal gear
14. Rear planetary carrier
15. Forward clutch
16. Forward one-way clutch17. Overrun clutch
18. Low one-way clutch
19. Low & reverse brake
20. Parking pawl
21. Parking gear
22. Output shaft
23. Idle gear
24. Output gear
FUNCTION OF CLUTCH AND BRAKENJAT0013S03
Clutch and brake components Abbr. Function
5Reverse clutch R/C To transmit input power to front sun gear7.
6High clutch H/C To transmit input power to front planetary carrier10.
15Forward clutch F/C To connect front planetary carrier10with forward one-way clutch16.
17Overrun clutch O/C To connect front planetary carrier10with rear internal gear13.
4Brake band B/B To lock front sun gear7.
16Forward one-way clutch F/O.C When forward clutch15is engaged, to stop rear internal gear13from rotat-
ing in opposite direction against engine revolution.
18Low one-way clutch L/O.C To stop front planetary carrier10from rotating in opposite direction against
engine revolution.
19Low & reverse brake L & R/B To lock front planetary carrier10.
OVERALL SYSTEM
Shift Mechanism
AT-22
Page 25 of 2898

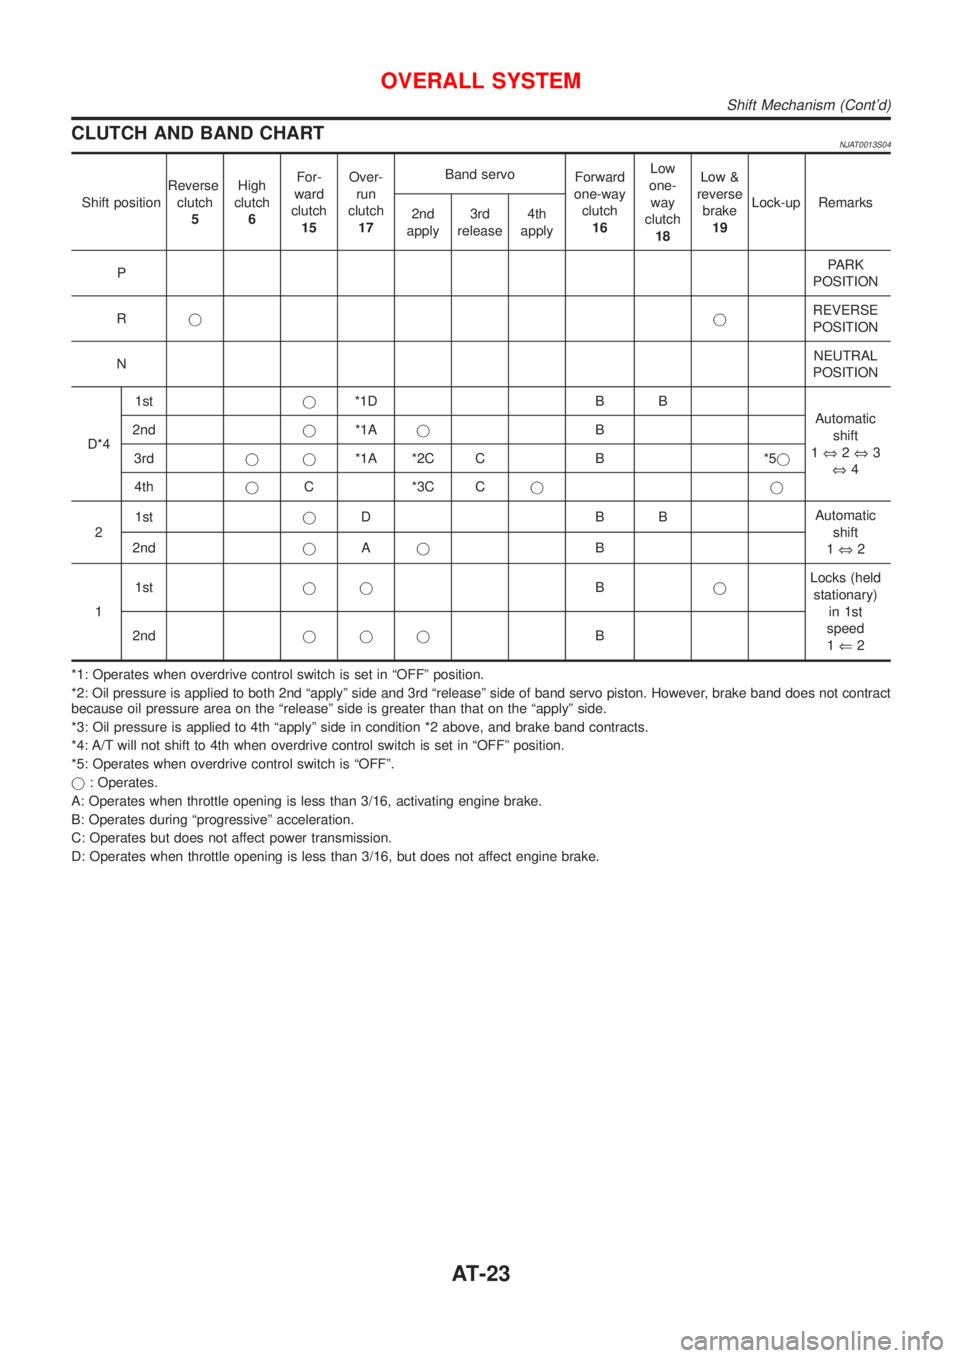
CLUTCH AND BAND CHARTNJAT0013S04
Shift positionReverse
clutch
5High
clutch
6For-
ward
clutch
15Over-
run
clutch
17Band servo
Forward
one-way
clutch
16Low
one-
way
clutch
18Low &
reverse
brake
19Lock-up Remarks
2nd
apply3rd
release4th
apply
PPARK
POSITION
RjjREVERSE
POSITION
NNEUTRAL
POSITION
D*41stj*1D B B
Automatic
shift
1Û2Û3
Û4 2ndj*1AjB
3rdjj*1A *2C C B *5j
4thjC *3C Cjj
21stjDBBAutomatic
shift
1Û2 2ndjAjB
11stjjBjLocks (held
stationary)
in 1st
speed
1Ü2 2ndjjjB
*1: Operates when overdrive control switch is set in ªOFFº position.
*2: Oil pressure is applied to both 2nd ªapplyº side and 3rd ªreleaseº side of band servo piston. However, brake band does not contract
because oil pressure area on the ªreleaseº side is greater than that on the ªapplyº side.
*3: Oil pressure is applied to 4th ªapplyº side in condition *2 above, and brake band contracts.
*4: A/T will not shift to 4th when overdrive control switch is set in ªOFFº position.
*5: Operates when overdrive control switch is ªOFFº.
j: Operates.
A: Operates when throttle opening is less than 3/16, activating engine brake.
B: Operates during ªprogressiveº acceleration.
C: Operates but does not affect power transmission.
D: Operates when throttle opening is less than 3/16, but does not affect engine brake.
OVERALL SYSTEM
Shift Mechanism (Cont'd)
AT-23
Page 27 of 2898

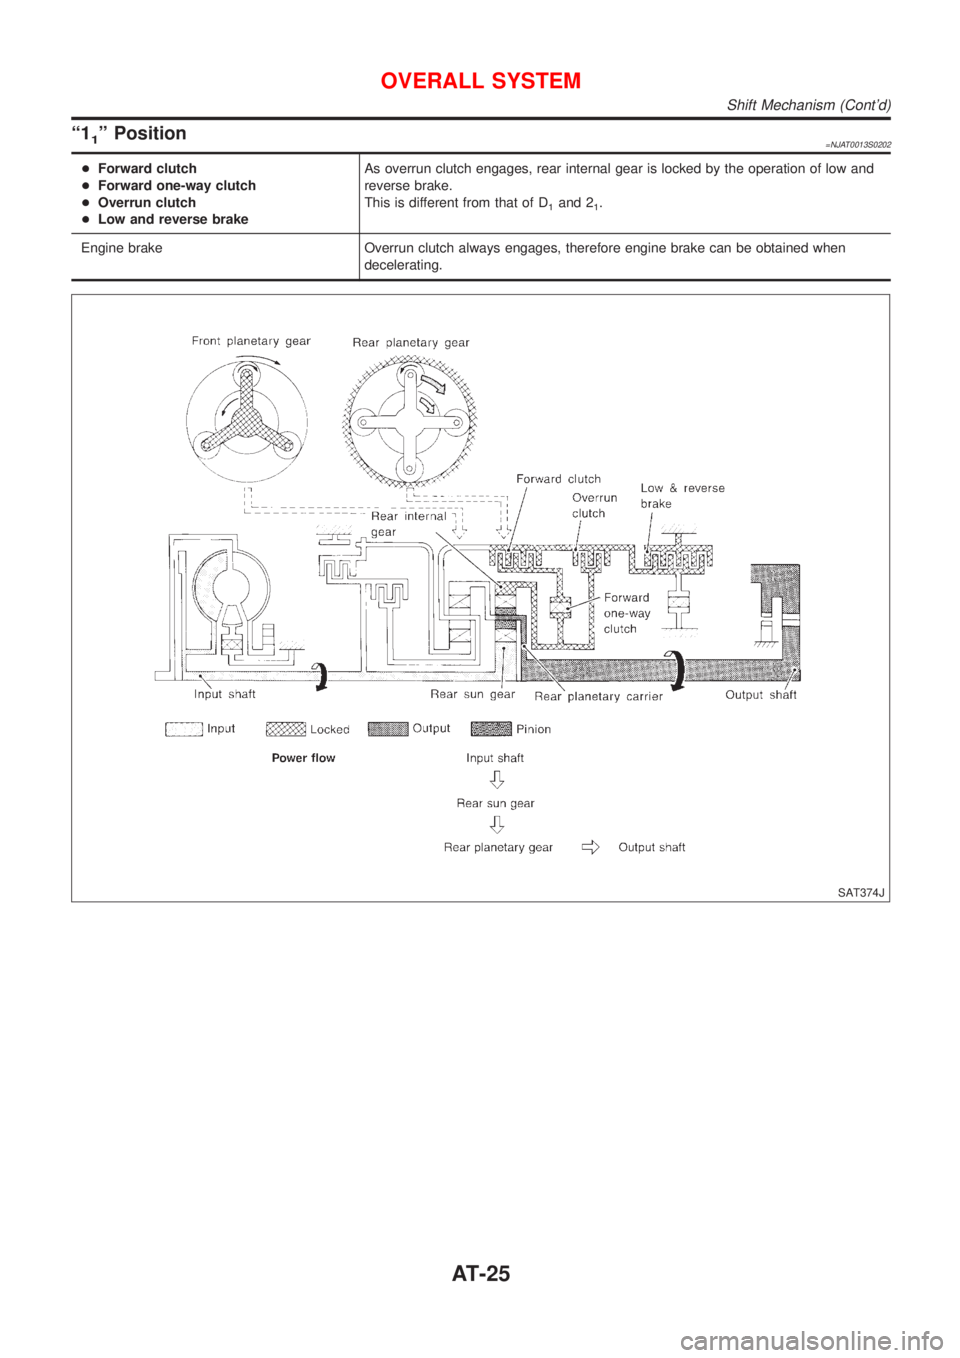
ª11º Position=NJAT0013S0202
+Forward clutch
+Forward one-way clutch
+Overrun clutch
+Low and reverse brakeAs overrun clutch engages, rear internal gear is locked by the operation of low and
reverse brake.
This is different from that of D
1and 21.
Engine brake Overrun clutch always engages, therefore engine brake can be obtained when
decelerating.
SAT374J
OVERALL SYSTEM
Shift Mechanism (Cont'd)
AT-25
Page 28 of 2898

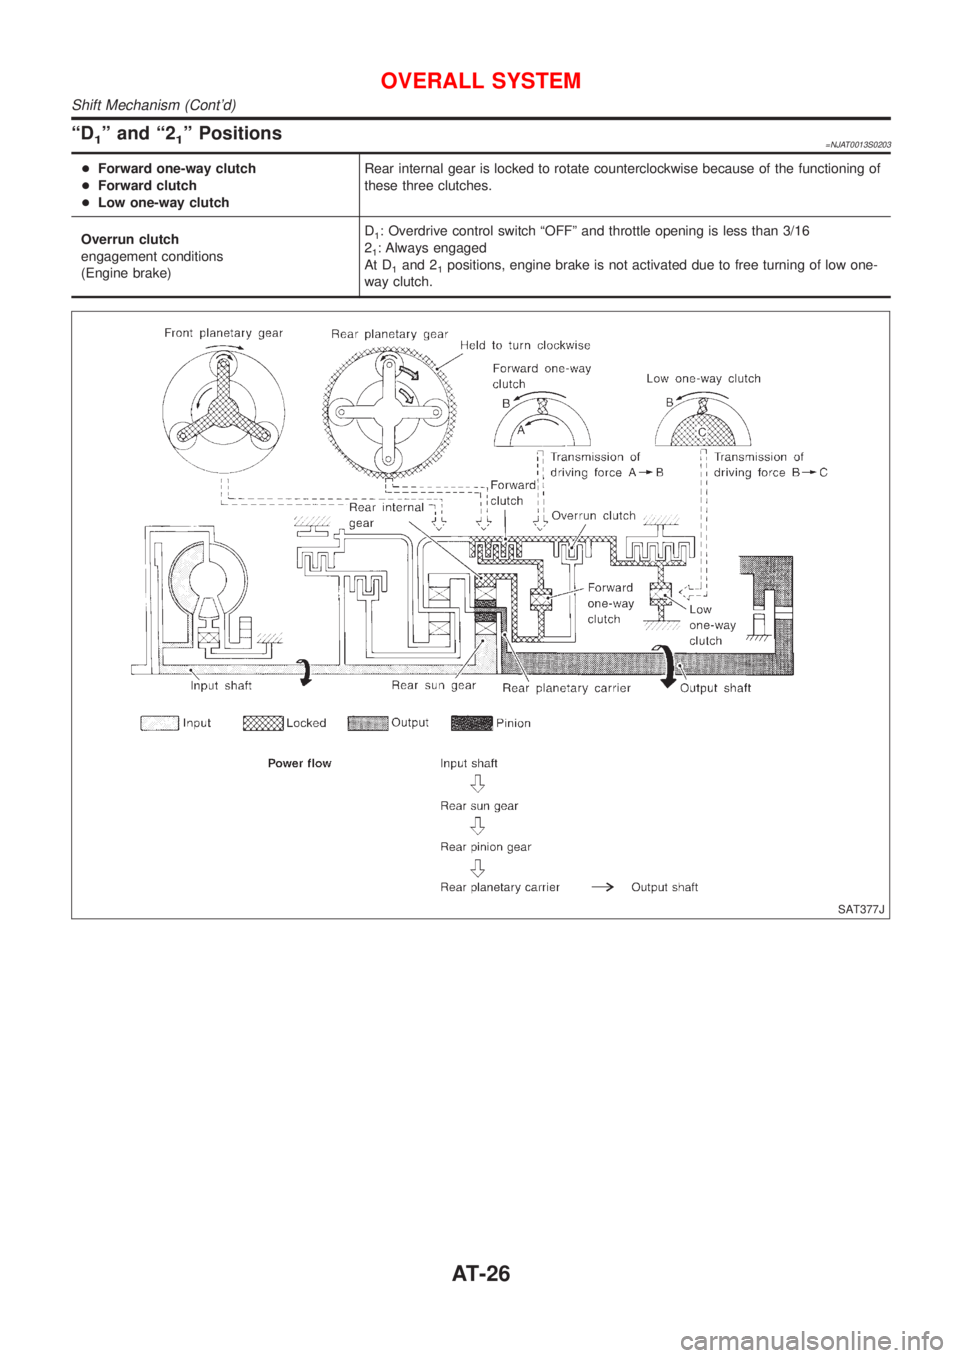
ªD1º and ª21º Positions=NJAT0013S0203
+Forward one-way clutch
+Forward clutch
+Low one-way clutchRear internal gear is locked to rotate counterclockwise because of the functioning of
these three clutches.
Overrun clutch
engagement conditions
(Engine brake)D
1: Overdrive control switch ªOFFº and throttle opening is less than 3/16
2
1: Always engaged
At D
1and 21positions, engine brake is not activated due to free turning of low one-
way clutch.
SAT377J
OVERALL SYSTEM
Shift Mechanism (Cont'd)
AT-26
Page 29 of 2898

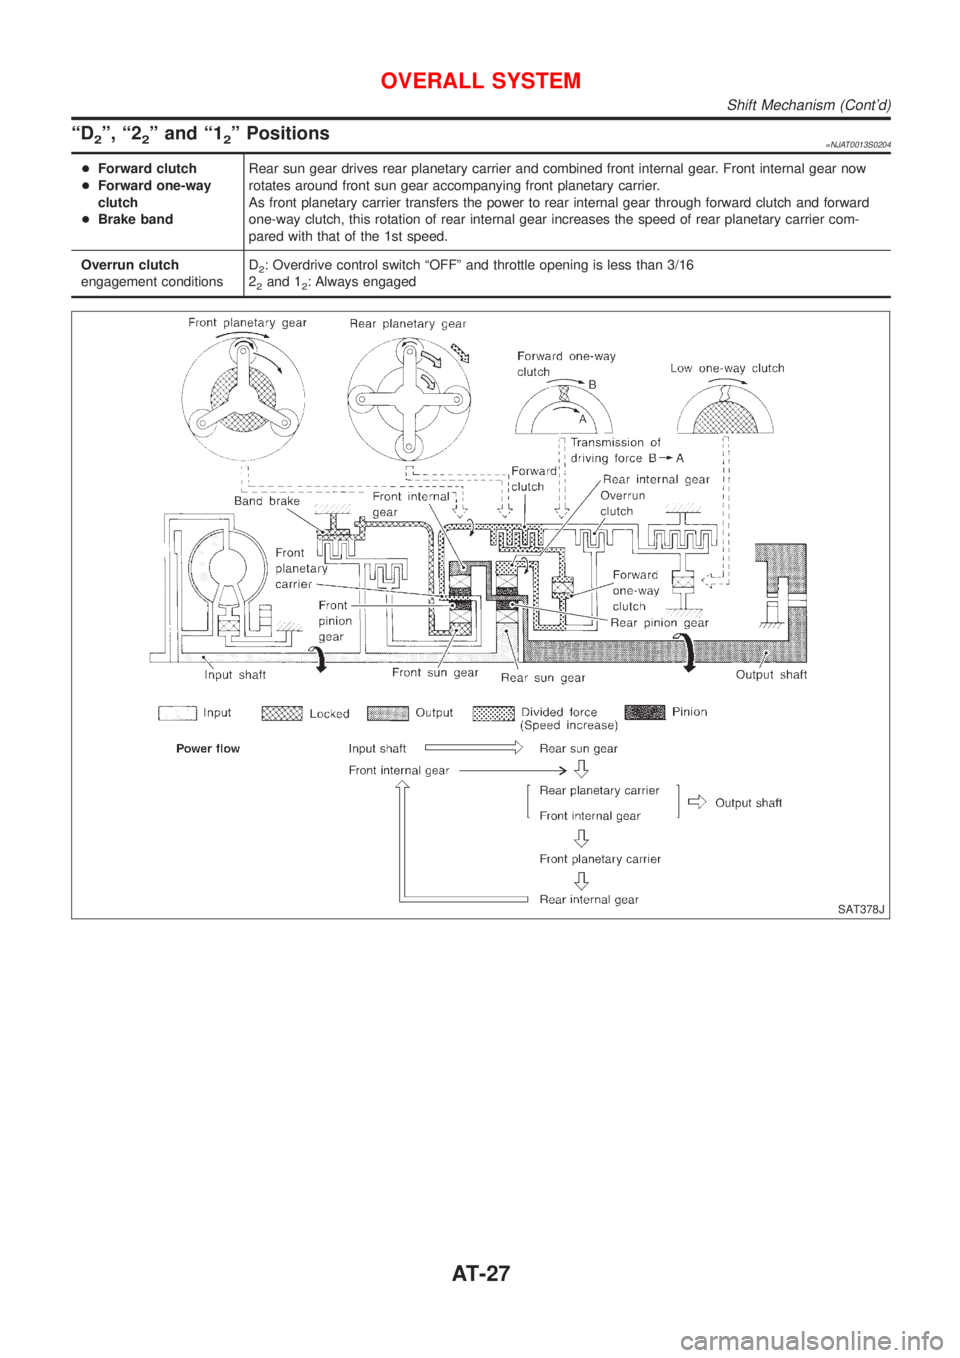
ªD2º, ª22º and ª12º Positions=NJAT0013S0204
+Forward clutch
+Forward one-way
clutch
+Brake bandRear sun gear drives rear planetary carrier and combined front internal gear. Front internal gear now
rotates around front sun gear accompanying front planetary carrier.
As front planetary carrier transfers the power to rear internal gear through forward clutch and forward
one-way clutch, this rotation of rear internal gear increases the speed of rear planetary carrier com-
pared with that of the 1st speed.
Overrun clutch
engagement conditionsD
2: Overdrive control switch ªOFFº and throttle opening is less than 3/16
2
2and 12: Always engaged
SAT378J
OVERALL SYSTEM
Shift Mechanism (Cont'd)
AT-27