2001 CHRYSLER VOYAGER engine coolant
[x] Cancel search: engine coolantPage 2442 of 4284
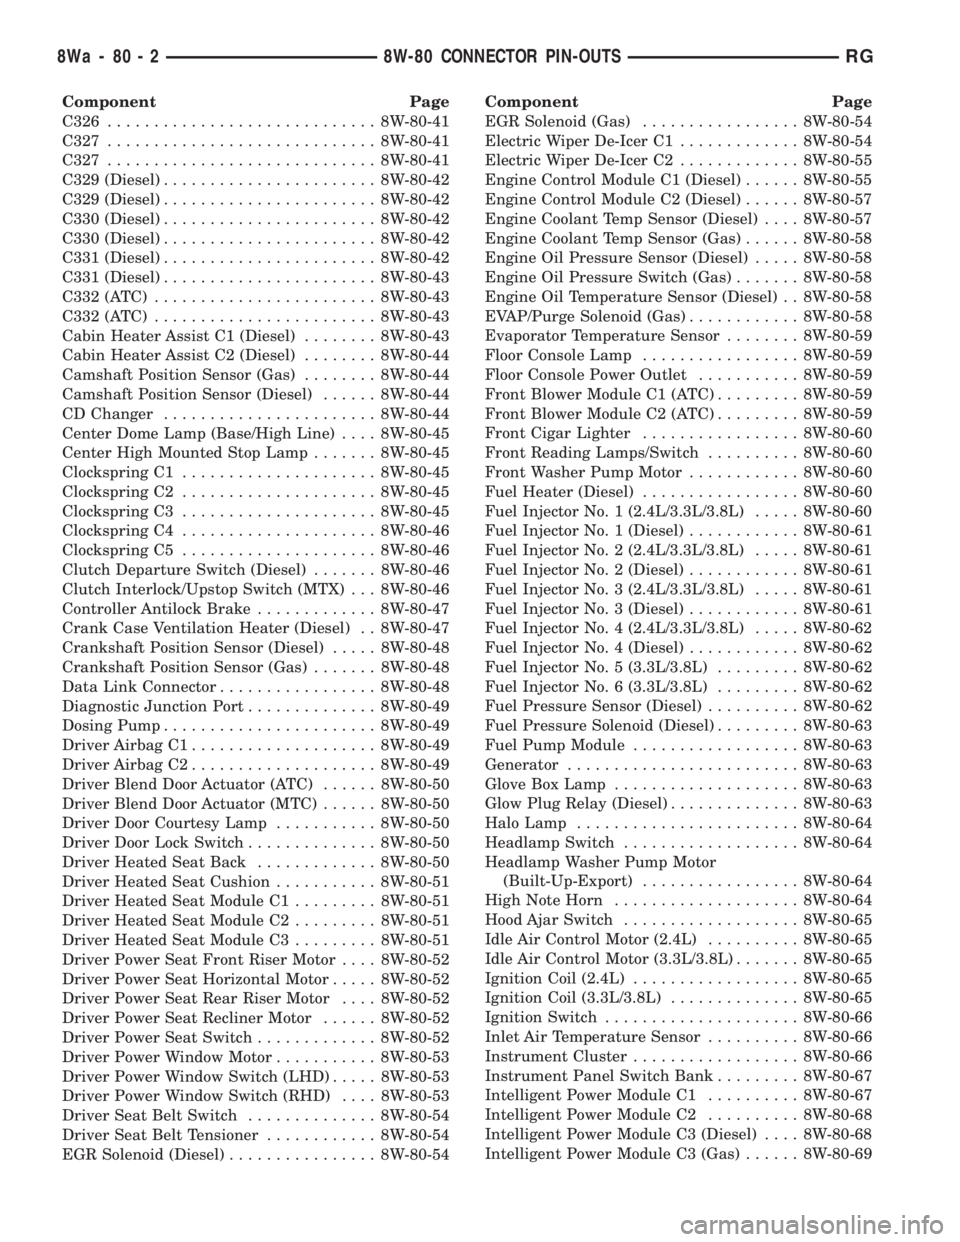
Component Page
C326............................. 8W-80-41
C327............................. 8W-80-41
C327............................. 8W-80-41
C329 (Diesel)....................... 8W-80-42
C329 (Diesel)....................... 8W-80-42
C330 (Diesel)....................... 8W-80-42
C330 (Diesel)....................... 8W-80-42
C331 (Diesel)....................... 8W-80-42
C331 (Diesel)....................... 8W-80-43
C332 (ATC)........................ 8W-80-43
C332 (ATC)........................ 8W-80-43
Cabin Heater Assist C1 (Diesel)........ 8W-80-43
Cabin Heater Assist C2 (Diesel)........ 8W-80-44
Camshaft Position Sensor (Gas)........ 8W-80-44
Camshaft Position Sensor (Diesel)...... 8W-80-44
CD Changer....................... 8W-80-44
Center Dome Lamp (Base/High Line).... 8W-80-45
Center High Mounted Stop Lamp....... 8W-80-45
Clockspring C1..................... 8W-80-45
Clockspring C2..................... 8W-80-45
Clockspring C3..................... 8W-80-45
Clockspring C4..................... 8W-80-46
Clockspring C5..................... 8W-80-46
Clutch Departure Switch (Diesel)....... 8W-80-46
Clutch Interlock/Upstop Switch (MTX) . . . 8W-80-46
Controller Antilock Brake............. 8W-80-47
Crank Case Ventilation Heater (Diesel) . . 8W-80-47
Crankshaft Position Sensor (Diesel)..... 8W-80-48
Crankshaft Position Sensor (Gas)....... 8W-80-48
Data Link Connector................. 8W-80-48
Diagnostic Junction Port.............. 8W-80-49
Dosing Pump....................... 8W-80-49
Driver Airbag C1.................... 8W-80-49
Driver Airbag C2.................... 8W-80-49
Driver Blend Door Actuator (ATC)...... 8W-80-50
Driver Blend Door Actuator (MTC)...... 8W-80-50
Driver Door Courtesy Lamp........... 8W-80-50
Driver Door Lock Switch.............. 8W-80-50
Driver Heated Seat Back............. 8W-80-50
Driver Heated Seat Cushion........... 8W-80-51
Driver Heated Seat Module C1......... 8W-80-51
Driver Heated Seat Module C2......... 8W-80-51
Driver Heated Seat Module C3......... 8W-80-51
Driver Power Seat Front Riser Motor.... 8W-80-52
Driver Power Seat Horizontal Motor..... 8W-80-52
Driver Power Seat Rear Riser Motor.... 8W-80-52
Driver Power Seat Recliner Motor...... 8W-80-52
Driver Power Seat Switch............. 8W-80-52
Driver Power Window Motor........... 8W-80-53
Driver Power Window Switch (LHD)..... 8W-80-53
Driver Power Window Switch (RHD).... 8W-80-53
Driver Seat Belt Switch.............. 8W-80-54
Driver Seat Belt Tensioner............ 8W-80-54
EGR Solenoid (Diesel)................ 8W-80-54Component Page
EGR Solenoid (Gas)................. 8W-80-54
Electric Wiper De-Icer C1............. 8W-80-54
Electric Wiper De-Icer C2............. 8W-80-55
Engine Control Module C1 (Diesel)...... 8W-80-55
Engine Control Module C2 (Diesel)...... 8W-80-57
Engine Coolant Temp Sensor (Diesel).... 8W-80-57
Engine Coolant Temp Sensor (Gas)...... 8W-80-58
Engine Oil Pressure Sensor (Diesel)..... 8W-80-58
Engine Oil Pressure Switch (Gas)....... 8W-80-58
Engine Oil Temperature Sensor (Diesel) . . 8W-80-58
EVAP/Purge Solenoid (Gas)............ 8W-80-58
Evaporator Temperature Sensor........ 8W-80-59
Floor Console Lamp................. 8W-80-59
Floor Console Power Outlet........... 8W-80-59
Front Blower Module C1 (ATC)......... 8W-80-59
Front Blower Module C2 (ATC)......... 8W-80-59
Front Cigar Lighter................. 8W-80-60
Front Reading Lamps/Switch.......... 8W-80-60
Front Washer Pump Motor............ 8W-80-60
Fuel Heater (Diesel)................. 8W-80-60
Fuel Injector No. 1 (2.4L/3.3L/3.8L)..... 8W-80-60
Fuel Injector No. 1 (Diesel)............ 8W-80-61
Fuel Injector No. 2 (2.4L/3.3L/3.8L)..... 8W-80-61
Fuel Injector No. 2 (Diesel)............ 8W-80-61
Fuel Injector No. 3 (2.4L/3.3L/3.8L)..... 8W-80-61
Fuel Injector No. 3 (Diesel)............ 8W-80-61
Fuel Injector No. 4 (2.4L/3.3L/3.8L)..... 8W-80-62
Fuel Injector No. 4 (Diesel)............ 8W-80-62
Fuel Injector No. 5 (3.3L/3.8L)......... 8W-80-62
Fuel Injector No. 6 (3.3L/3.8L)......... 8W-80-62
Fuel Pressure Sensor (Diesel).......... 8W-80-62
Fuel Pressure Solenoid (Diesel)......... 8W-80-63
Fuel Pump Module.................. 8W-80-63
Generator......................... 8W-80-63
Glove Box Lamp.................... 8W-80-63
Glow Plug Relay (Diesel).............. 8W-80-63
Halo Lamp........................ 8W-80-64
Headlamp Switch................... 8W-80-64
Headlamp Washer Pump Motor
(Built-Up-Export)................. 8W-80-64
High Note Horn.................... 8W-80-64
Hood Ajar Switch................... 8W-80-65
Idle Air Control Motor (2.4L).......... 8W-80-65
Idle Air Control Motor (3.3L/3.8L)....... 8W-80-65
Ignition Coil (2.4L).................. 8W-80-65
Ignition Coil (3.3L/3.8L).............. 8W-80-65
Ignition Switch..................... 8W-80-66
Inlet Air Temperature Sensor.......... 8W-80-66
Instrument Cluster.................. 8W-80-66
Instrument Panel Switch Bank......... 8W-80-67
Intelligent Power Module C1.......... 8W-80-67
Intelligent Power Module C2.......... 8W-80-68
Intelligent Power Module C3 (Diesel).... 8W-80-68
Intelligent Power Module C3 (Gas)...... 8W-80-69
8Wa - 80 - 2 8W-80 CONNECTOR PIN-OUTSRG
Page 2495 of 4284
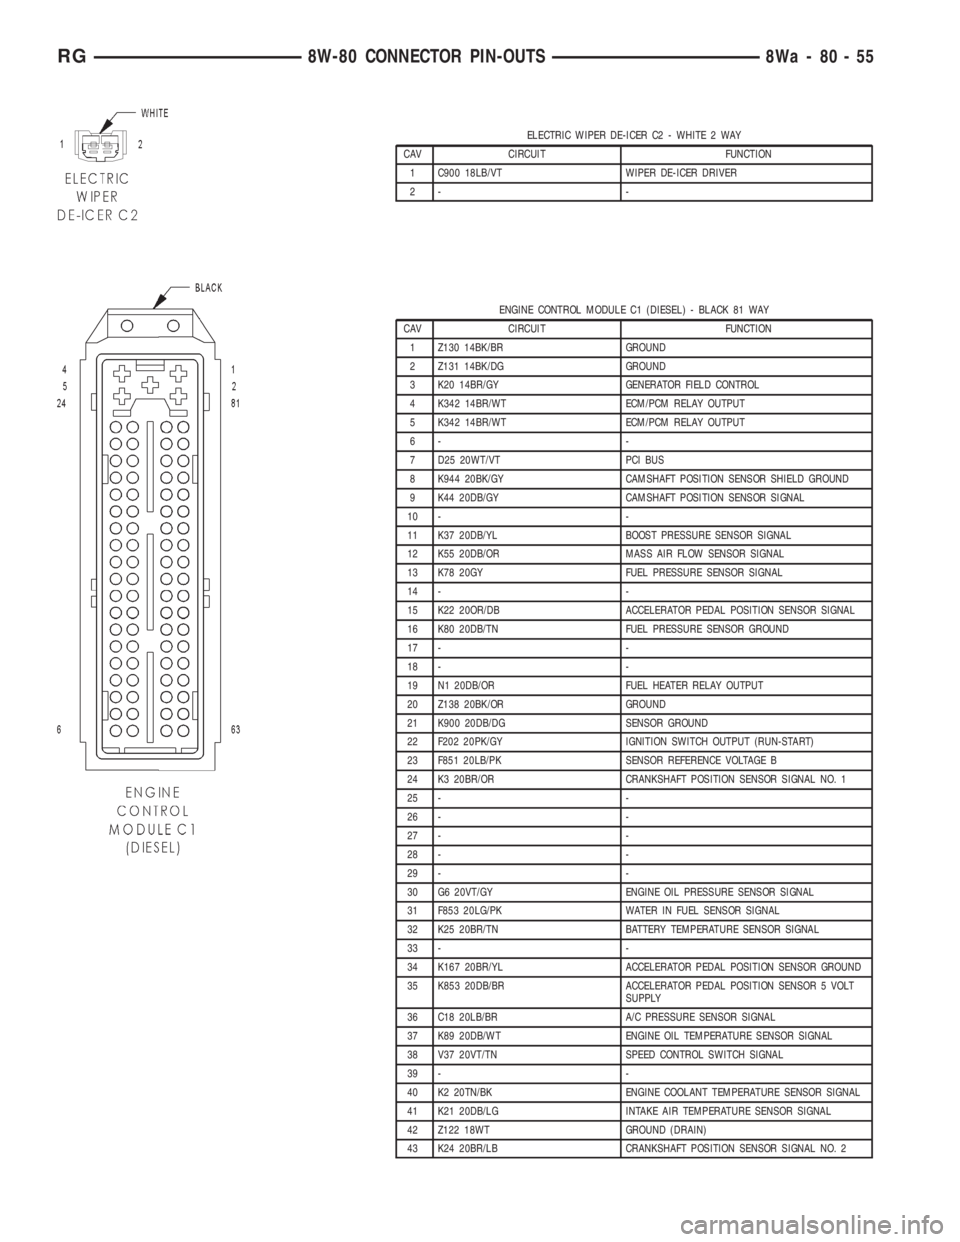
ELECTRIC WIPER DE-ICER C2 - WHITE 2 WAY
CAV CIRCUIT FUNCTION
1 C900 18LB/VT WIPER DE-ICER DRIVER
2- -
ENGINE CONTROL MODULE C1 (DIESEL) - BLACK 81 WAY
CAV CIRCUIT FUNCTION
1 Z130 14BK/BR GROUND
2 Z131 14BK/DG GROUND
3 K20 14BR/GY GENERATOR FIELD CONTROL
4 K342 14BR/WT ECM/PCM RELAY OUTPUT
5 K342 14BR/WT ECM/PCM RELAY OUTPUT
6- -
7 D25 20WT/VT PCI BUS
8 K944 20BK/GY CAMSHAFT POSITION SENSOR SHIELD GROUND
9 K44 20DB/GY CAMSHAFT POSITION SENSOR SIGNAL
10 - -
11 K37 20DB/YL BOOST PRESSURE SENSOR SIGNAL
12 K55 20DB/OR MASS AIR FLOW SENSOR SIGNAL
13 K78 20GY FUEL PRESSURE SENSOR SIGNAL
14 - -
15 K22 20OR/DB ACCELERATOR PEDAL POSITION SENSOR SIGNAL
16 K80 20DB/TN FUEL PRESSURE SENSOR GROUND
17 - -
18 - -
19 N1 20DB/OR FUEL HEATER RELAY OUTPUT
20 Z138 20BK/OR GROUND
21 K900 20DB/DG SENSOR GROUND
22 F202 20PK/GY IGNITION SWITCH OUTPUT (RUN-START)
23 F851 20LB/PK SENSOR REFERENCE VOLTAGE B
24 K3 20BR/OR CRANKSHAFT POSITION SENSOR SIGNAL NO. 1
25 - -
26 - -
27 - -
28 - -
29 - -
30 G6 20VT/GY ENGINE OIL PRESSURE SENSOR SIGNAL
31 F853 20LG/PK WATER IN FUEL SENSOR SIGNAL
32 K25 20BR/TN BATTERY TEMPERATURE SENSOR SIGNAL
33 - -
34 K167 20BR/YL ACCELERATOR PEDAL POSITION SENSOR GROUND
35 K853 20DB/BR ACCELERATOR PEDAL POSITION SENSOR 5 VOLT
SUPPLY
36 C18 20LB/BR A/C PRESSURE SENSOR SIGNAL
37 K89 20DB/WT ENGINE OIL TEMPERATURE SENSOR SIGNAL
38 V37 20VT/TN SPEED CONTROL SWITCH SIGNAL
39 - -
40 K2 20TN/BK ENGINE COOLANT TEMPERATURE SENSOR SIGNAL
41 K21 20DB/LG INTAKE AIR TEMPERATURE SENSOR SIGNAL
42 Z122 18WT GROUND (DRAIN)
43 K24 20BR/LB CRANKSHAFT POSITION SENSOR SIGNAL NO. 2
RG8W-80 CONNECTOR PIN-OUTS8Wa-80-55
Page 2497 of 4284
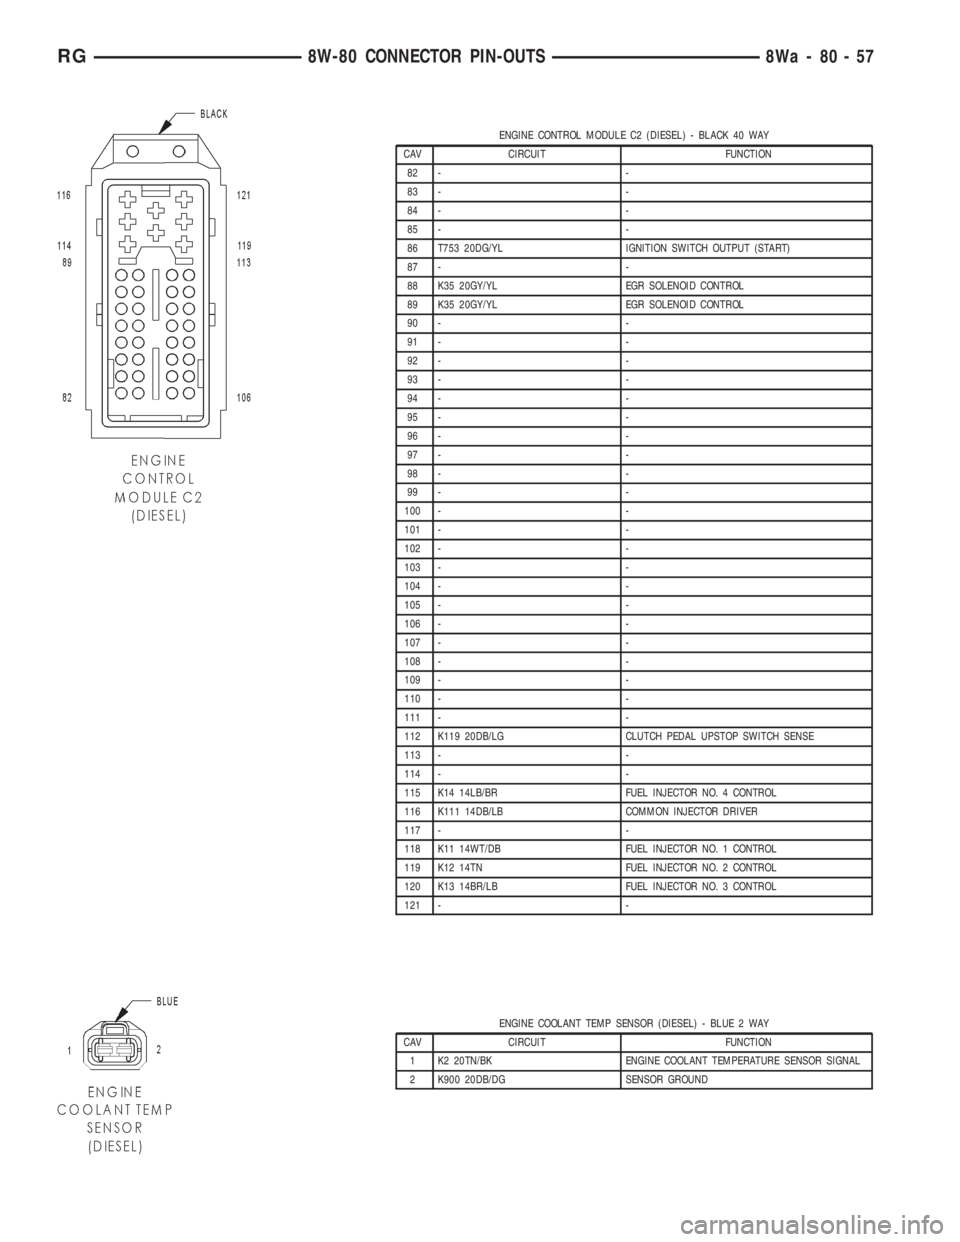
ENGINE CONTROL MODULE C2 (DIESEL) - BLACK 40 WAY
CAV CIRCUIT FUNCTION
82 - -
83 - -
84 - -
85 - -
86 T753 20DG/YL IGNITION SWITCH OUTPUT (START)
87 - -
88 K35 20GY/YL EGR SOLENOID CONTROL
89 K35 20GY/YL EGR SOLENOID CONTROL
90 - -
91 - -
92 - -
93 - -
94 - -
95 - -
96 - -
97 - -
98 - -
99 - -
100 - -
101 - -
102 - -
103 - -
104 - -
105 - -
106 - -
107 - -
108 - -
109 - -
110 - -
111 - -
112 K119 20DB/LG CLUTCH PEDAL UPSTOP SWITCH SENSE
113 - -
114 - -
115 K14 14LB/BR FUEL INJECTOR NO. 4 CONTROL
116 K111 14DB/LB COMMON INJECTOR DRIVER
117 - -
118 K11 14WT/DB FUEL INJECTOR NO. 1 CONTROL
119 K12 14TN FUEL INJECTOR NO. 2 CONTROL
120 K13 14BR/LB FUEL INJECTOR NO. 3 CONTROL
121 - -
ENGINE COOLANT TEMP SENSOR (DIESEL) - BLUE 2 WAY
CAV CIRCUIT FUNCTION
1 K2 20TN/BK ENGINE COOLANT TEMPERATURE SENSOR SIGNAL
2 K900 20DB/DG SENSOR GROUND
RG8W-80 CONNECTOR PIN-OUTS8Wa-80-57
Page 2498 of 4284
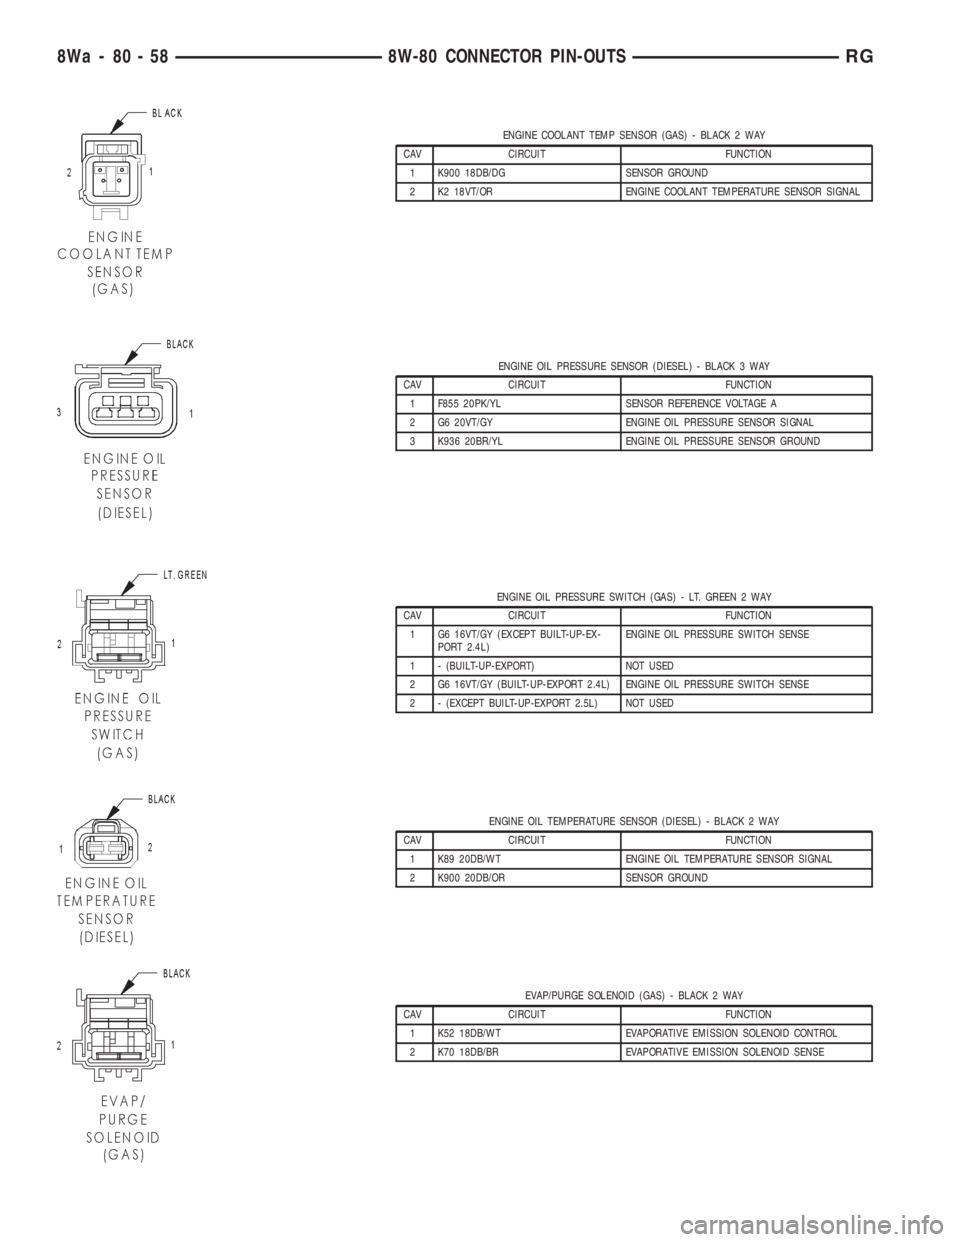
ENGINE COOLANT TEMP SENSOR (GAS) - BLACK 2 WAY
CAV CIRCUIT FUNCTION
1 K900 18DB/DG SENSOR GROUND
2 K2 18VT/OR ENGINE COOLANT TEMPERATURE SENSOR SIGNAL
ENGINE OIL PRESSURE SENSOR (DIESEL) - BLACK 3 WAY
CAV CIRCUIT FUNCTION
1 F855 20PK/YL SENSOR REFERENCE VOLTAGE A
2 G6 20VT/GY ENGINE OIL PRESSURE SENSOR SIGNAL
3 K936 20BR/YL ENGINE OIL PRESSURE SENSOR GROUND
ENGINE OIL PRESSURE SWITCH (GAS) - LT. GREEN 2 WAY
CAV CIRCUIT FUNCTION
1 G6 16VT/GY (EXCEPT BUILT-UP-EX-
PORT 2.4L)ENGINE OIL PRESSURE SWITCH SENSE
1 - (BUILT-UP-EXPORT) NOT USED
2 G6 16VT/GY (BUILT-UP-EXPORT 2.4L) ENGINE OIL PRESSURE SWITCH SENSE
2 - (EXCEPT BUILT-UP-EXPORT 2.5L) NOT USED
ENGINE OIL TEMPERATURE SENSOR (DIESEL) - BLACK 2 WAY
CAV CIRCUIT FUNCTION
1 K89 20DB/WT ENGINE OIL TEMPERATURE SENSOR SIGNAL
2 K900 20DB/OR SENSOR GROUND
EVAP/PURGE SOLENOID (GAS) - BLACK 2 WAY
CAV CIRCUIT FUNCTION
1 K52 18DB/WT EVAPORATIVE EMISSION SOLENOID CONTROL
2 K70 18DB/BR EVAPORATIVE EMISSION SOLENOID SENSE
8Wa - 80 - 58 8W-80 CONNECTOR PIN-OUTSRG
Page 2538 of 4284
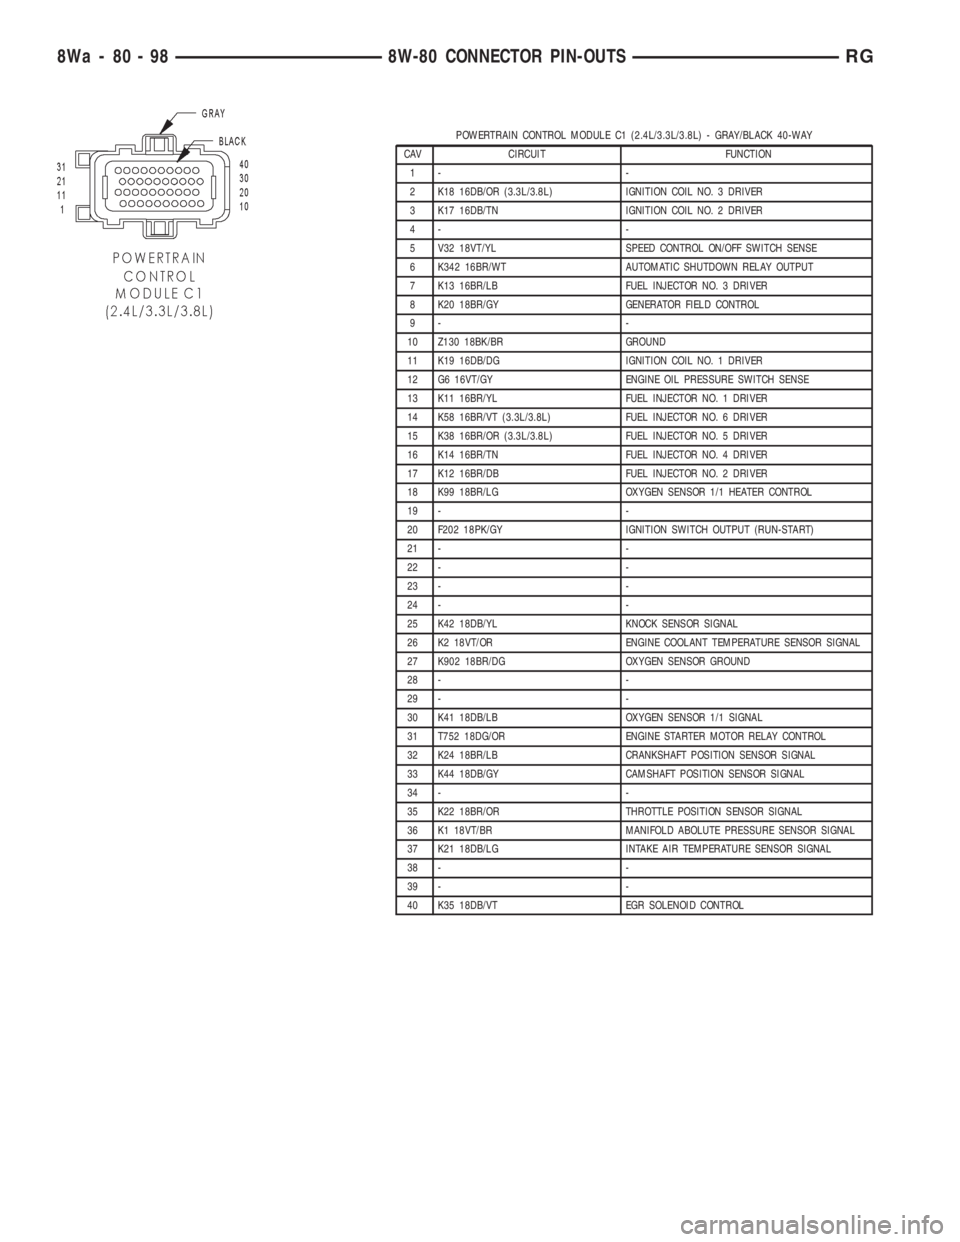
POWERTRAIN CONTROL MODULE C1 (2.4L/3.3L/3.8L) - GRAY/BLACK 40-WAY
CAV CIRCUIT FUNCTION
1- -
2 K18 16DB/OR (3.3L/3.8L) IGNITION COIL NO. 3 DRIVER
3 K17 16DB/TN IGNITION COIL NO. 2 DRIVER
4- -
5 V32 18VT/YL SPEED CONTROL ON/OFF SWITCH SENSE
6 K342 16BR/WT AUTOMATIC SHUTDOWN RELAY OUTPUT
7 K13 16BR/LB FUEL INJECTOR NO. 3 DRIVER
8 K20 18BR/GY GENERATOR FIELD CONTROL
9- -
10 Z130 18BK/BR GROUND
11 K19 16DB/DG IGNITION COIL NO. 1 DRIVER
12 G6 16VT/GY ENGINE OIL PRESSURE SWITCH SENSE
13 K11 16BR/YL FUEL INJECTOR NO. 1 DRIVER
14 K58 16BR/VT (3.3L/3.8L) FUEL INJECTOR NO. 6 DRIVER
15 K38 16BR/OR (3.3L/3.8L) FUEL INJECTOR NO. 5 DRIVER
16 K14 16BR/TN FUEL INJECTOR NO. 4 DRIVER
17 K12 16BR/DB FUEL INJECTOR NO. 2 DRIVER
18 K99 18BR/LG OXYGEN SENSOR 1/1 HEATER CONTROL
19 - -
20 F202 18PK/GY IGNITION SWITCH OUTPUT (RUN-START)
21 - -
22 - -
23 - -
24 - -
25 K42 18DB/YL KNOCK SENSOR SIGNAL
26 K2 18VT/OR ENGINE COOLANT TEMPERATURE SENSOR SIGNAL
27 K902 18BR/DG OXYGEN SENSOR GROUND
28 - -
29 - -
30 K41 18DB/LB OXYGEN SENSOR 1/1 SIGNAL
31 T752 18DG/OR ENGINE STARTER MOTOR RELAY CONTROL
32 K24 18BR/LB CRANKSHAFT POSITION SENSOR SIGNAL
33 K44 18DB/GY CAMSHAFT POSITION SENSOR SIGNAL
34 - -
35 K22 18BR/OR THROTTLE POSITION SENSOR SIGNAL
36 K1 18VT/BR MANIFOLD ABOLUTE PRESSURE SENSOR SIGNAL
37 K21 18DB/LG INTAKE AIR TEMPERATURE SENSOR SIGNAL
38 - -
39 - -
40 K35 18DB/VT EGR SOLENOID CONTROL
8Wa - 80 - 98 8W-80 CONNECTOR PIN-OUTSRG
Page 2566 of 4284
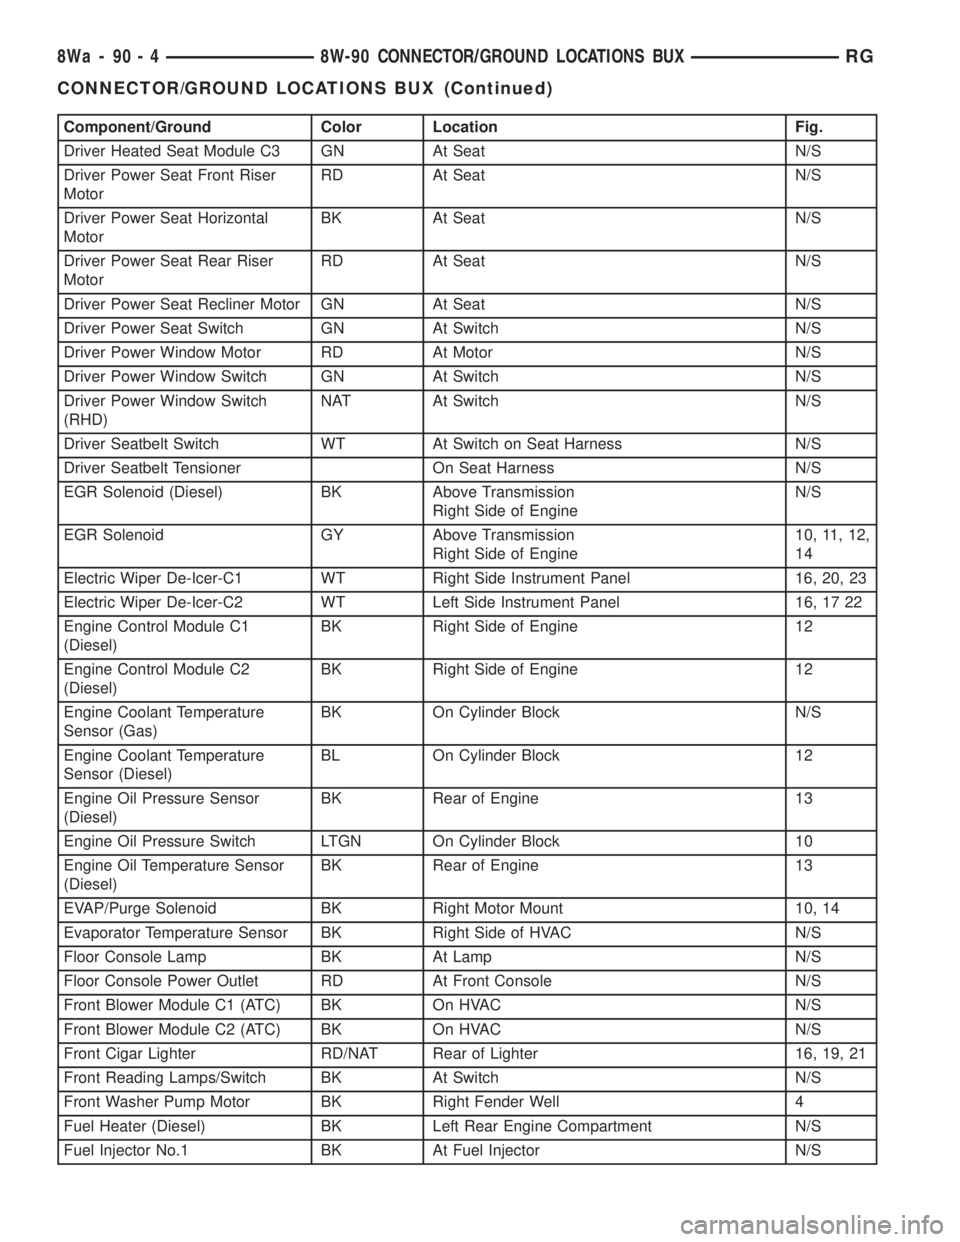
Component/Ground Color Location Fig.
Driver Heated Seat Module C3 GN At Seat N/S
Driver Power Seat Front Riser
MotorRD At Seat N/S
Driver Power Seat Horizontal
MotorBK At Seat N/S
Driver Power Seat Rear Riser
MotorRD At Seat N/S
Driver Power Seat Recliner Motor GN At Seat N/S
Driver Power Seat Switch GN At Switch N/S
Driver Power Window Motor RD At Motor N/S
Driver Power Window Switch GN At Switch N/S
Driver Power Window Switch
(RHD)NAT At Switch N/S
Driver Seatbelt Switch WT At Switch on Seat Harness N/S
Driver Seatbelt Tensioner On Seat Harness N/S
EGR Solenoid (Diesel) BK Above Transmission
Right Side of EngineN/S
EGR Solenoid GY Above Transmission
Right Side of Engine10, 11, 12,
14
Electric Wiper De-Icer-C1 WT Right Side Instrument Panel 16, 20, 23
Electric Wiper De-Icer-C2 WT Left Side Instrument Panel 16, 17 22
Engine Control Module C1
(Diesel)BK Right Side of Engine 12
Engine Control Module C2
(Diesel)BK Right Side of Engine 12
Engine Coolant Temperature
Sensor (Gas)BK On Cylinder Block N/S
Engine Coolant Temperature
Sensor (Diesel)BL On Cylinder Block 12
Engine Oil Pressure Sensor
(Diesel)BK Rear of Engine 13
Engine Oil Pressure Switch LTGN On Cylinder Block 10
Engine Oil Temperature Sensor
(Diesel)BK Rear of Engine 13
EVAP/Purge Solenoid BK Right Motor Mount 10, 14
Evaporator Temperature Sensor BK Right Side of HVAC N/S
Floor Console Lamp BK At Lamp N/S
Floor Console Power Outlet RD At Front Console N/S
Front Blower Module C1 (ATC) BK On HVAC N/S
Front Blower Module C2 (ATC) BK On HVAC N/S
Front Cigar Lighter RD/NAT Rear of Lighter 16, 19, 21
Front Reading Lamps/Switch BK At Switch N/S
Front Washer Pump Motor BK Right Fender Well 4
Fuel Heater (Diesel) BK Left Rear Engine Compartment N/S
Fuel Injector No.1 BK At Fuel Injector N/S
8Wa - 90 - 4 8W-90 CONNECTOR/GROUND LOCATIONS BUXRG
CONNECTOR/GROUND LOCATIONS BUX (Continued)
Page 2627 of 4284
ENGINE 2.4L
DESCRIPTION
The 2.4 Liter (148 cu. in.) in-line four cylinder
engine is a double over head camshaft with hydraulic
lifters and four valve per cylinder design. The engine
is free-wheeling; meaning it has provisions for piston-
to-valve clearance. However valve-to-valve interfer-
ence can occur, if camshafts are rotated
independently.
The cylinders are numbered from front of the
engine to the rear. The firing order is 1±3±4±2.
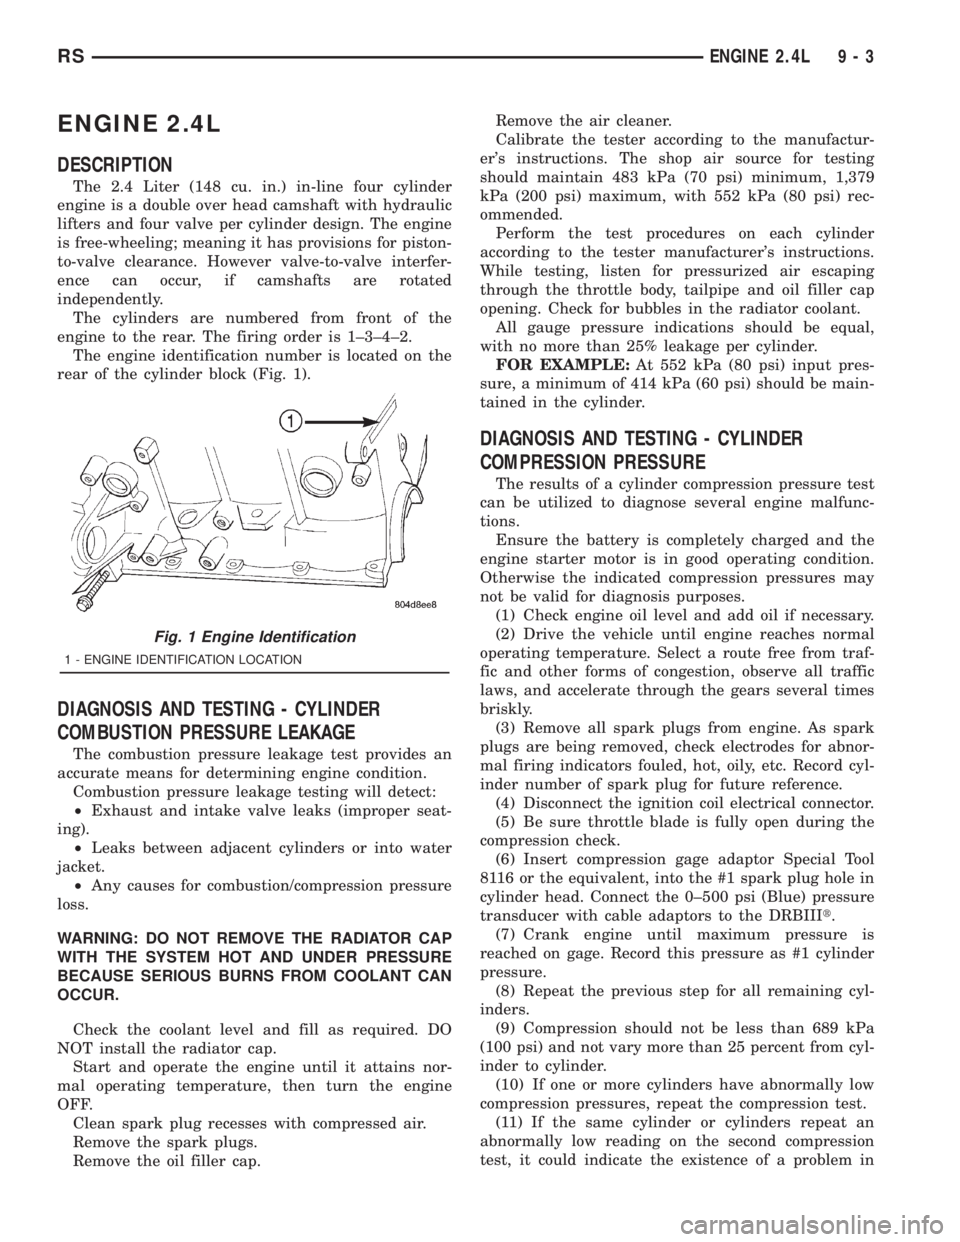
The engine identification number is located on the
rear of the cylinder block (Fig. 1).
DIAGNOSIS AND TESTING - CYLINDER
COMBUSTION PRESSURE LEAKAGE
The combustion pressure leakage test provides an
accurate means for determining engine condition.
Combustion pressure leakage testing will detect:
²Exhaust and intake valve leaks (improper seat-
ing).
²Leaks between adjacent cylinders or into water
jacket.
²Any causes for combustion/compression pressure
loss.
WARNING: DO NOT REMOVE THE RADIATOR CAP
WITH THE SYSTEM HOT AND UNDER PRESSURE
BECAUSE SERIOUS BURNS FROM COOLANT CAN
OCCUR.
Check the coolant level and fill as required. DO
NOT install the radiator cap.
Start and operate the engine until it attains nor-
mal operating temperature, then turn the engine
OFF.
Clean spark plug recesses with compressed air.
Remove the spark plugs.
Remove the oil filler cap.Remove the air cleaner.
Calibrate the tester according to the manufactur-
er's instructions. The shop air source for testing
should maintain 483 kPa (70 psi) minimum, 1,379
kPa (200 psi) maximum, with 552 kPa (80 psi) rec-
ommended.
Perform the test procedures on each cylinder
according to the tester manufacturer's instructions.
While testing, listen for pressurized air escaping
through the throttle body, tailpipe and oil filler cap
opening. Check for bubbles in the radiator coolant.
All gauge pressure indications should be equal,
with no more than 25% leakage per cylinder.
FOR EXAMPLE:At 552 kPa (80 psi) input pres-
sure, a minimum of 414 kPa (60 psi) should be main-
tained in the cylinder.
DIAGNOSIS AND TESTING - CYLINDER
COMPRESSION PRESSURE
The results of a cylinder compression pressure test
can be utilized to diagnose several engine malfunc-
tions.
Ensure the battery is completely charged and the
engine starter motor is in good operating condition.
Otherwise the indicated compression pressures may
not be valid for diagnosis purposes.
(1) Check engine oil level and add oil if necessary.
(2) Drive the vehicle until engine reaches normal
operating temperature. Select a route free from traf-
fic and other forms of congestion, observe all traffic
laws, and accelerate through the gears several times
briskly.
(3) Remove all spark plugs from engine. As spark
plugs are being removed, check electrodes for abnor-
mal firing indicators fouled, hot, oily, etc. Record cyl-
inder number of spark plug for future reference.
(4) Disconnect the ignition coil electrical connector.
(5) Be sure throttle blade is fully open during the
compression check.
(6) Insert compression gage adaptor Special Tool
8116 or the equivalent, into the #1 spark plug hole in
cylinder head. Connect the 0±500 psi (Blue) pressure
transducer with cable adaptors to the DRBIIIt.
(7) Crank engine until maximum pressure is
reached on gage. Record this pressure as #1 cylinder
pressure.
(8) Repeat the previous step for all remaining cyl-
inders.
(9) Compression should not be less than 689 kPa
(100 psi) and not vary more than 25 percent from cyl-
inder to cylinder.
(10) If one or more cylinders have abnormally low
compression pressures, repeat the compression test.
(11) If the same cylinder or cylinders repeat an
abnormally low reading on the second compression
test, it could indicate the existence of a problem in
Fig. 1 Engine Identification
1 - ENGINE IDENTIFICATION LOCATION
RSENGINE 2.4L9-3
Page 2634 of 4284
(1) Inspect air cleaner, induction system and
intake manifold to insure system is dry and clear of
foreign material.
(2) Remove negative battery cable.
(3) Place a shop towel around the spark plugs
when removing them from the engine. This will catch
any fluid that may possibly be in the cylinder under
pressure.
(4) With all spark plugs removed, rotate engine
crankshaft using a breaker bar and socket.
(5) Identify the fluid in the cylinder(s) (i.e., cool-
ant, fuel, oil or other).
(6) Make sure all fluid has been removed from the
cylinders. Inspect engine for damage (i.e., connecting
rods, pistons, valves, etc.)
(7) Repair engine or components as necessary to
prevent this problem from re-occurring.
CAUTION: Squirt approximately one teaspoon of oil
into the cylinders, rotate engine to lubricate the cyl-
inder walls to prevent damage on restart.
(8) Install new spark plugs.
(9) Drain engine oil and remove oil filter.
(10) Install a new oil filter.
(11) Fill engine with specified amount of approved
oil.
(12) Connect negative battery cable.
(13) Start engine and check for any leaks.
STANDARD PROCEDURE - FORM-IN-PLACE
GASKETS AND SEALERS
There are numerous places where form-in-place
gaskets are used on the engine. Care must be taken
when applying form-in-place gaskets to assure
obtaining the desired results.Do not use form-in-
place gasket material unless specified.Bead size,
continuity, and location are of great importance. Too
thin a bead can result in leakage while too much can
result in spill-over which can break off and obstruct
fluid feed lines. A continuous bead of the proper
width is essential to obtain a leak-free gasket.
There are numerous types of form-in-place gasket
materials that are used in the engine area. Mopart
Engine RTV GEN II, MopartATF-RTV, and Mopart
Gasket Maker gasket materials, each have different
properties and can not be used in place of the other.
MOPARtENGINE RTV GEN IIis used to seal
components exposed to engine oil. This material is a
specially designed black silicone rubber RTV that
retains adhesion and sealing properties when
exposed to engine oil. Moisture in the air causes the
material to cure. This material is available in three
ounce tubes and has a shelf life of one year. After one
year this material will not properly cure. Alwaysinspect the package for the expiration date before
use.
MOPARtATF RTVis a specifically designed
black silicone rubber RTV that retains adhesion and
sealing properties to seal components exposed to
automatic transmission fluid, engine coolants, and
moisture. This material is available in three ounce
tubes and has a shelf life of one year. After one year
this material will not properly cure. Always inspect
the package for the expiration date before use.
MOPARtGASKET MAKERis an anaerobic type
gasket material. The material cures in the absence of
air when squeezed between two metallic surfaces. It
will not cure if left in the uncovered tube. The
anaerobic material is for use between two machined
surfaces. Do not use on flexible metal flanges.
MOPARtBED PLATE SEALANTis a unique
(green-in-color) anaerobic type gasket material that
is specially made to seal the area between the bed-
plate and cylinder block without disturbing the bear-
ing clearance or alignment of these components. The
material cures slowly in the absence of air when
torqued between two metallic surfaces, and will rap-
idly cure when heat is applied.
MOPARtGASKET SEALANTis a slow drying,
permanently soft sealer. This material is recom-
mended for sealing threaded fittings and gaskets
against leakage of oil and coolant. Can be used on
threaded and machined parts under all tempera-
tures. This material is used on engines with multi-
layer steel (MLS) cylinder head gaskets. This
material also will prevent corrosion. MopartGasket
Sealant is available in a 13 oz. aerosol can or 4oz./16
oz. can w/applicator.
SEALER APPLICATION
MopartGasket Maker material should be applied
sparingly 1 mm (0.040 in.) diameter or less of sealant
to one gasket surface. Be certain the material sur-
rounds each mounting hole. Excess material can eas-
ily be wiped off. Components should be torqued in
place within 15 minutes. The use of a locating dowel
is recommended during assembly to prevent smear-
ing material off the location.
MopartEngine RTV GEN II or ATF RTV gasket
material should be applied in a continuous bead
approximately 3 mm (0.120 in.) in diameter. All
mounting holes must be circled. For corner sealing, a
3.17 or 6.35 mm (1/8 or 1/4 in.) drop is placed in the
center of the gasket contact area. Uncured sealant
may be removed with a shop towel. Components
should be torqued in place while the sealant is still
wet to the touch (within 10 minutes). The usage of a
locating dowel is recommended during assembly to
prevent smearing material off the location.
9 - 10 ENGINE 2.4LRS
ENGINE 2.4L (Continued)